>
Profile Page > Achievements
As you record flights in Gaggle we automatically start tracking your personal bests over your flying career. You can access your personal bests by navigating to the Profile tab and selecting the Achievements option.
The achievements page gives you an overview of the badges you’ve been awared, and your personal bests for various flight metrics.
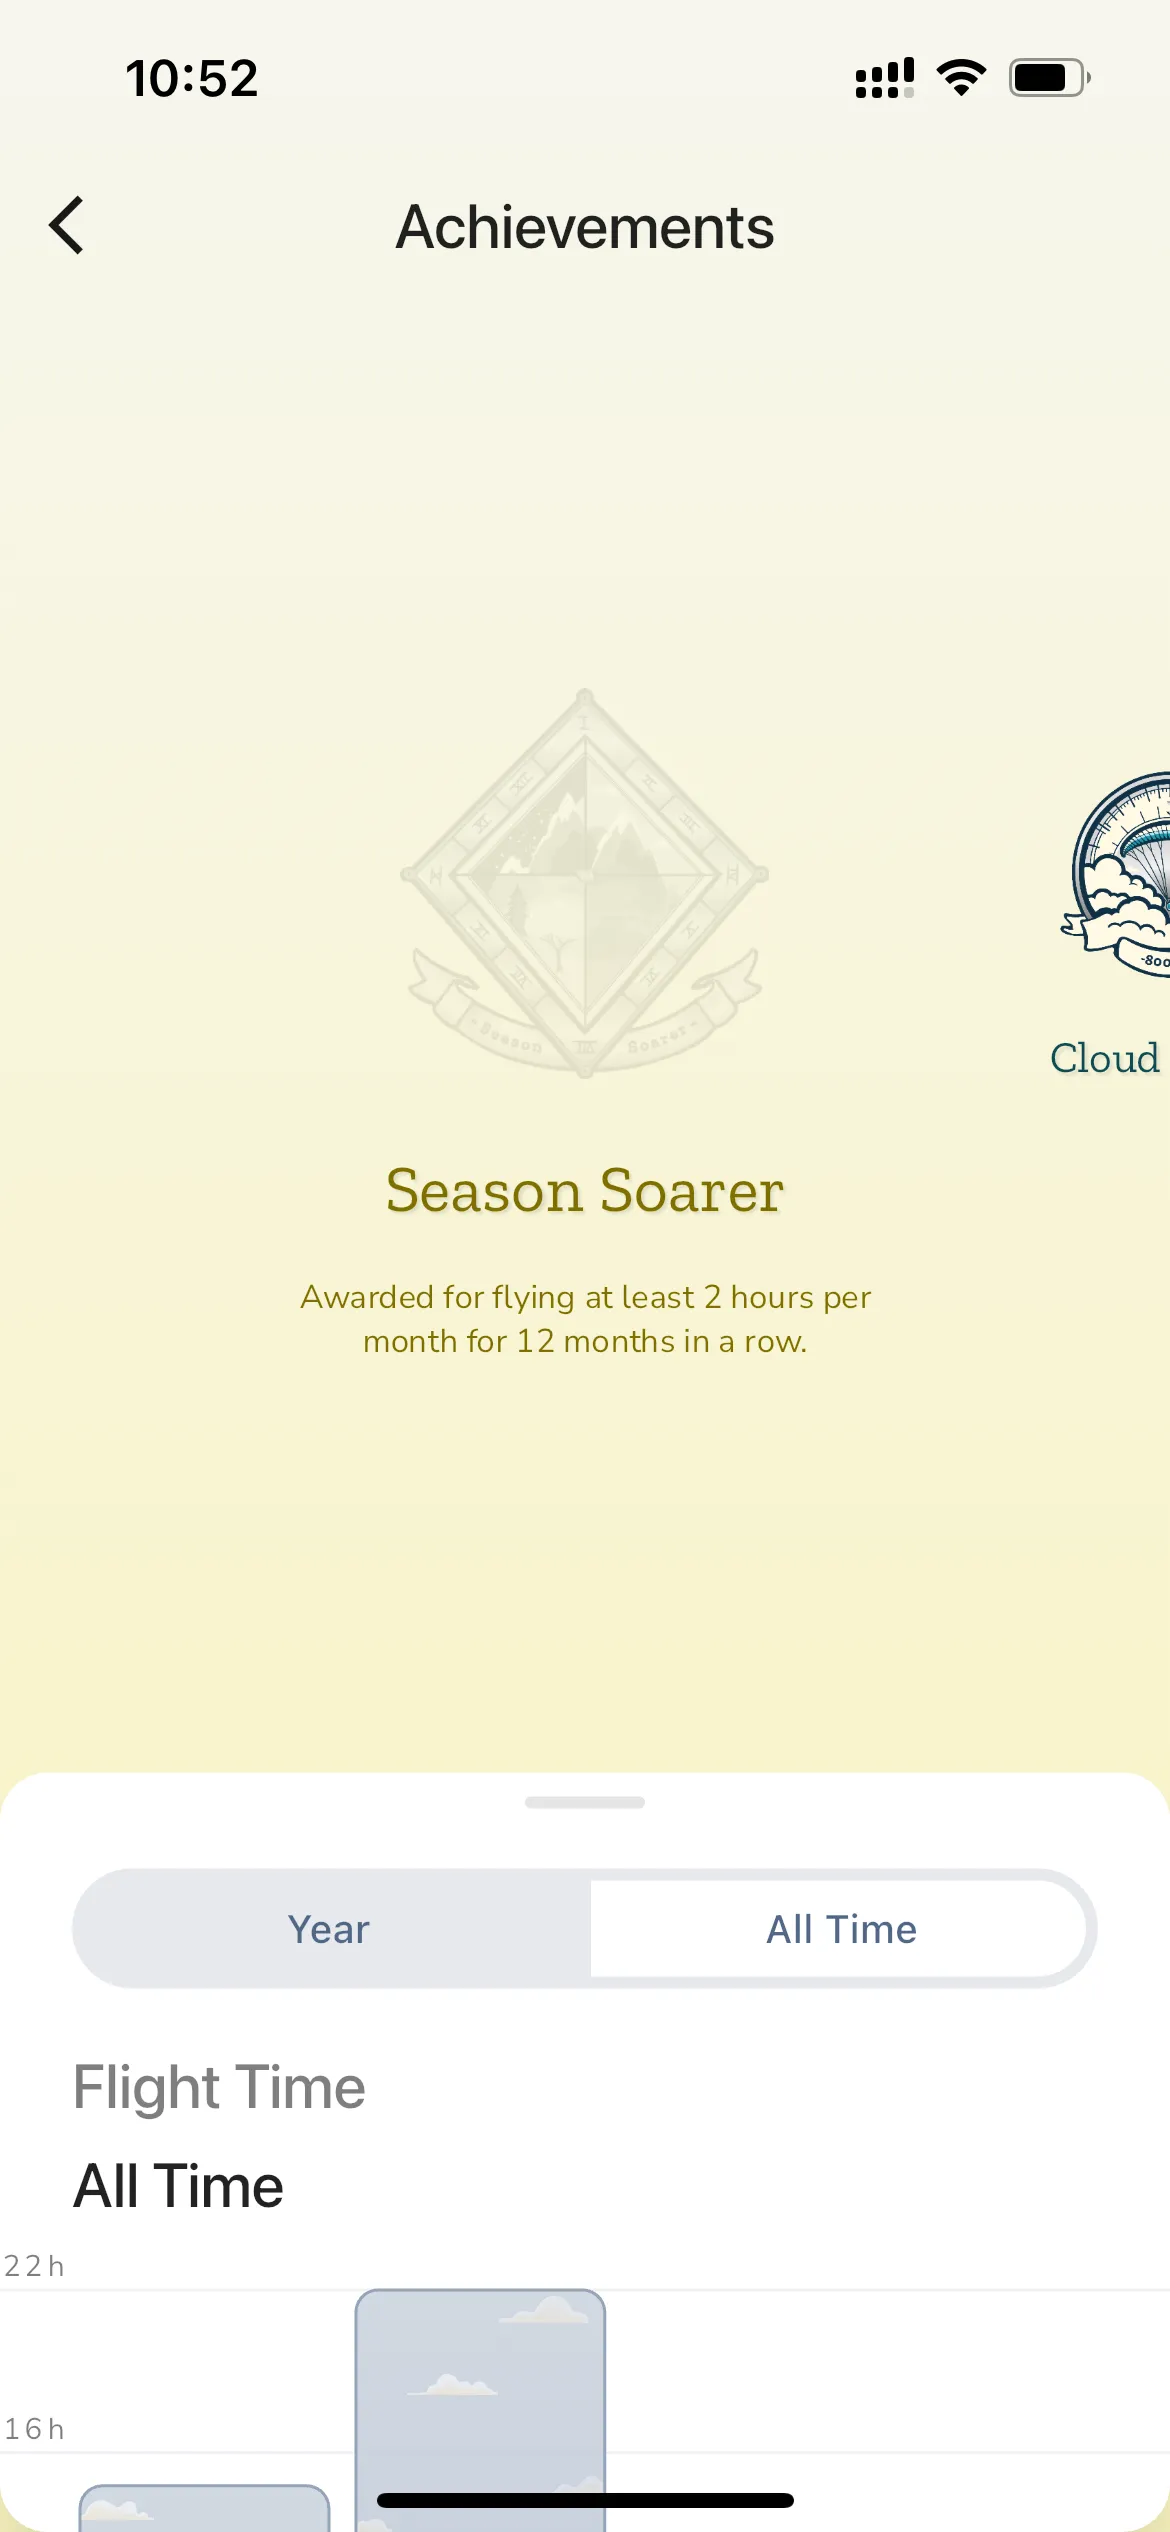
At the top of the achievements page you will see bages for:
Badges are only awarded if you meet the criteria for the badge. If you don’t meet the criteria the badge will be greyed out. Not all flights will count towards badges, only flights that we deem to be valid will count towards badges.
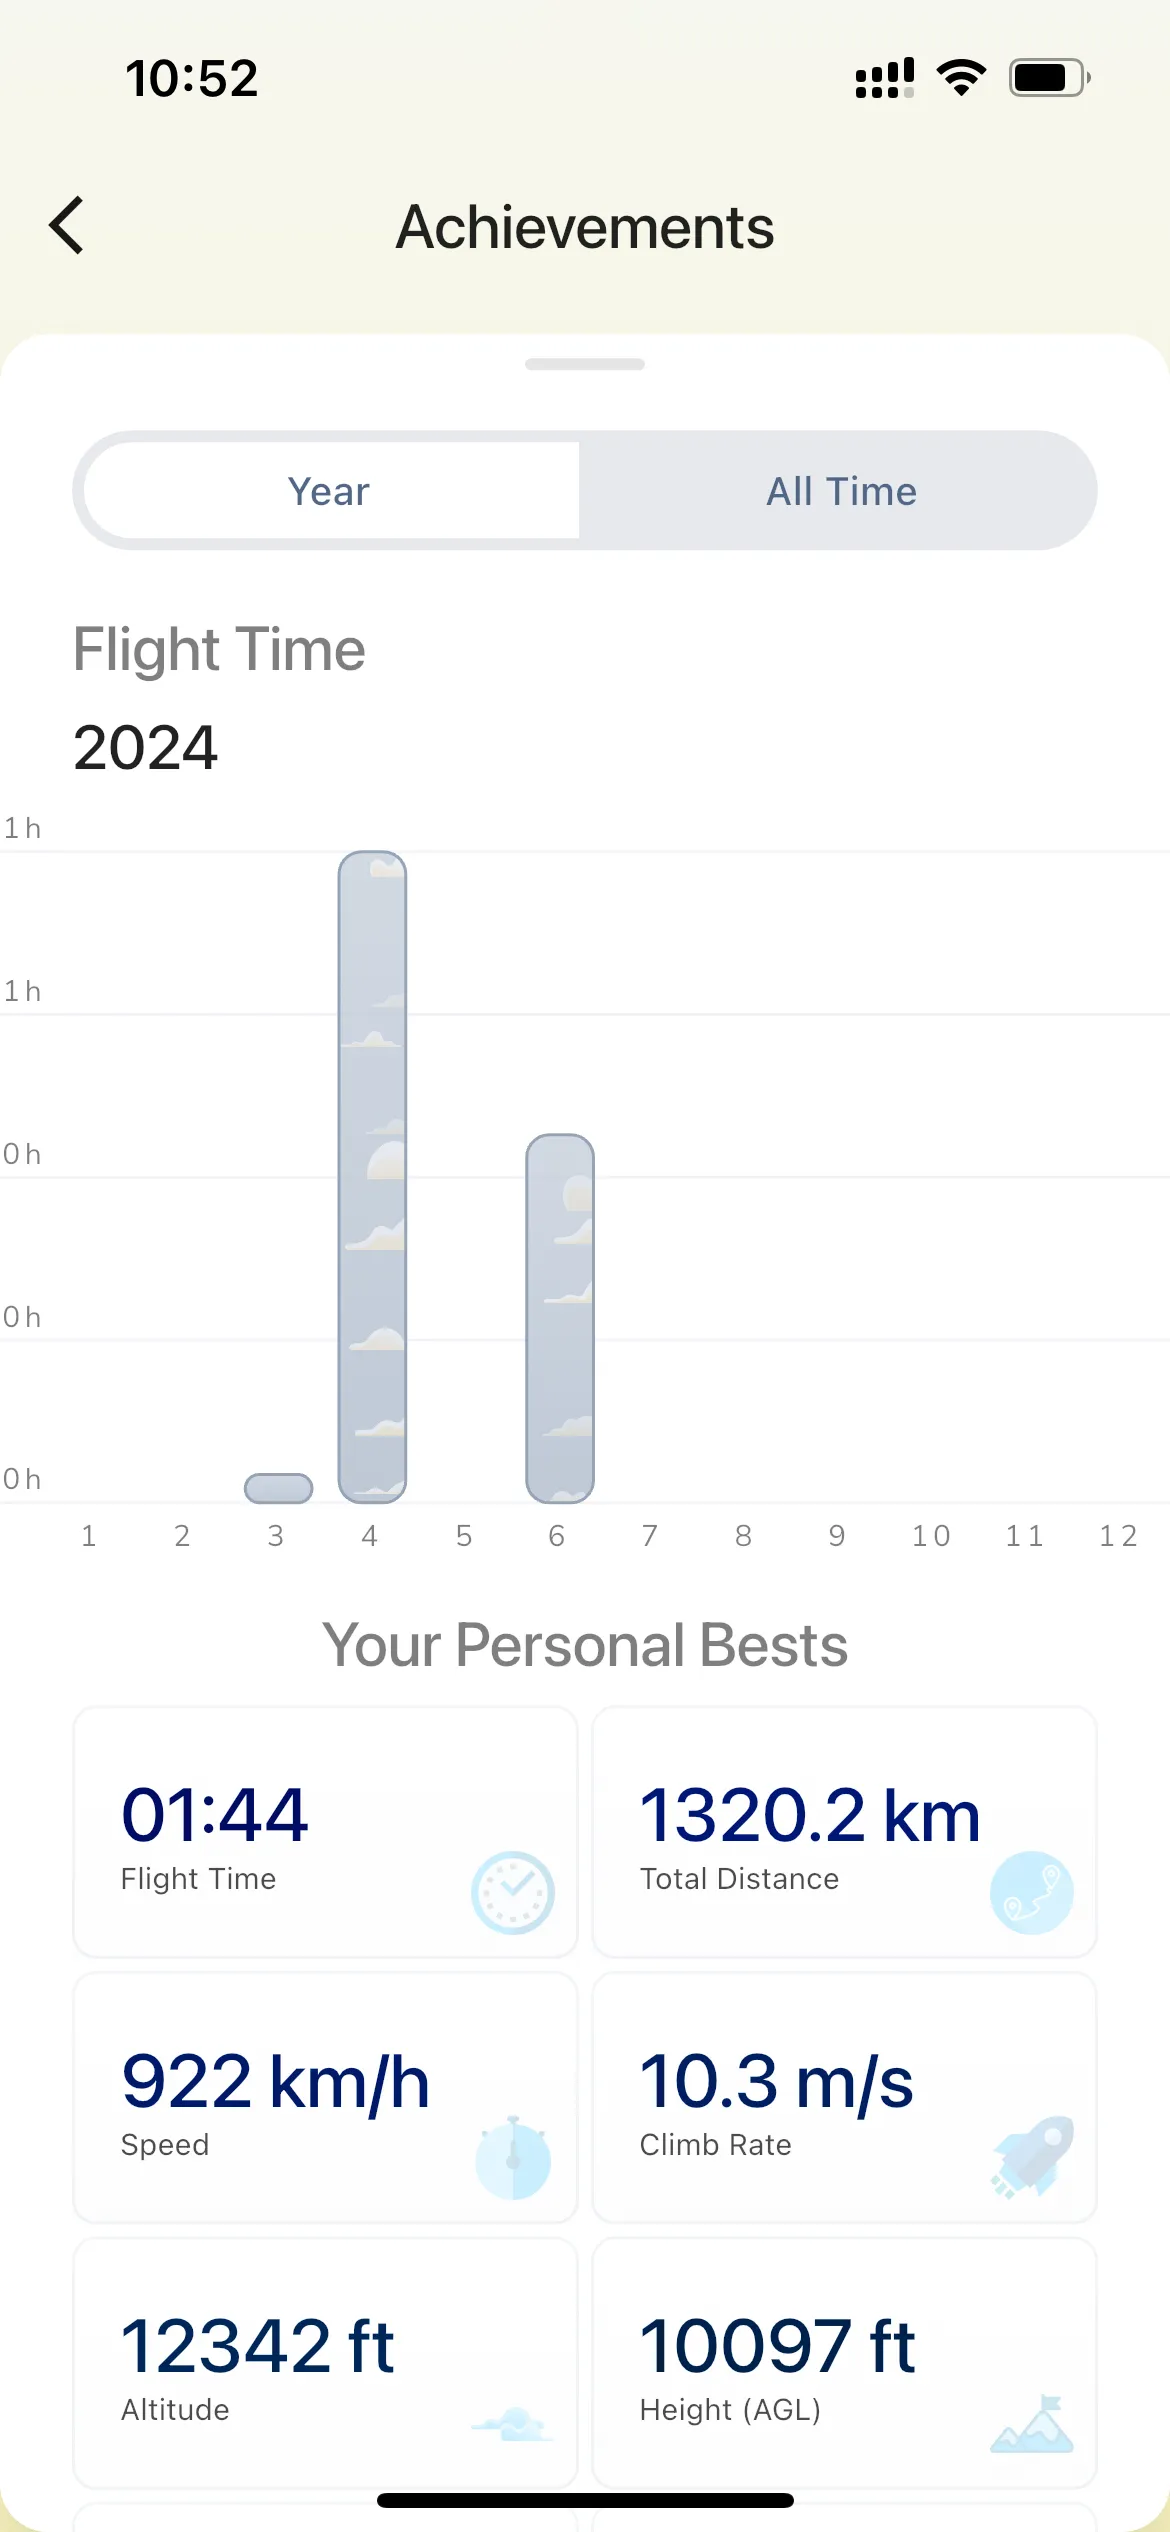
Dragging up the bottom panel reveals your personal bests. You can choose to see personal bests for all time, or tap the year tab to see personal bests for a specific year. You will see a graph showing total flight time per year/month. Tapping on a month will show the flights and stats for that month.
Gaggle keeps track of the following personal bests:
Tapping on a record opens up the flight recording that set that record.
Personal bests are calculated based on trends in your flight and is not calculated based on any absolute maximum value in your flight, so might achieve higher values for short periods of time but not have it count towards your personal bests. Typically, you need to maintain a maximum for at least 10 seconds for it to count towards your personal bests.
>
Explore Page > Airspaces > Tap your airspace to configure
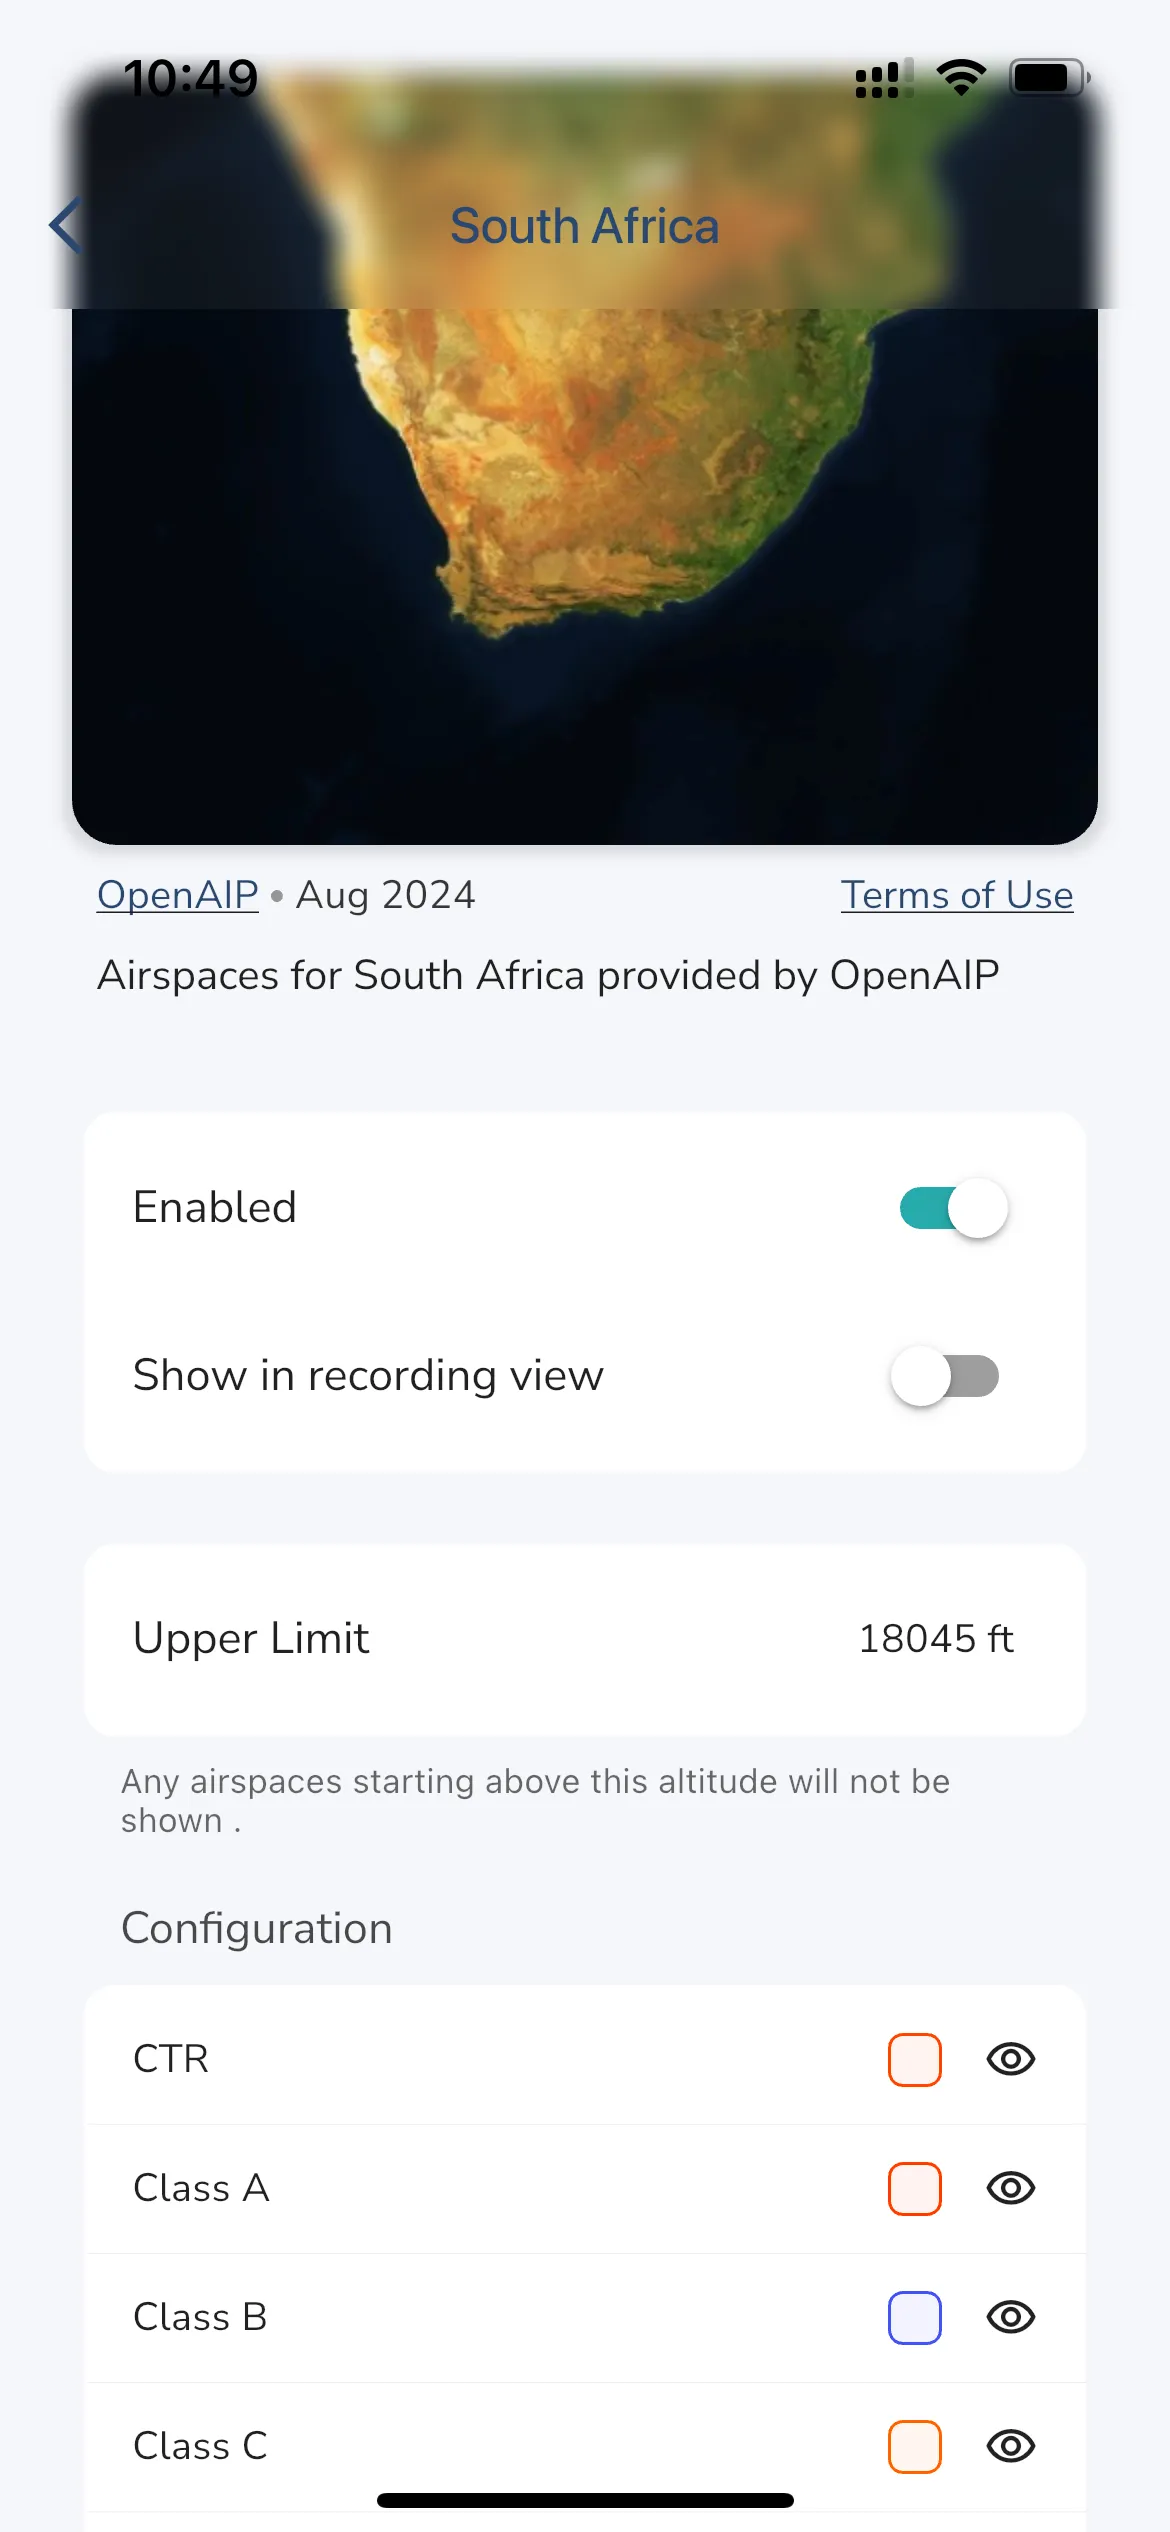
You can configure how airspaces are displayed in Gaggle. Simply tap the airspace that has been installed to open the configurator for that airspace. From the configurator you can choose if the airspace collection should be used (enabled) or not, which airspaces classes are displayed, and the color that will be used to render each airspace class. If you want to see airspaces in the recording view tap the “Show in recording view” toggle to on.
You can define an upper limit for airspaces, any airspaces starting above this limit will not be displayed in Gaggle. This is useful if you want to hide airspaces that are above the altitude you are flying at, and it reduces the clutter on the map.
Tip: To see what your changes will look like open the Airspace Viewer to and browse around the map to see how the airspaces are rendered.
>
Explore Page > Airspaces > Airspace Gallery
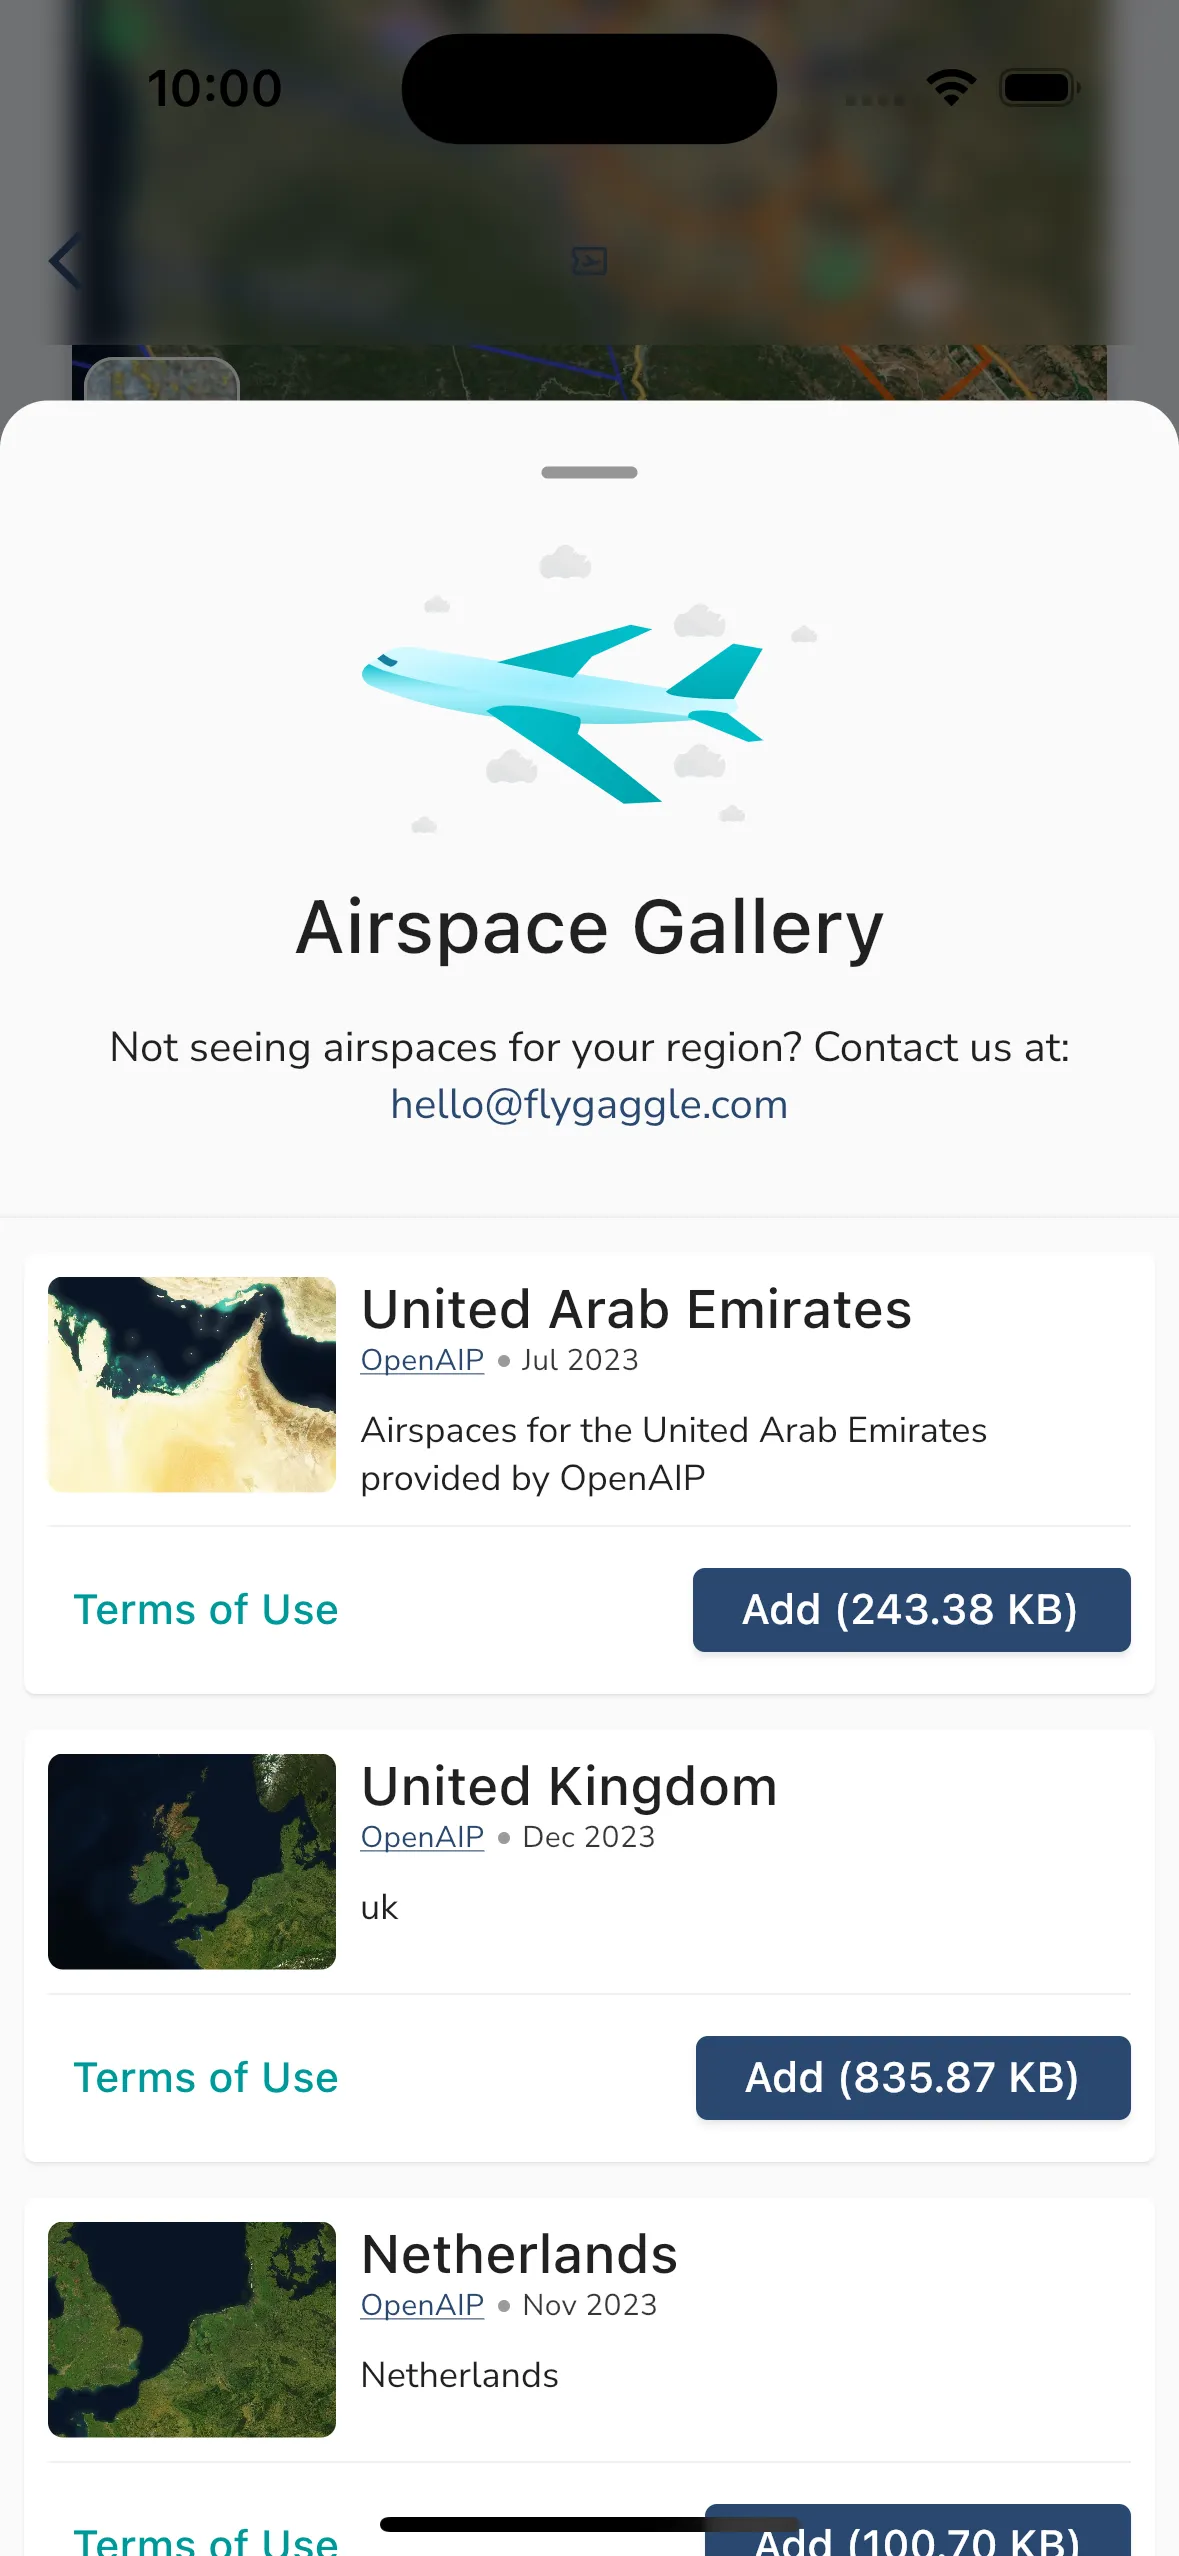
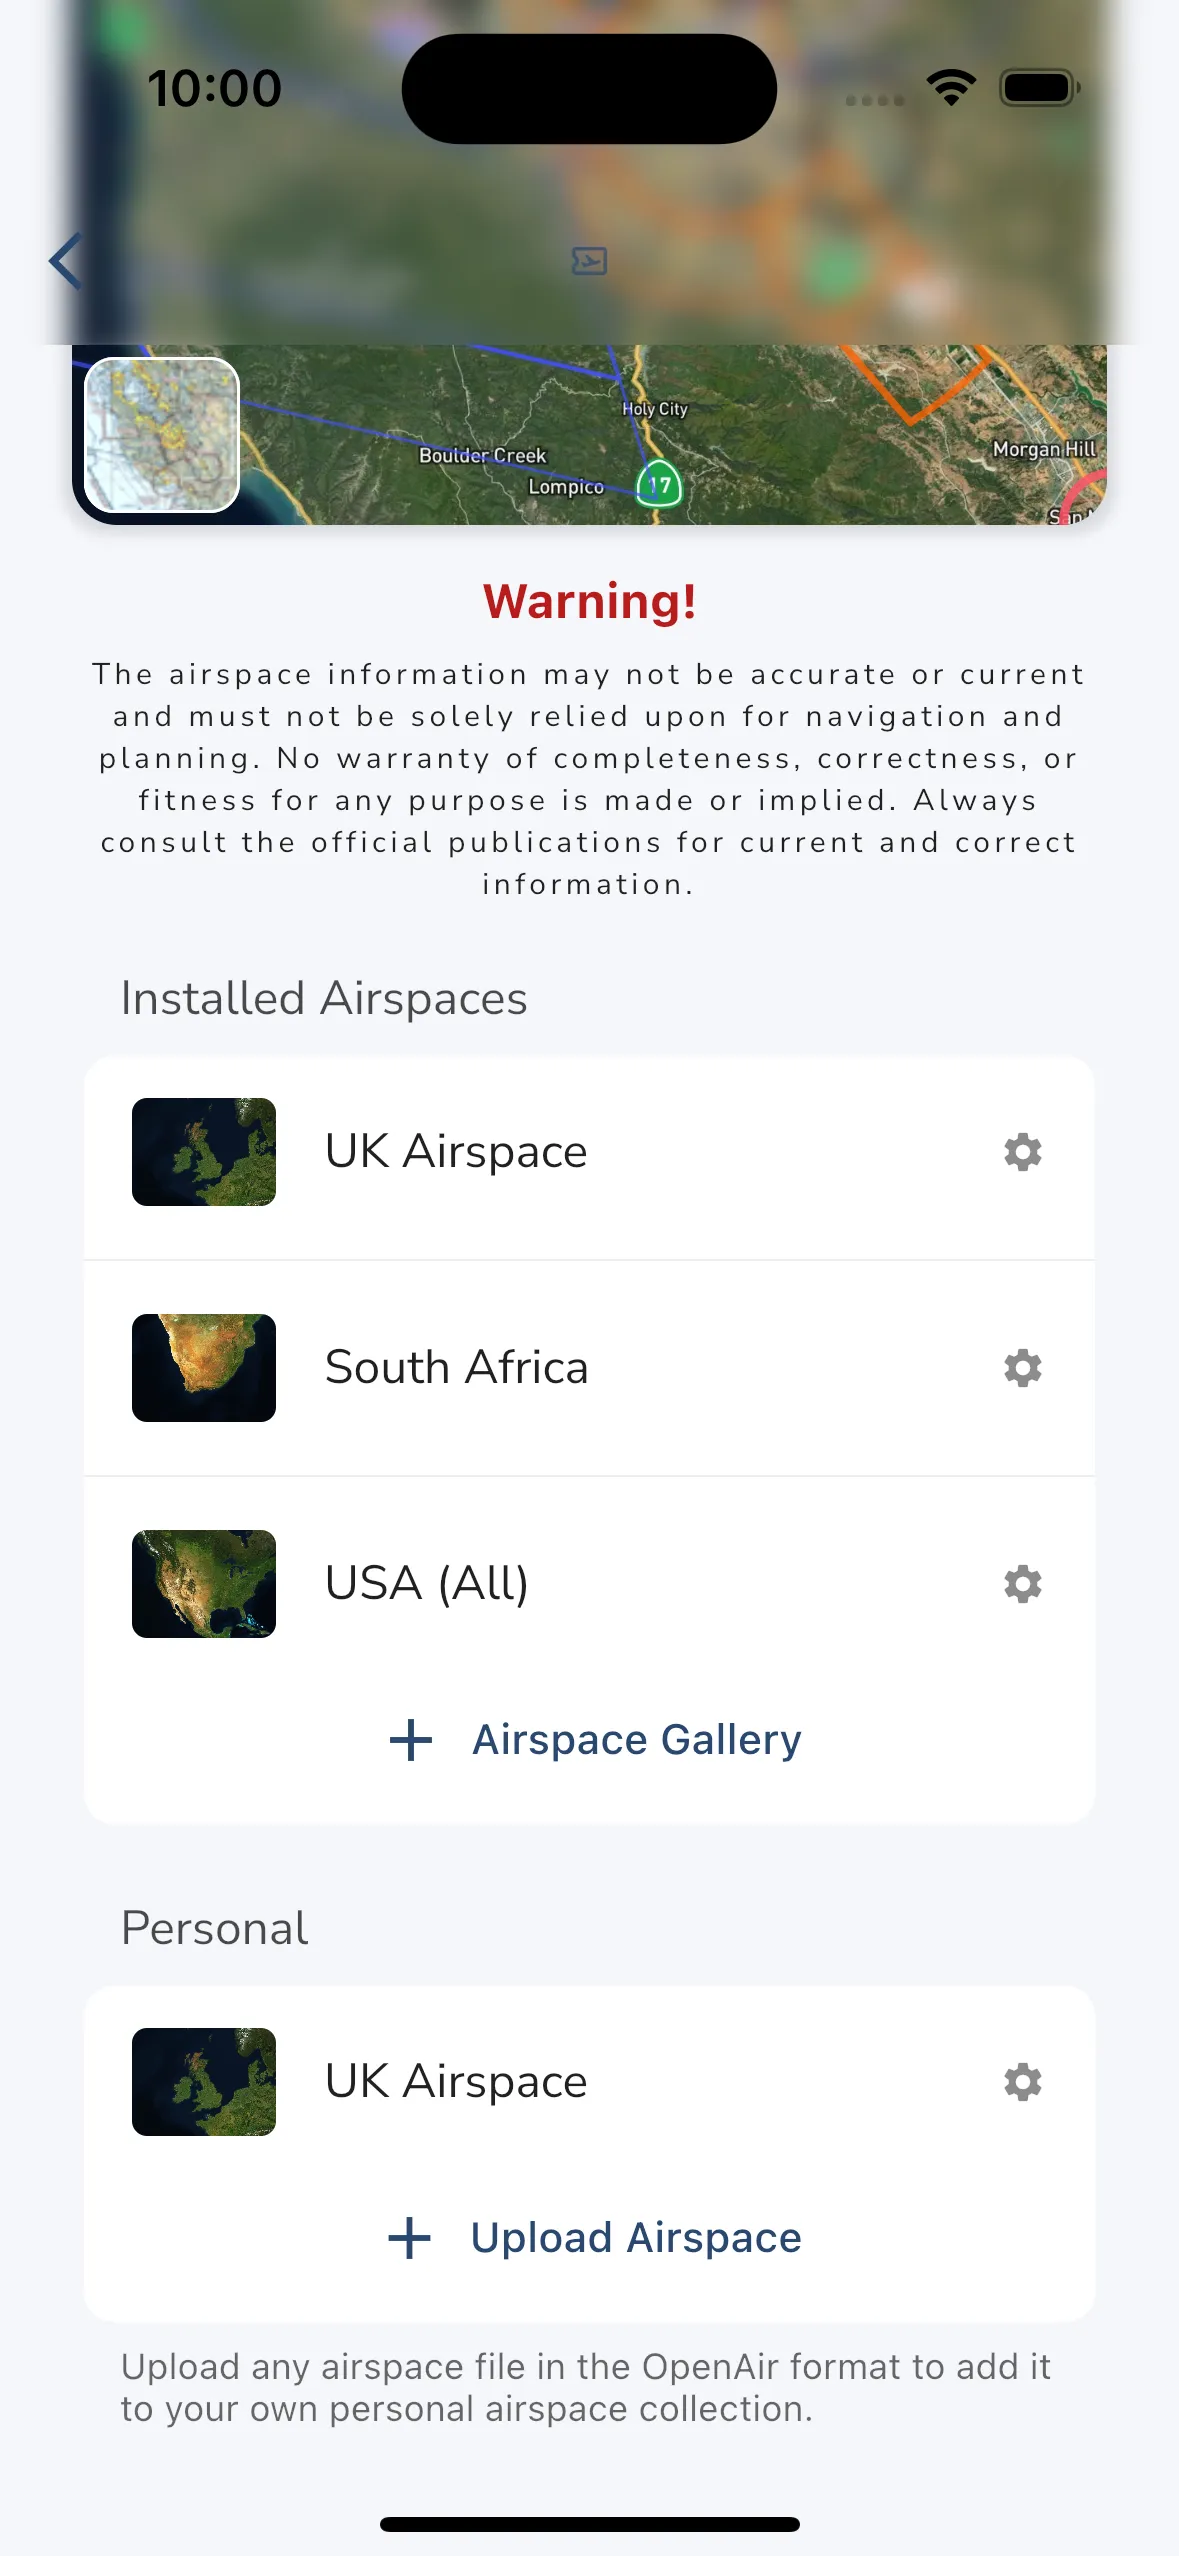
Gaggle has airspaces available for many of the popular regions in the world. To see if we have airspaces for your region, open the Airspace Gallery and browse the available airspaces. You can access the airspace gallery by tapping Explore > Airspaces > Airspace Gallery. If you see a region you would like to add then tap the Add button for the region.
The majority of the airspaces in Gaggle are provided by OpenAIP, an open community where you can register to modify and correct airspaces that you notice are incorrect. Gaggle processes airspace updates daily so any edits that you make on OpenAIP will show up in Gaggle in a day or two. Please make sure you consult the Terms of Use for OpenAIP before making use of their airspaces.
Currently, Gaggle has support for the following airspaces:
Warning! The airspaces shown in Gaggle are retrieved from various sources, and it may not be current or accurate. Always consult the official publications for areas you will be flying.
>
Explore Page > Airspaces
In addition to the official airspaces Gaggle also supports personal airspaces. Personal airspaces come in handy if you want to create your own “No-Fly Zones” if you know there are areas where landowners don’t want you flying.
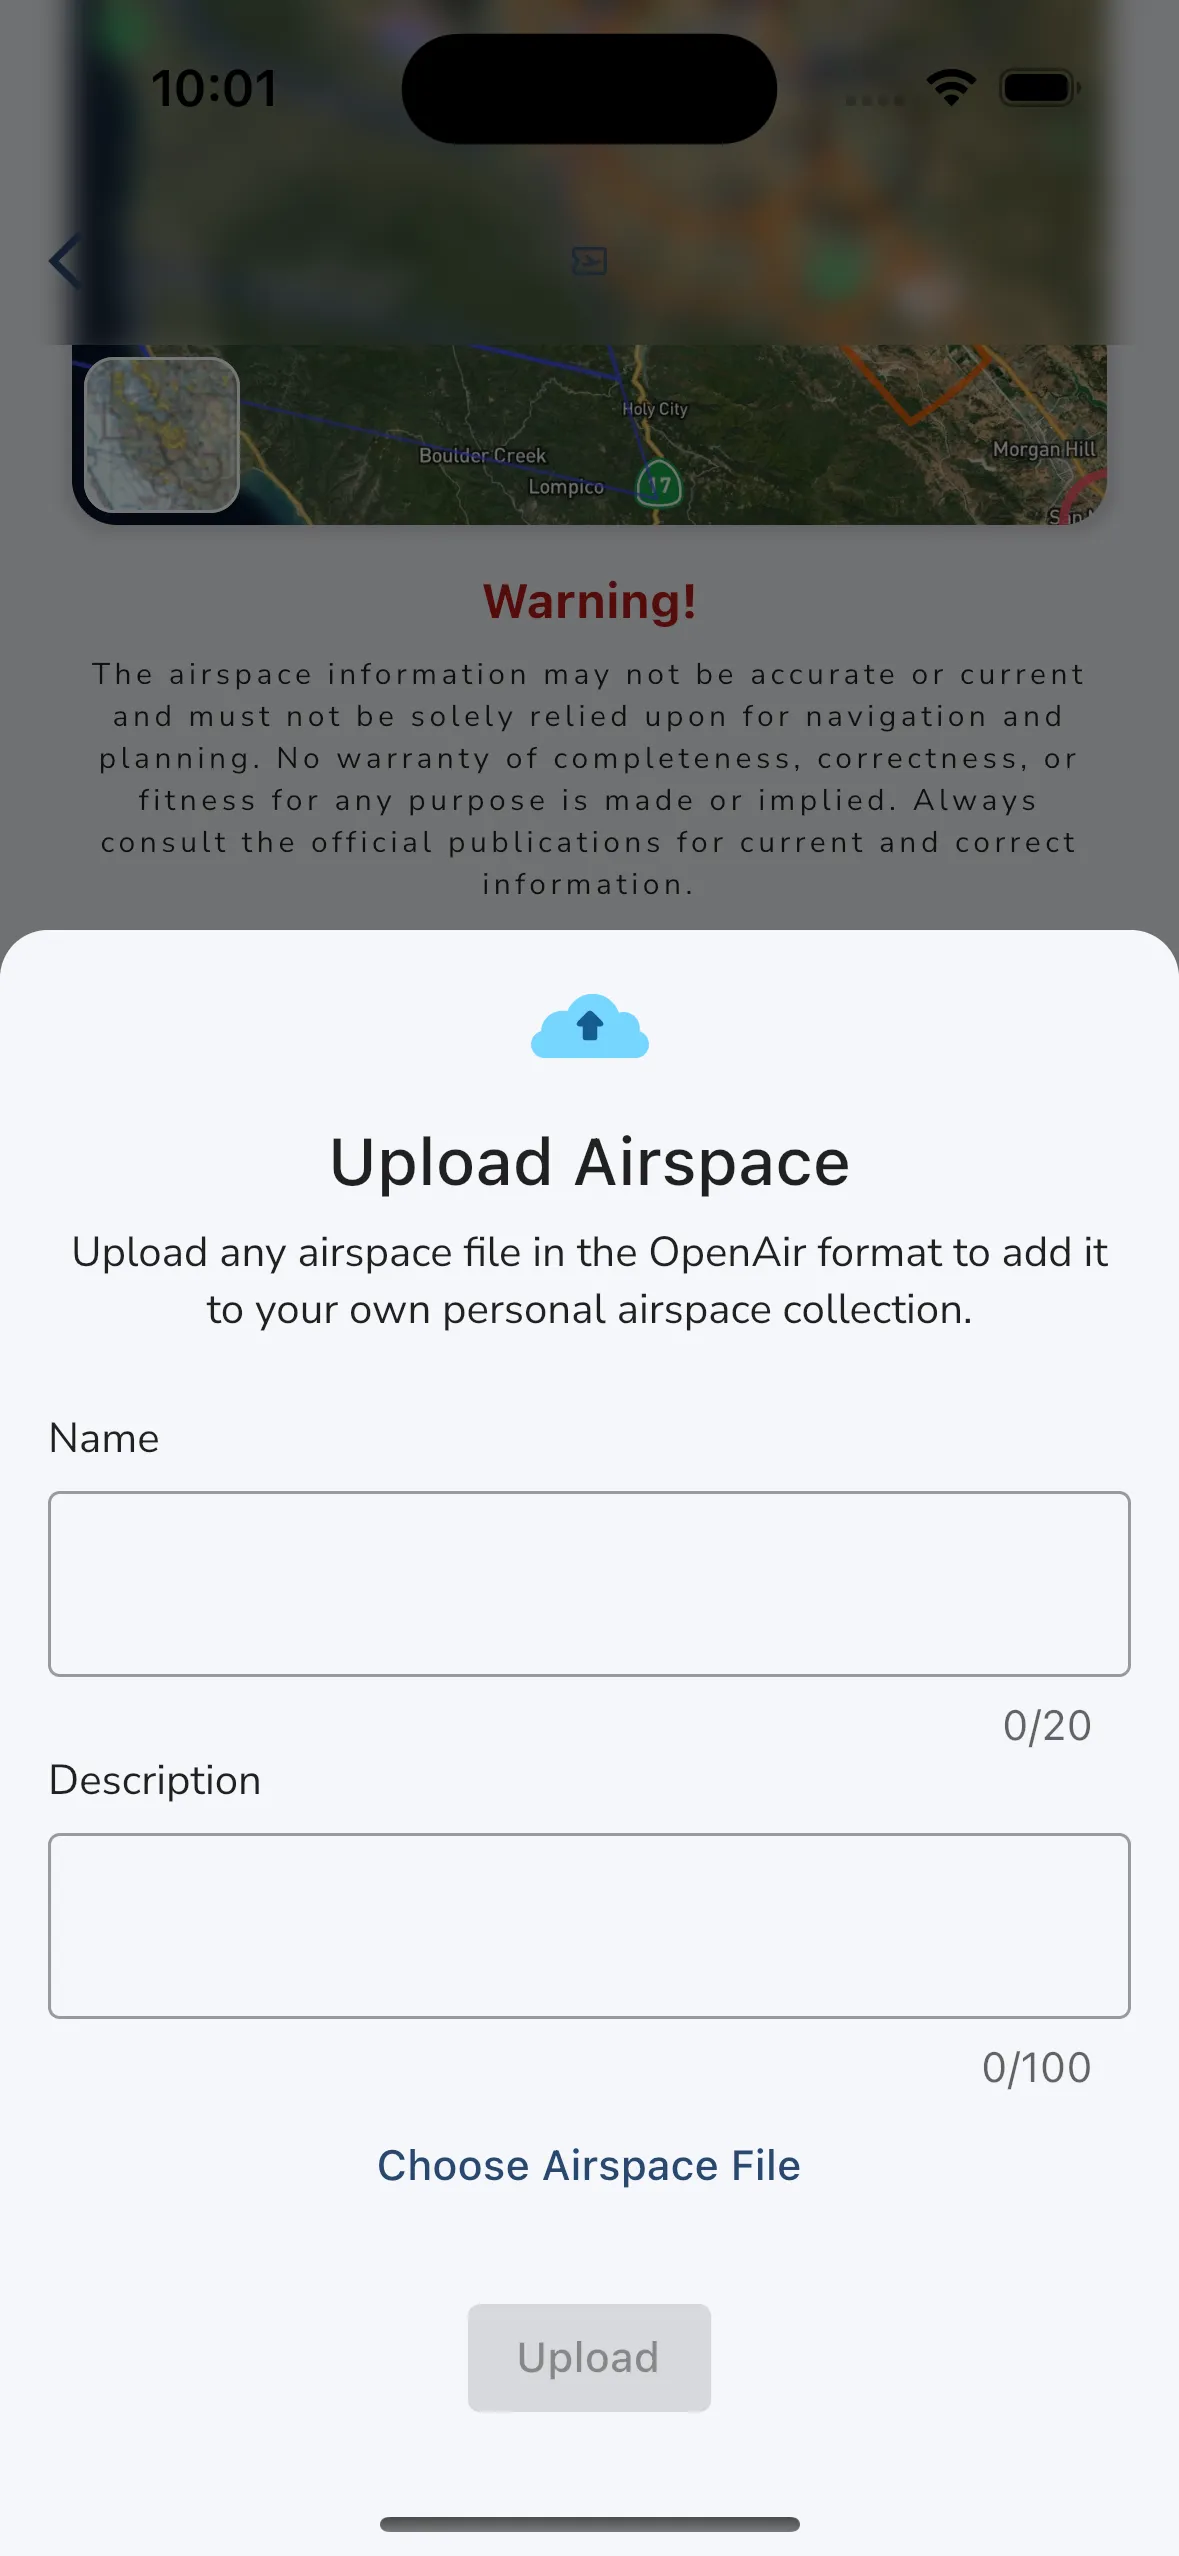
You can upload personal airspaces by navigating the Airspaces section under the Explore tab. To upload your own personal airspace you need to provide a name, description, and the OpenAIR airspace file.
OpenAIR Format: Gaggle uses plain text files in the OpenAIR format to import personal airspaces. For a full explanation of the OpenAIR format you can read the documentation here. You can also utilise online tools build and view OpenAIR files, XC Guide being one example. But at it’s most basic it is a plain text (.TXT) file you that you can edit yourself with some basic information in the following format:
AC R \* <- Airspace Class (A, B, C, P, R, Q)<br>
AN My Restricted Airspace Name \* <- Airspace Name<br>
AL SFC \* <- Lower Limit (Surface)<br>
AH 2000ft \* <- Upper Limit<br>
V X=25:51.861N -27:27.669W \* <- Coordinates<br>
DC 0.3 \* <- Draw circle with a 3 nautical miles radius<br>
\* <- Empty Line indicating end of airspace information<br>
Have a look at the example airspace file that you can download here: Download Example OpenAIR File
Open the file using XC Guide or a similar tool, or start with one of the existing airspaces files in XC Guide under the xcglobe folder and start editing those files. Once you are happy you can export the file and save it to your phone. Then you can upload it to Gaggle using the Personal tab in the Airspace Gallery.
>
Explore Page > Airspaces > Tap the map
If you quickly want to look at airspaces for a region that you want to go fly in, or for planning purposes, you can use the built-in Airspace Viewer to see all the airspaces in an area. To open the airspace viewer you can go to Explore > Airspaces > Tap the map.
For pilots in the USA, you also have the option of viewing the sectional charts by tapping the sectional map view displayed in the bottom left corner of the map where the preview of the sectional charts are displayed. This will open the sectional charts for the area you are currently viewing.
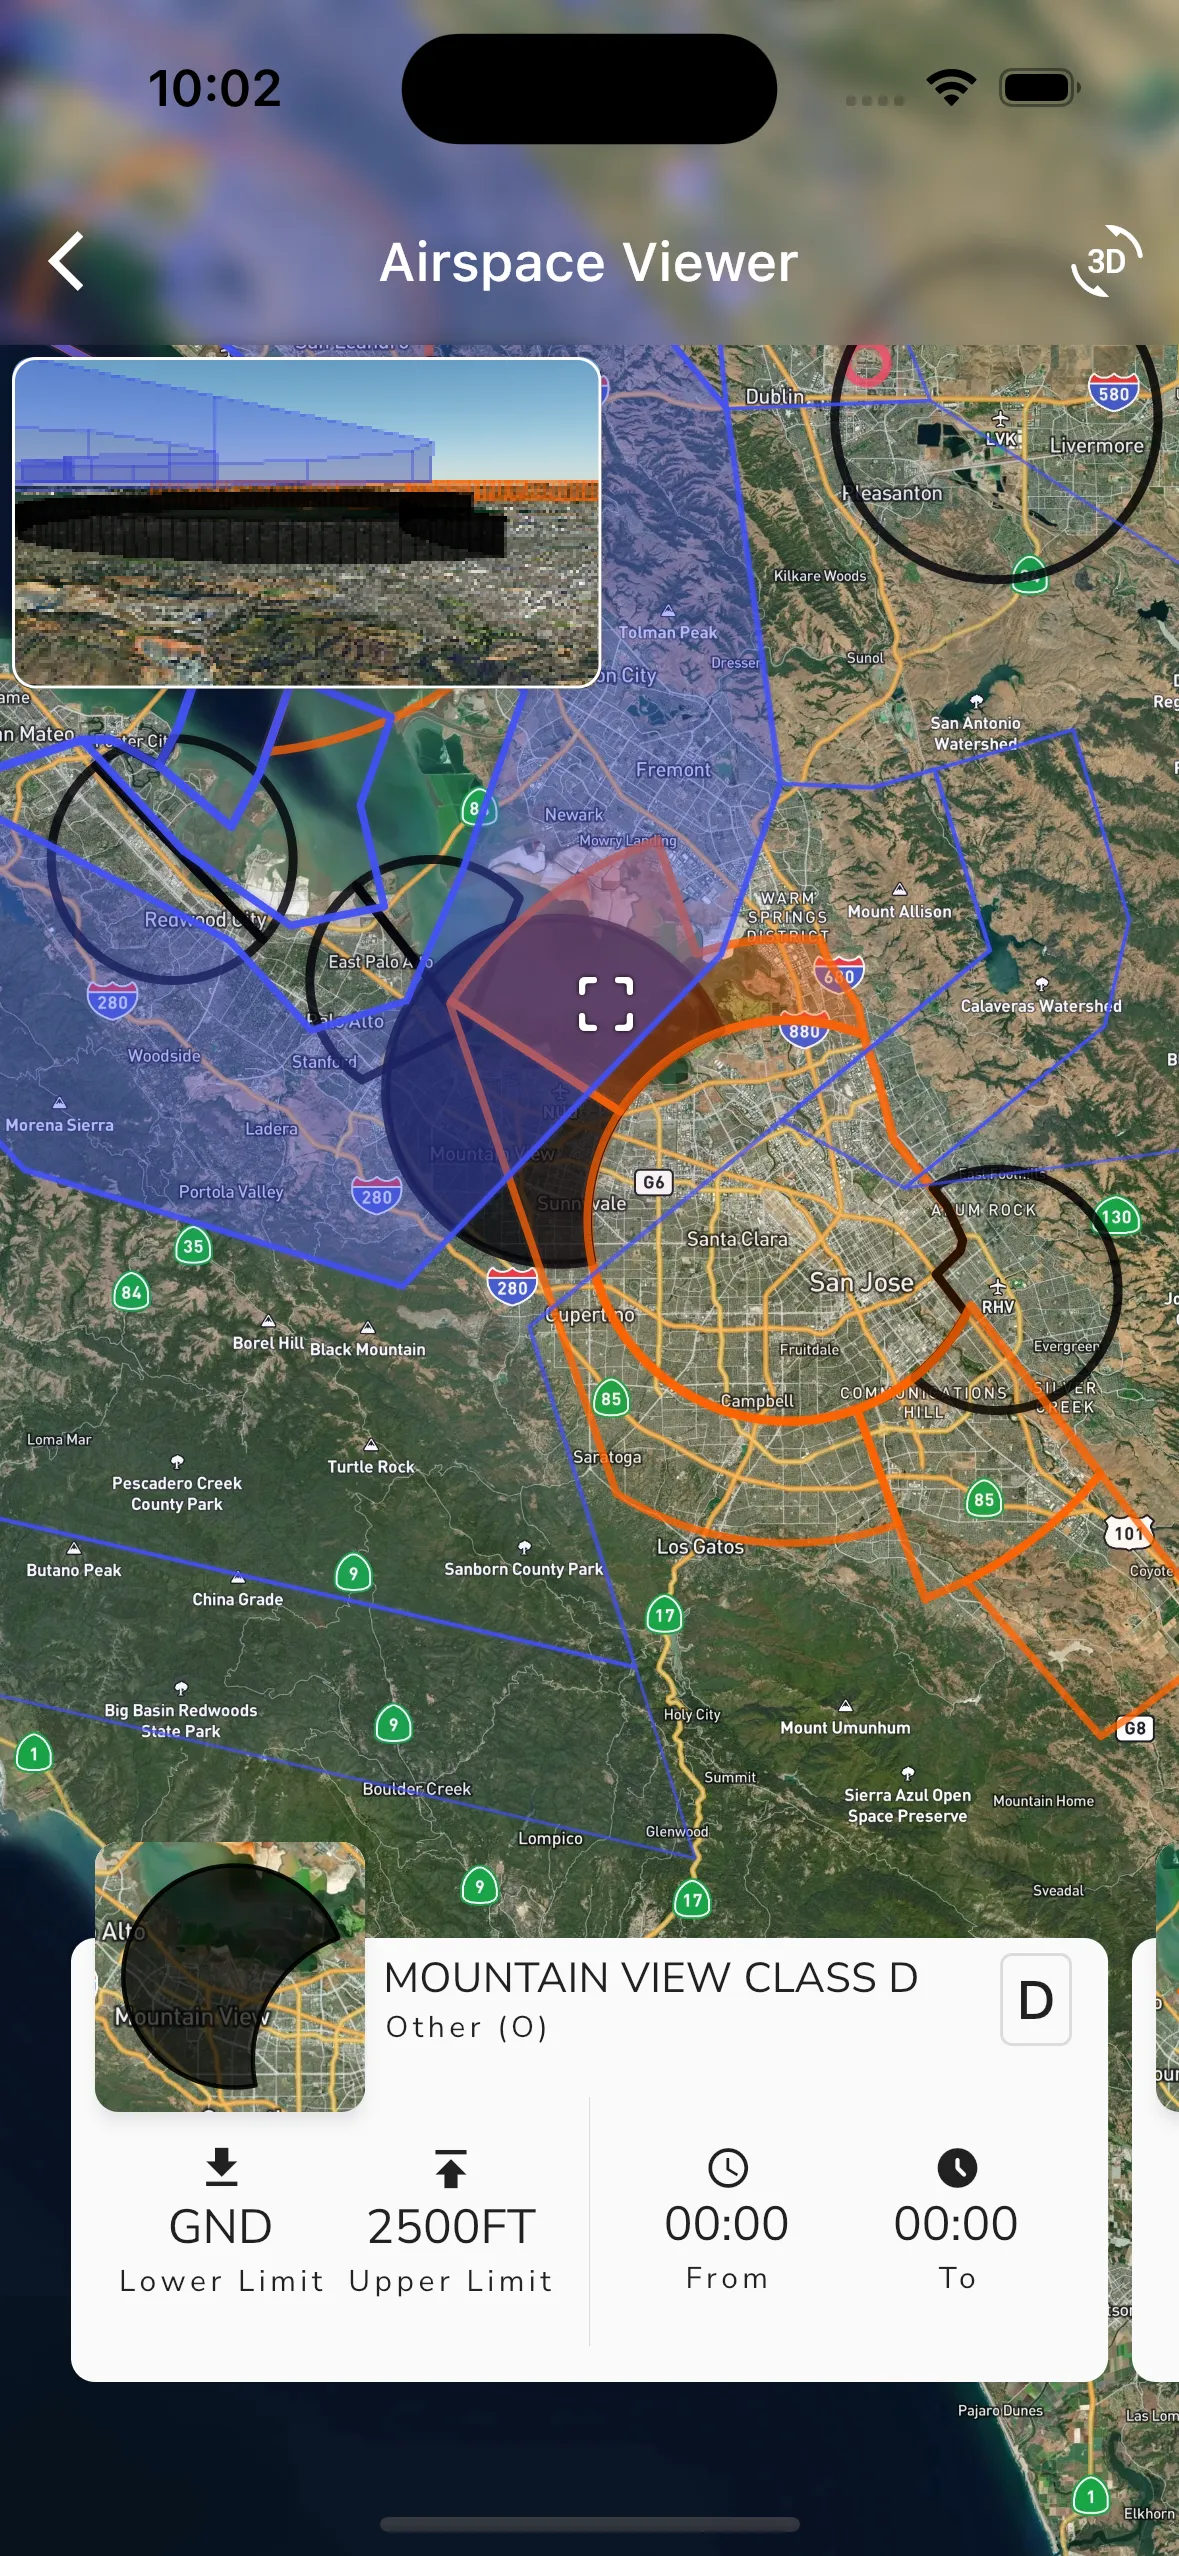
The airspace viewer displays all the airspaces currently visible under the cross-hairs on the map, and it also gives high level details about each airspace such as:
Tap anywhere on the map to see the airspaces that are visible under the cross-hairs. You can also slide the airspace slider at the bottom of the page to see airspaces that are higher from the selected one.
For members on the Adventurer plan, a 3D viewer is also displayed in the top left corner circling the active airspace. This 3D viewer can be used to get a better understanding of the airspace and how it is shaped.
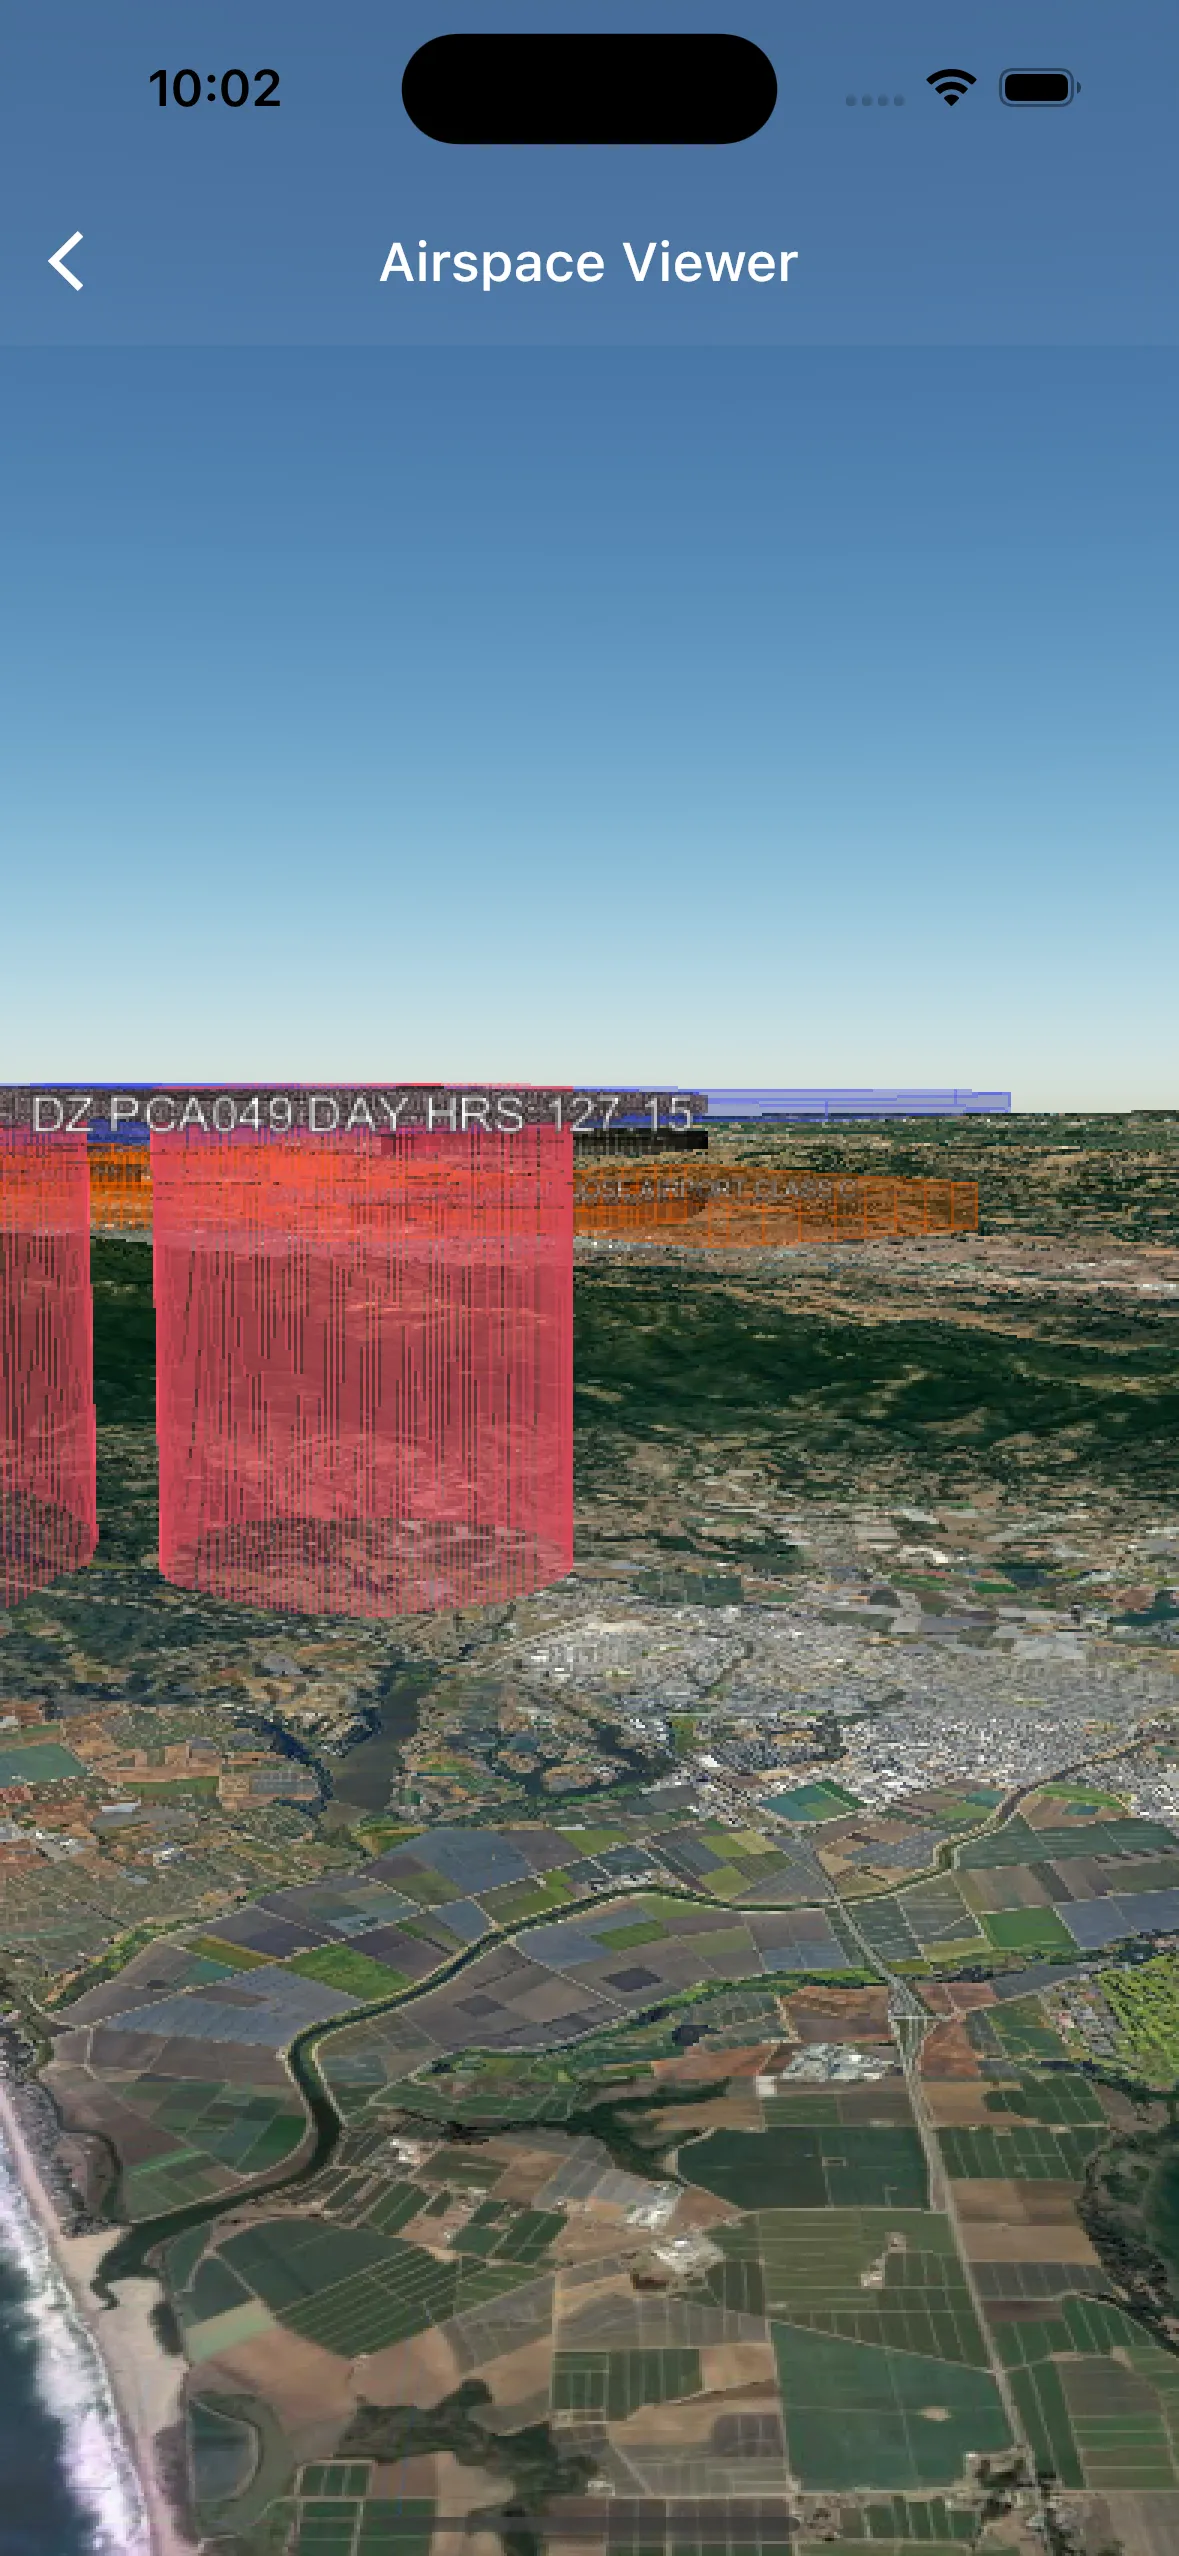
Open the viewer by tapping the “3D” button in the top right corner of the viewer. This will open the 3D viewer and display the airspace in 3D. You can then use the 3D viewer to rotate the airspace and get a better understanding of the airspaces in an area. Zooming into a specific airspace will show the upper and lower limits as labels on the edge of the airspace.
>
Record Page > Settings > Audio Cues
Gaggle comes equipped with a sophisticated digital assistant that serves as your co-pilot on all your flights. During your flight, Gaggle will alert you to critical information that you need to be aware of. You also have the ability to customise what information Gaggle provides and how frequently it delivers updates. For the best results using bluetooth headphones is recommended.
For pilots with an active subscription, audio cues are already enabled by default. However, if you wish to adjust or turn off these settings, you can easily do so through the Flight Recorder Settings accessed by tapping Record > Settings > Audio Cues. You can also get a demo of what it sounds like from the Audio Cues settings page.
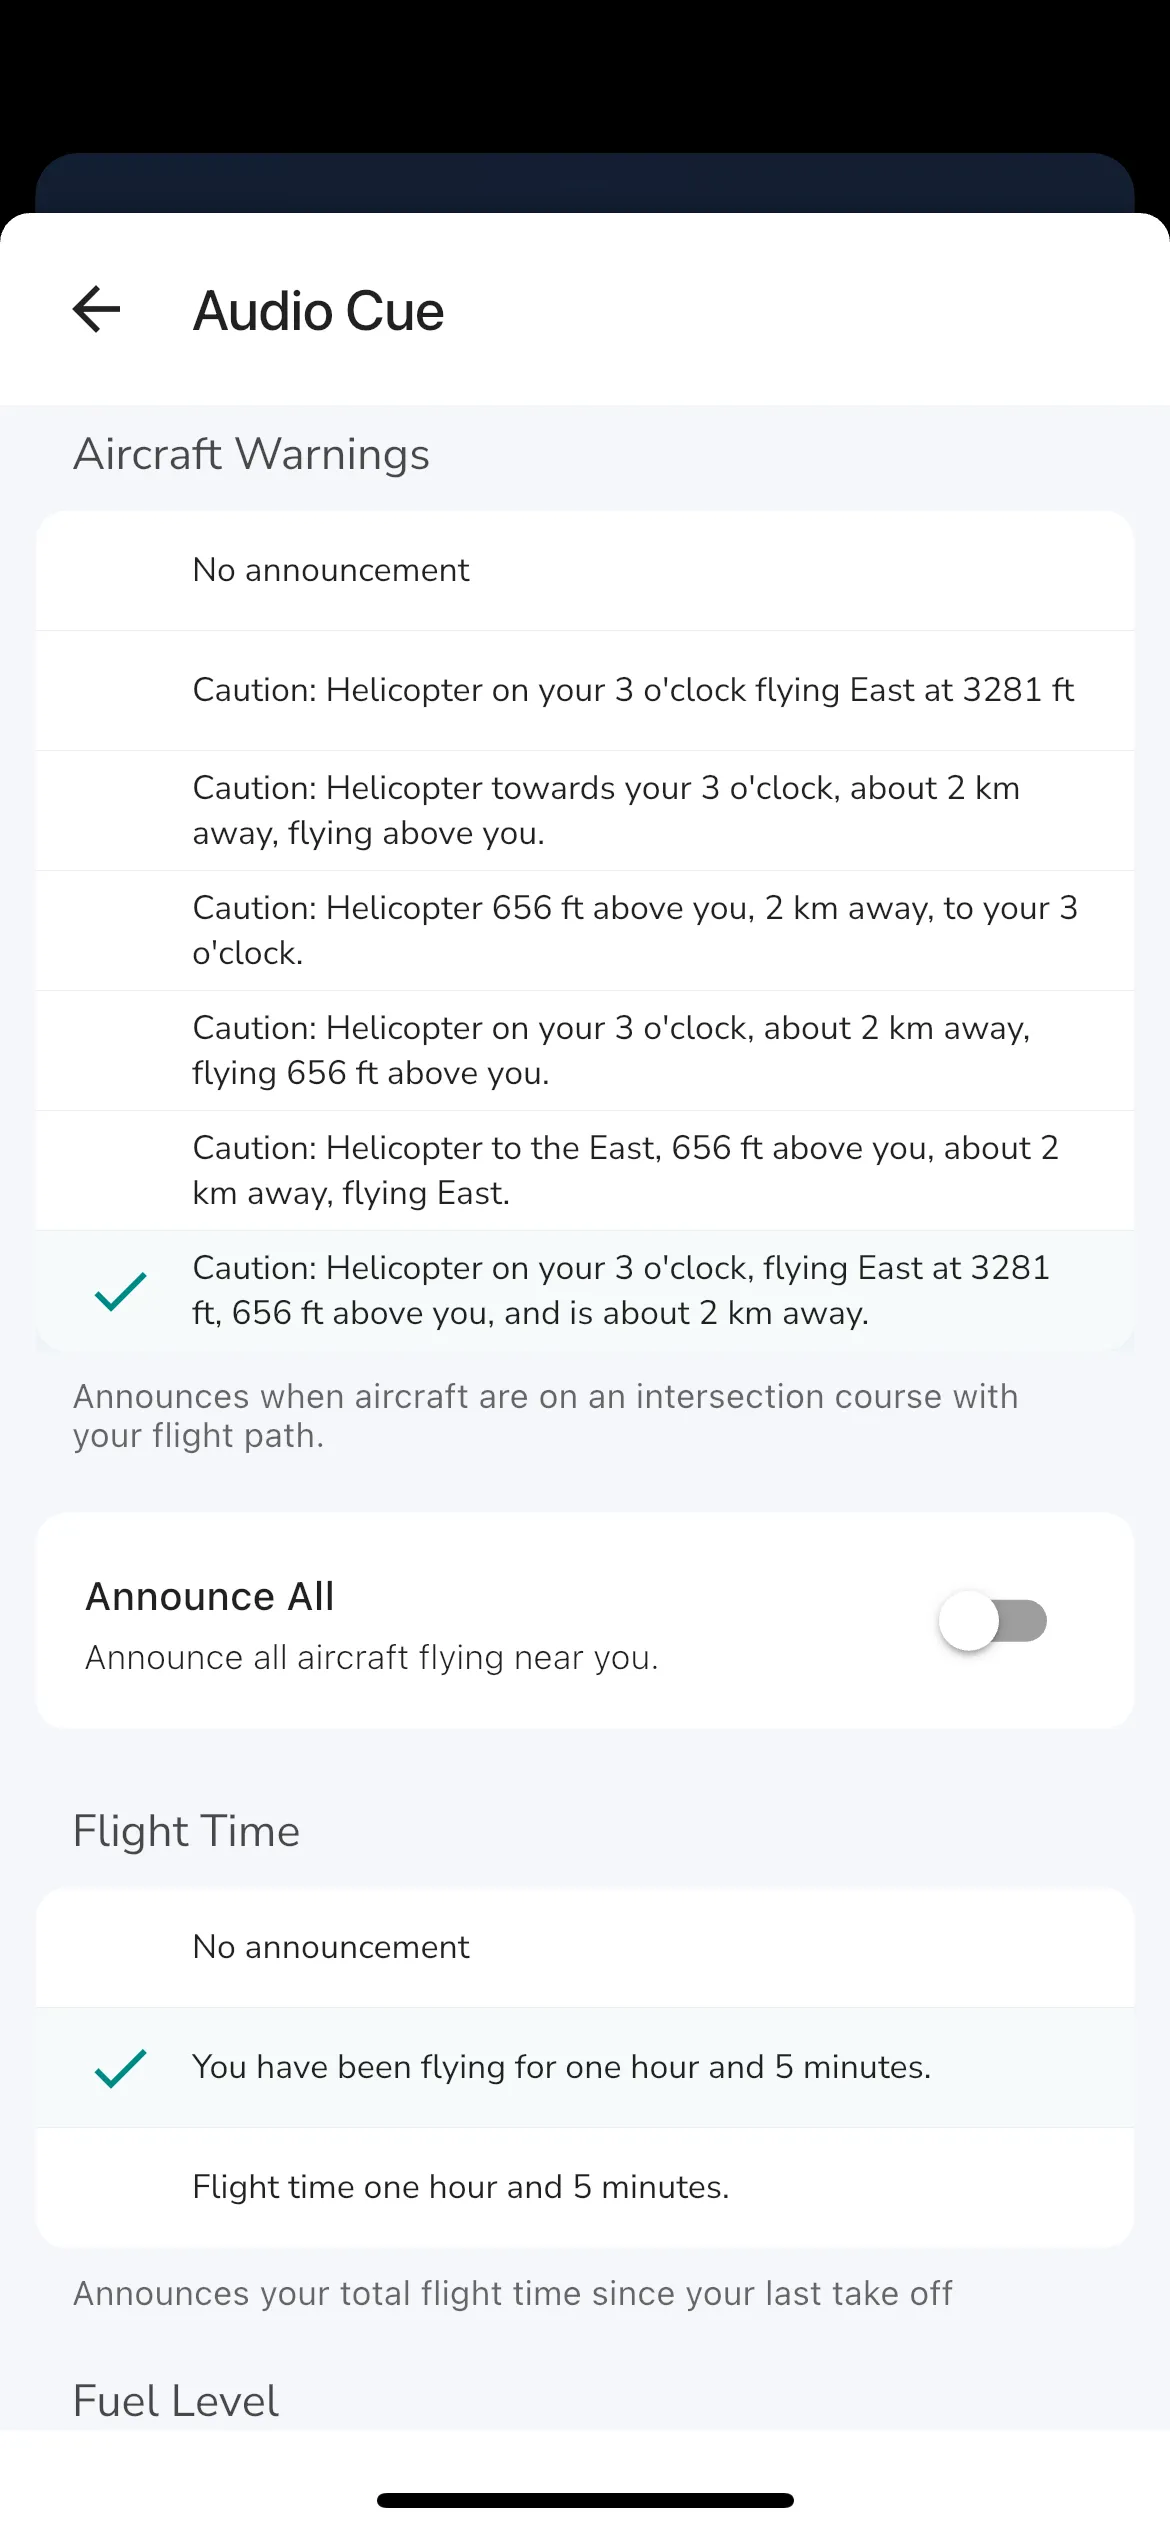
By default, your instrument values will be announced at a set interval of 5 minutes. You can change this interval in the settings.
If you want the ability to initiate audio cues at a moments notice then you can enable knock detection in the settings. Knock detection listens for a knocking like motion on your phone and when it is detected it will initiate the interval announcements immediately. Fuel level and flight time will also be announced. If you have problems with the knock detection you can change the sensitivity up or down.
To access Knock Detection settings, go to Record > Settings > Knock Detection. Knock detection has the following settings:
>
Community Page
The community tab is where you can see what other pilots are doing in your area. You can also see what’s happening in the wider Gaggle community. From the community tab you can also navigate to:
If there are any upcoming meetups in your area (1500km radius) then you will see them here. You can tap on a meetup to see more details about the meetup, and you can also join the meetup. If you join the meetup you will be able to see who else is attending the meetup. You can also see the location of the meetup and the description that gives you more details about the meetup.
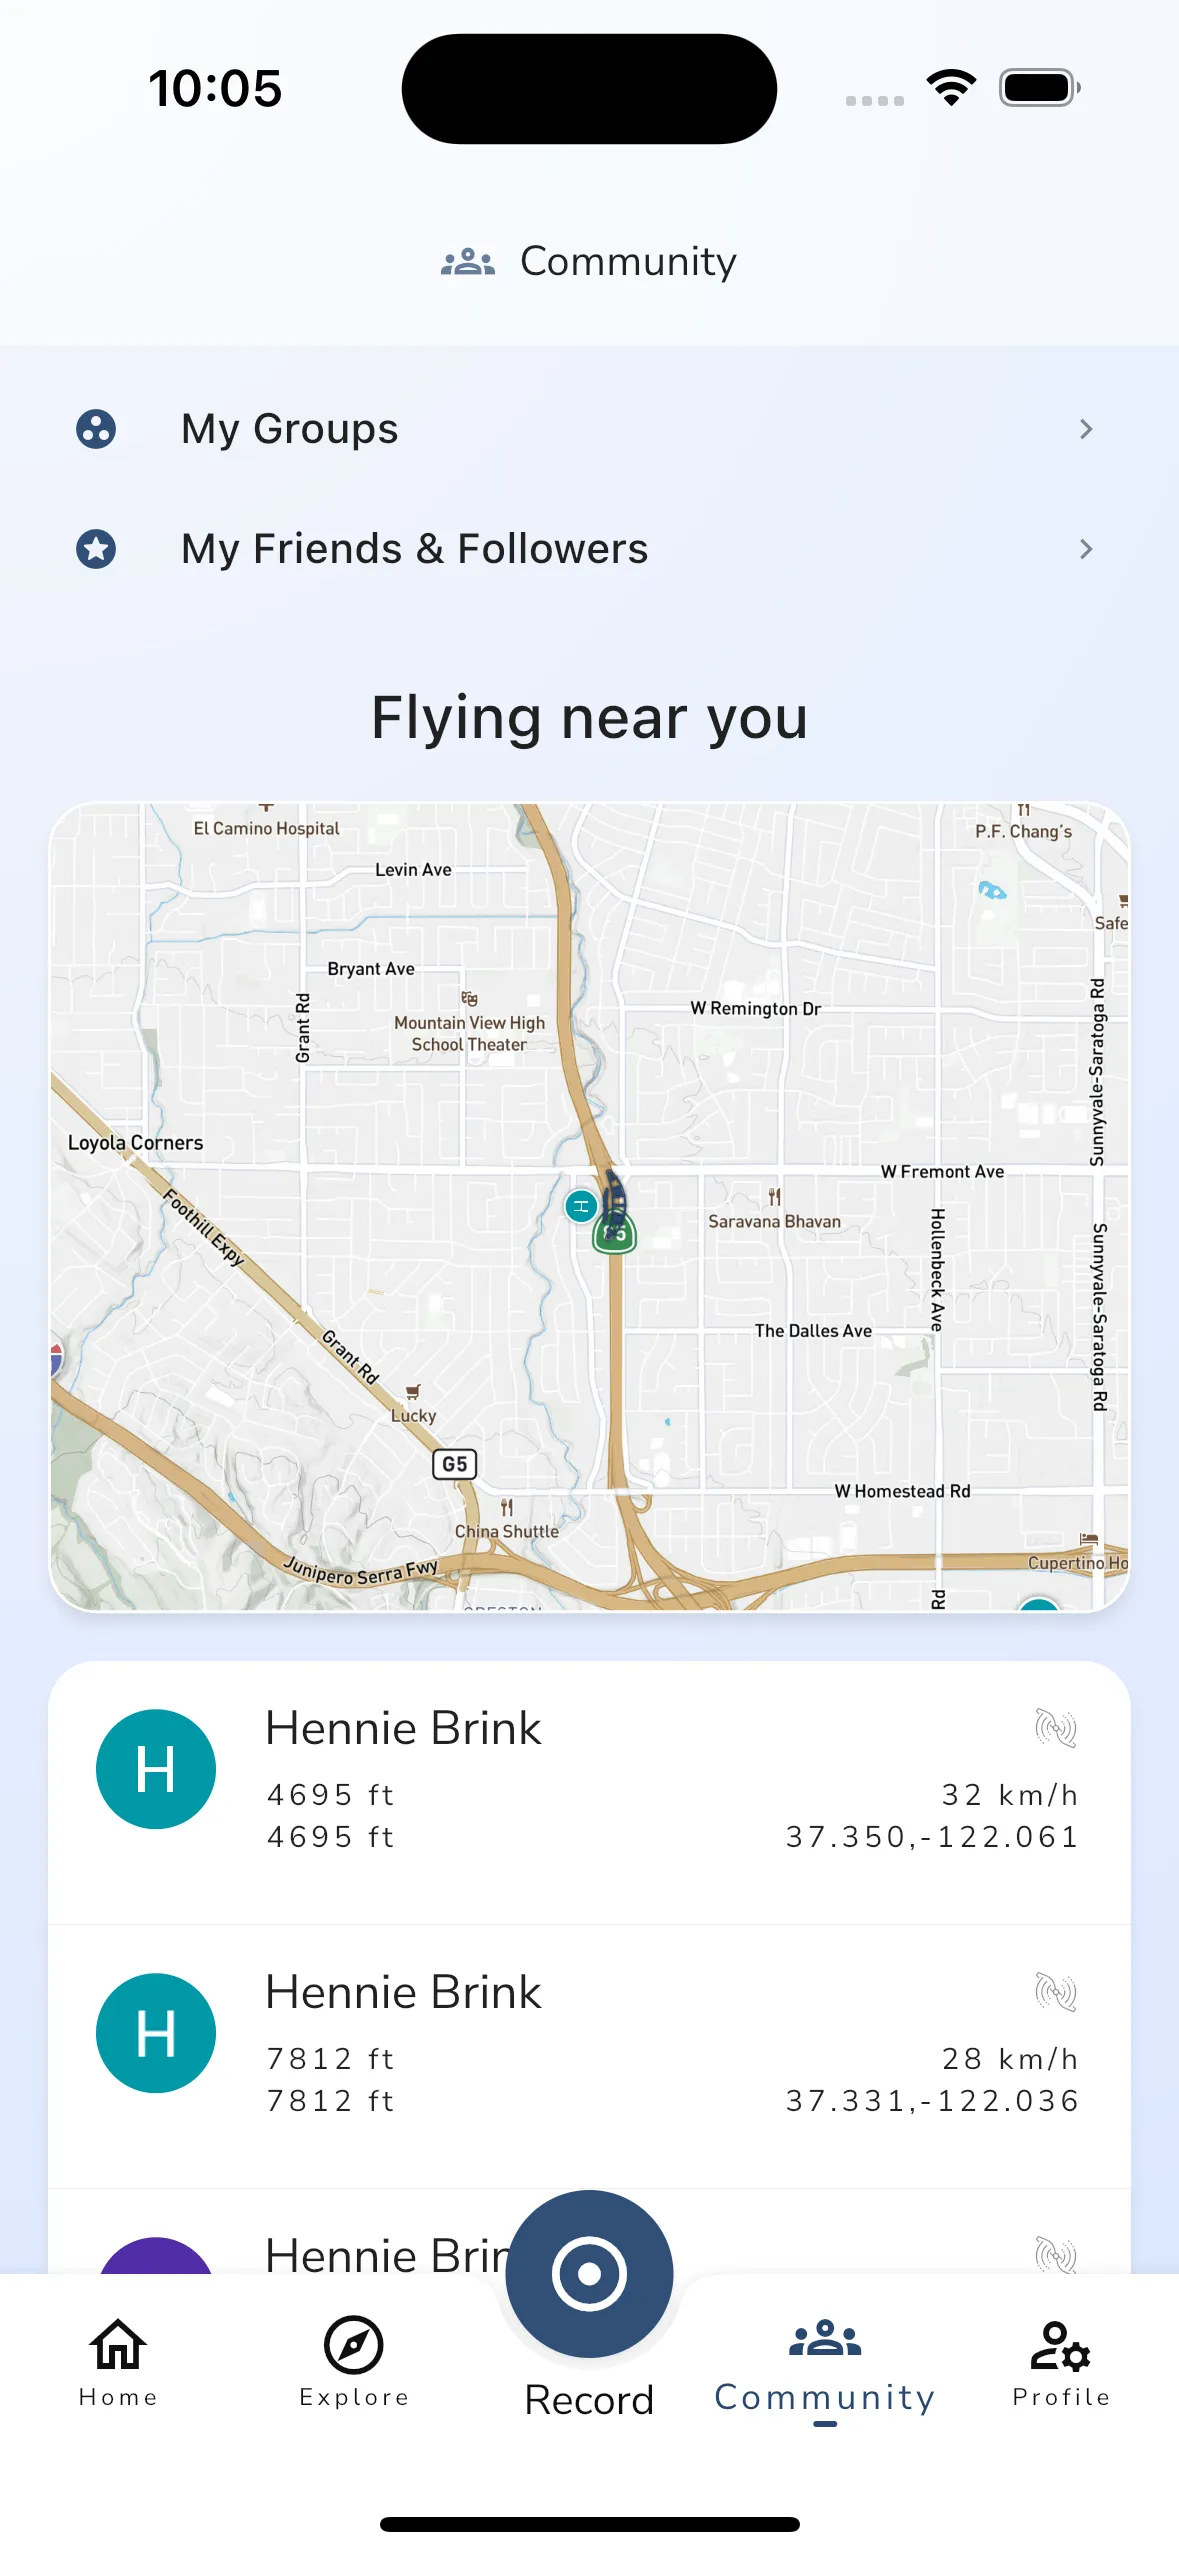
If there are people flying near you (about 100km radius), and they are sharing their live location, then you can follow their flight from here. You will see basic details like altitude, height above ground, speed, aircraft type, and battery level for each pilot. We also display a map of the area with the pilots’ locations. You can tap on the map or on a pilots to open up the live tracking viewer.
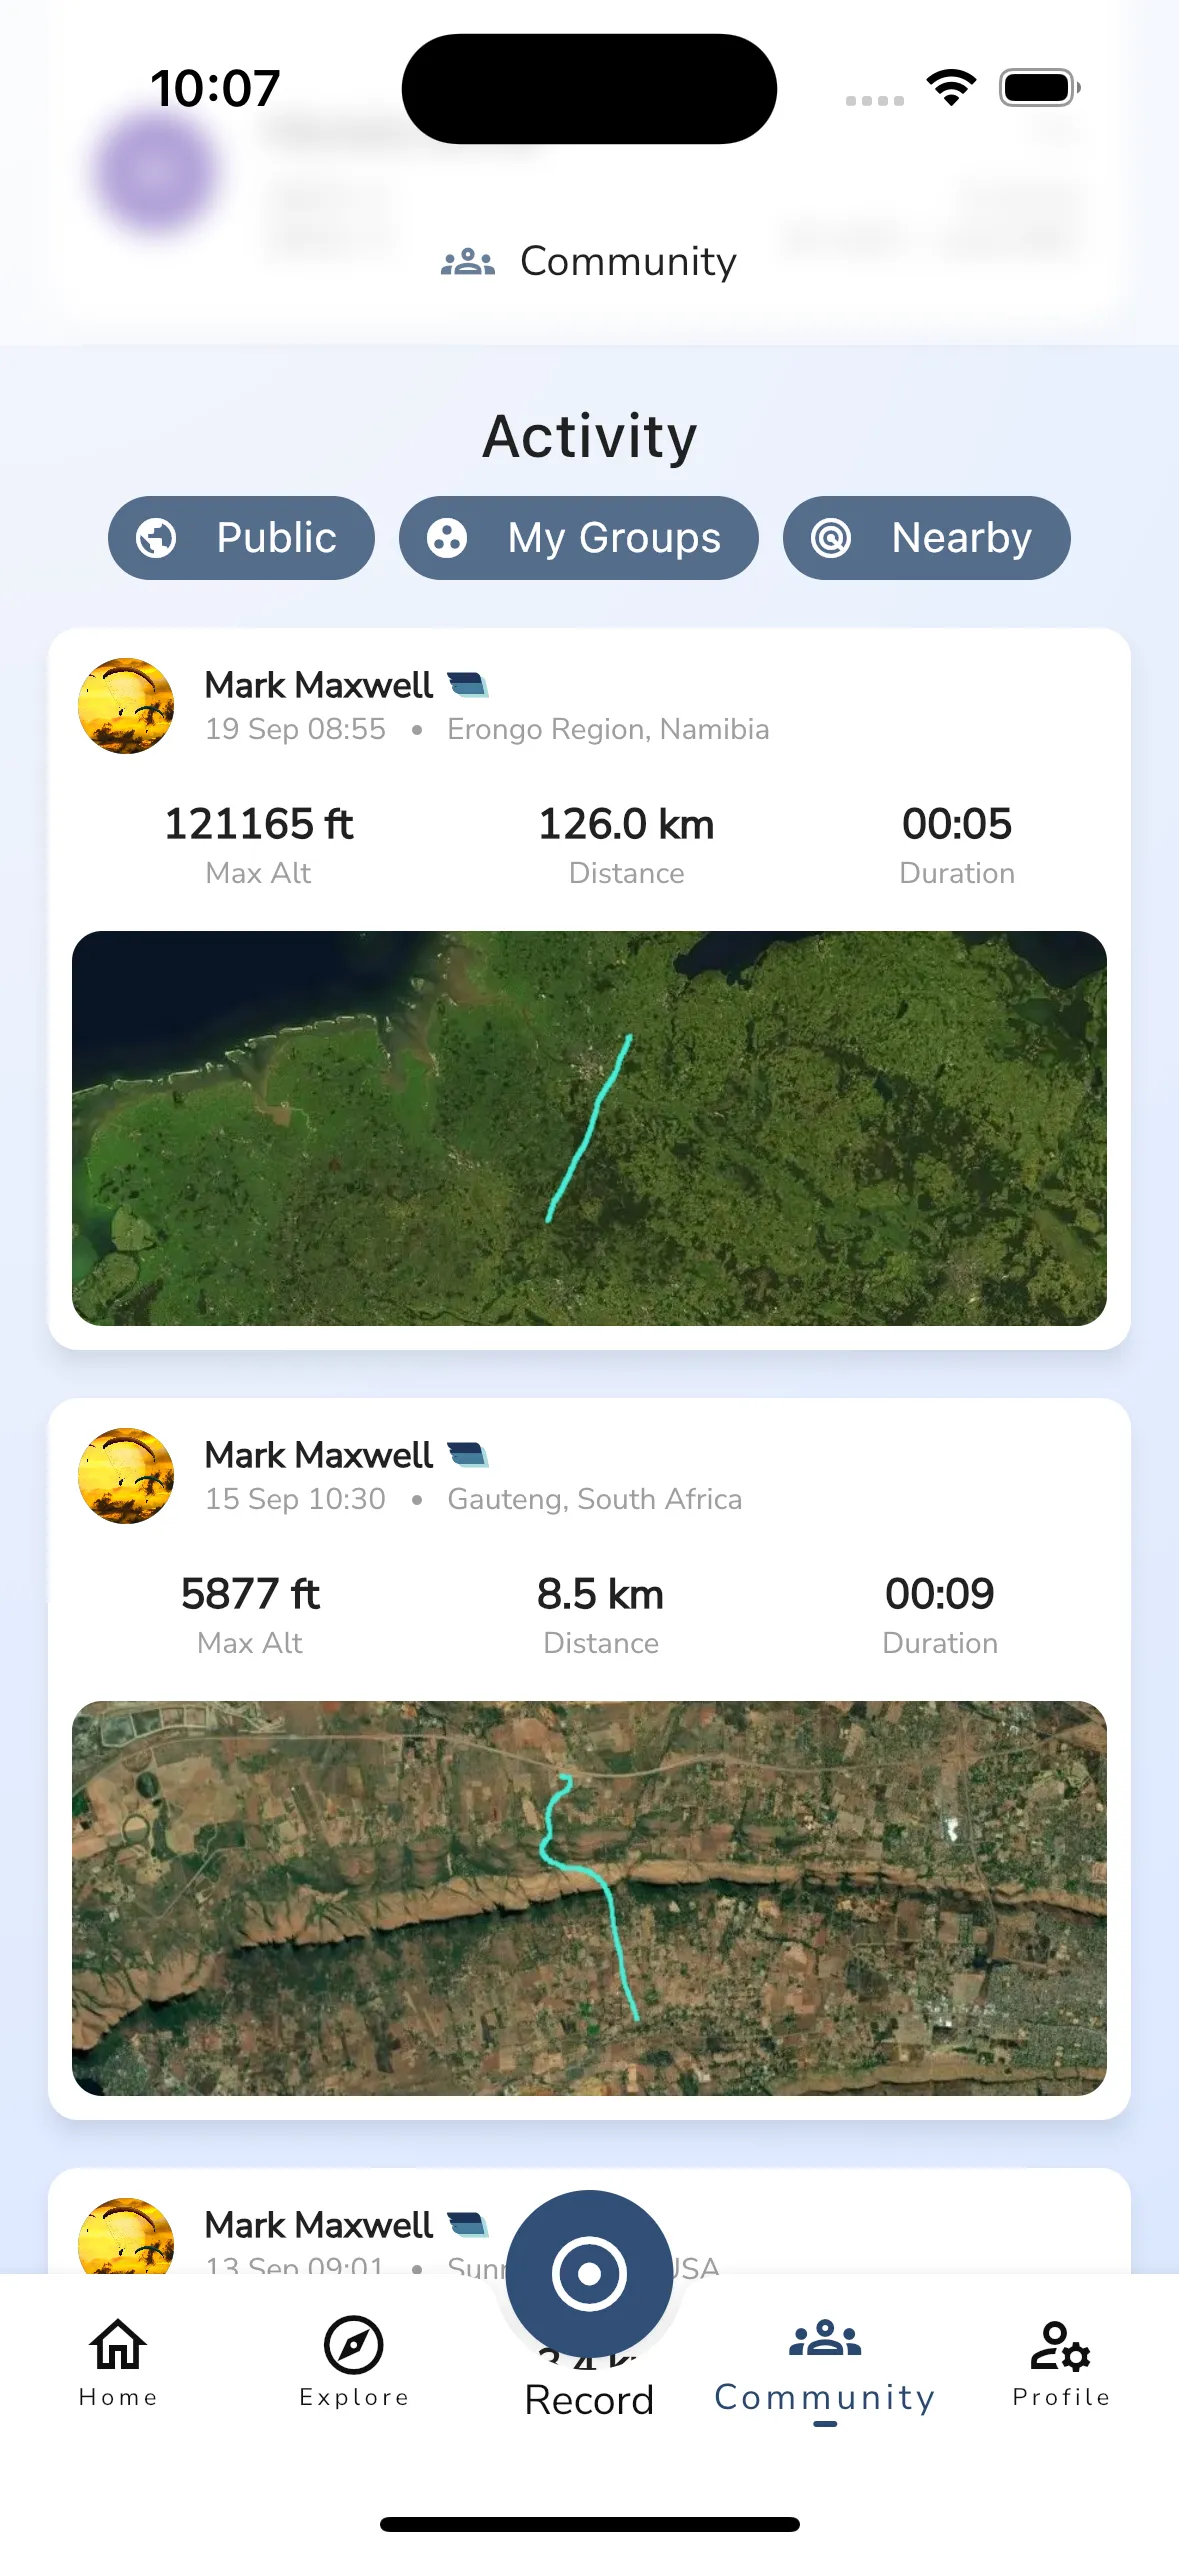
The activity feed shows you flight recordings from pilots in your area, your groups, and your friends. The feed is not in chronological order but rather tries to choose flights that might be of interest to you. It follows the following basic rules, in order of priority:
You can use the filter toggles to choose which items you want in the feed. The toggles allow you to change if flights are shown from:
You can tap on any flight in the activity feed to open up the flight recording viewer.
>
Profile Page > Conversations
Gaggle has built in messaging capabilities that you can use to connect with other pilots, groups, and flying sites. You can access your conversations by navigating to the Profile tab and selecting the Conversations option. There is also a conversation button on the home screen that will take you directly to your conversations.
Sending messages are limited to subscribed users, and you will need:
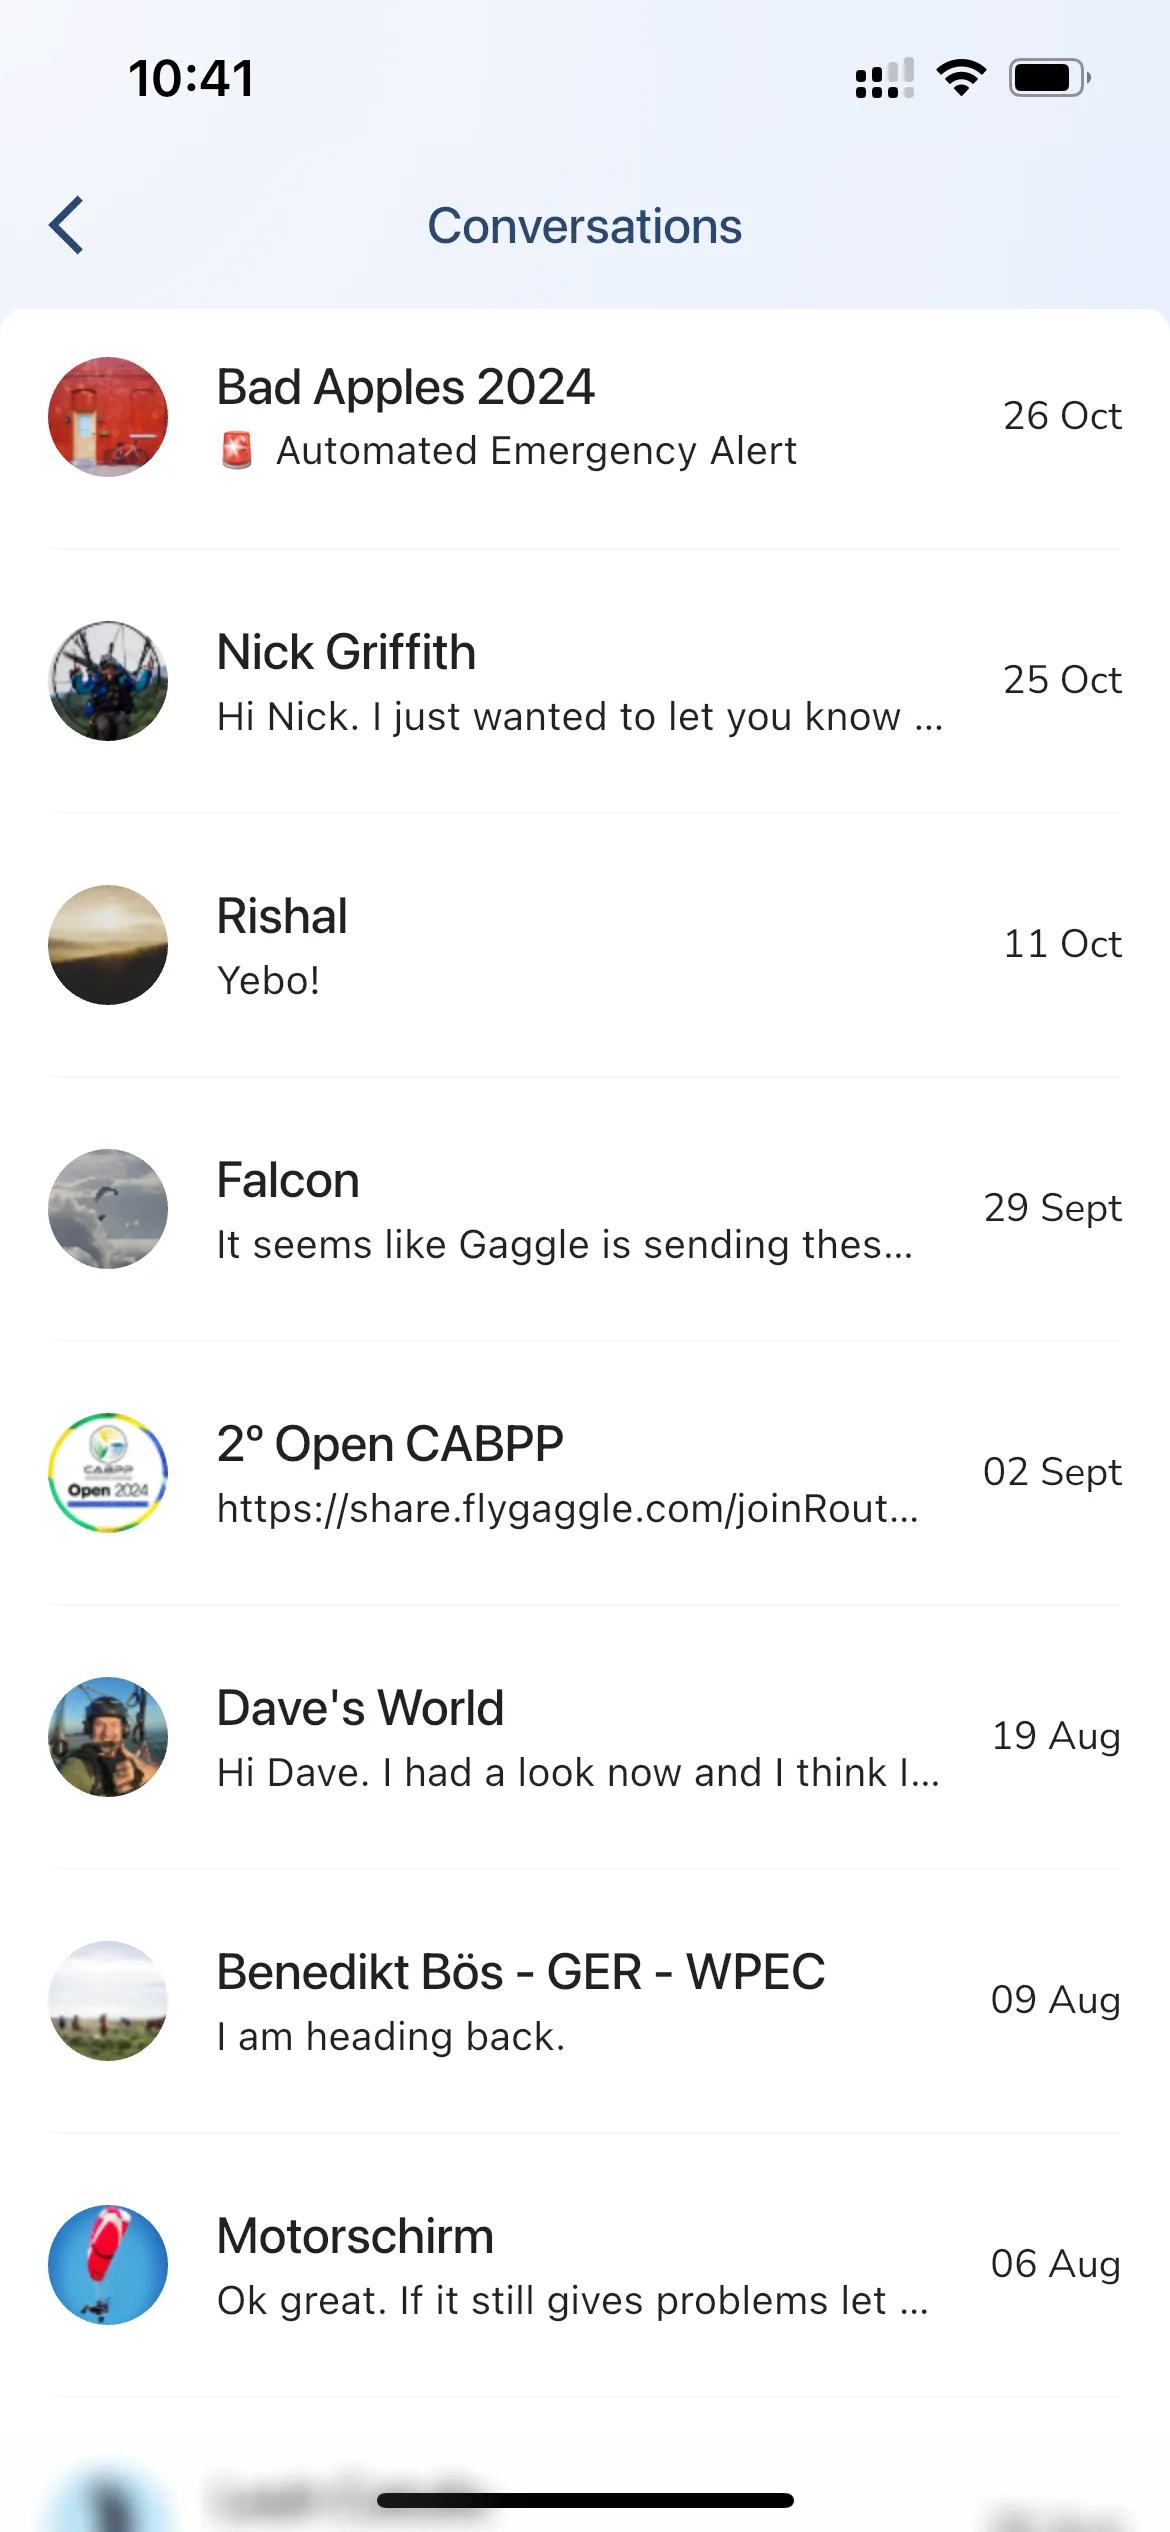
On the conversations page you will see all the pilots, groups, and flying sites that you have conversations with. You can tap on any of these to open up the conversation. The page will show you the name of the pilot, group, or flying site, and the last message that was sent. You can also see if there are any unread messages in the conversation.
>
Profile Page > Equipment > Tap a Bluetooth Device
Gaggle can connect to a variety of Bluetooth devices, like variometers and fuel sensors. By connecting a Bluetooth device you can use it to report pressure values, gps values, and climb rate values for Gaggle to use.
Gaggle supports the following protocols when communicating with Bluetooth devices:
Gaggle has support for many of the popular variometers used by pilots like SkyBean, BlueFly, DigiFly, LebipBip, and more. If we don’t support a device yet then please get in touch, and we will look at adding support for you.
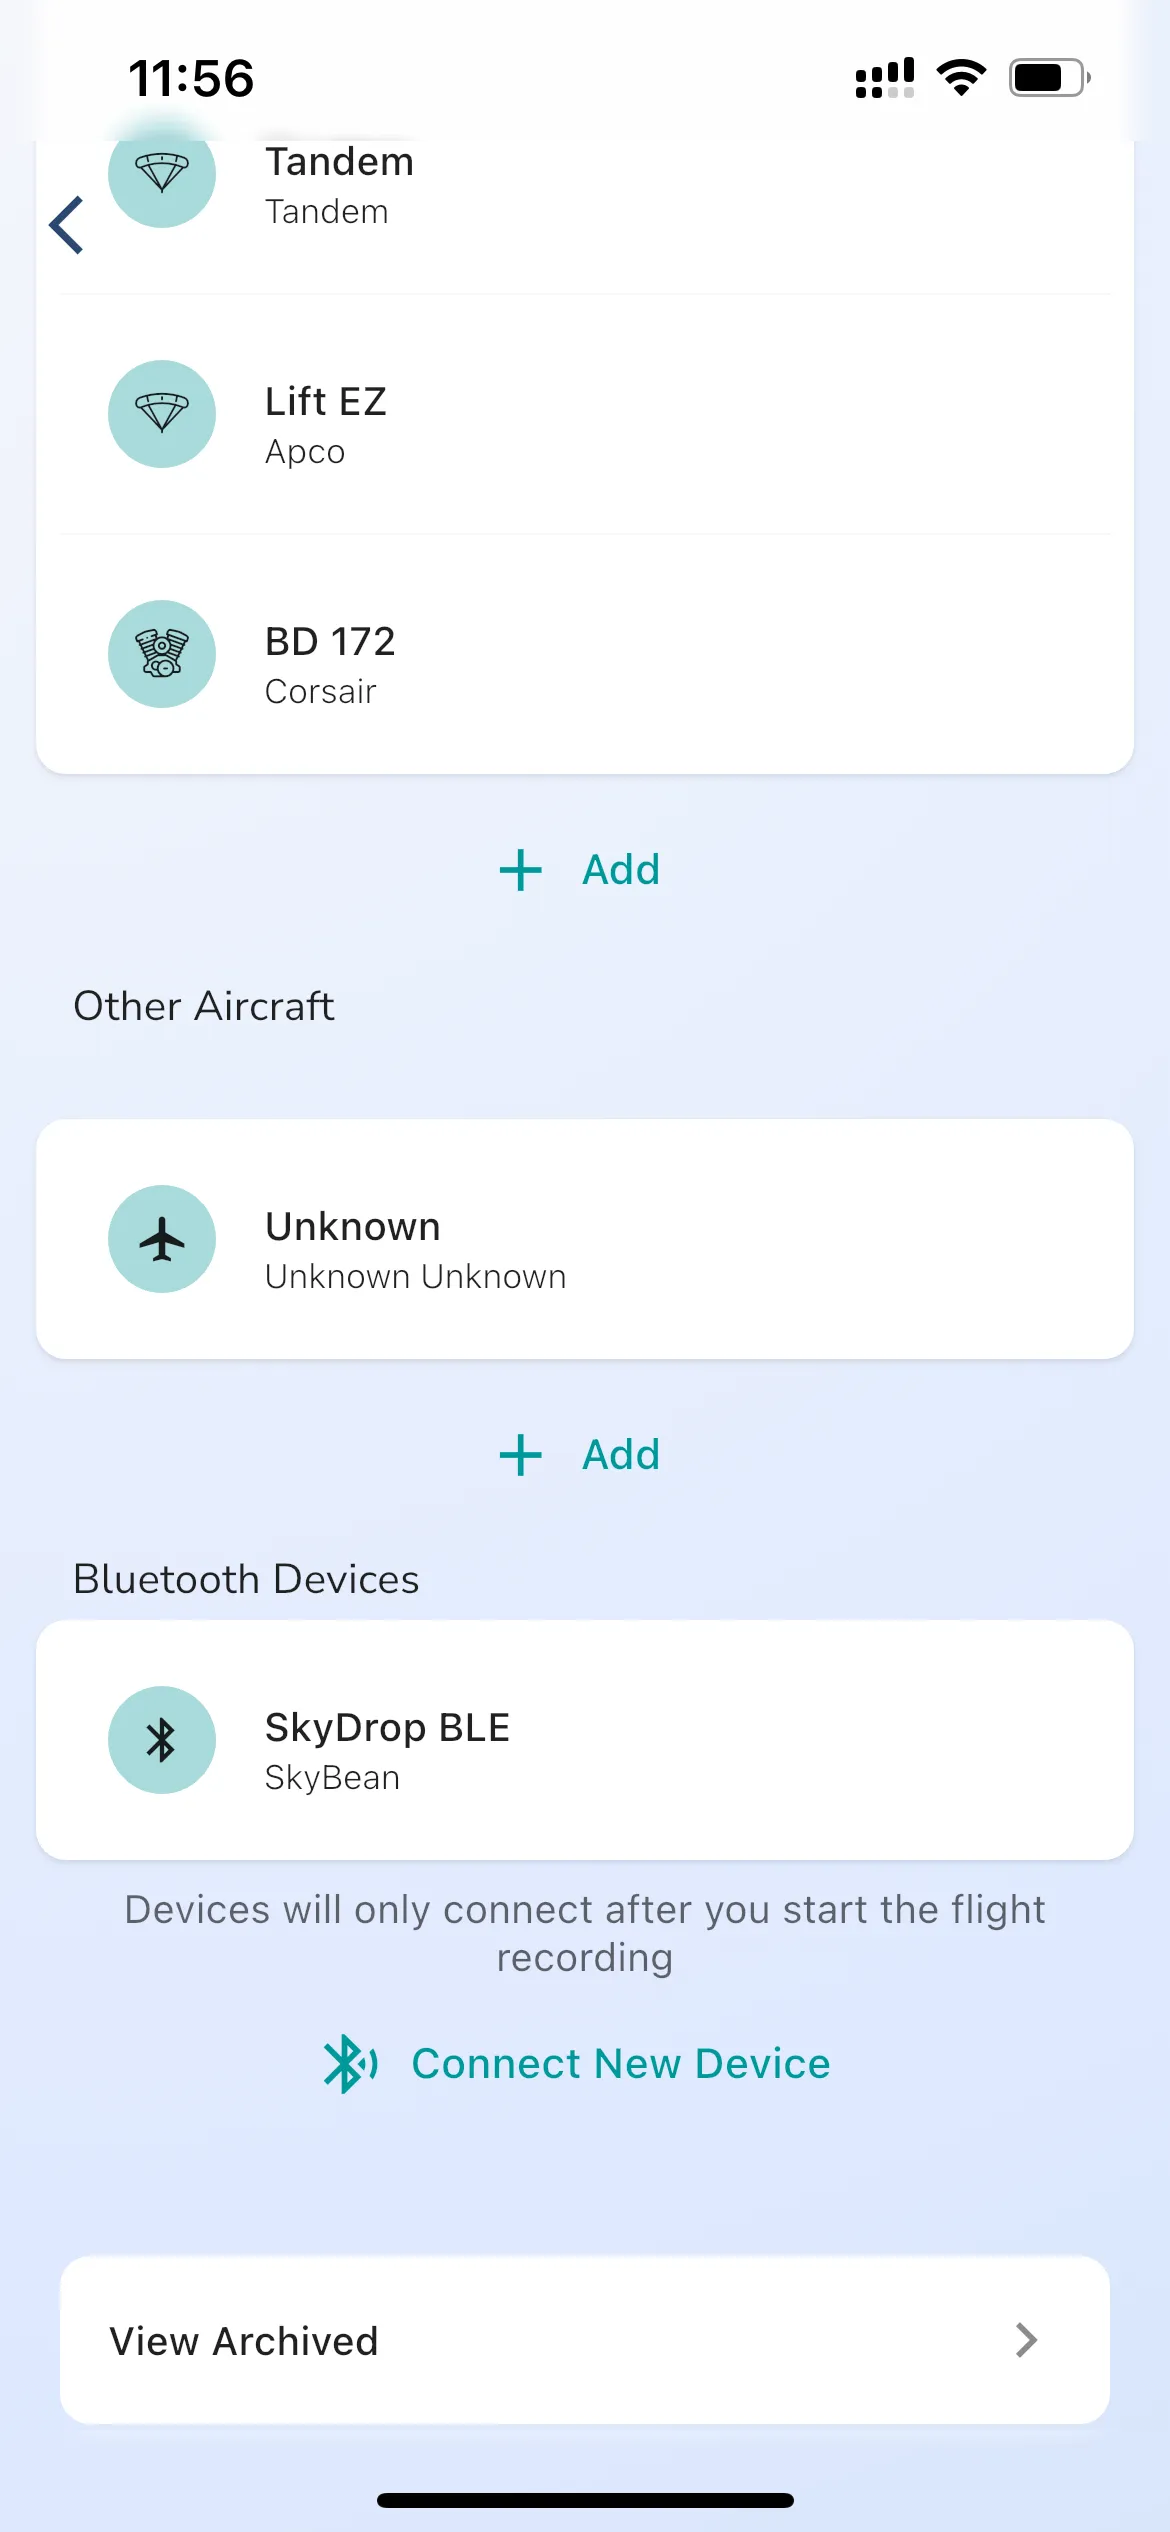
To connect a new Bluetooth Variometer you can tap the “Connect New Device” button. If you haven’t done so already, give the needed permissions for Gaggle to use your phones Bluetooth. If Gaggle has Bluetooth permissions then you will see a list of all the Bluetooth devices nearby (make sure your variometer is on and waiting for a bluetooth connection). Tap the name of the variometer that you want to connect to and Gaggle will connect. Gaggle automatically find the type of device that you are connected too, and you are now ready to use your variometer to go fly.
A note on bluetooth connections: Gaggle will only connect to your variometer when it needs too, this means that a connection will only be made after you start a flight recording and not before. Gaggle wil also automatically retry connections if they fail. If you are using a Bluetooth variometer while flying and the connection is lost, like when the device shuts off, then Gaggle will gracefully fall back to the internal sensors of the phone after about 5 seconds until the connection to the device can be restored. You will be able to see if the Bluetooth connection is active when the Bluetooth indicator appears on the Altitude Instrument Widget.
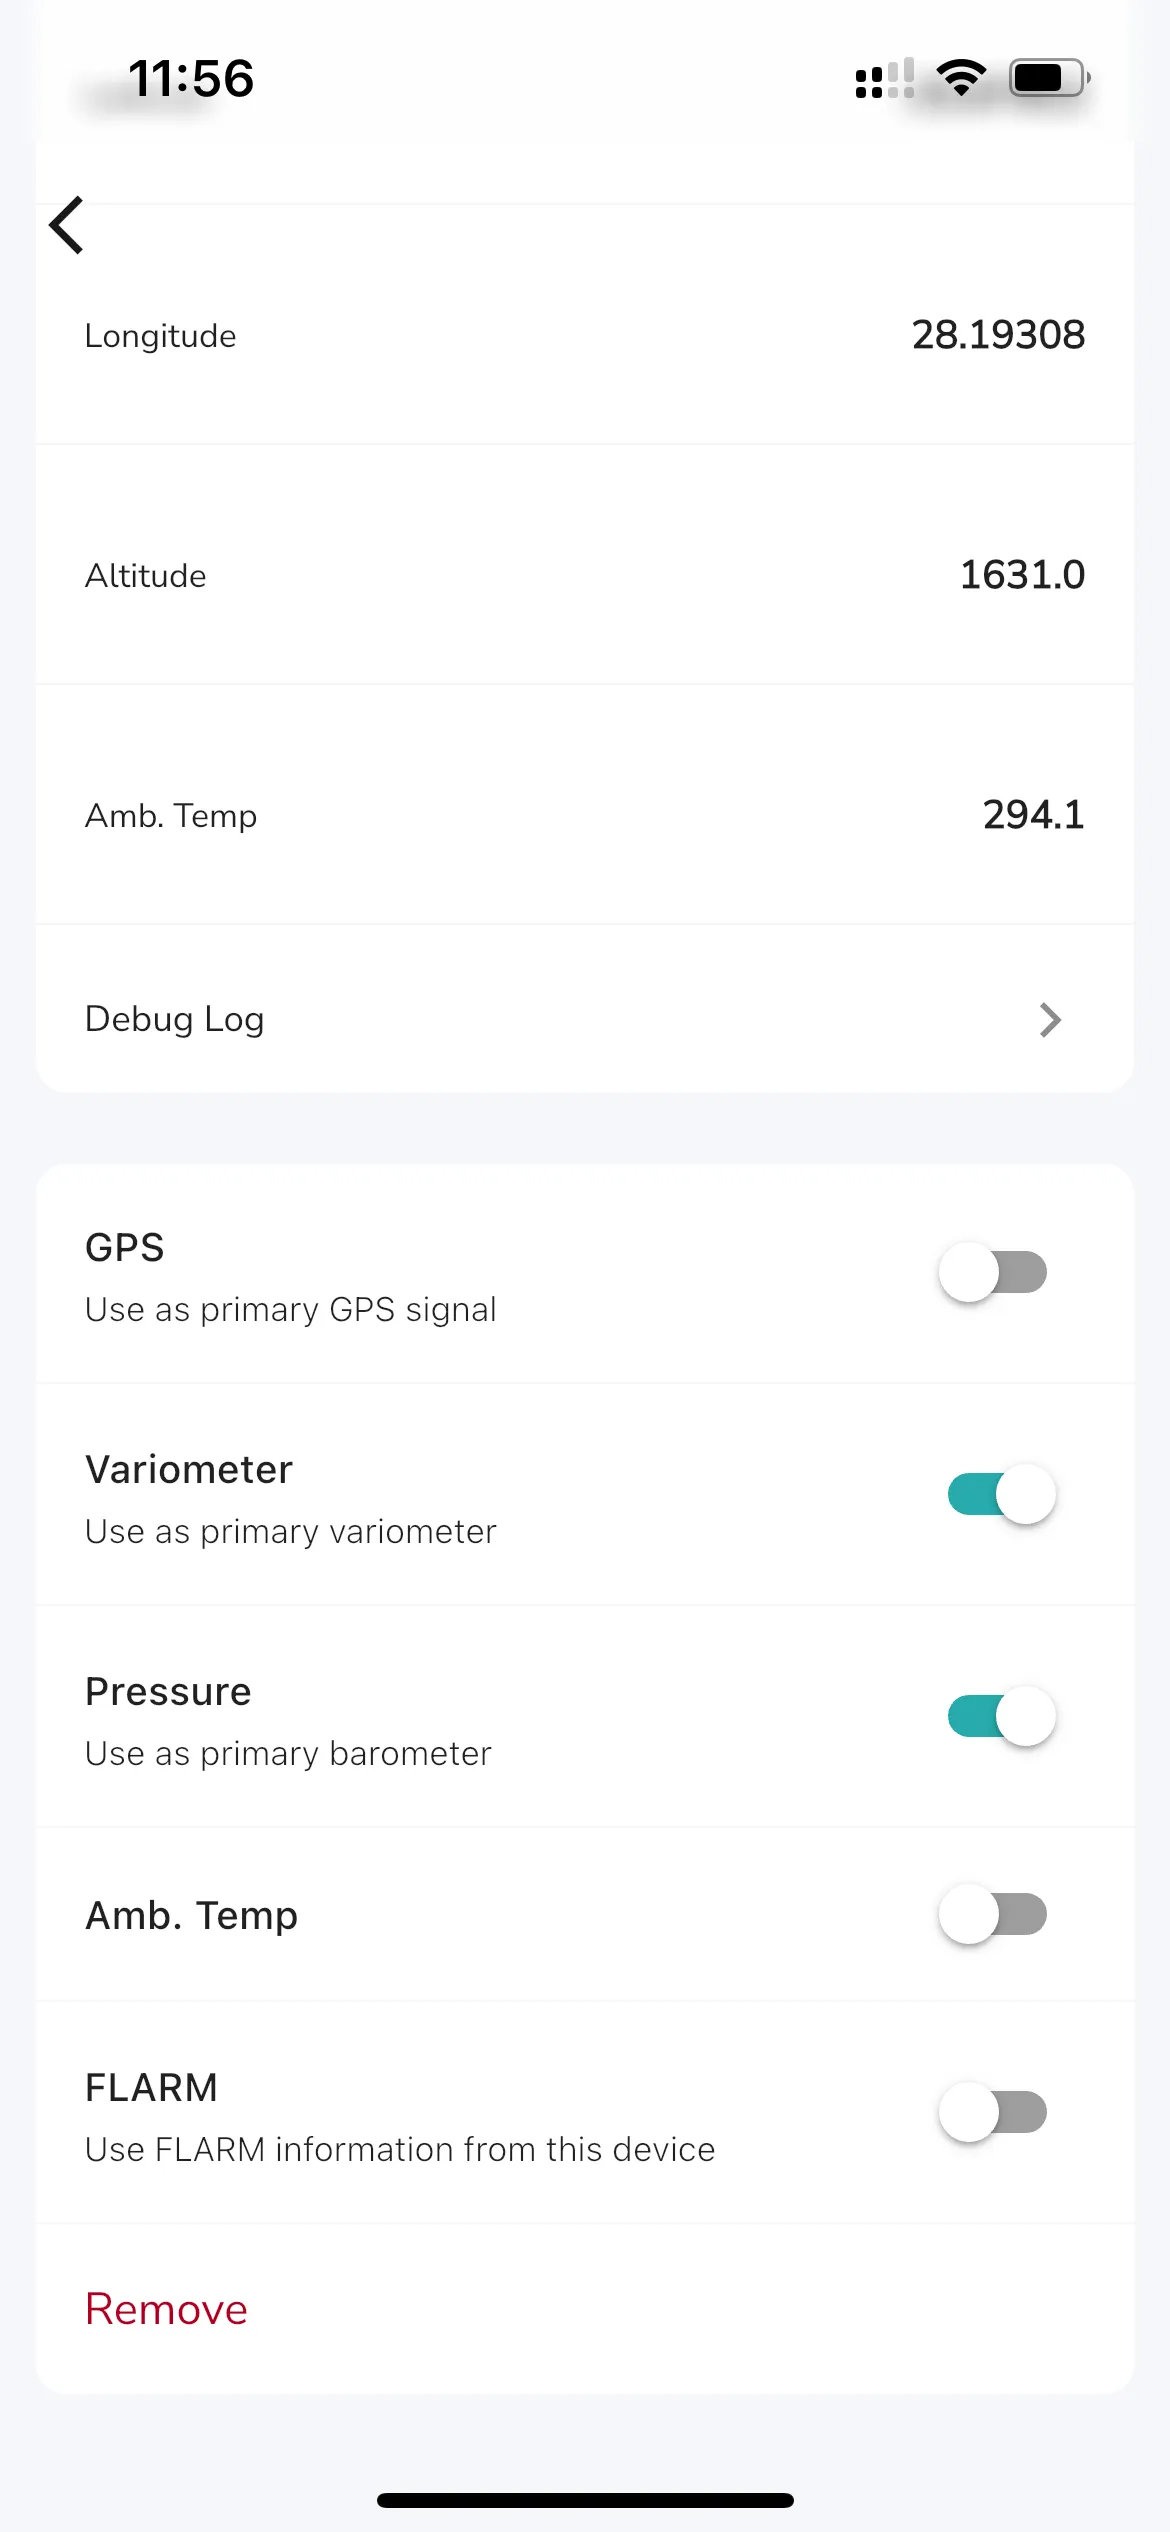
Tapping on a Bluetooth device brings up its detail page. On this page you can see:
Device Info: This provides basic information for the device like the Manufacturer, Model Number, and Name. Incoming Data: If your device is on and Gaggle has established the bluetooth connection then all the raw data, like GPS coordinates, barometric pressure, climb rate, and anything else being transmitted by your device is displayed here.
From this screen you can also choose which of the sensor values Gaggle must use. For the settings that are toggled on, the values received from your Bluetooth Device will be used instead of the internal values from your phone when recording your flight (Gaggle will still fall back to the internal sensors if the bluetooth connection fails).
Gaggle can use the following information from GPS devices:
For the technical inclined building their own Bluetooth devices, here are the details for the NMEA sentences that Gaggle supports that you can use to send data. You can use these sentences to send data to Gaggle from your own custom devices.
The PRS sentence is used to send the barometric pressure to Gaggle. The sentence is in the format:
$PRS,03F2
$PRS,{pressure:hPa encoded as hex}
Where 03F2 is the current barometric pressure in hPa encoded as a hex value.
Where 1013.25 is the current barometric pressure in hPa.
```plaintext
_PRS,03F2
_PRS,{pressure:hPa encoded as hex}
Where 03F2 is the current barometric pressure in hPa encoded as a hex value.
Bluefly variometers use the BFV sentence to send the barometric pressure, vario, temperature, battery, and pitot differential pressure to Gaggle. The sentence is in the format:
$BFV,101325,0,25,100*00
$BFV,{pressure:Pa},{vario:cm/s},{temp:deg C},{battery:%},{pitotDiffPressure:Pa}*{checksum}
Where 101325 is the current barometric pressure in Pa, 0 is the current vario in cm/s, 25 is the current temperature in degrees Celsius, 100 is the current battery percentage, and 00 is the checksum.
$BFX,101325,0,25,100,0,12.5*00
$BFX,{pressure:Pa},{vario:cm/s},{temp:deg C},{battery:%},{pitotDiffPressure:Pa},{volts:V}*{checksum}
Where 101325 is the current barometric pressure in Pa, 0 is the current vario in cm/s, 25 is the current temperature in degrees Celsius, 100 is the current battery percentage, 0 is the current pitot differential pressure in Pa, 12.5 is the current battery voltage, and 00 is the checksum.
Digifly variometers use the PDGFTL1 sentence to send the barometric pressure, vario, temperature, battery, and pitot differential pressure to Gaggle. The sentence is in the format:
$PDGFTL1,1013.25,1013.25,0,0,0,0,0,0,0*00
$PDGFTL1,{qne:hPa},{qnh:hPa},{vario:cm/s},{nettoVario:cm/s},{airSpeed:km/h},{groundEfficiency:0-100},{windSpeed:km/h},{windDirection:0-360},{mainLithiumVoltage:V},{backupBatteryVoltage:V}*{checksum}
Where 1013.25 is the current QNE pressure in hPa, 1013.25 is the current QNH pressure in hPa, 0 is the current vario in cm/s, 0 is the current netto vario in cm/s, 0 is the current air speed in km/h, 0 is the current ground efficiency in 0-100, 0 is the current wind speed in km/h, 0 is the current wind direction in 0-360, 0 is the current main lithium voltage in V, 0 is the current backup battery voltage in V, and 00 is the checksum.
$D,0,1013.25,0,0,24.5*00
$D,{vario:cm/s},{pressure:hPa},{ignored},{ignored},{temperature:deg C}*{checksum}
Where 0 is the current vario in cm/s, 1013.25 is the current pressure in hPa, 0 field is ignored, 0 field is ignored, 24.5 is the current temperature in degrees Celsius, and 00 is the checksum.
Engine monitoring systems can use the EMS sentence to send the fuel level to Gaggle. The sentence is in the format:
$EMS,101325,0.04,0.50,0.75,1.25,1.25,1.25,1.25,849.50*00
$EMS,{pressure:hPa},{fuelFlow:l/ph},{tankLevel:ltr},{totalFuelUsed:ltr},{ambientTemperature:C},{headTemperature:C},{exhaustTemperature:C},{waterTemperature:C},{engineRPM:rpm}*{checksum}
Where 101325 is the current pressure in hPa, 0.04 is the current fuel flow in l/ph, 0.50 is the current tank level in ltr, 0.75 is the total fuel used in ltr, 1.25 is the current ambient temperature in C, 1.25 is the current head temperature in C, 1.25 is the current exhaust temperature in C, 1.25 is the current water temperature in C, 849.50 is the current engine RPM in rpm, and 00 is the checksum.
Flarm devices can use the FLAU sentence to send the GPS location, altitude, and speed to Gaggle. The sentence is in the format:
$FLAU,0,1,2,1,1,0,2,0,0,5A77B1*00
$FLAU,{rx:count},{tx:status},{gps:status},{power:status},{alarmLevel:level},{relativeBearing:deg},{alarmType:type},{relativeVertical:m},{relativeDistance:m},{id:hex}*{checksum}
Where 0 is the current count of devices, 1 is the current transmission status, 2 is the current GPS status, 1 is the current power status, 1 is the current alarm level, 0 is the current relative bearing in degrees, 2 is the current alarm type, 0 is the current relative vertical separation in meters, 0 is the current relative distance in meters, 5A77B1 is the current ID in hex, and 00 is the checksum.
$FLAA,1,0,0,0,1,0,0,0,0,0*00
$FLAA,{alarmLevel:level},{relativeNorth:m},{relativeEast:m},{relativeVertical:m},{idType:type},{id:hex},{track:deg},{turnRate:deg/s},{groundSpeed:m/s},{climbRate:m/s},{acftType:type}*{checksum}
Where 1 is the current alarm level, 0 is the current relative north in meters, 0 is the current relative east in meters, 0 is the current relative vertical in meters, 0 is the current ID type, 0 is the current ID in hex, 0 is the current track in degrees, 0 is the current turn rate in degrees per second, 0 is the current ground speed in m/s, 0 is the current climb rate in m/s, and 0 is the current aircraft type, and 00 is the checksum.
Garmin devices can use the GRMZ sentence to send the GPS location, altitude, and speed to Gaggle. The sentence is in the format:
$PGRMZ,500,3*00
$PGRMZ,{altitude:ft},{fixMode:mode}*{checksum}
Where 500 is the current altitude in feet, and 3 is the current fix mode, and 00 is the checksum.
GPS devices can use the GPGGA sentence to send the GPS location, altitude, and speed to Gaggle. The sentence is in the format:
$GPGGA,123519,4807.038,N,01131.000,E,1,08,0.9,545.4,M,46.9,M,,*42
$GPGGA,{utcTime},{latitude},{northSouthIndicator},{longitude},{eastWestIndicator},{positionFixIndicator},{satellitesUsed},{horizontalDilutionOfPrecision},{mslAltitude},{unitsOfMSL},{geoidalSeparation},{ageOfDifferentialCorrection},{differentialRefStationId}*{checksum}
Where 123519 is the current UTC time, 4807.038 is the current latitude, N is the current north/south indicator, 01131.000 is the current longitude, E is the current east/west indicator, 1 is the current position fix indicator, 08 is the current satellites used, 0.9 is the current horizontal dilution of precision, 545.4 is the current MSL altitude, M is the current units of MSL, 46.9 is the current geoidal separation, M is the current age of differential correction, and 42 is the current differential reference station ID, and 00 is the checksum.
GPS devices can use the GPGSA sentence to send the GPS location, altitude, and speed to Gaggle. The sentence is in the format:
$GPGSA,A,3,04,05,,09,12,,,24,,,,,2.5,1.3,2.1*39
$GPGSA,{modeMa},{mode1},{prn1},{prn2},{prn3},{prn4},{prn5},{prn6},{prn7},{prn8},{prn9},{prn10},{prn11},{pdop},{hdop},{vdop},{systemId}*{checksum}
Where A is the current mode MA, 3 is the current mode 1, 04 is the current PRN 1, 05 is the current PRN 2, 09 is the current PRN 3, 12 is the current PRN 4, 24 is the current PRN 5, 2.5 is the current PDOP, 1.3 is the current HDOP, 2.1 is the current VDOP, and 39 is the current system ID, and 00 is the checksum.
GPS devices can use the GPRMC sentence to send the GPS location, altitude, and speed to Gaggle. The sentence is in the format:
$GPRMC,123519,A,4807.038,N,01131.000,E,022.4,084.4,230394,003.1,W*6A
$GPRMC,{utcTime},{status},{latitude},{northSouthIndicator},{longitude},{eastWestIndicator},{speedOverGround},{trackMadeGood},{date},{magneticVariation},{eastWestIndicator},{checksum}
Where 123519 is the current UTC time, A is the current status, 4807.038 is the current latitude, N is the current north/south indicator, 01131.000 is the current longitude, E is the current east/west indicator, 022.4 is the current speed over ground, 084.4 is the current track made good, 230394 is the current date, 003.1 is the current magnetic variation, W is the current east/west indicator, and 6A is the checksum.
Custom devices can use the HFM sentence to send the fuel level to Gaggle. The sentence is in the format:
$HFM,0.50,25,20*00
$HFM,{fuelLevel:ltr},{tankTemp:C},{airTemp:C}*{checksum}
Where 0.50 is the current fuel level in ltr, 25 is the current tank temperature in degrees Celsius, 20 is the current air temperature in degrees Celsius, and 00 is the checksum.
Insight paramotor sensors can use the IBPPG sentence to send the fuel level to Gaggle. The sentence is in the format:
$IBPPG,5000,0,700,100,200,25,12.5,0,A,1,100,0,0,C,0*00
$IBPPG,{rpm:RPM},{rpmMax:RPM},{probeValue:mV},{cht:C},{tempMax:C},{airTemp:C},{battery:V},{needle:deg},{needleAdjustment:A/M/0},{cutOn:1/0},{hourMeter:hours},{hourMeterMin:minutes},{totalHourMeter:hours},{temperatureUnit:C/F},{mark:0/1}*{checksum}
Where 5000 is the current RPM, 0 is the current RPM max, 700 is the current probe value in mV, 100 is the current CHT in degrees Celsius, 200 is the current temp max in degrees Celsius, 25 is the current air temp in degrees Celsius, 12.5 is the current battery voltage in V, 0 is the current needle position in degrees, A is the current needle adjustment, 1 is the current cut on, 100 is the current hour meter in hours, 0 is the current hour meter min in minutes, 0 is the current total hour meter in hours, C is the current temperature unit, F is the current temperature unit, and 00 is the checksum.
LK8EX1 variometers use the LK8EX1 sentence to send the barometric pressure, vario, temperature, battery, and pitot differential pressure to Gaggle. The sentence is in the format:
$LK8EX1,101325,0,25,100,12.5*00
$LK8EX1,{pressure:hPa},{vario:cm/s},{temp:deg C},{battery:%},{volts:V}*{checksum}
Where 101325 is the current barometric pressure in hPa, 0 is the current vario in cm/s, 25 is the current temperature in degrees Celsius, 100 is the current battery percentage, 12.5 is the current battery voltage, and 00 is the checksum.
XCTracer variometers use the LXWP0, LXWP1, LXWP2, LXWP3, and PLXVF sentences to send the barometric pressure, vario, temperature, battery, and pitot differential pressure to Gaggle. The sentences are in the format:
$LXWP0,0,0,0,0,0,0,0,0,0,0,0,0,0,0*00
$LXWP0,{loggerStored},{speed},{pressureAltitude},{vario1},{vario2},{vario3},{vario4},{vario5},{vario6},{heading},{windDirection},{windSpeed}*{checksum}
Where 0 is the current logger stored, 0 is the current speed, 0 is the current pressure altitude, 0 is the current vario1, 0 is the current vario2, 0 is the current vario3, 0 is the current vario4, 0 is the current vario5, 0 is the current vario6, 0 is the current heading, 0 is the current wind direction, 0 is the current wind speed, and 00 is the checksum.
$LXWP1,0,0,0,0,0*00
$LXWP1,{instrumentId},{serialNumber},{softwareVersion},{hardwareVersion},{license}*{checksum}
Where 0 is the current instrument ID, 0 is the current serial number, 0 is the current software version, 0 is the current hardware version, 0 is the current license, and 00 is the checksum.
$LXWP2,0,0,0,0,0,0,0*00
$LXWP2,{macCready},{ballast},{bugs},{polarA},{polarB},{polarC},{audioVolume}*{checksum}
Where 0 is the current macCready, 0 is the current ballast, 0 is the current bugs, 0 is the current polarA, 0 is the current polarB, 0 is the current polarC, 0 is the current audio volume, and 00 is the checksum.
$LXWP3,0,0,0,0,0,0,0,0,0,0,0,0,0*00
$LXWP3,{altimeterOffset},{scMode},{varioFilter},{telFilter},{teLevel},{varioAverage},{varioRange},{scTab},{scLow},{scSpeed},{smartDiff},{gliderName},{timeOffset}*{checksum}
Where 0 is the current altimeter offset, 0 is the current SC mode, 0 is the current vario filter, 0 is the current tel filter, 0 is the current TE level, 0 is the current vario average, 0 is the current vario range, 0 is the current SC tab, 0 is the current SC low, 0 is the current SC speed, 0 is the current smart diff, 0 is the current glider name, 0 is the current time offset, and 00 is the checksum.
$PLXVF
$PLXVF,{time},{accelerometerX},{accelerometerY},{accelerometerZ},{gyroscopeX},{gyroscopeY},{gyroscopeZ},{magnetometerX},{magnetometerY},{magnetometerZ},{temperature},{pressure},{humidity},{battery},{voltage}*{checksum}
Where 0 is the current time, 0 is the current accelerometer X, 0 is the current accelerometer Y, 0 is the current accelerometer Z, 0 is the current gyroscope X, 0 is the current gyroscope Y, 0 is the current gyroscope Z, 0 is the current magnetometer X, 0 is the current magnetometer Y, 0 is the current magnetometer Z, 0 is the current temperature, 0 is the current pressure, 0 is the current humidity, 0 is the current battery, 0 is the current voltage, and 00 is the checksum.
Custom devices can use the —RPM and —CHT sentences to send the engine RPM and chamber temperature to Gaggle. The sentences are in the format:
$--RPM,S,1,1000,0,A*00
$--RPM,{source},{engineOrShaftNumber},{speed},{propellerPitch},{status}*{checksum}
Where S is the current source, 1 is the current engine or shaft number, 1000 is the current speed, 0 is the current propeller pitch, A is the current status, and 00 is the checksum.
$--CHT,25,A*00
$--CHT,{chamberTemperature},{status}*{checksum}
Where 25 is the current chamber temperature, A is the current status, and 00 is the checksum.
Custom devices can use the OV sentence to send the oxygen level to Gaggle. The sentence is in the format:
$OV,P,1013.25,E,0.0,T,273.15*00
$OV,{typeIdentifier},{value},{typeIdentifier},{value},{typeIdentifier},{value}*{checksum}
Where P is the current type identifier for pressure, 1013.25 is the current pressure value, E is the current type identifier for variometer, 0.0 is the current variometer value, T is the current type identifier for temperature, 273.15 is the current temperature value, and 00 is the checksum.
XCTracer variometers use the XCTRC sentence to send the GPS location, altitude, speed, heading, climb rate, pressure, and battery to Gaggle. The sentence is in the format:
$XCTRC,2021,1,1,0,0,0,0,0,0,0,0,0,0,0,0*00
$XCTRC,{year},{month},{day},{hour},{minute},{second},{centisecond},{latitude},{longitude},{altitude},{speed},{heading},{climbRate},{pressure},{battery}*{checksum}
Where 2021 is the current year, 1 is the current month, 1 is the current day, 0 is the current hour, 0 is the current minute, 0 is the current second, 0 is the current centisecond, 0 is the current latitude, 0 is the current longitude, 0 is the current altitude, 0 is the current speed, 0 is the current heading, 0 is the current climb rate, 0 is the current pressure, 0 is the current battery, and 00 is the checksum.
>
Profile Page > Equipment > Tap a paramotor engine
You can see all of your paramotor engines from the All Equipment page. With Gaggle you can store all of your motors to easily choose which one you will be flying with when you start a new recording.
To add more motors to Gaggle you can simply tap the ”+ Add” button which will give you a dialog to capture some basic information about the motor.
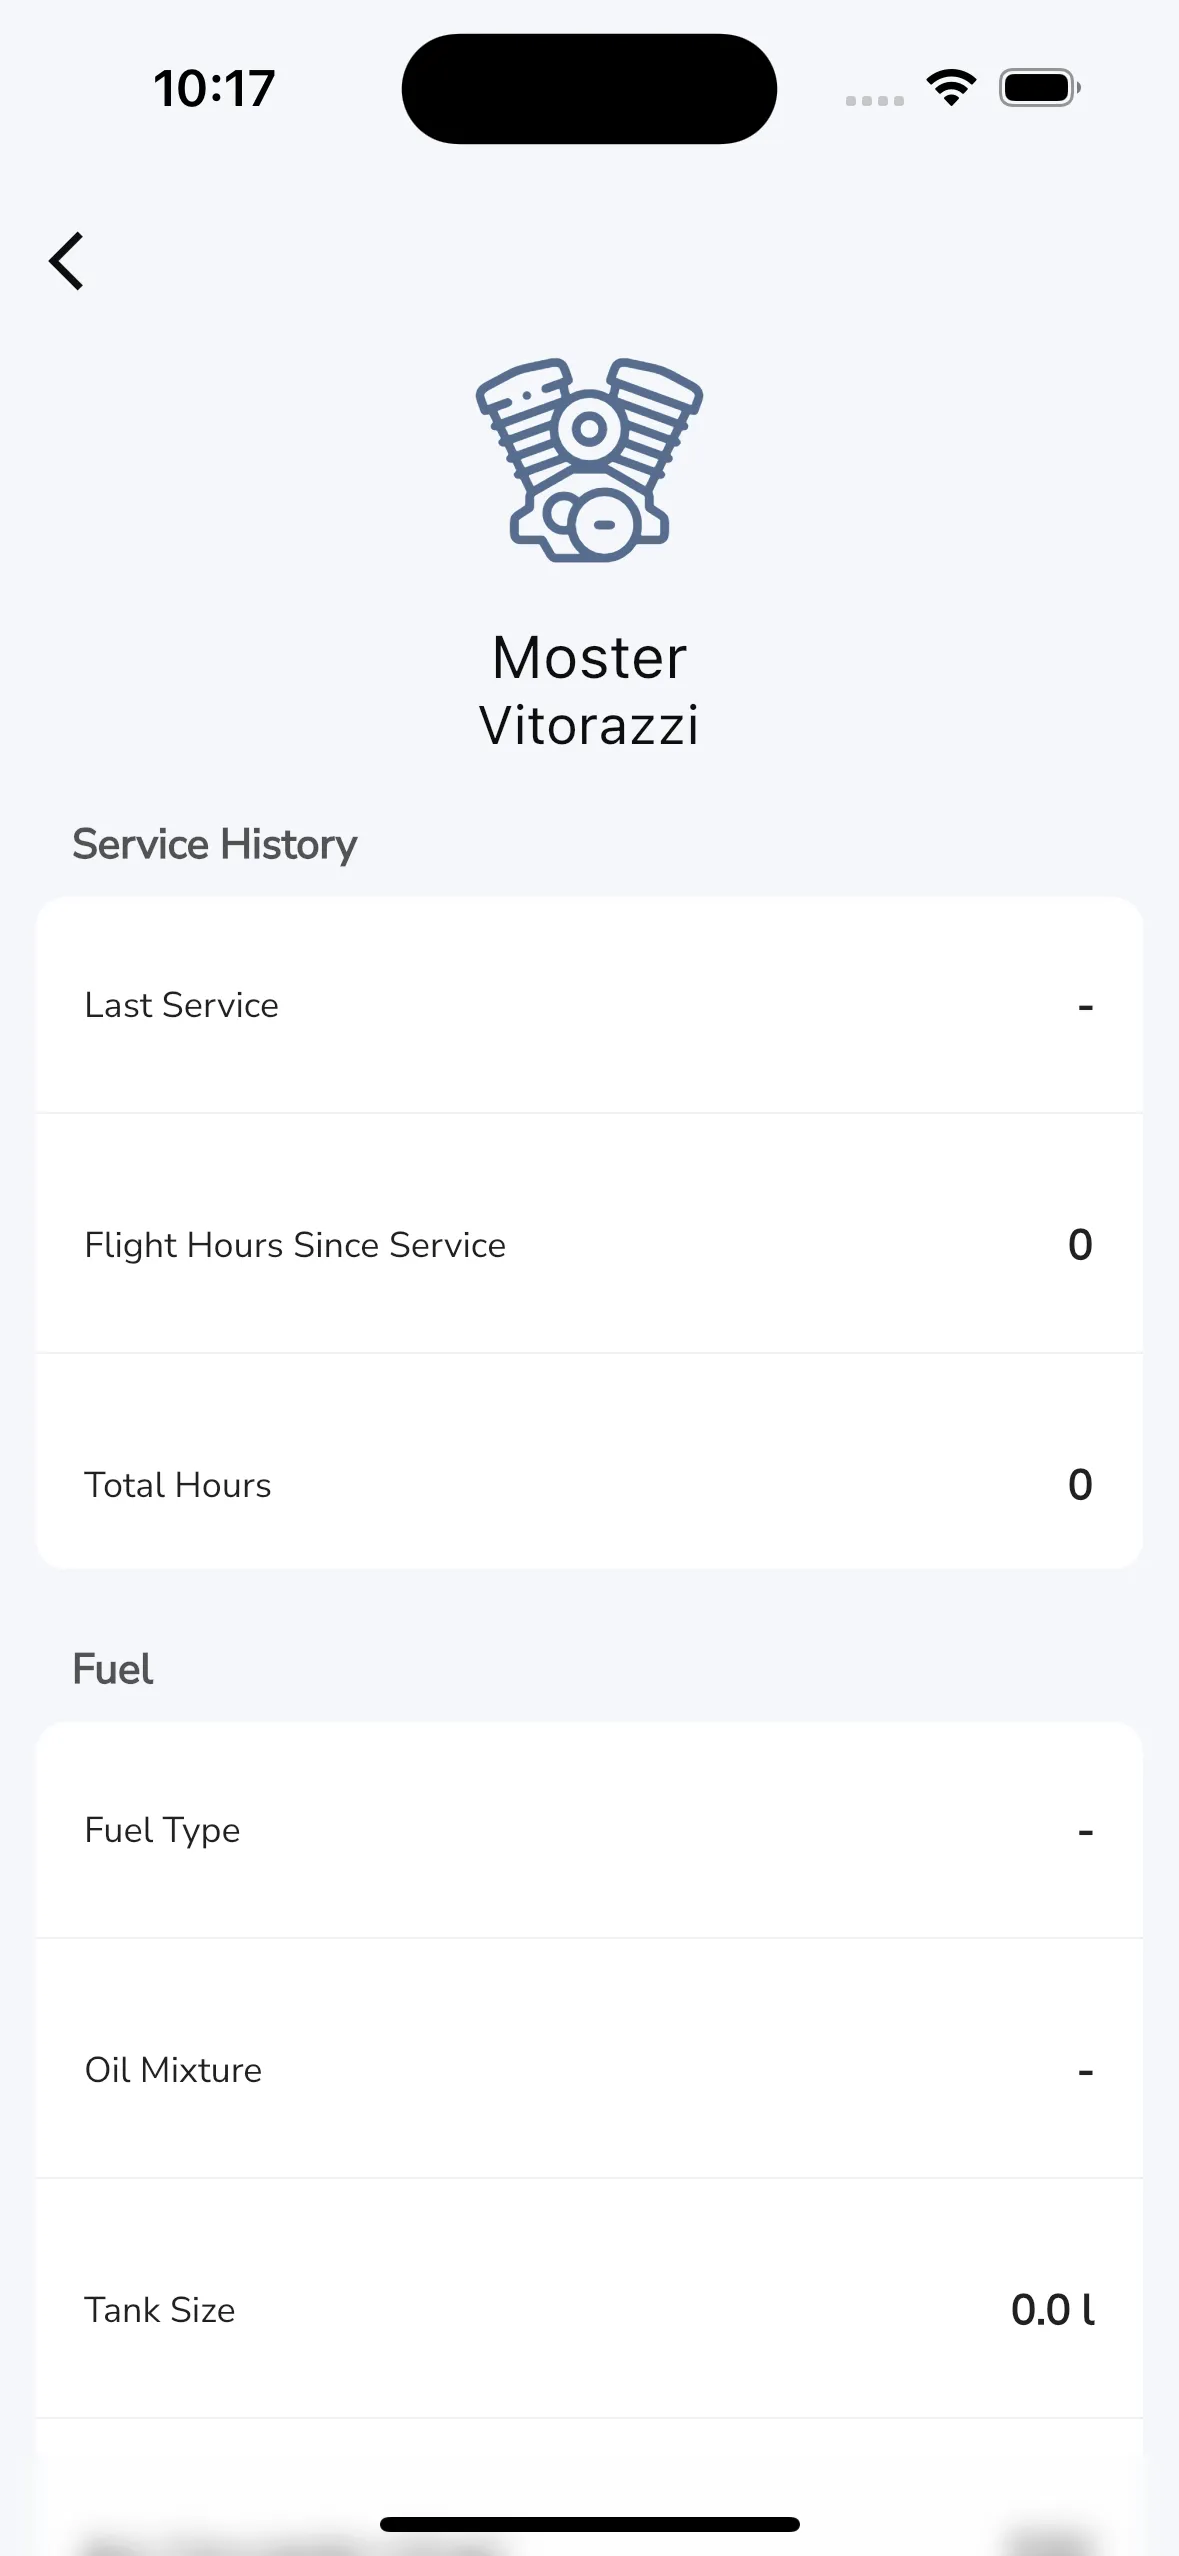
By tapping on a paramotor engine from the equipment list you can access the information page for the engine. The page has a couple of sections that provides useful information for you
Gaggle can help you keep track of the service history for your different equipment. In the service history section you can set the last data that your engine went for a service.
If you use Gaggle to record your flights then your hours are automatically updated for you so you will always know exactly how many hours have been flown on your engine since your last service. You can also update these values manually by tapping on the field you want to edit.
Gaggle provides you with some fields to capture the fuel information for your engine. The Fuel Type and Oil Mixture fields are there for your reference only, and it isn’t used by Gaggle. By setting values for the Tank Size and Average Consumption fields, Gaggle can calculate your fuel usage while flying, so we can display you the estimated fuel remaining. For more information on this widget have a look at our flight instruments.
In the notes section you can capture any notes that you want to keep for this wing.
>
Profile Page > Equipment > Tap a Paragliding wing
You can see all of your paragliding and hang gliding wings from the Equipment page. With Gaggle, you can store all of your wings to easily choose which one you are busy flying with when you start a new recording.
Flying with one wing for paragliding and a different one for paramotor? That not a problem either, Gaggle will remember which wing you last flew with for each type of flight making it easy to record your flight next time without having to remember to change the wings when yous start the recording.
To add more wings to Gaggle you can simply tap the ”+ Add” button which will give you a dialog to capture some basic information about the wing.
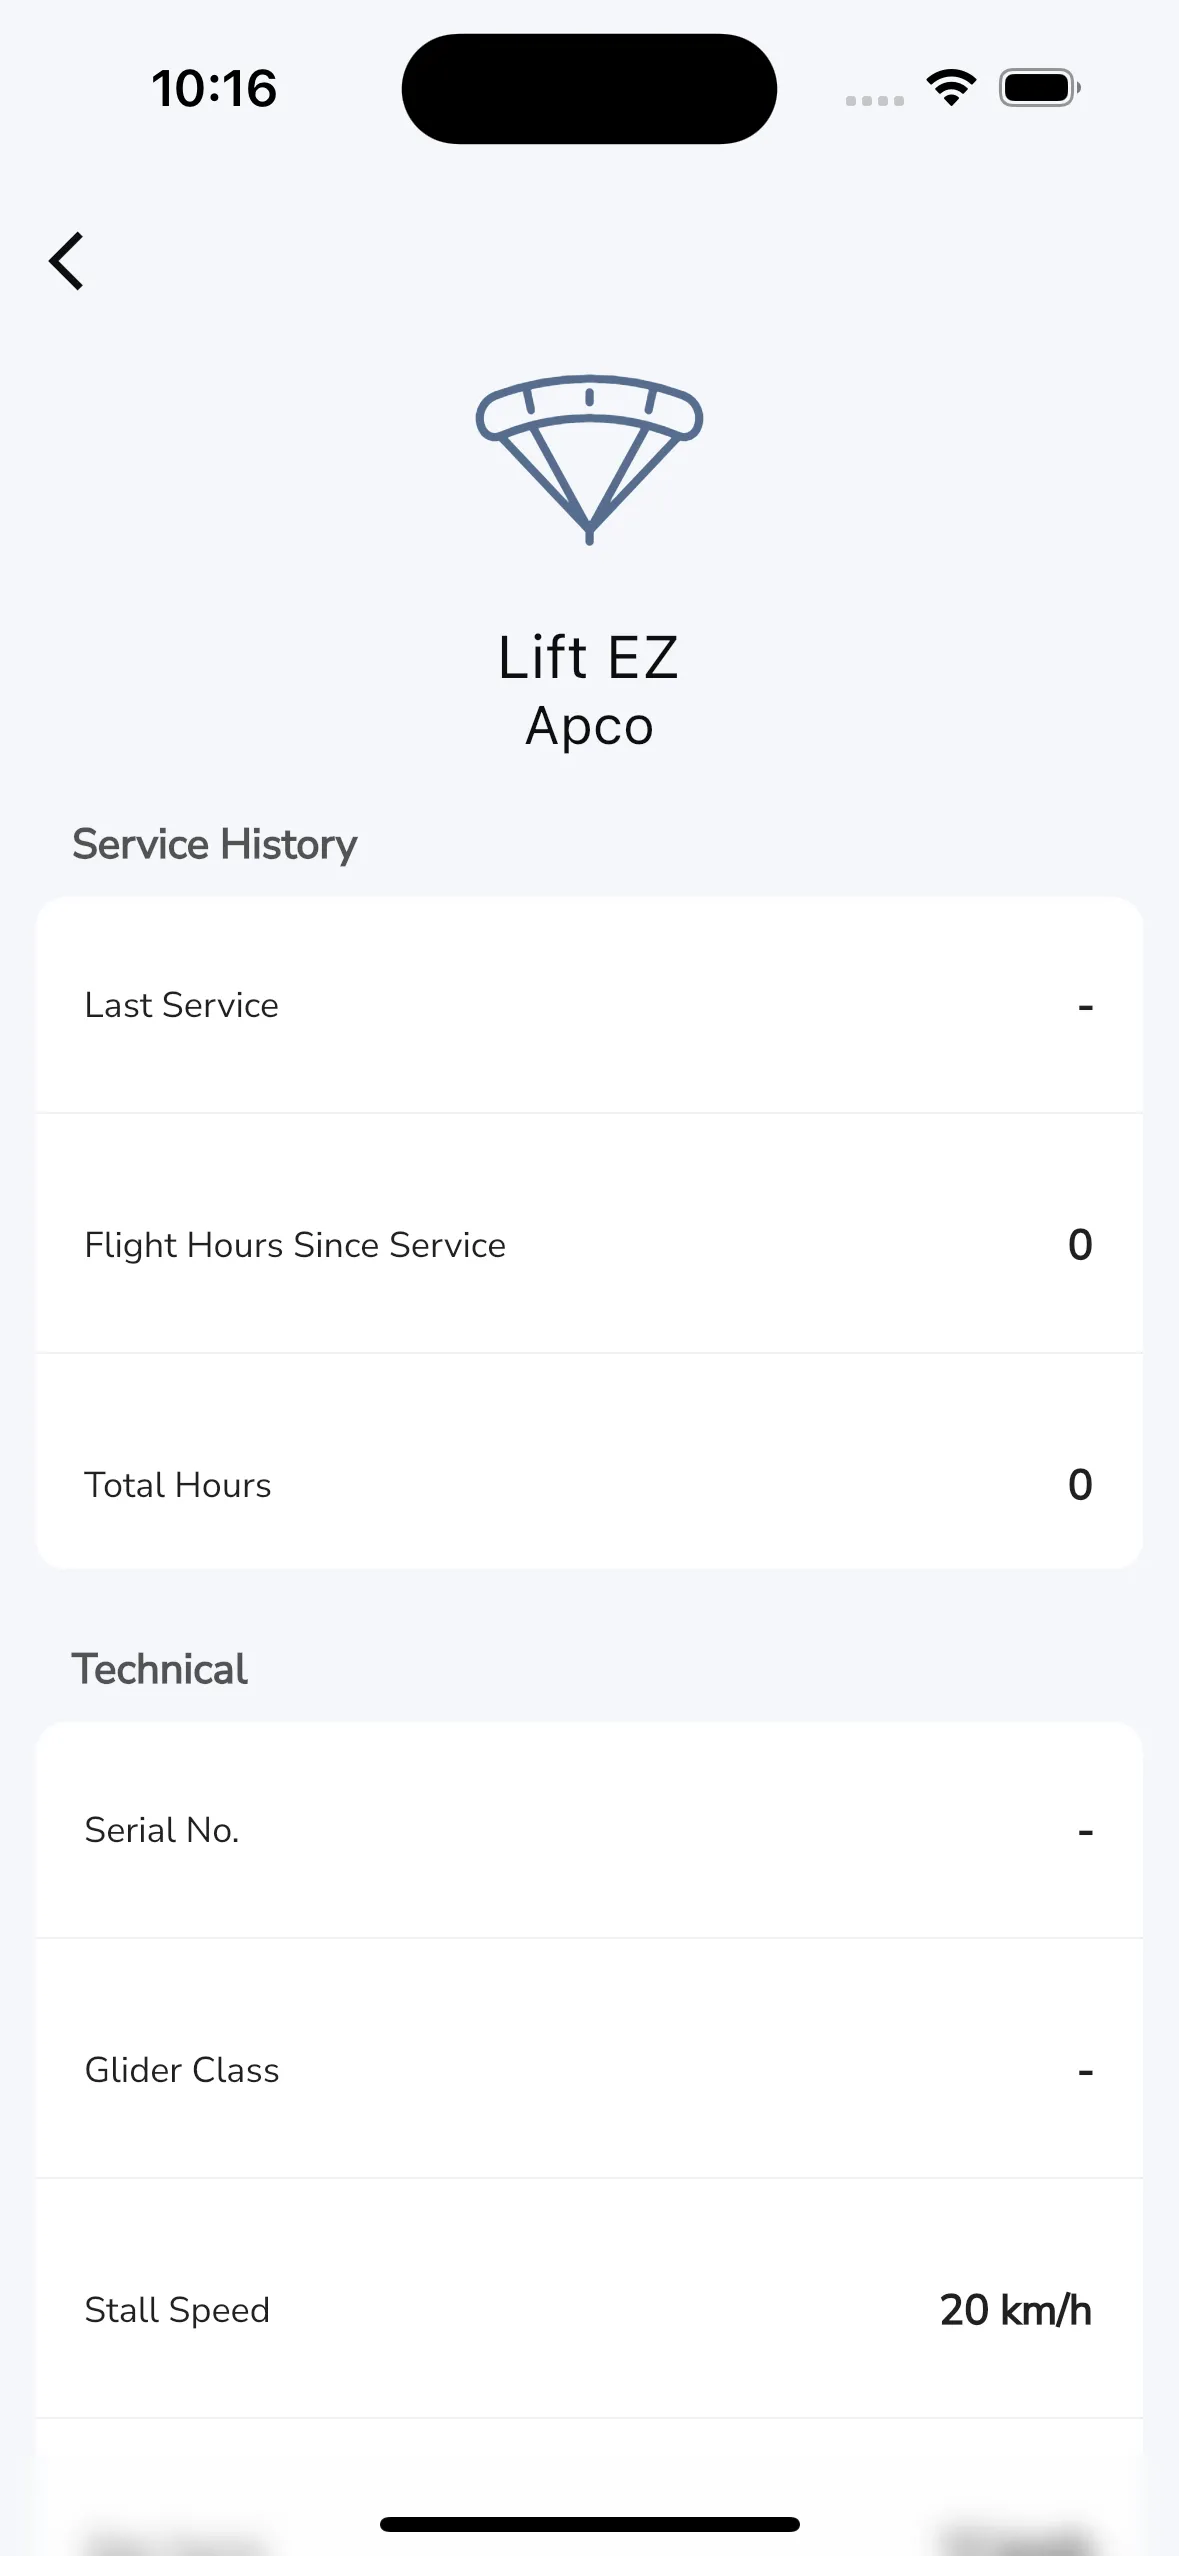
Gaggle can help you keep track of the service history for your different equipment. In the service history section you can set the last data that your wing went for a service.
If you use Gaggle to record your flights then your hours are automatically updated for you so you will always know exactly how many hours have been flown on your wing since your last service. You can also update these values manually by tapping on the field you want to edit.
Gaggle provides some fields for you to keep track of your technical information for your wing. These fields are just for your reference, and it does not serve any other purpose within Gaggle. Fields like Glide Ratio, Airspeed are all calculated in flight using current conditions.
If you have mutliple paragliding wings and they each have different fuel consumption rates then you can set the fuel consumption adjustment for each wing. This adjustment is used to calculate the fuel consumption for your flight and the value you enter here is added to the fuel consumption for your paramotor engine. So negative values will reduce the fuel consumption and positive values will increase the fuel consumption.
Tip: If your fuel consumption in Gaggle is much higher than you expect then you probably have fuel consumption adjustment set on both your motor and wing. To fix this set the consumption adjustment on your wing to 0.
From the colors section you can set the colors of your wing. Setting your wing colors not only helps for your reference but Gaggle can also use the colors to personalise your profile for other users.
When your wing colors are set then:
In the notes section you can capture any notes that you want to keep for this wing.
>
Profile Page > Equipment
Gaggle allows you to create and manage all the equipment you use for flying. You can access your equipment by navigating to the Profile tab and selecting the Equipment option.
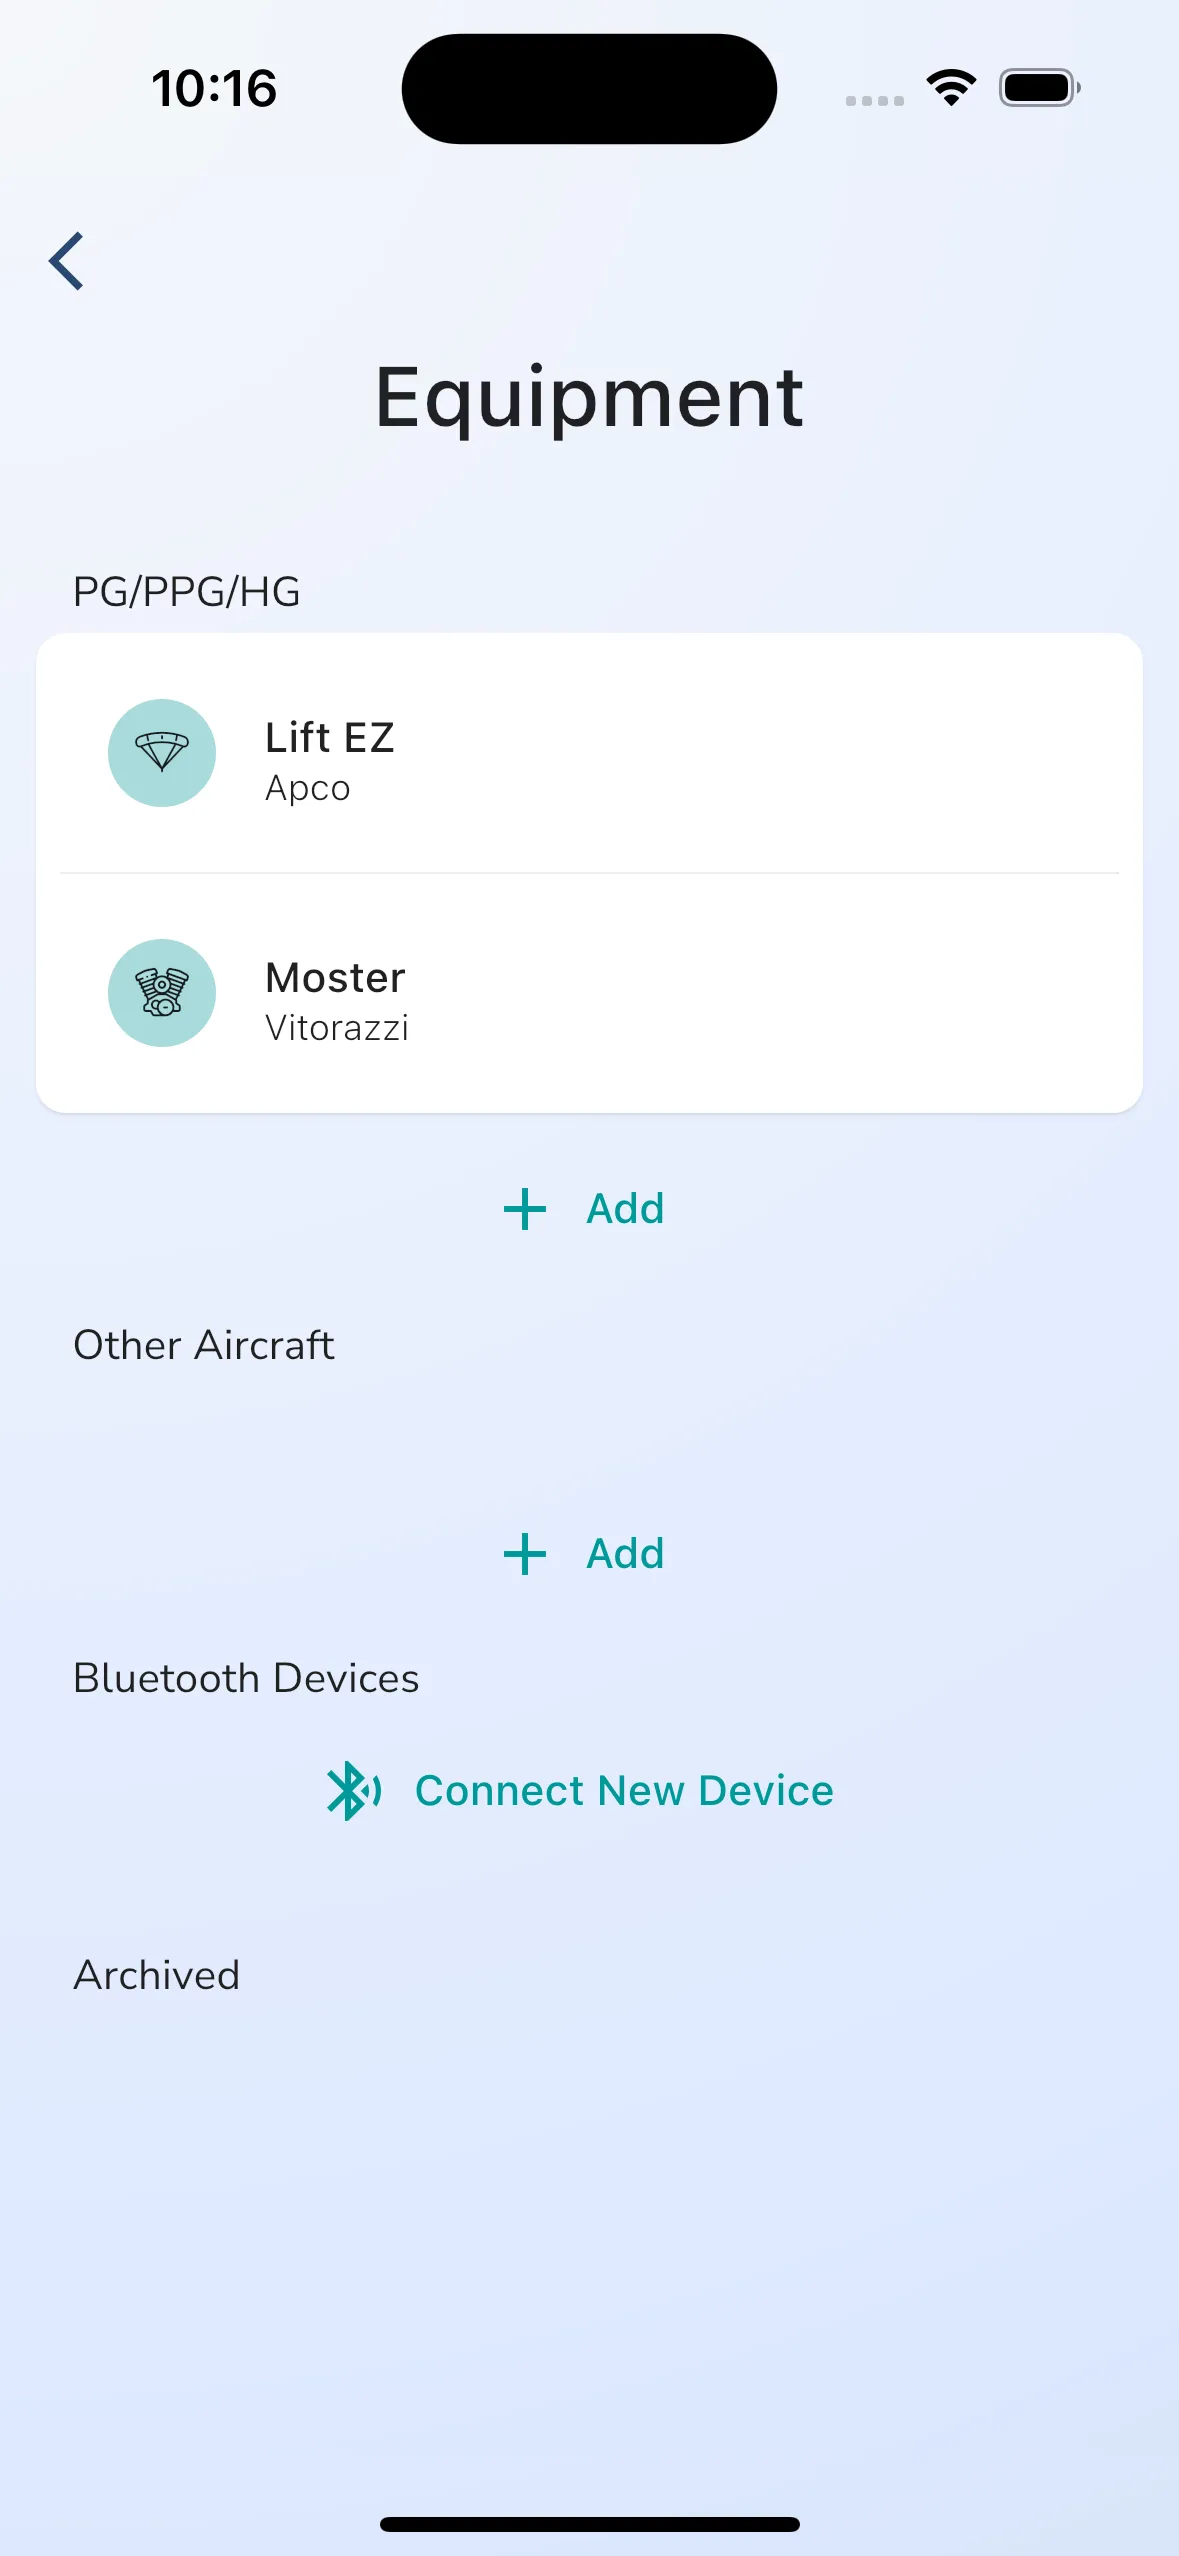
The equipment overview page is divided into 4 sections:
To add a new piece of equipment you can tap on the + button under the respective list. This will open up a form where you can enter the details of the equipment you want to add. You can also tap on any of the equipment in the list to view and edit it.
To connect new Bluetooth devices tap the “Connect New Device” button.
>
Explore Page
The explore tab is where you can find flying sites, routes, points of interest, and airspaces. You will also see a map of all sites and routes near your location. A global search is available to quickly search for any explore item. From the explore tab you can also navigate to:
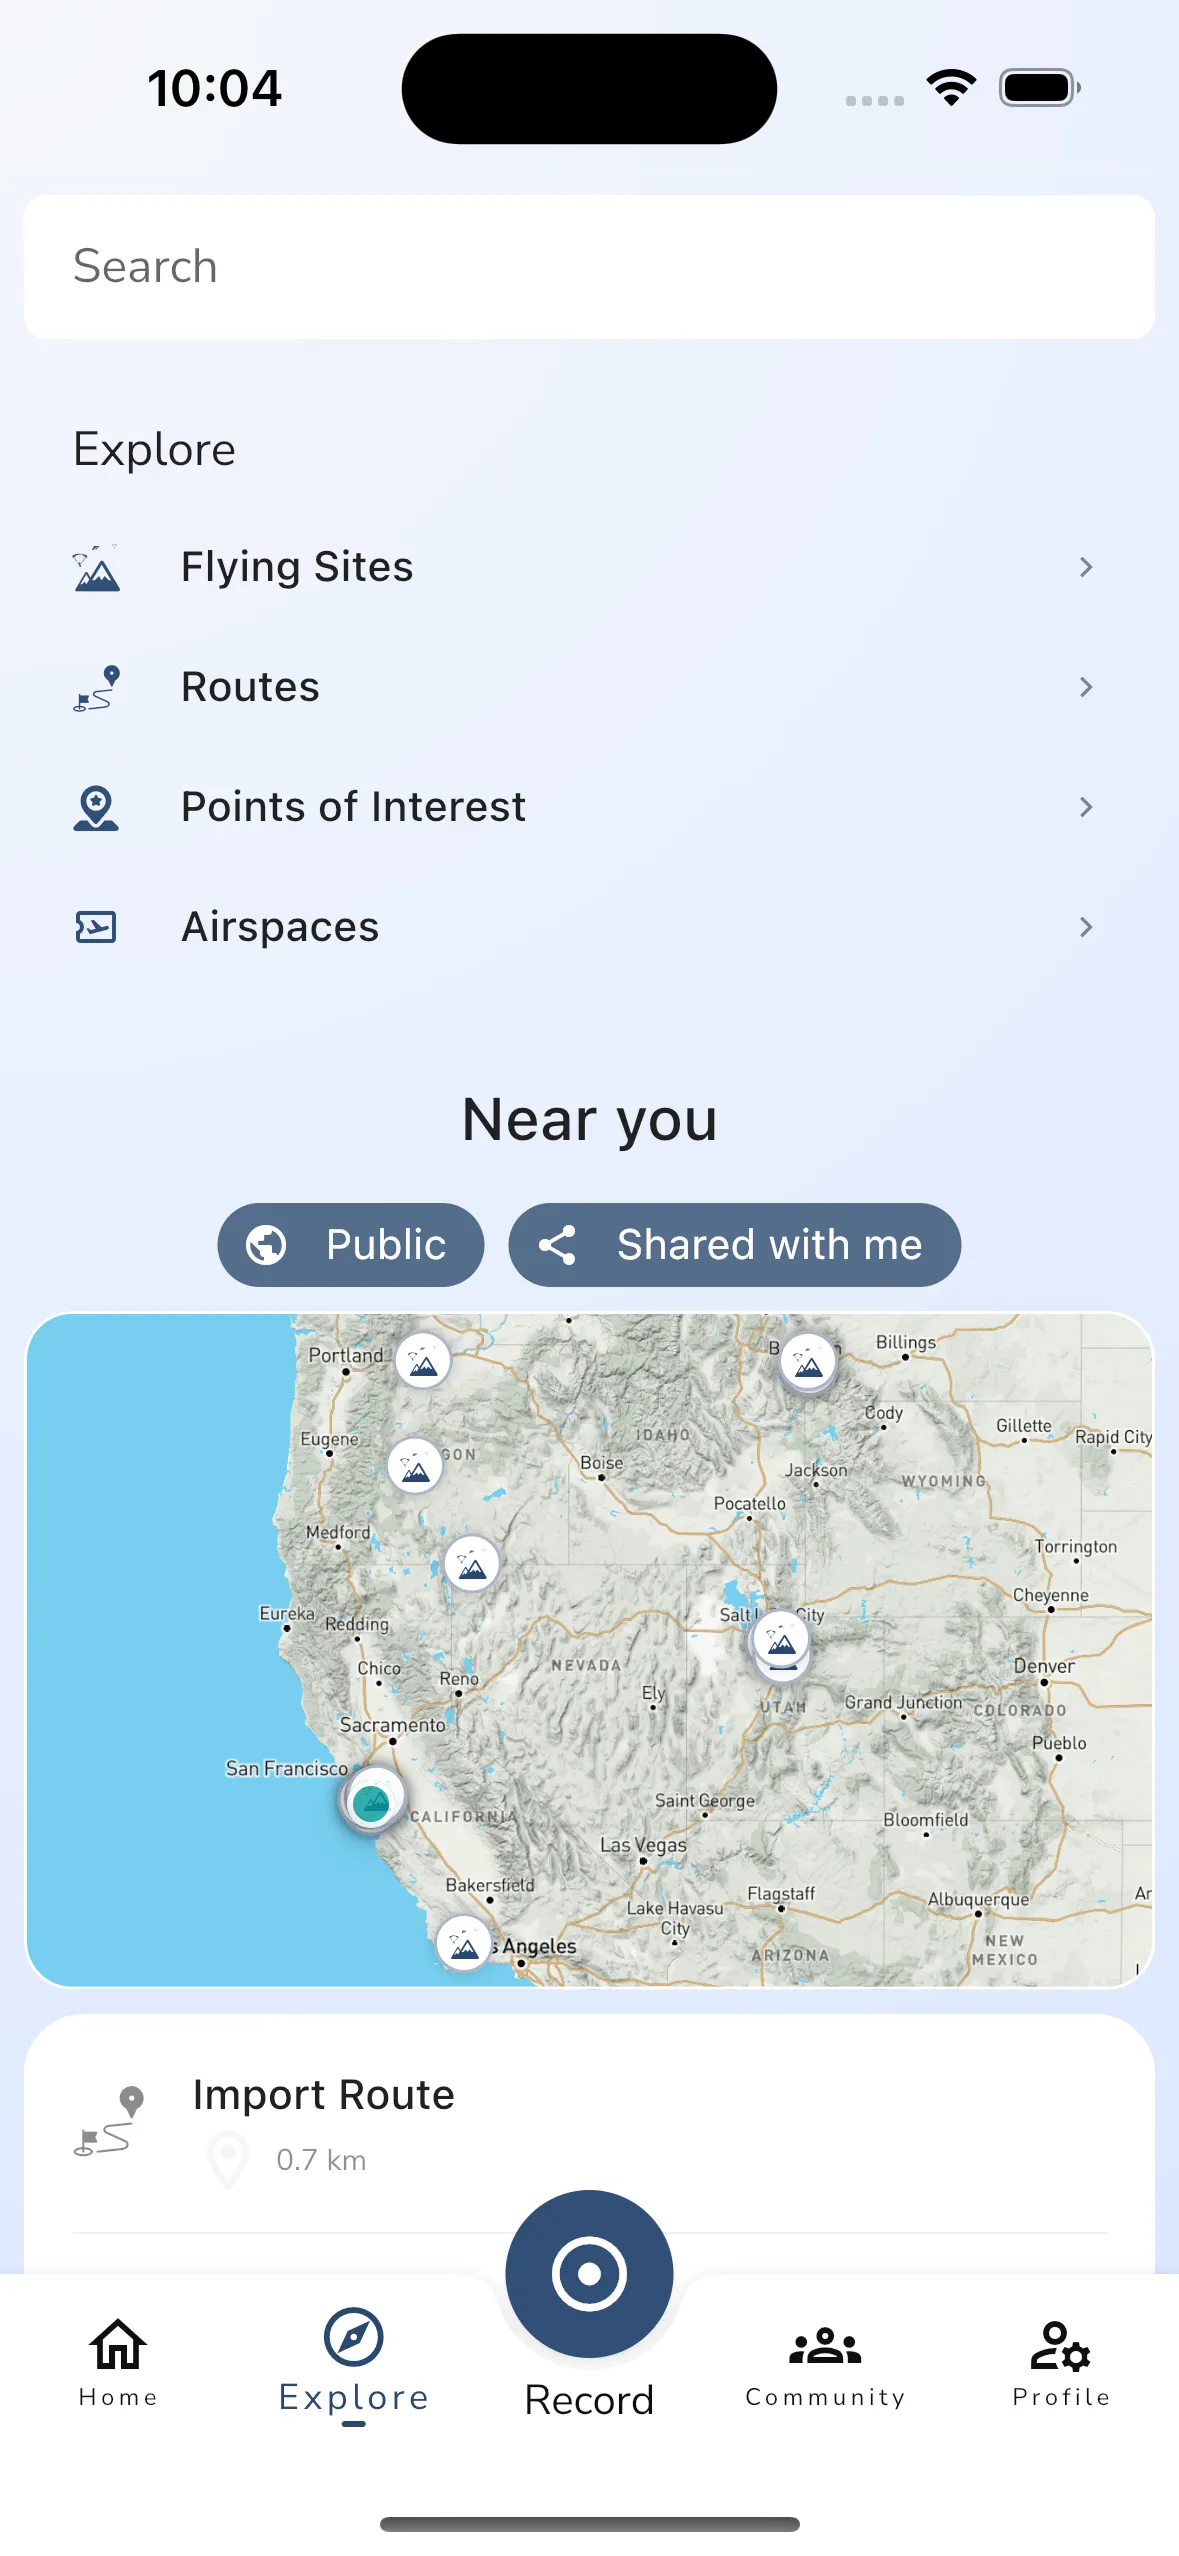
The map shows all the flying sites, routes, and points of interest near your location. You can tap on any of the items on the map to open up the details page for that item.
To see more items or to explore the map you can tap the map to open up the map viewer. The map viewer will show you all the items in the area you are currently viewing. You can tap on any of the items on the map to open up the details page for that item. In the explore viewer you can tap the icons beneath the search bar to show/hide items like flying sites, airspaces, and more.
You can filter the items you see in the Explore section of Gaggle by tapping:
>
Profile Page > All Flights
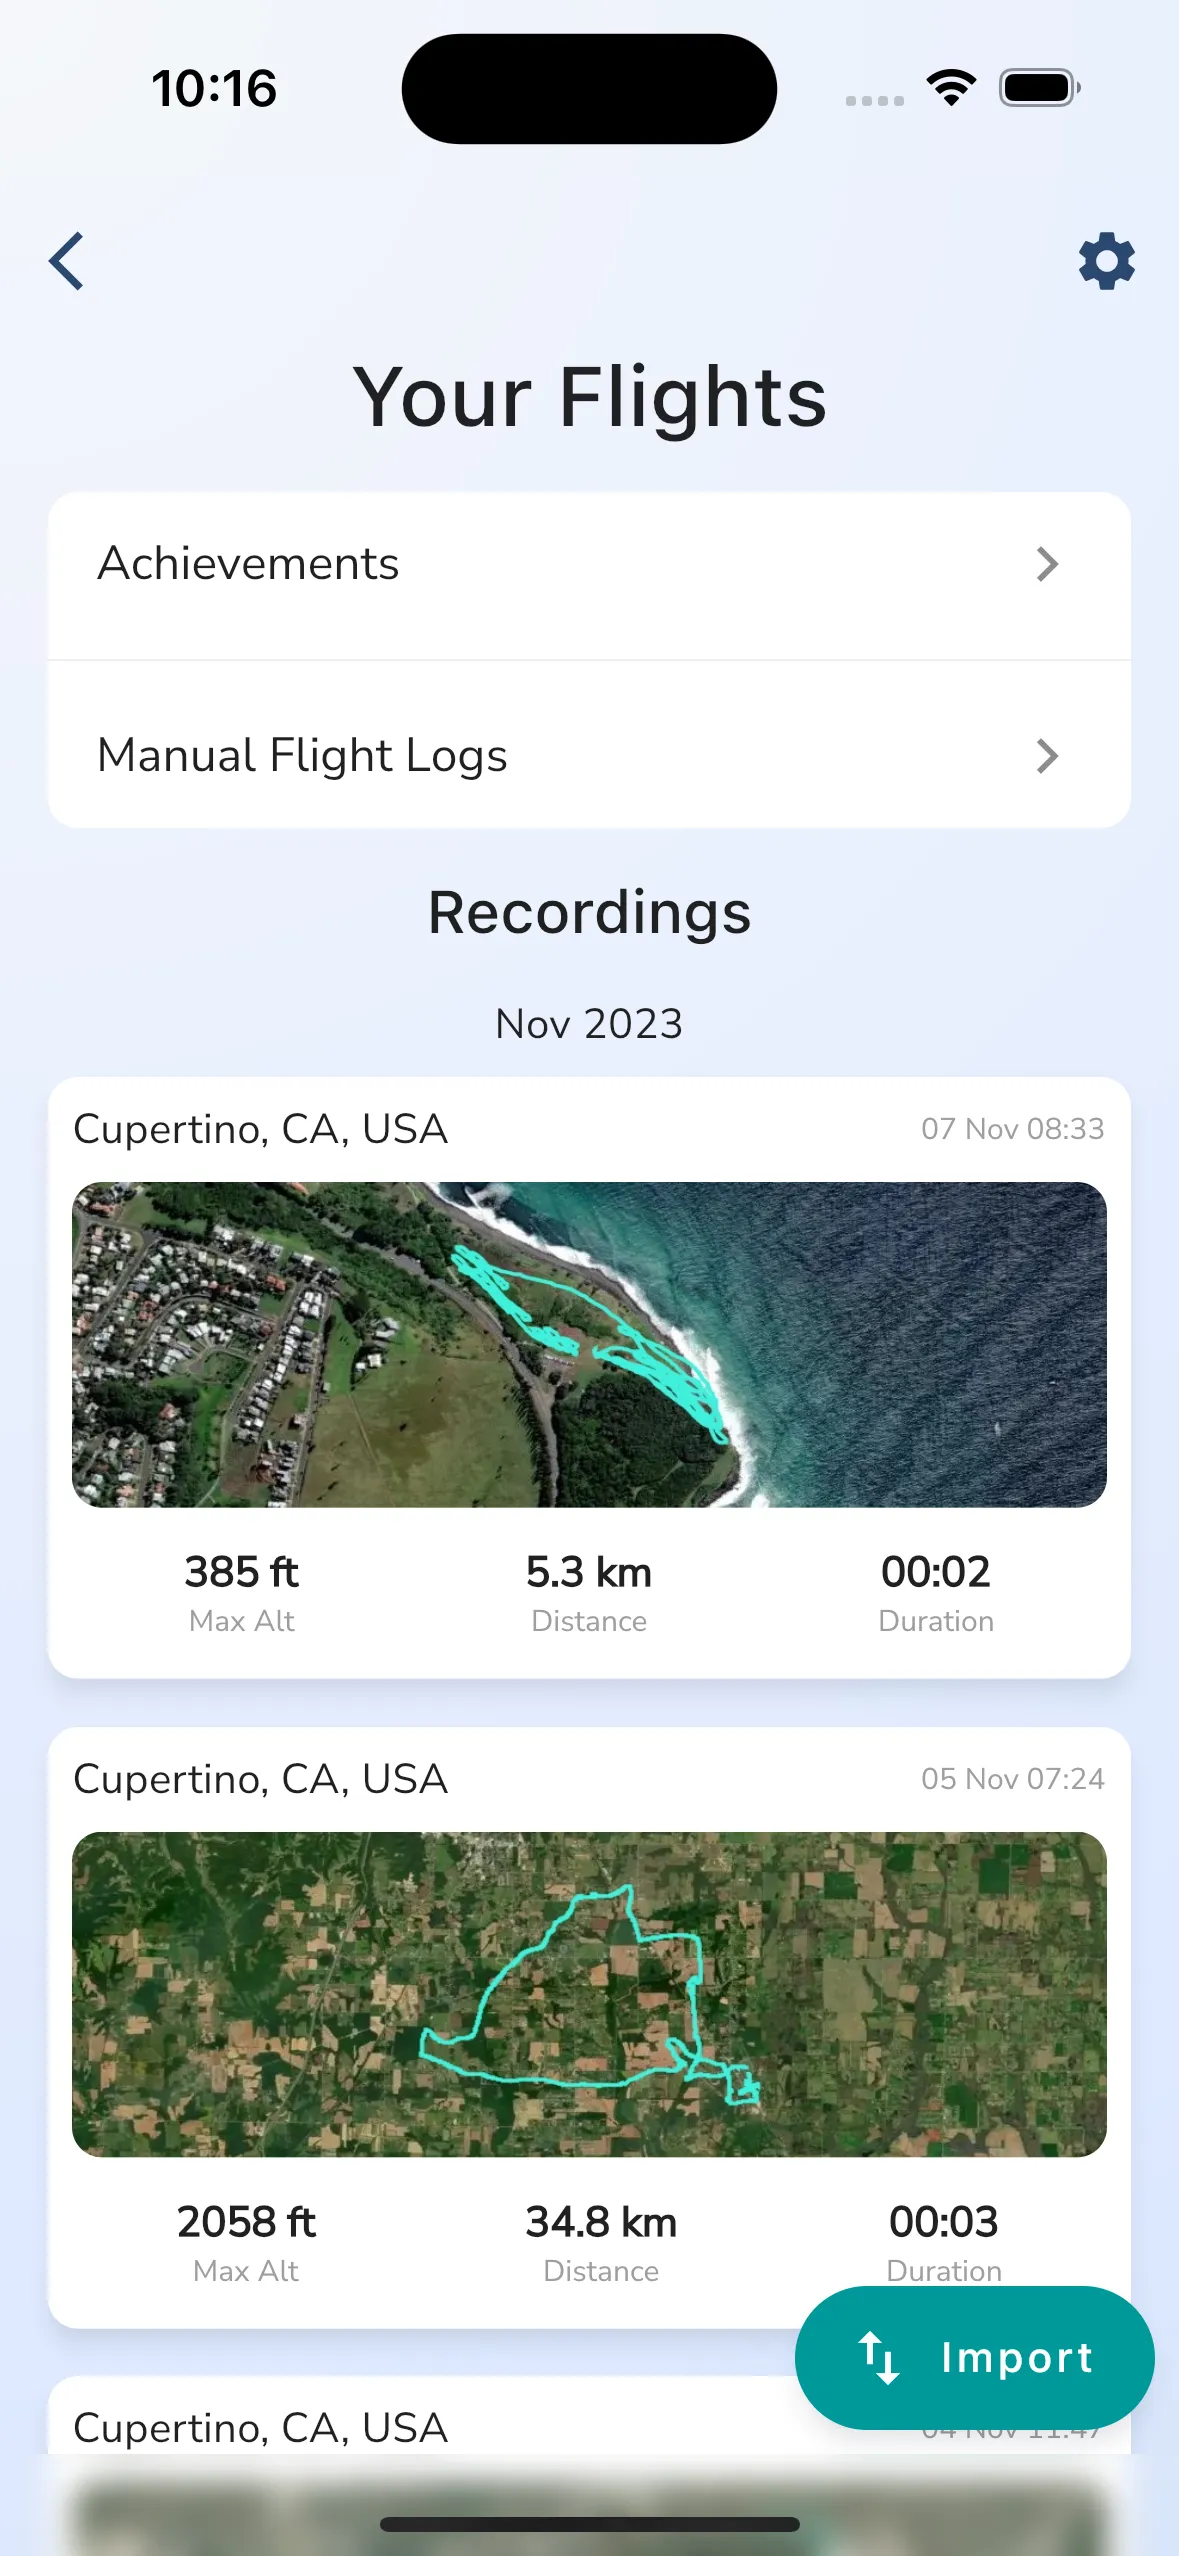
As your record your flights with Gaggle every flight recording will be added to your electronic flight log. You can access your flight logs from the “All Flights” button on your profile page. You can quickly view a picture of the flight track, when the flight occurred, and some basic stats about the flight. To view a flight recording simply tap the recording to see the details.
To record your flights with Gaggle you simply need to use the built-in flight recorder.
Recording flights is not the only way to record flights into your logbook. You can also capture flights manually by tapping the “Manual Flight Logs” option. For manual flights you can capture the following details:
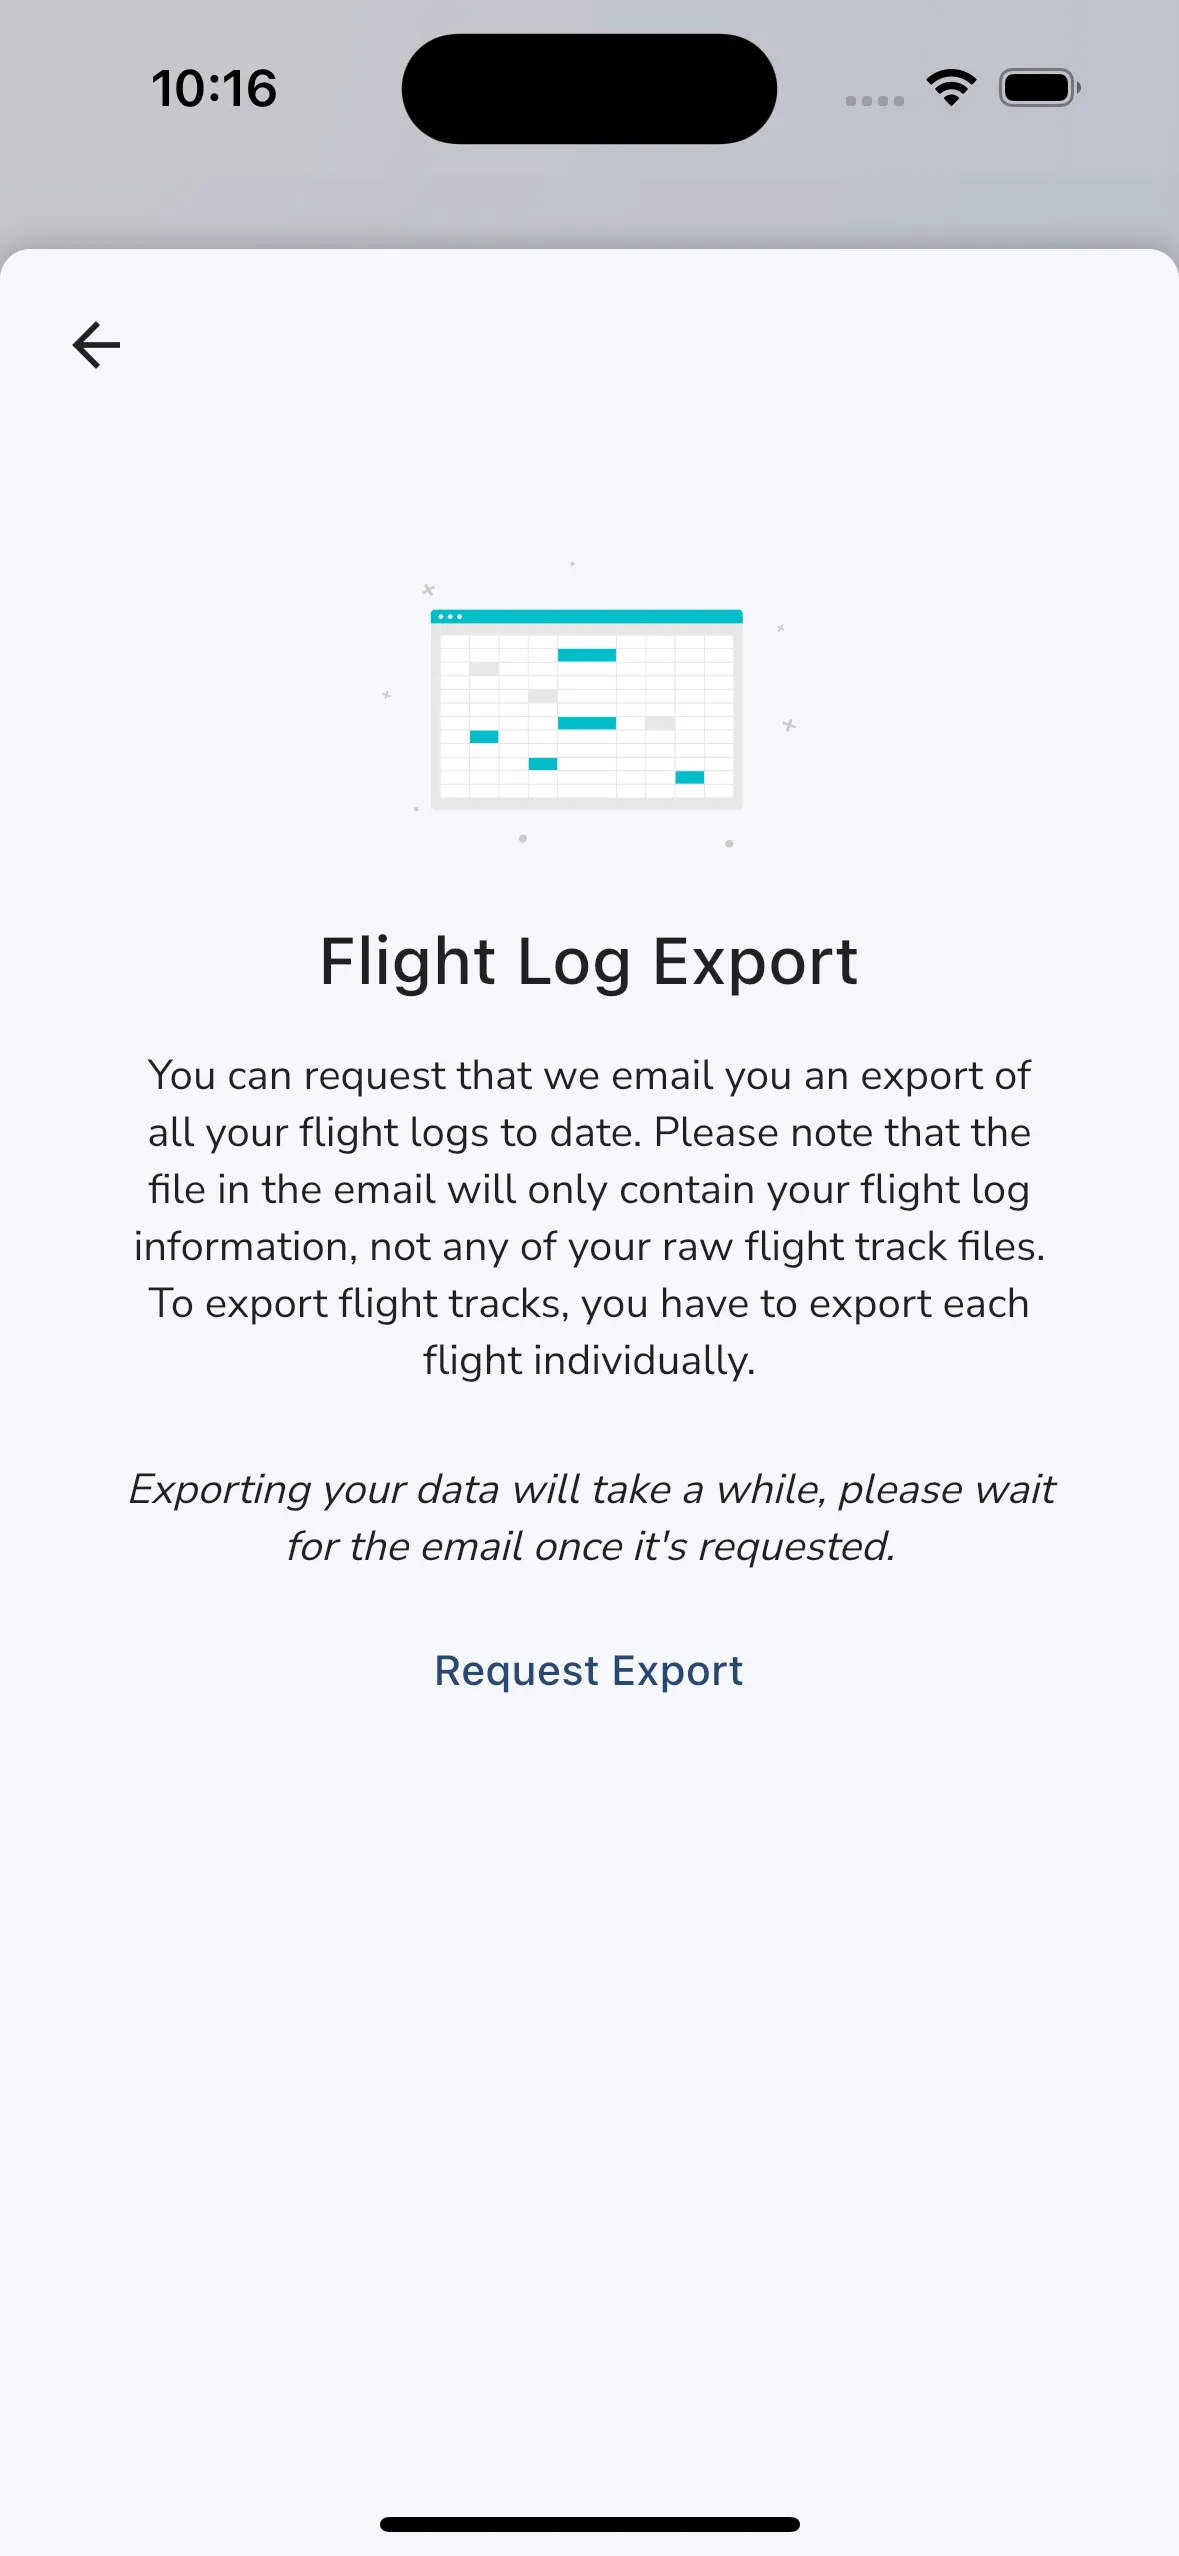
You can quickly export your entire flight log book to Excel by tapping the settings cog and then choosing the Flight Log Export option. Flight log exporting happens in the background and the results will be emailed to the email address registered on your account as an Excel attachment.
The attached Excel will contain the following fields for every flight:
You can easily import your flights from other apps like PPGpS, FlySkyHy, PPGFlyer, Paragliding Logbook, and more by tapping the “Import” button. To import a flight select the GPX or IGC file that you exported from the other application. Gaggle will then import the flight data and treat it as if was a normal Gaggle flight recording meaning you can see the flight path, data analysis, and use the 3D replay function as well for the flight.
Note: The quality of the data imported into Gaggle is dependent on the export of the other application. Some applications don’t export speed, altitude, and other telemetry information. Where possible Gaggle will do its best to figure it out from the GPS points, like speed for instance, but this also means it is inferred, and it may not be 100% accurate.
>
Profile Page > All Flights > Tap on a flight recording
Tapping a flight recording in your flight log will open up the detail view for the flight recording. You will see a map of the flight path that you can move around and zoom in and out of. Under the map you will see some details about the flight.
The detail view screen is broken into tabs for your flights:
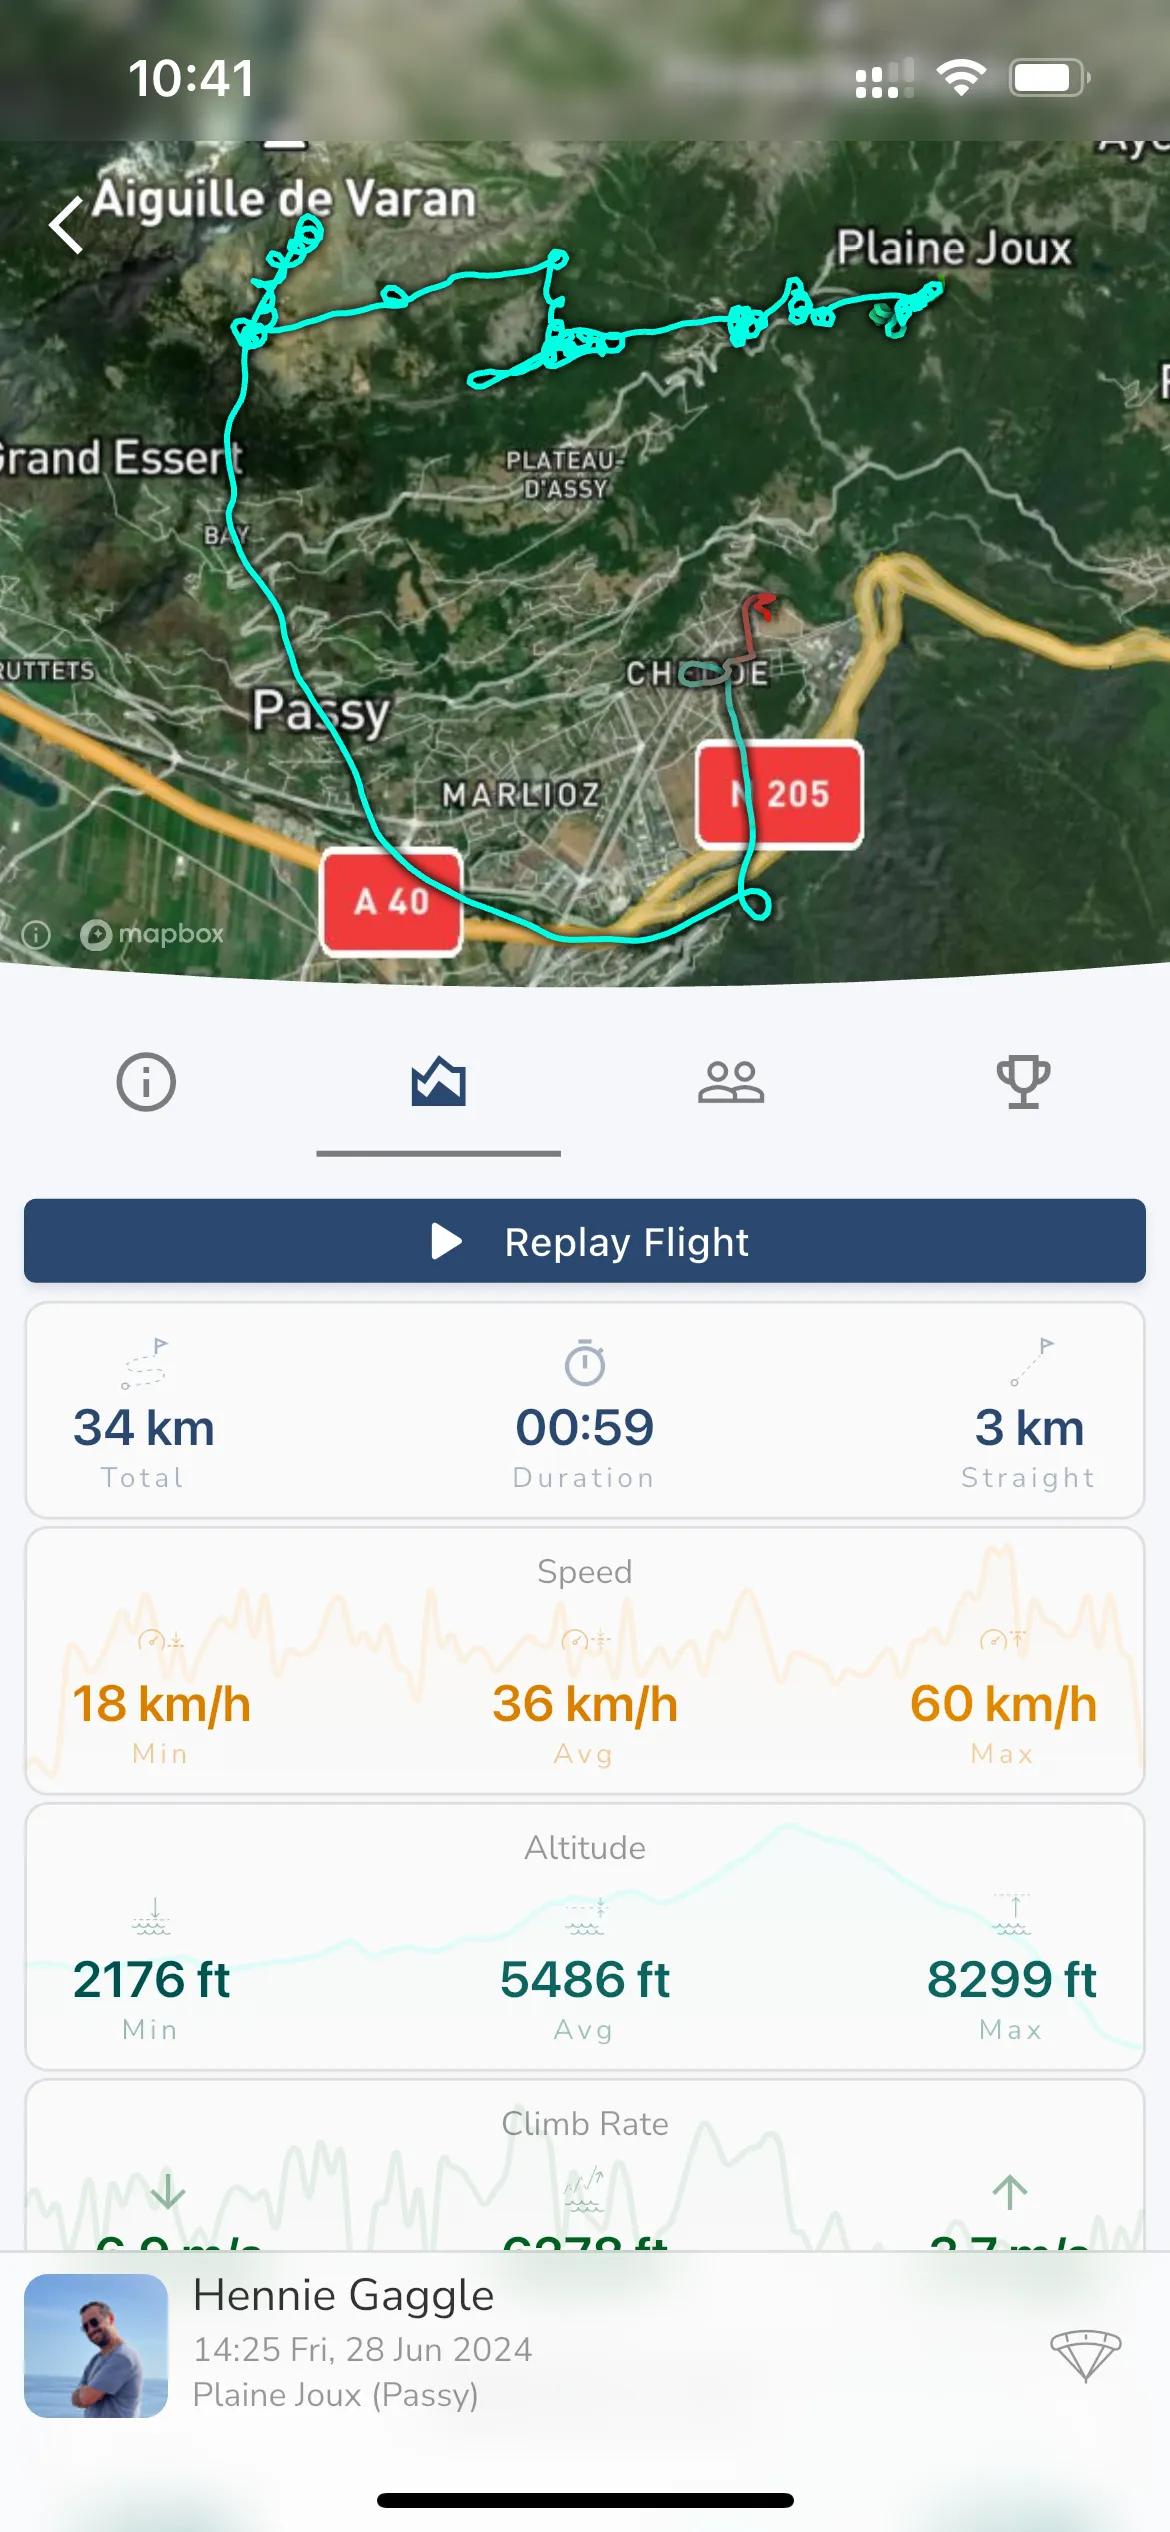
The flight analysis tab shows you details about your flights. The following details is shown (when available) for every flight:
Time and Distance - The total track length of the flight from start to end, the duration of the flight, and the distance from takeoff to landing.
Speed - The minimum, maximum, and average speed of the flight.
Altitude - The minimum, maximum, and average altitude of the flight.
Climb Rate - The max sink, max climb, and total altitude gained.
Height Above Ground - The maximum, and average height above ground.
G-Force - The maximum G-Force experienced during the flight.
For each of the graph items you can tap and hold on the graph to see the exact value for that point on the graph. This will also change the track on the map view to show you where you were at that point in the flight. The track will also change color to match the color of the graph item you are viewing, with darker colors being higher values and lighter colors being lower values.
From here you can also replay your flight using the Replay Flight button. This opens up the replay viewer that gives a full screen view of your flight in 2D or 3D. To replay flights recorded in other apps, simply import your IGC file into Gaggle and then replay the flight in full 3D.
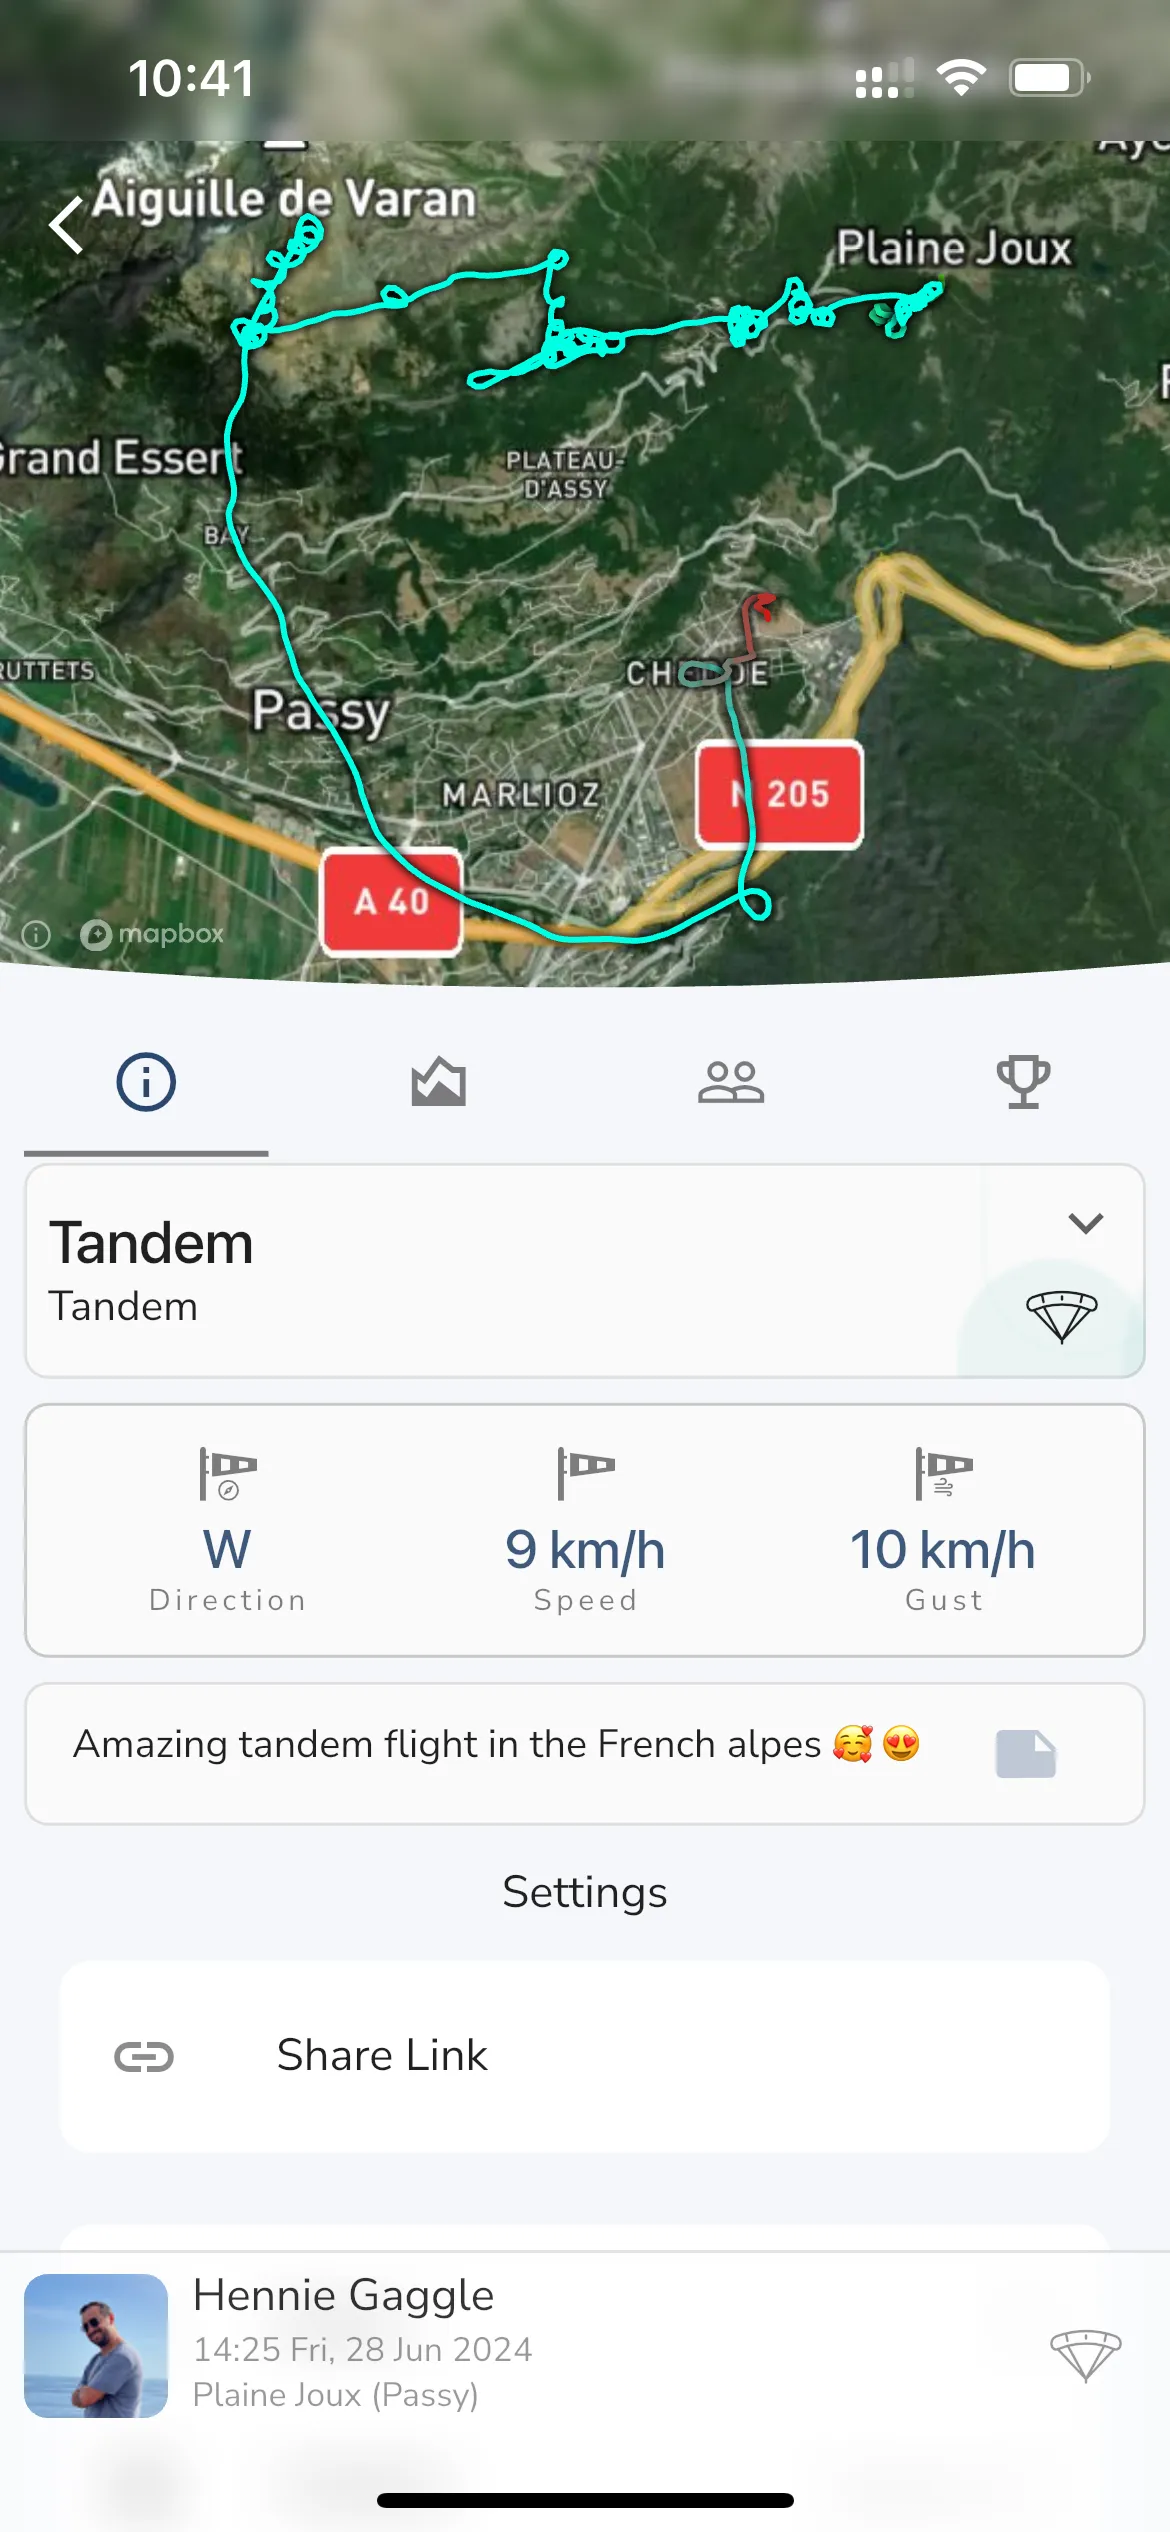
The general flight info tab shows you the following details about your flight:
Wing - The wing you flew with. You can tap this to change the wing if you flew with a different wing.
Motor - The motor you flew with. You can tap this to change the motor if you flew with a different motor.
Fuel - The final fuel level of your motor, fuel consumption per hour, and fuel used. You can tap this to change the fuel level if you know what it was.
Wind - The wind direction and speed at takeoff.
Notes - Any notes you want to add for the flight.
Other options available are:
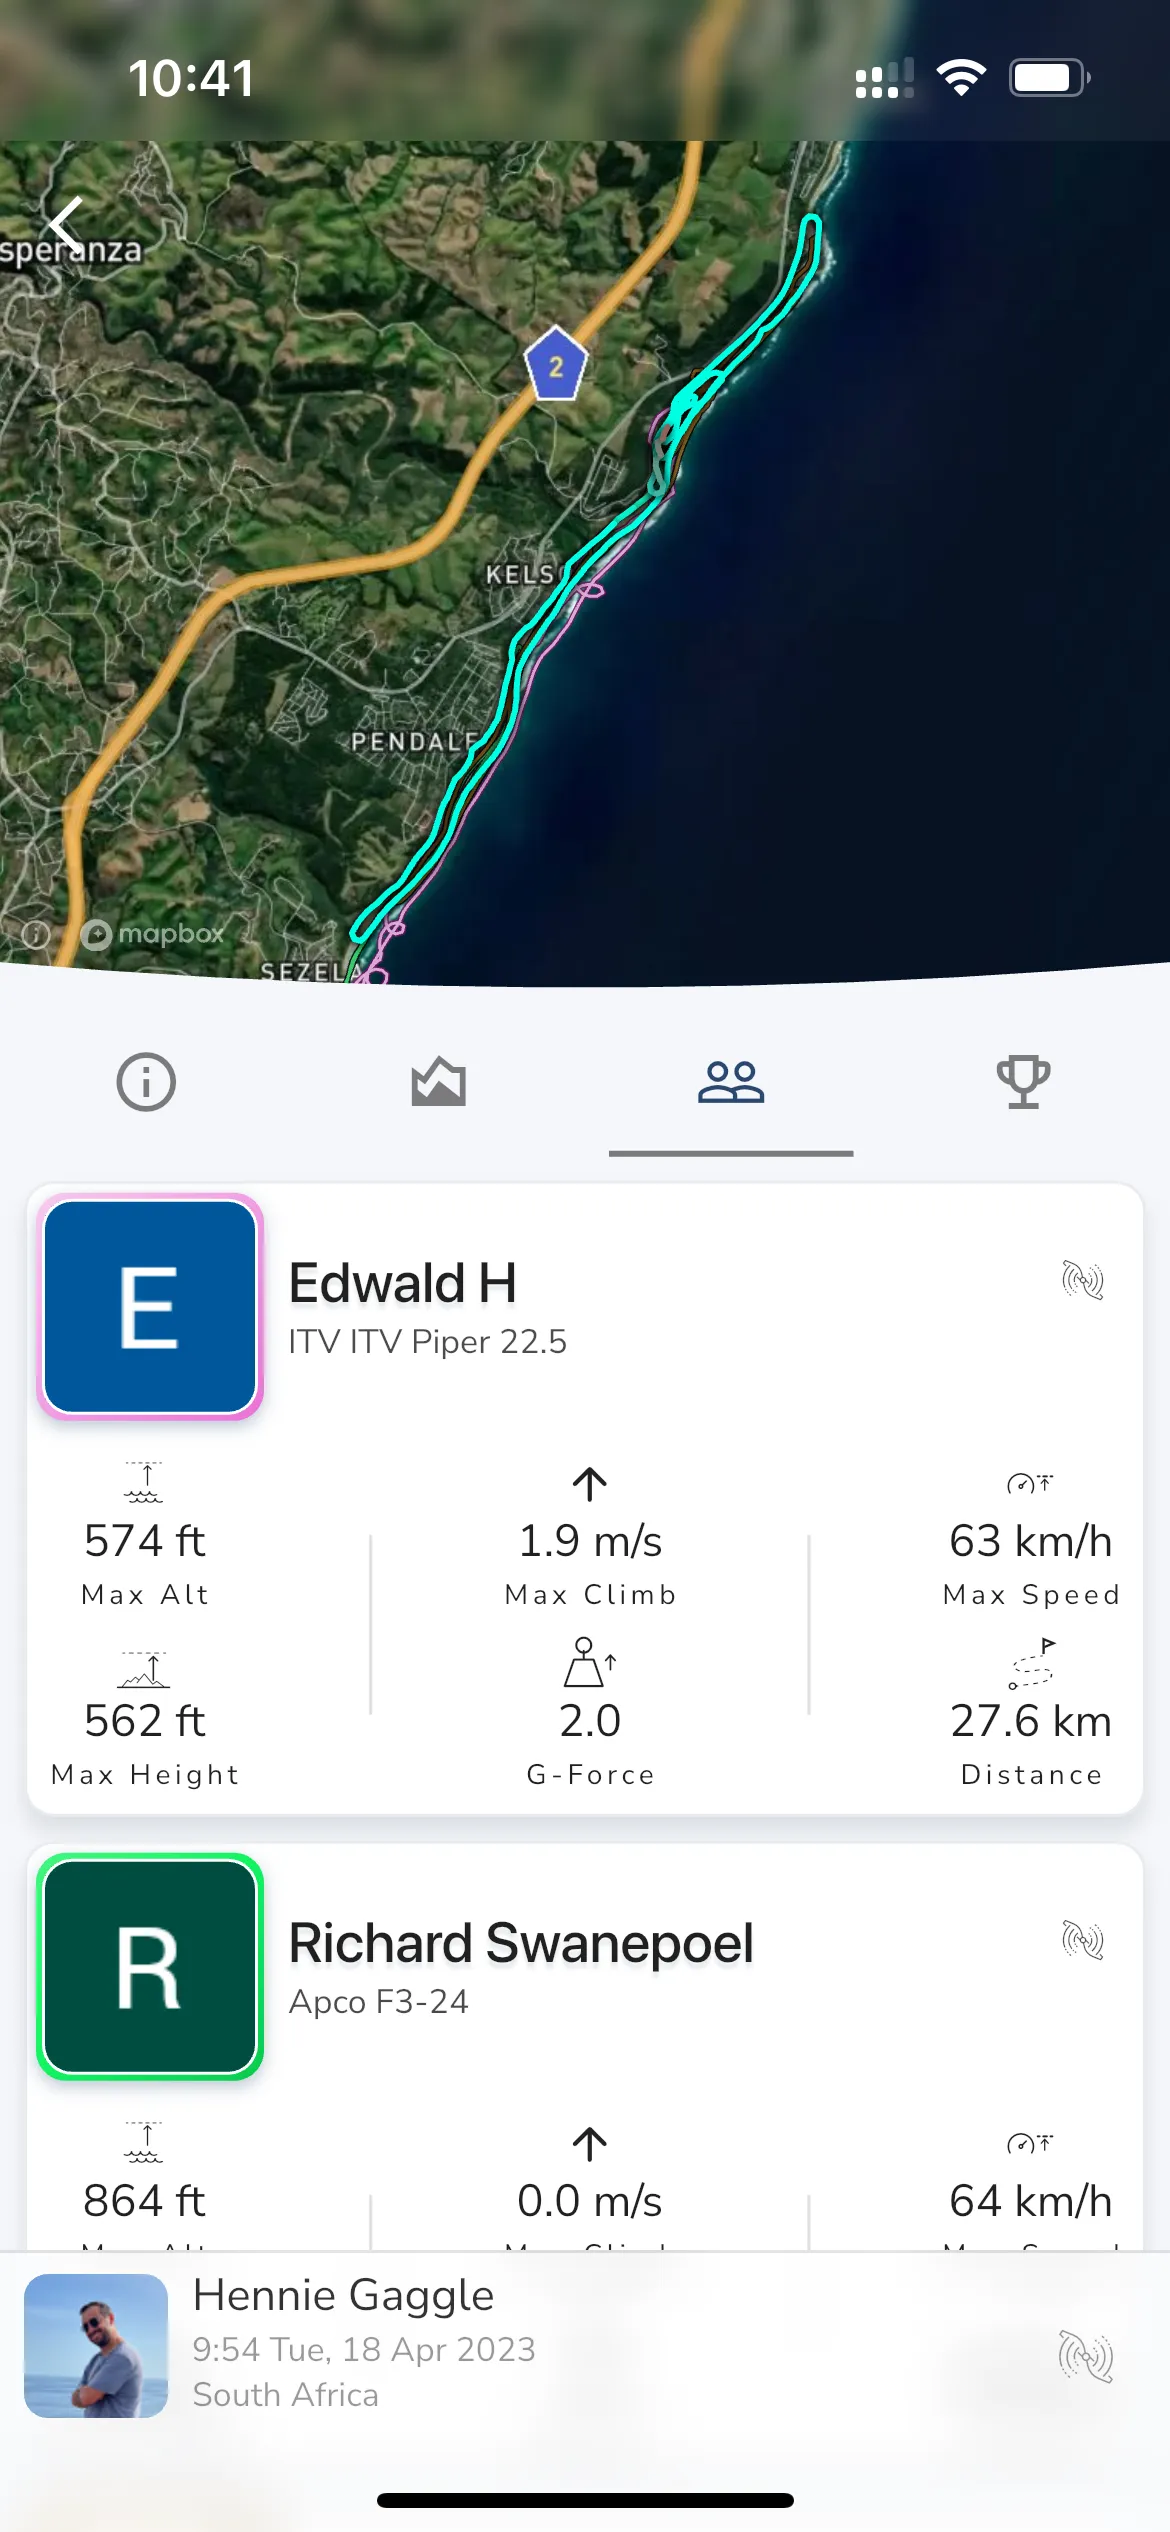
If you have flown with friends that belong to the same groups as you, then you will see their flights listed here. You will see a card with some basic details about every friends flight like the duration, max altitude, and distance. You can swipe on the card to hide their recording line on the map or to unlink their flight from yours.
If Gaggle did not automatically link the flight then you can link it manually by tapping the Link Recordings button and choosing the recording. If you cannot find the recording then it may not be on our servers yet or the recording has been set to private.
If you have leaderboards in any of your groups and your recording is shared with those groups then the leaderboard scores for this specific flight on each leaderboard will be shown here. Some leaderboards like the obstacle course allows you to tap the leaderboard to see the obstacle course on the map. Any active leaderboards will also show in the flight replay view.
>
Recording Overview > Analysis Tab > Tap the replay button
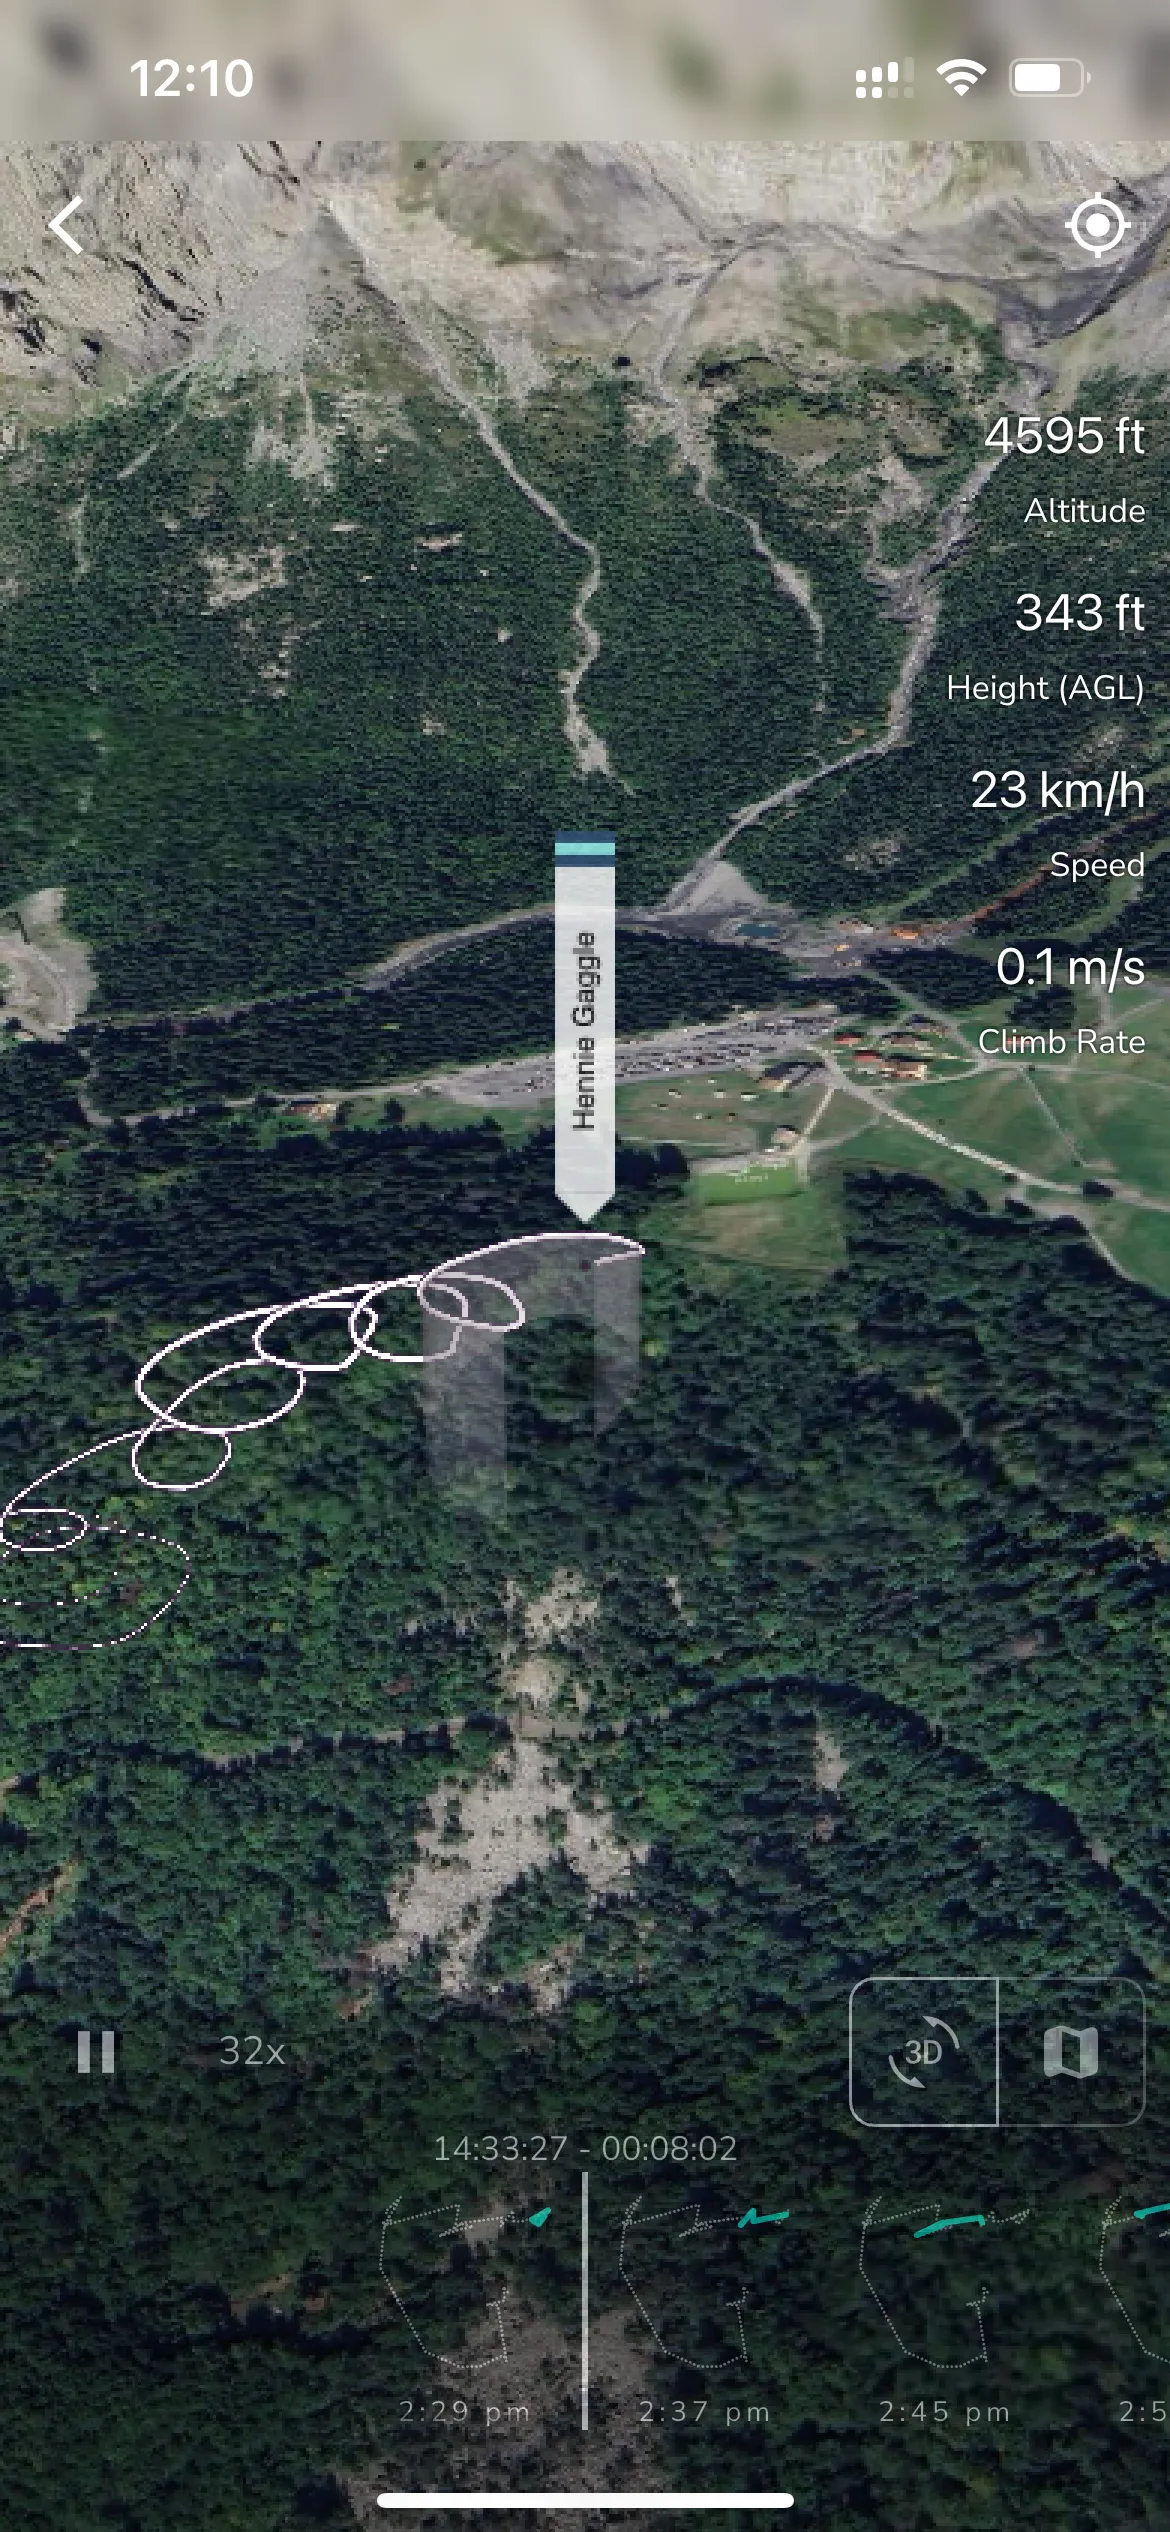
With Gaggle, you don’t need an external tool like Ayvri or Sports Track Live to visualise your flight. You can relive every flight directly inside the app. To see your flight visualised simply open your flight recording and tap the Replay Flight button. Your friends can also see your flight visualisation, simply share your recording with them.
You can also import flights from other apps like FlySkyHy or XCTrack by exporting your flight as an IGC file and importing it into Gaggle. Once your flight is imported you can visualise it by viewing the flight recording.
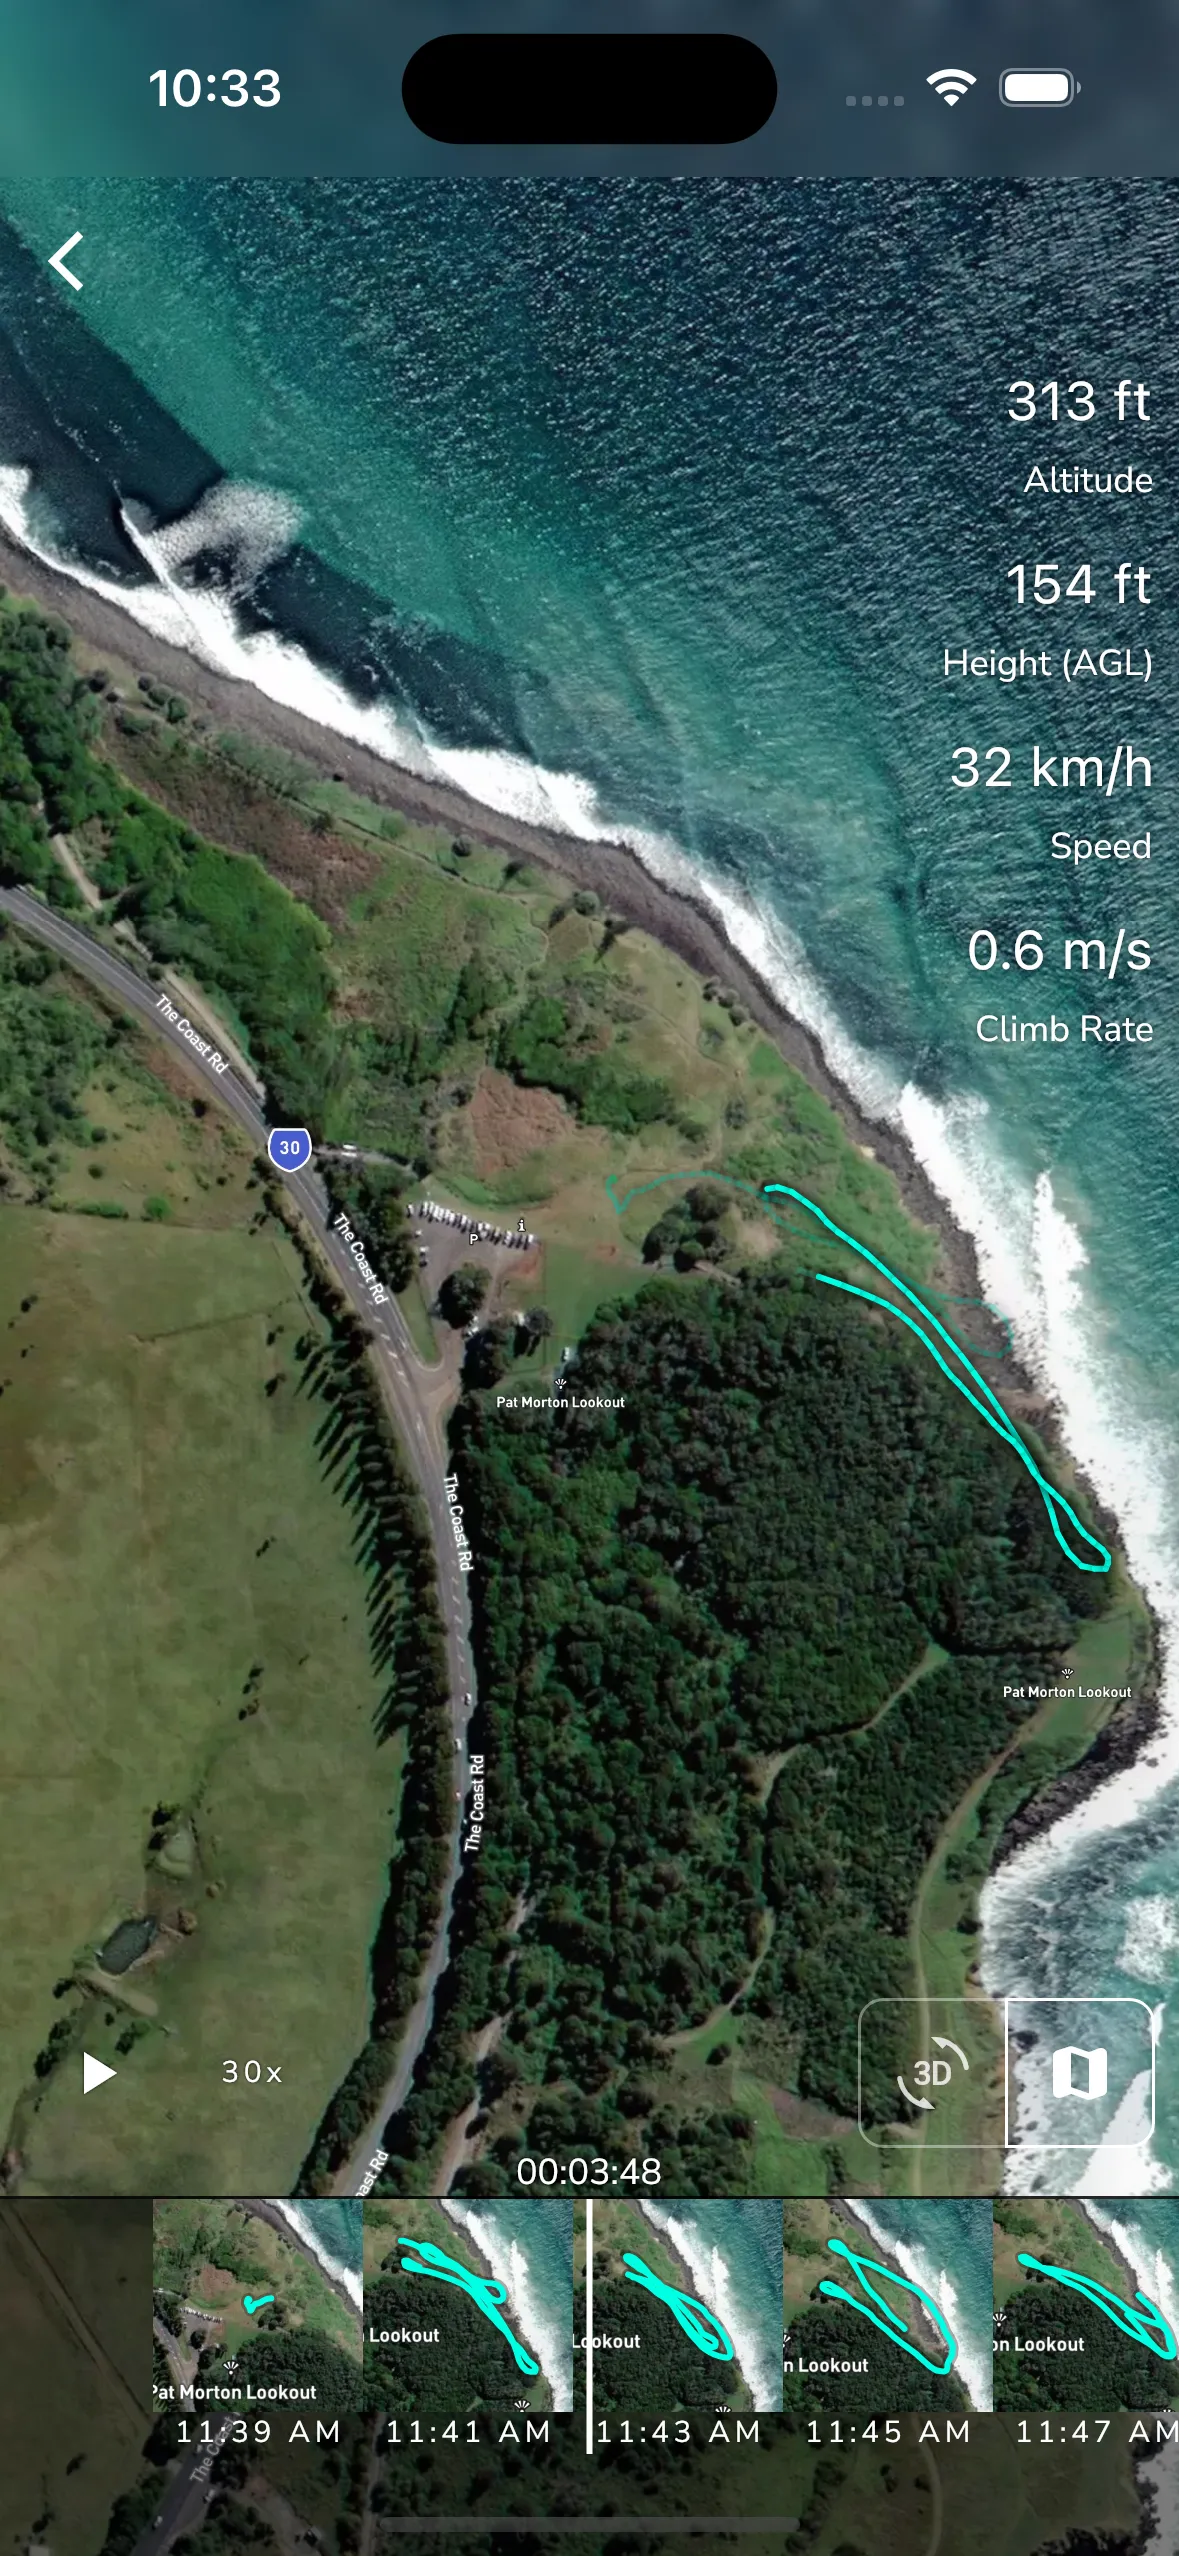
In the 2d view you can pan the visualiser map around by dragging across the screen. To move the time forwards or backwards simply slide the scrubber on the bottom of the page left or right. In replay mode the map will be locked to the current position, to disable this while in replay mode simply tap the lock button in the top right corner of the screen.
If you flew with friends from you groups then their recordings are automatically added to yours and visualiser alongside your flight. Every persons color trail will match the primary color of their wing as it was configured in Gaggle at the time of their flight. To hide this head over the recording overview screen, tap the linked flights tab, and swipe on the card to hide the flight.
To autoplay the visualiser tap the play button and tap the playback speed button to change the speed of the playback.
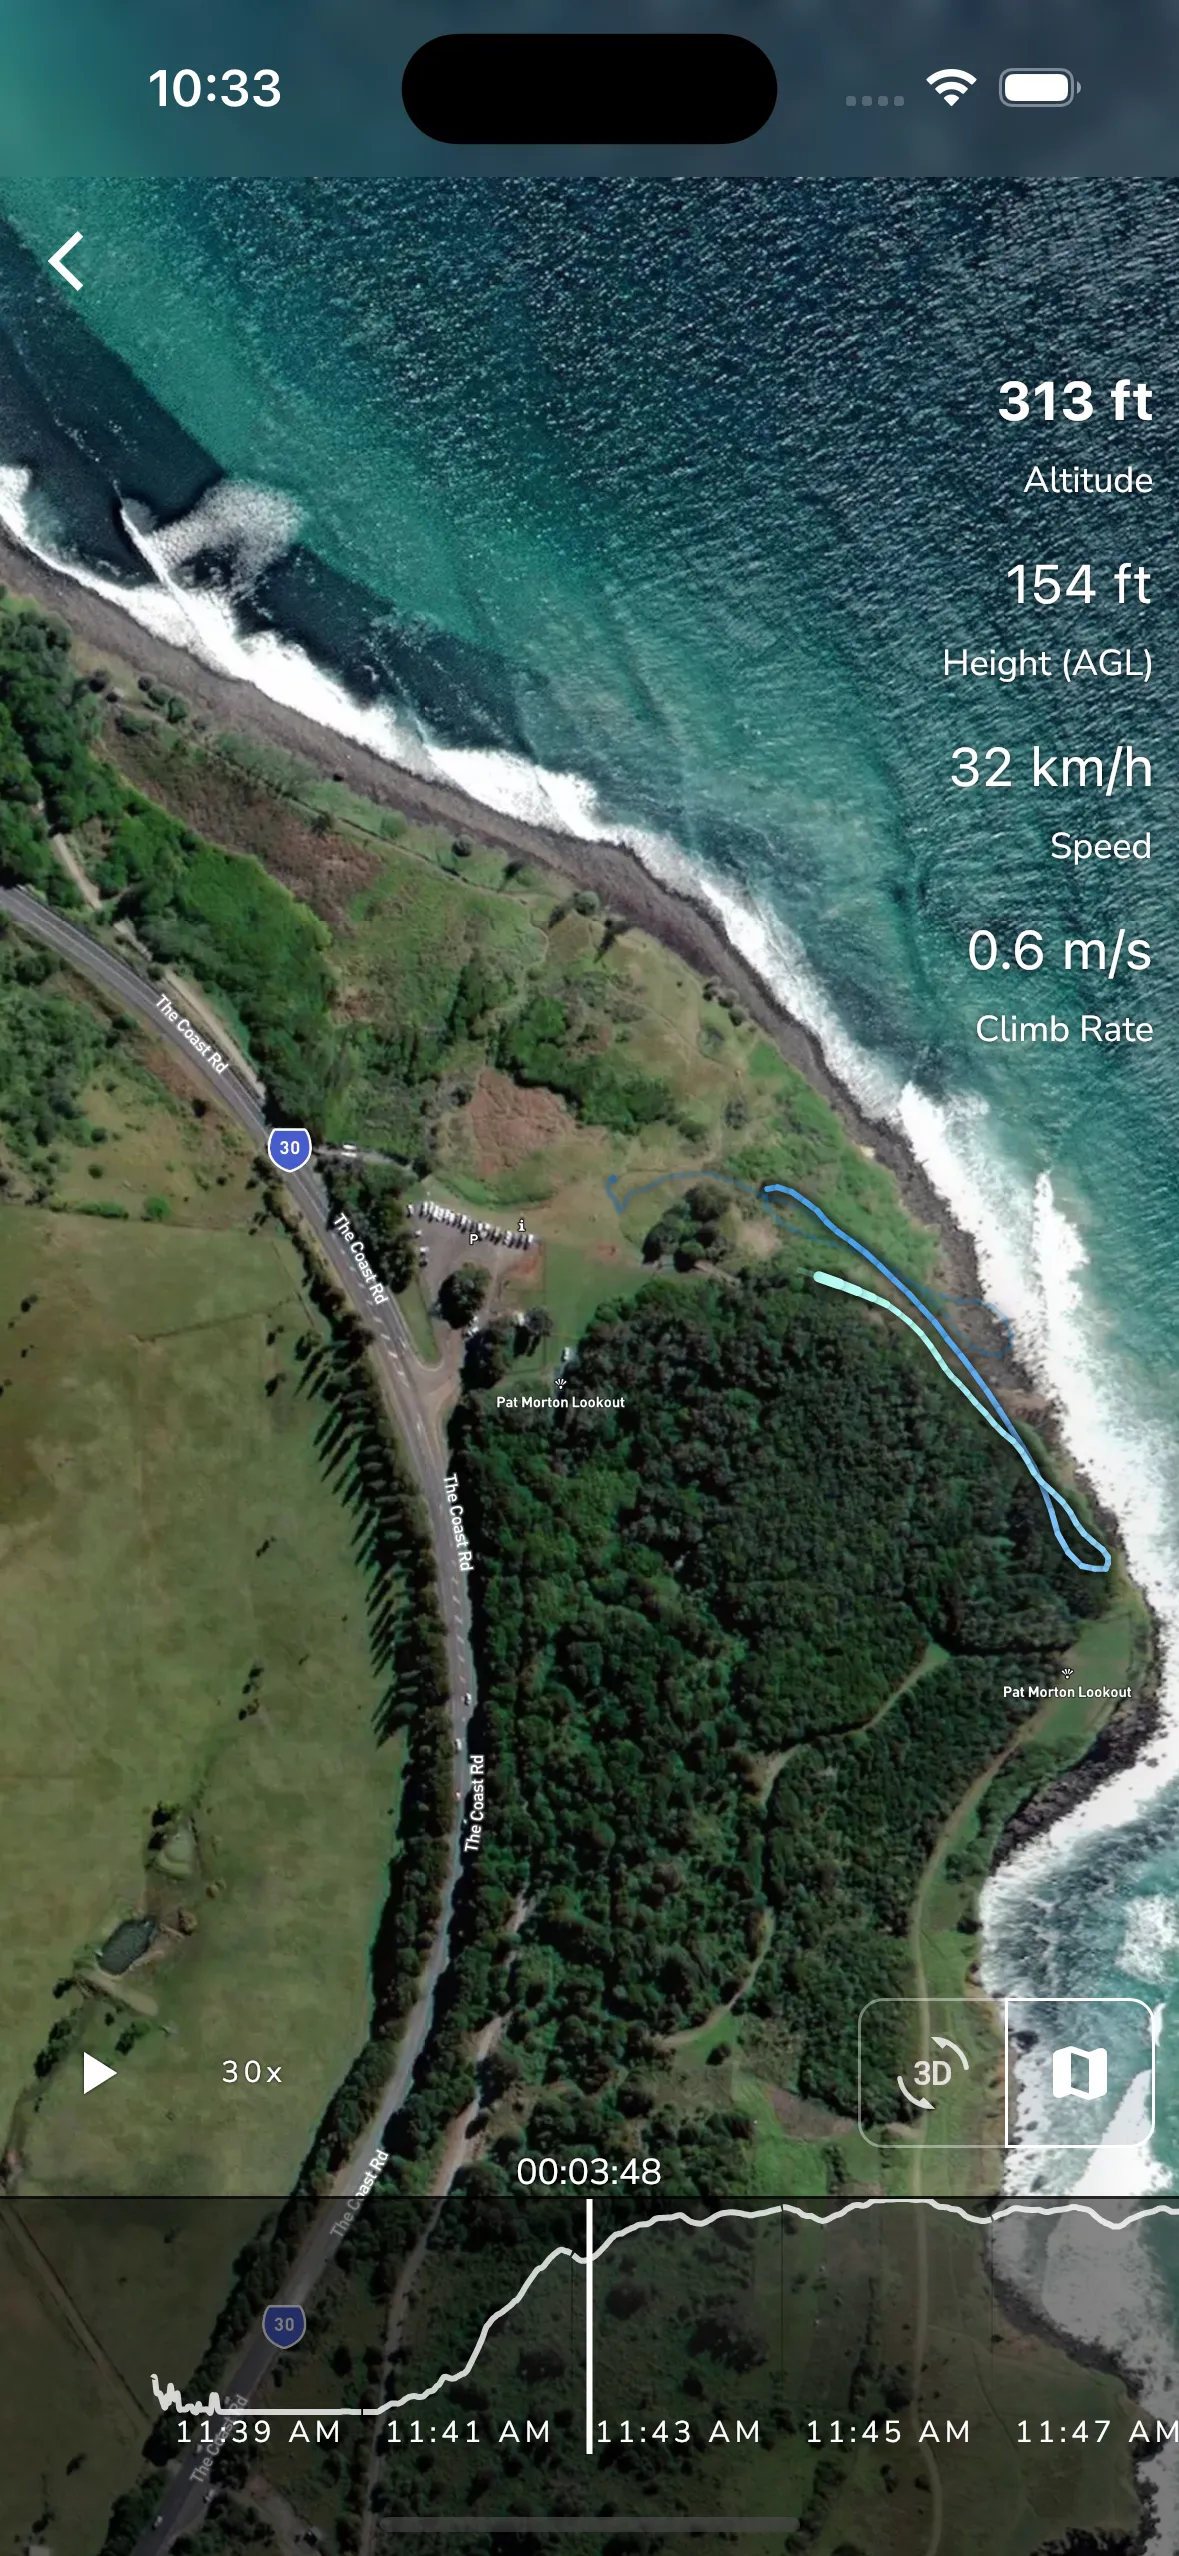
On the right side of the screen you will see the flight details. This will show the current value for:
Tapping on any of these items changes the scrubber to a graph showing you the value for that item over time. You can tap and hold on the graph to scrub it left and right to view the value at any point in the flight. The track on the map will also change color to match the color of the graph item you are viewing, with darker colors being higher values and lighter colors being lower values.
If you have a leaderboard view active then the left side of the screen will show

At any point you can change to a 3D viewer by tapping the 3D button. The 3D viewer will show you a 3D view of your flight. You can pan around the 3D view by dragging across the screen. You can also zoom in and out by pinching the screen.
Tap the map button to switch back to the map view.
>
Explore Page > Flying Sites
Gaggle has a built-in database of flying sites that you can use to discover places to fly from. Every flying site contains details about the site, favorable wind conditions, and a weather forecast viewer that shows you the weather forecast for the site. Sites also have a chat feature that you can use to connect with pilots that regularly fly from the site.
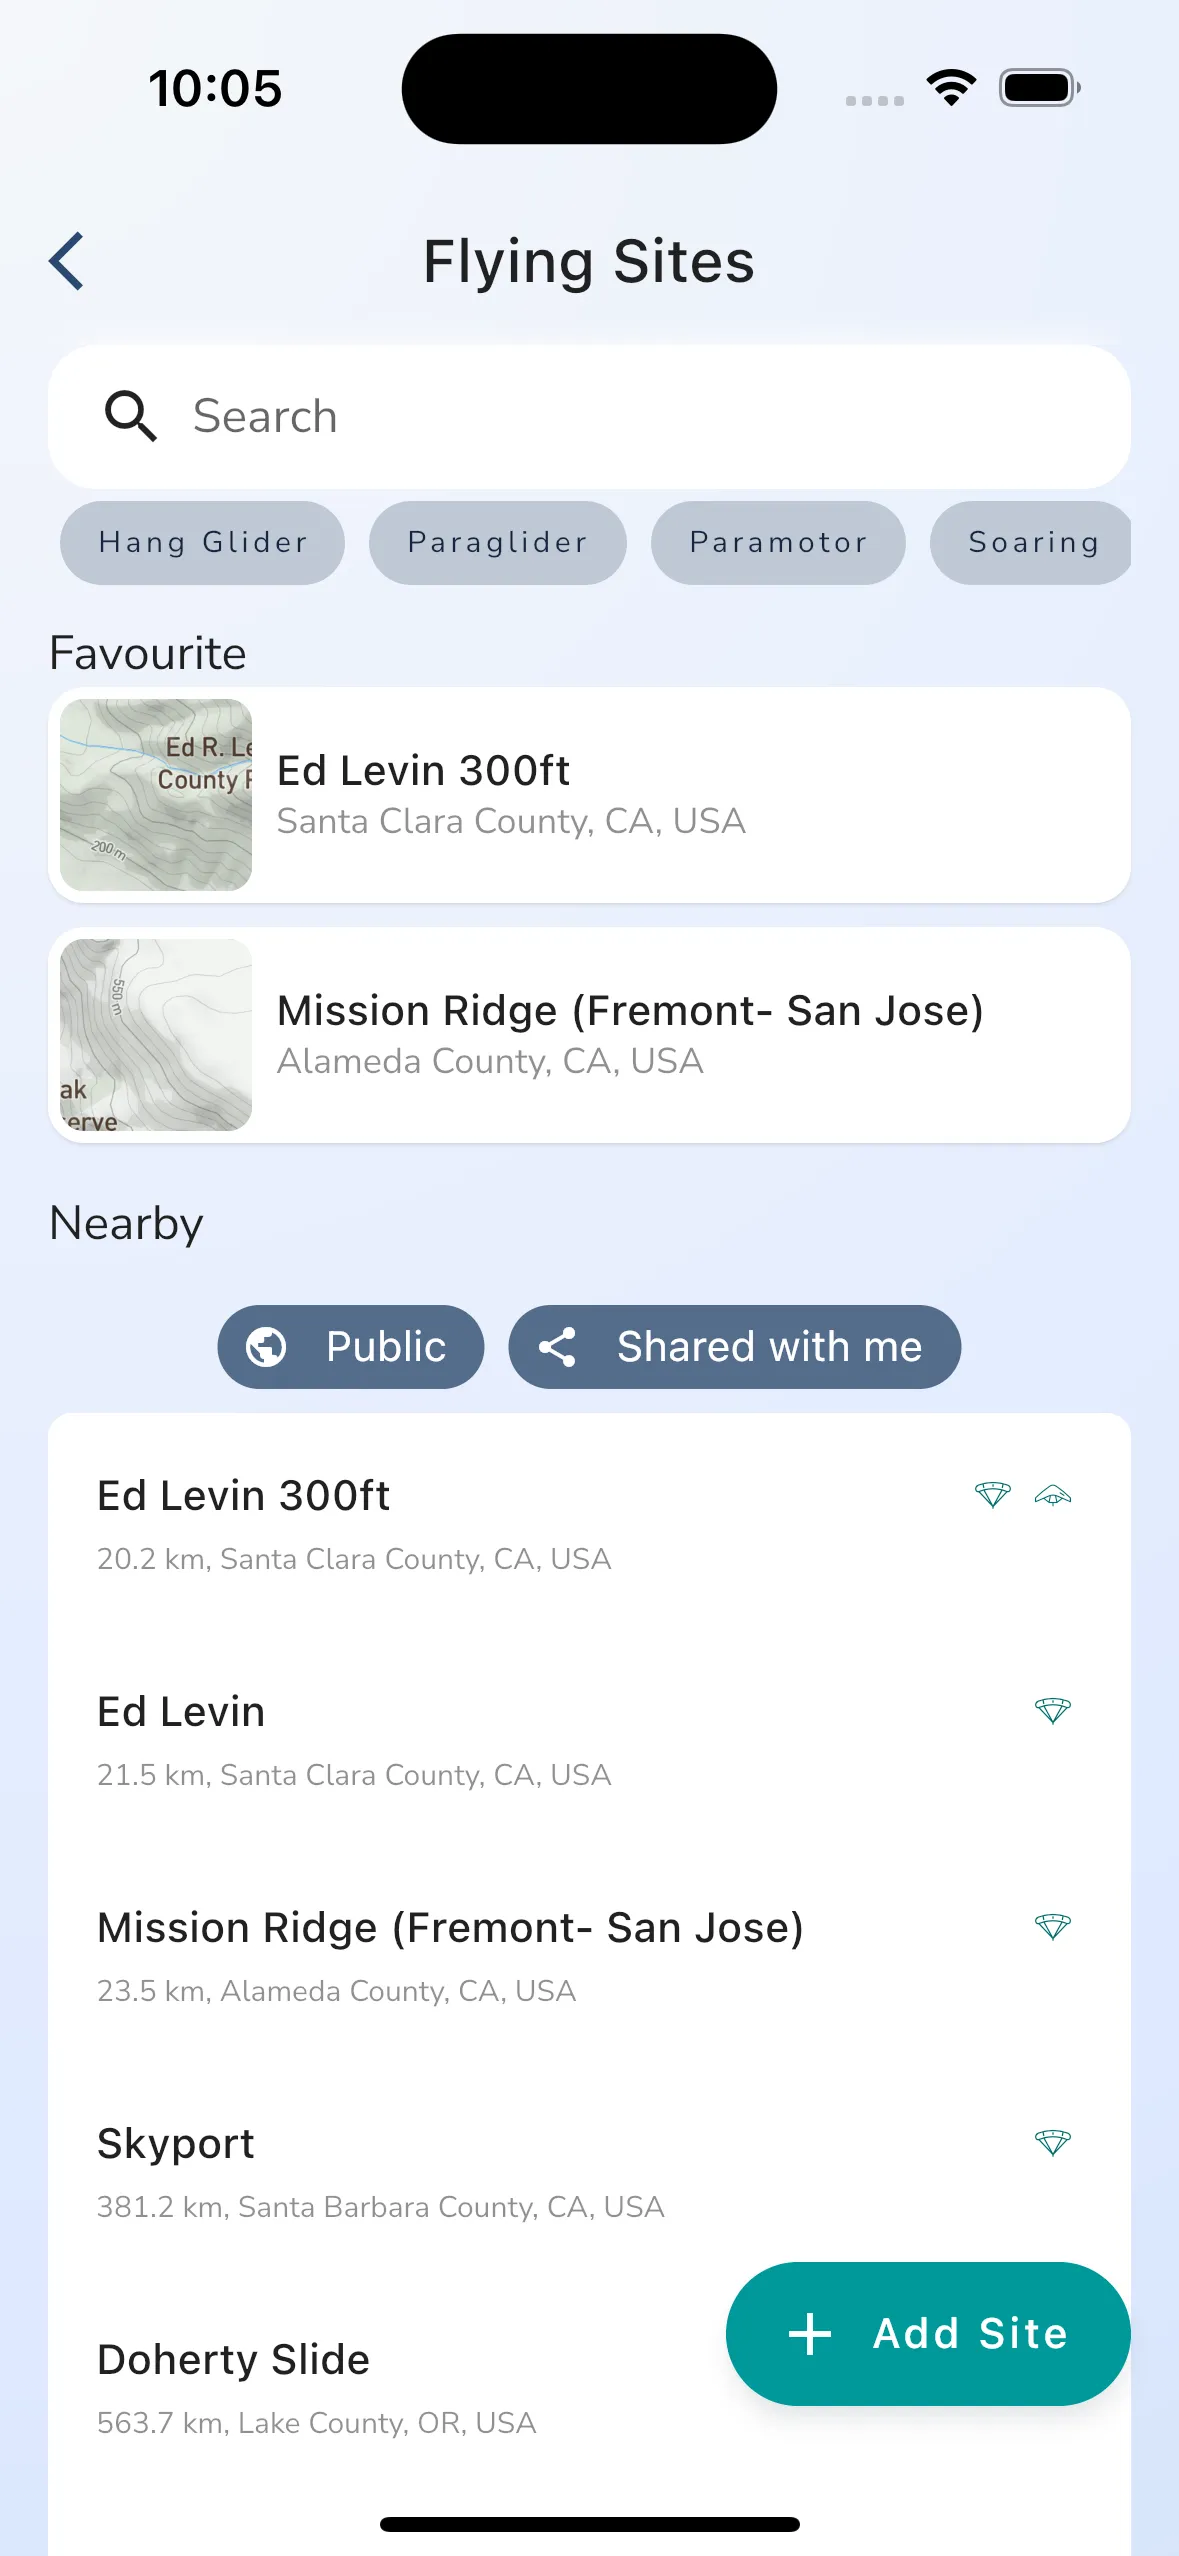
Tapping on the Flying Sites button on the Explore page brings you to the flying sites list page. From here you can search for and filter flying sites based on aircraft type. You can also tap on any of the flying sites to open up the flying site details page.
When you favorite a flying site they are added to your favorites list at the top of the page.
You can filter the items you see in the Explore section of Gaggle, like flying sites, by tapping:
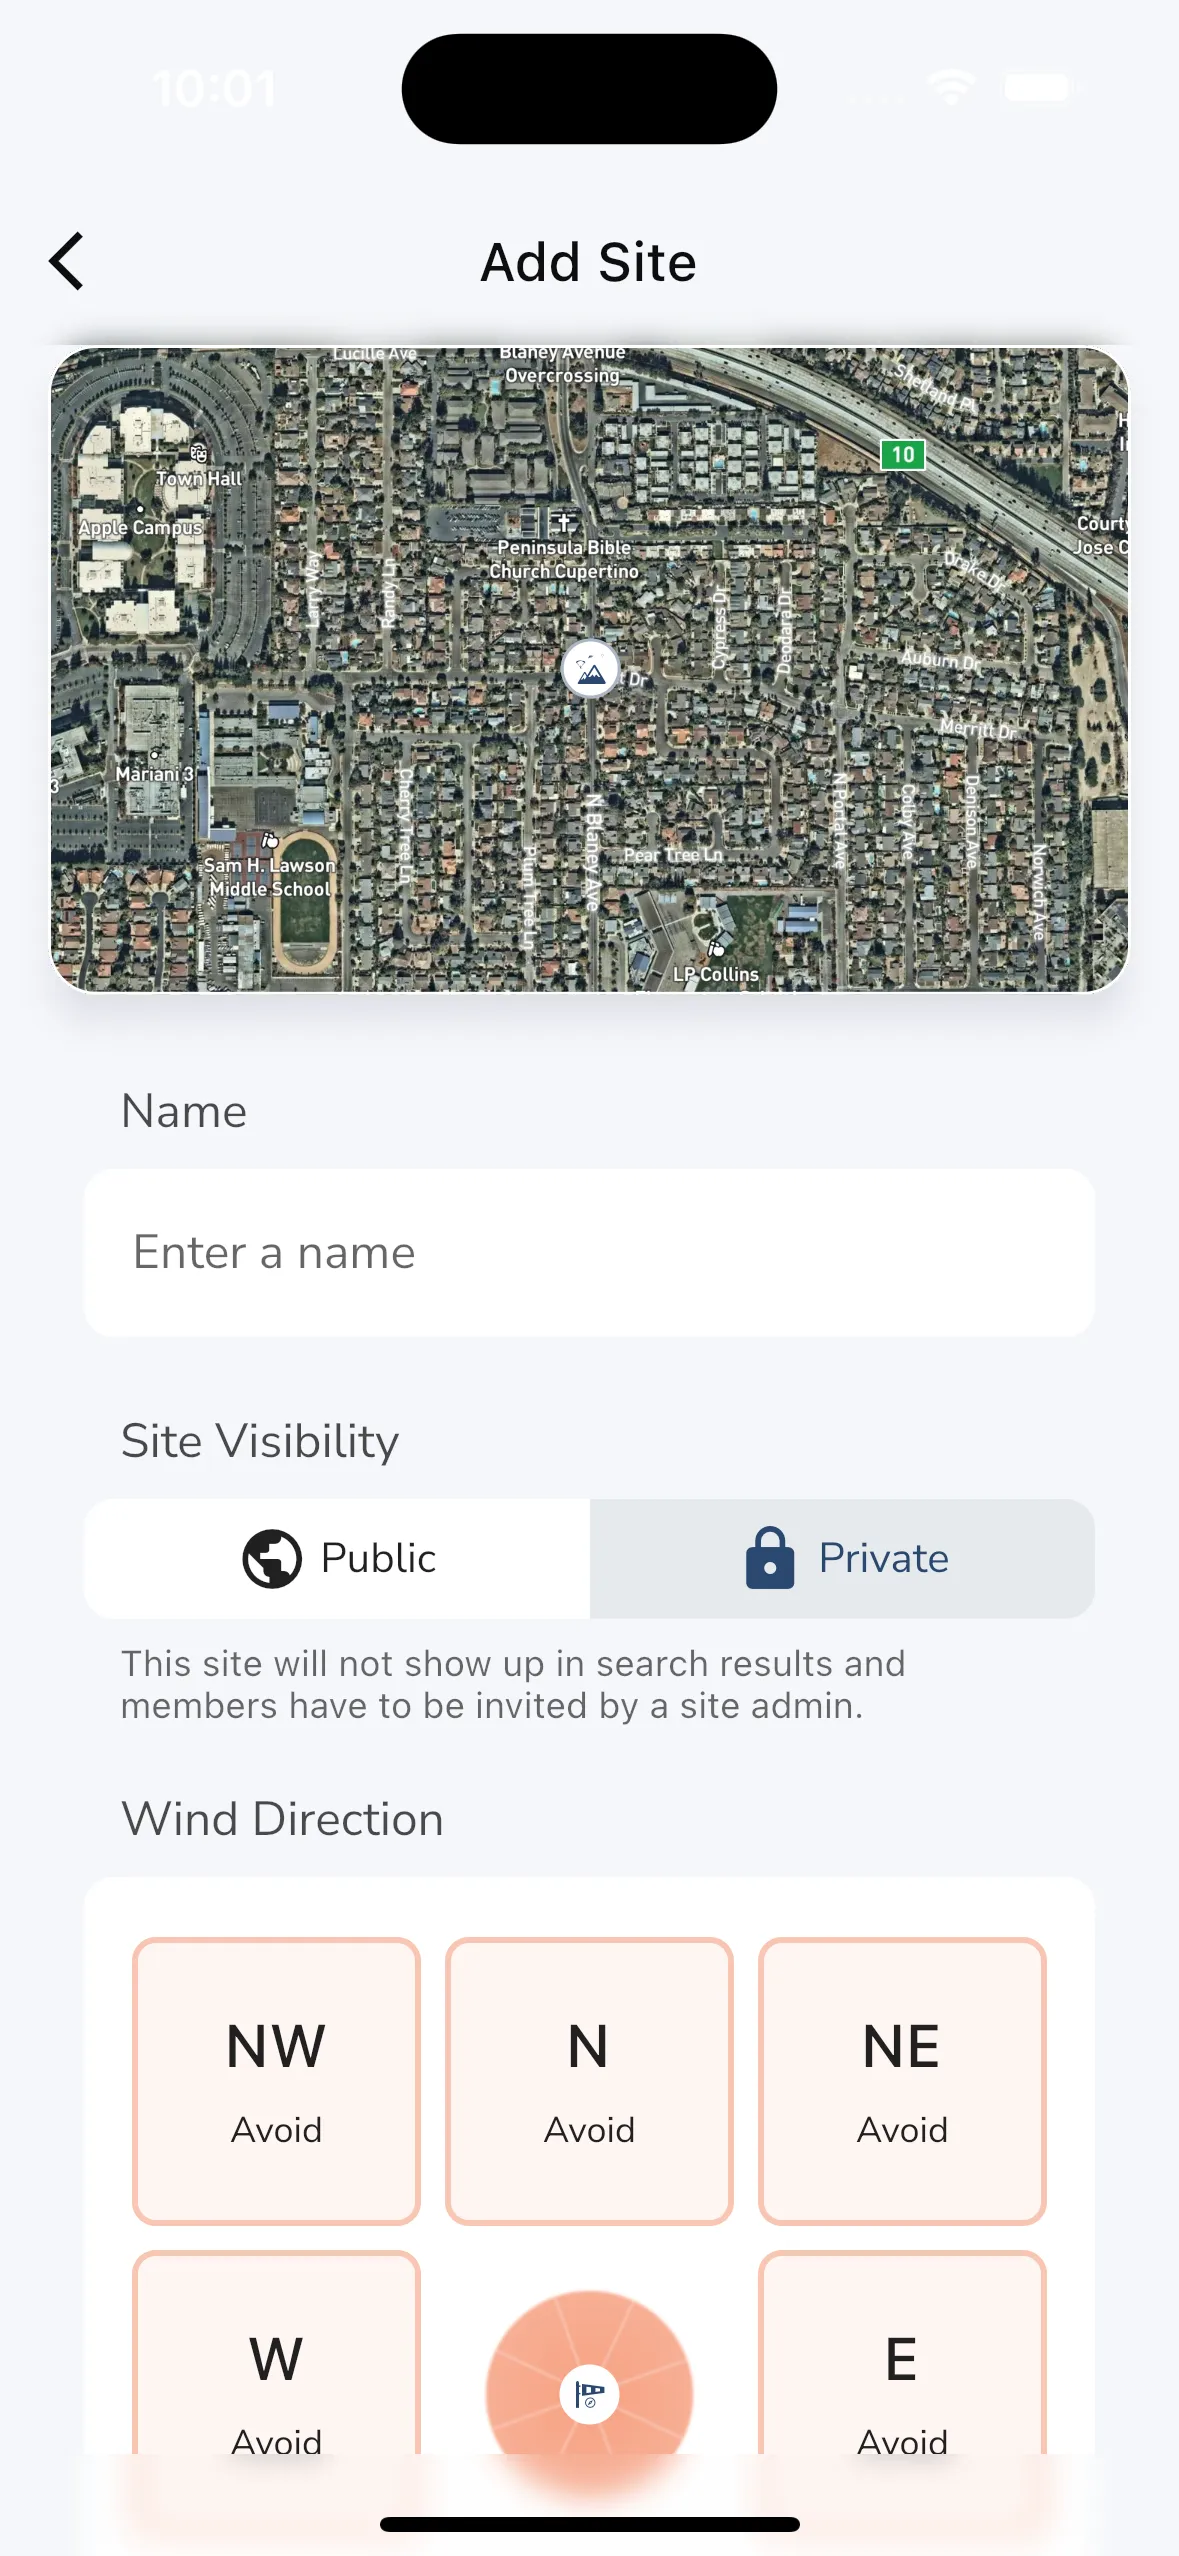
To create a new flying site you can tap on the + button at the top of the flying sites list page. This will open up a form where you can enter the details of the flying site you want to add. When creating a new flying site you have to choose the GPS location for the site using the map, and then you can enter the rest of the details. The following is required when creating a site:
More details about the site like the site guide can be added after you have created the site.
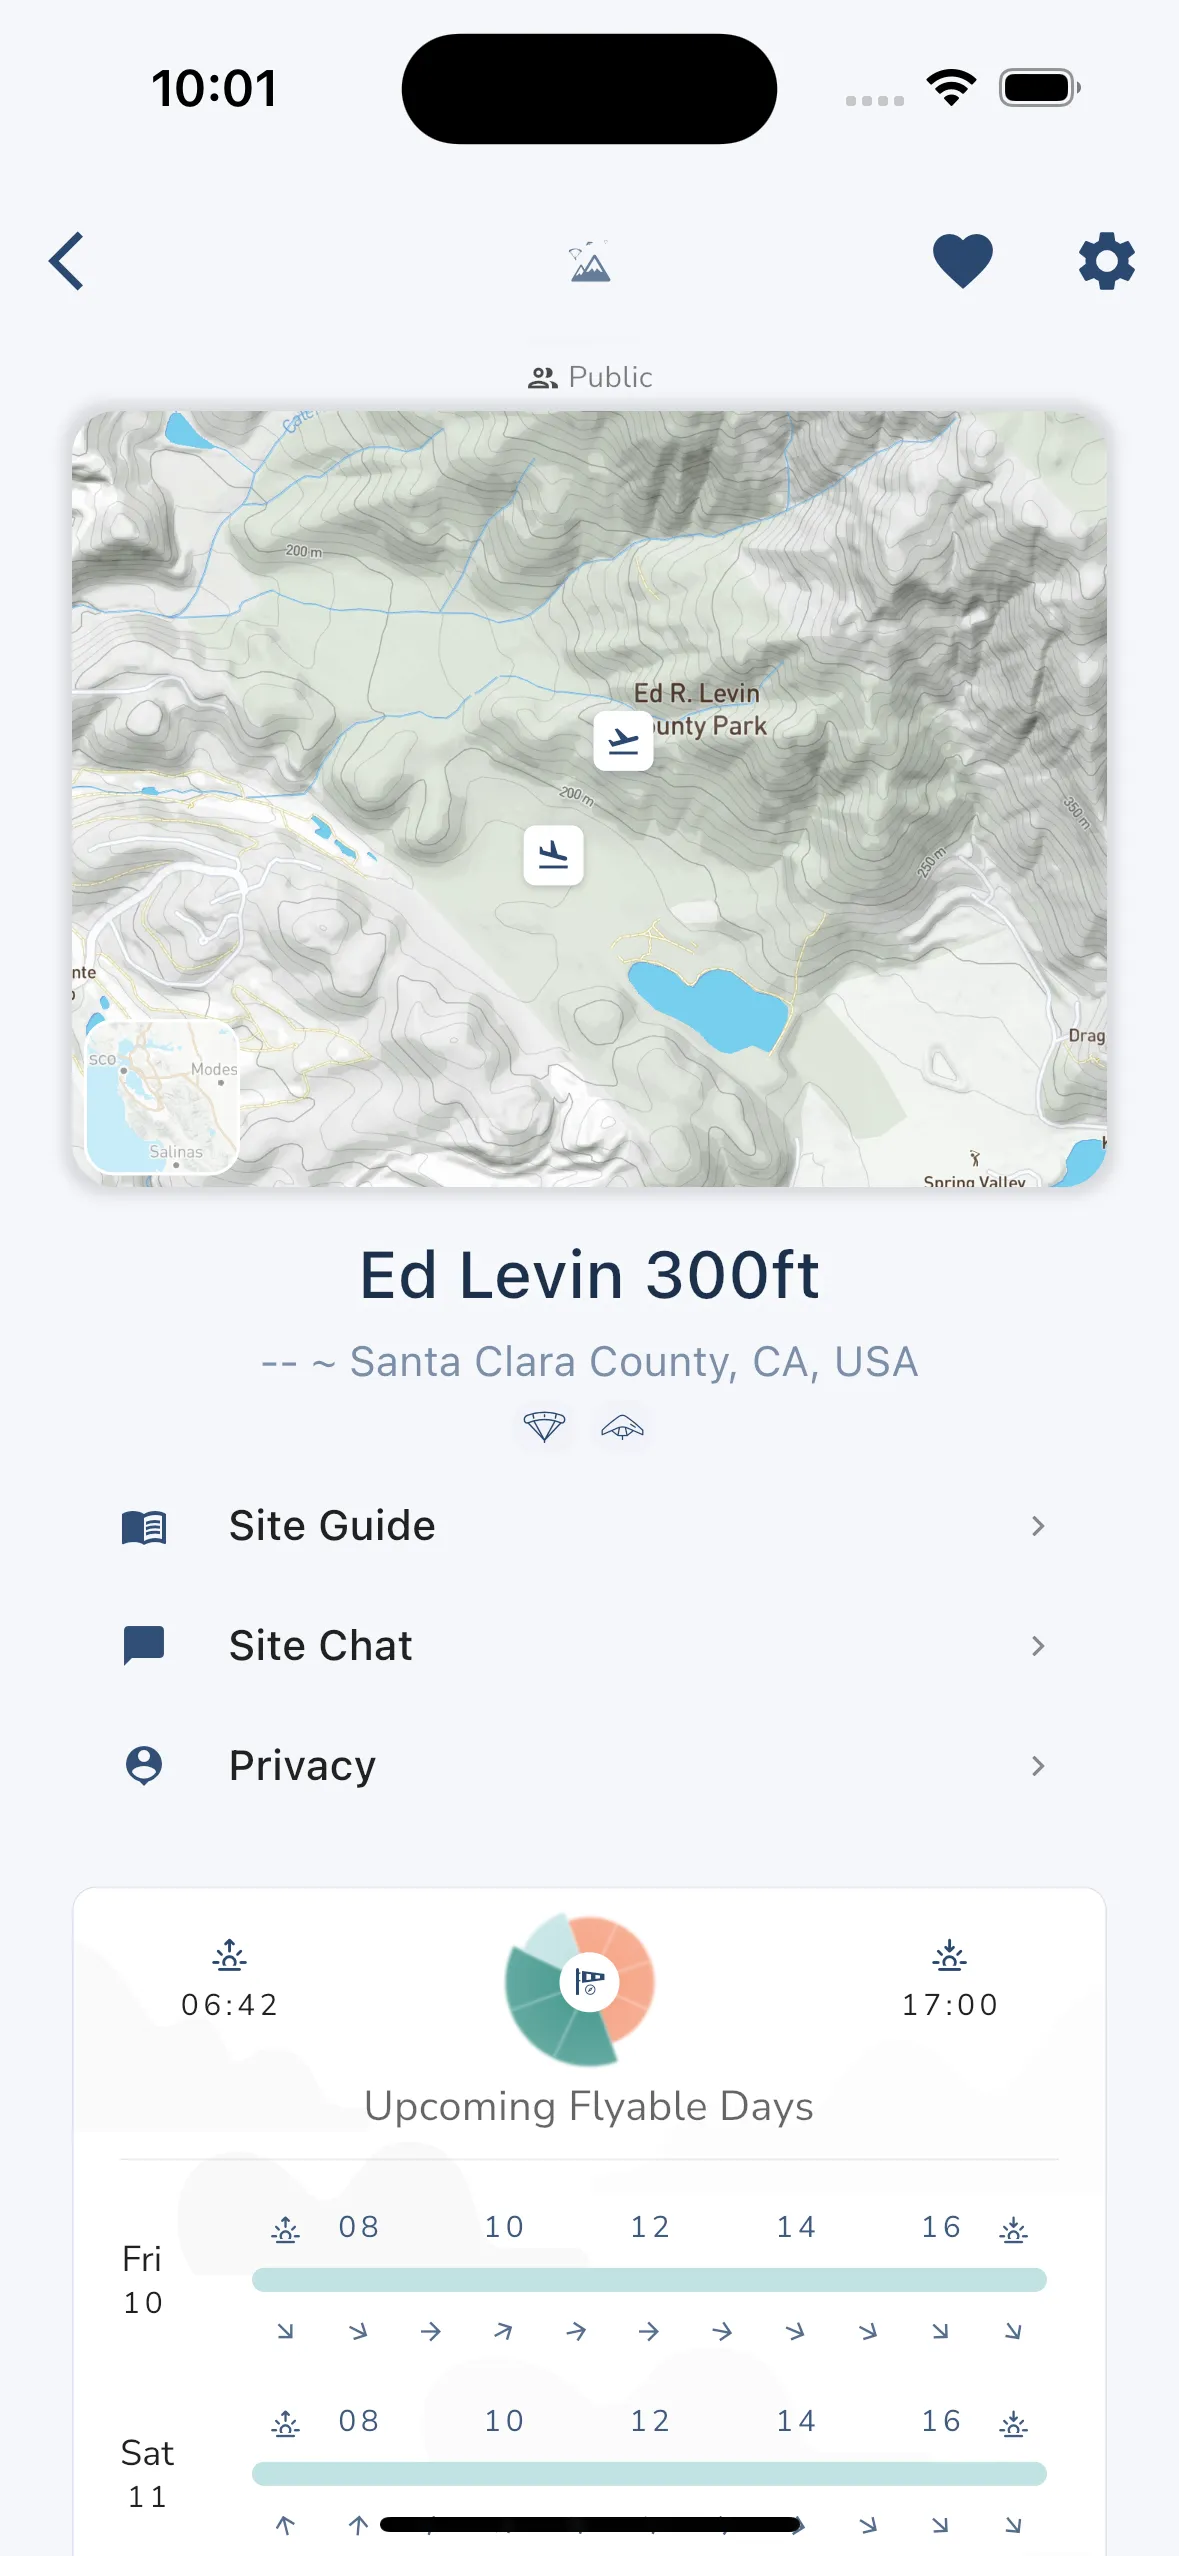
When viewing a flying site you will see the following information:
Map - The map shows you the import location information about the site like takeoff locations, landing locations, parking spots, and any pilots currently flying at the site. You can tap on the map to get driving directions to the site. On the left is a small radar viewer showing rain and clouds in the area. You can tap this to open up the weather viewer. It’s also possible to get a 3D view of the site by tapping the 3D button after tapping on the map.
Site Details - The site details section shows you the name of the site, the distance from you, the general area, and icons for the aircraft that can fly from the site.
Site Navigation - The site navigation section allows you to view the Site Guide, go to the Site Chat, or you can change the site Privacy settings which will override the flight sharing options for any pilot that flies from the site.
Site Weather - The site weather section shows you the favorable wind directions for the site, sunset and sunrise times, and subscribers on the Adventurer plan will see the next 3 upcoming flyable days for the site.
Site guides in Gaggle allow you to add detailed information about the site like takeoff and landing directions, hazards, and other useful information. Some sites in Gaggle are synced from open sources online and may already have a site guide. You can add to the site guide if you are a site admin. You can also request to become a site admin if you want to help manage the site. Site guides are automatically rewritten by AI and translated into multiple languages, this allows us to create a single site guide from multiple sources for a single site.
Every site has a built-in chat feature which allows you to chat with other pilots at site. Any pilots that flies from a public site automatically becomes a member at the site and will get notified of new chat messages at a site. You can switch of notifications for a site by change the notification settings for the site.
Sites in Gaggle allow you to choose if you want to hide any live location sharing and recordings from the site. When this is configured you can tell Gaggle what the recording privacy should be when we detect a takeoff from the site, and you can set the privacy radius for the live location sharing, while in this radius your location will not be shared with anyone.
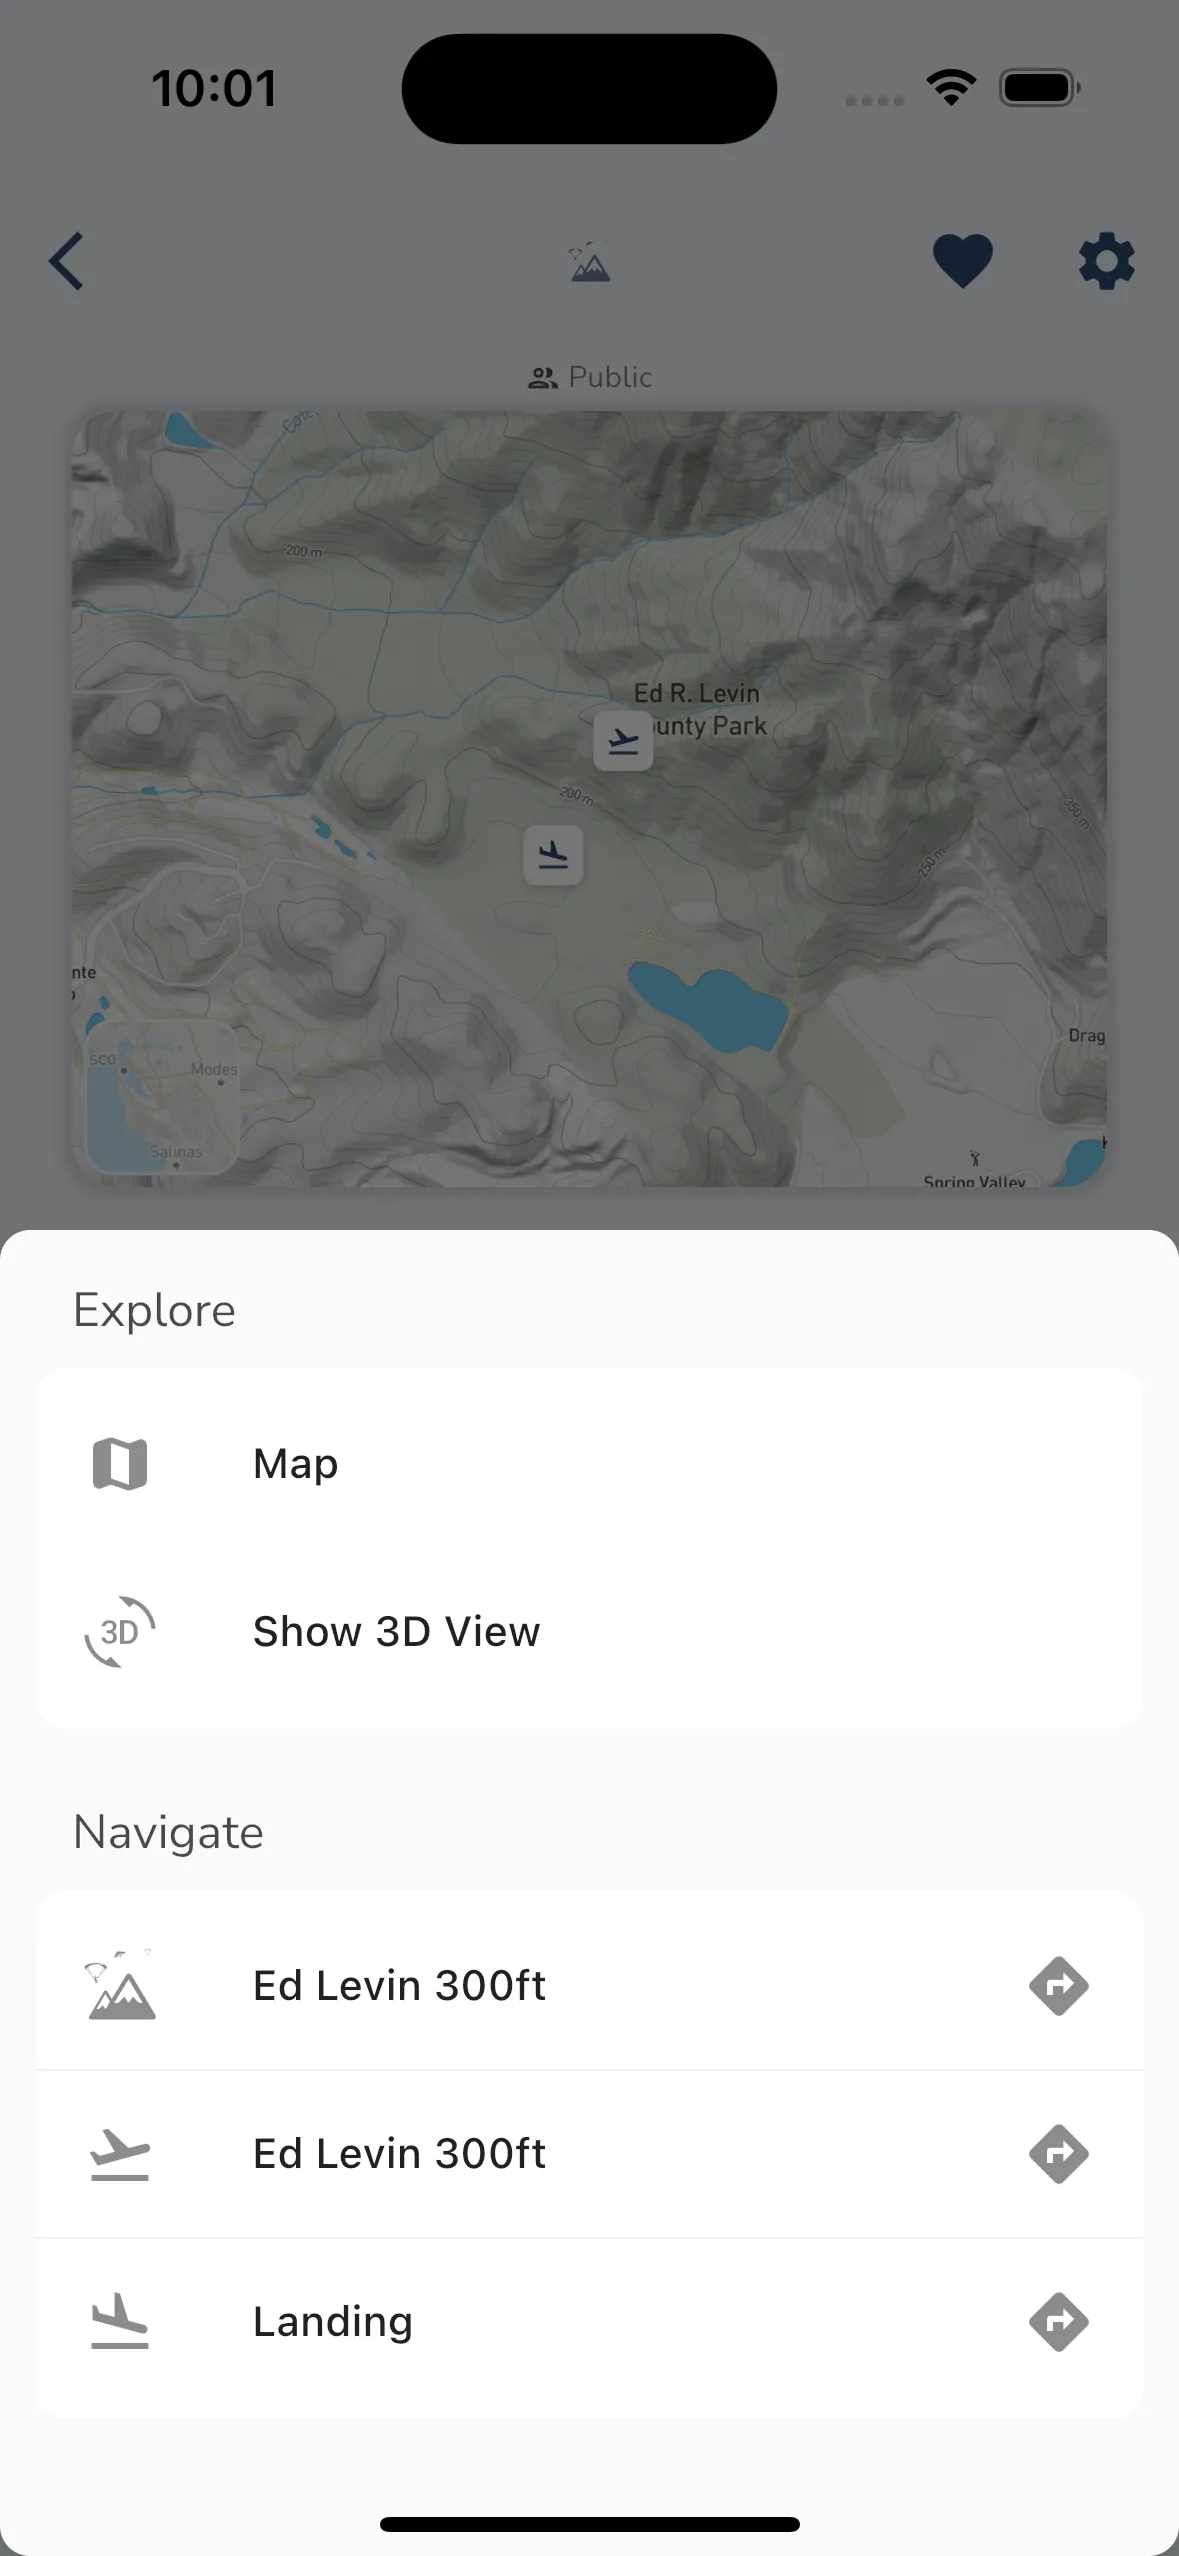
When tapping on the map for a flying site you will see a popup with the driving directions to the site. You can tap on the Directions button to open up the directions in your preferred navigation app.
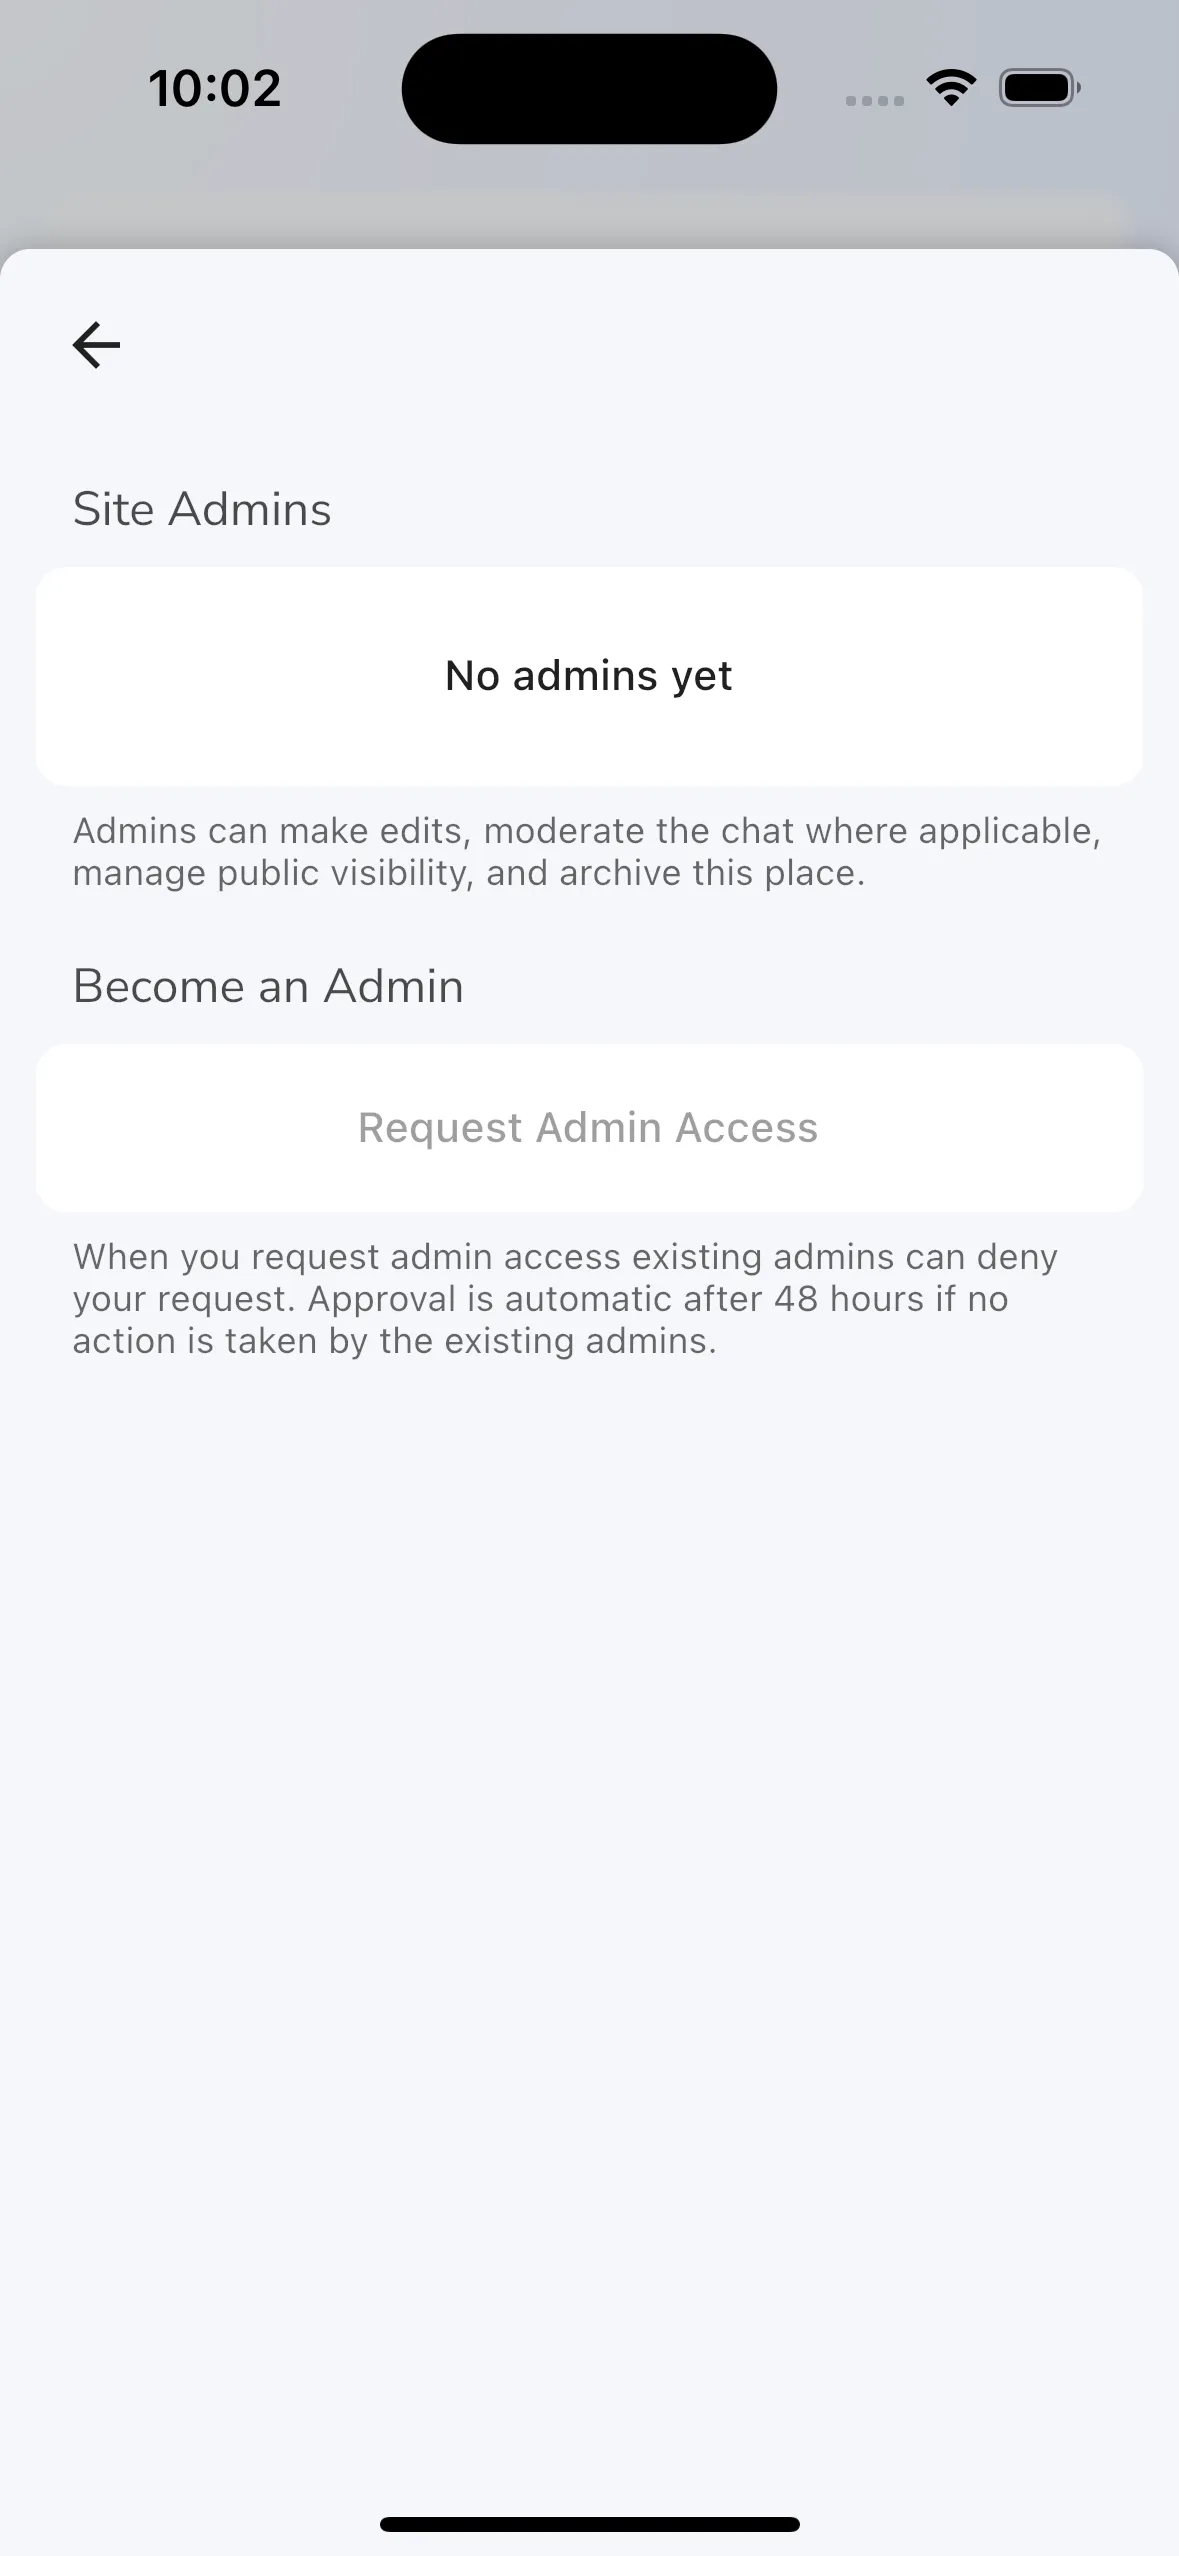
All flying sites have admins that are allowed to change the details for a flying site. You can request to become an admin for a site by tapping the Request Admin Access button. For sites with existing admins they will get a notification to approve your request. Admin requests are automatically approved after 7 days if no action is taken.
For sites without admins you will automatically become an admin for the site within a few minutes.
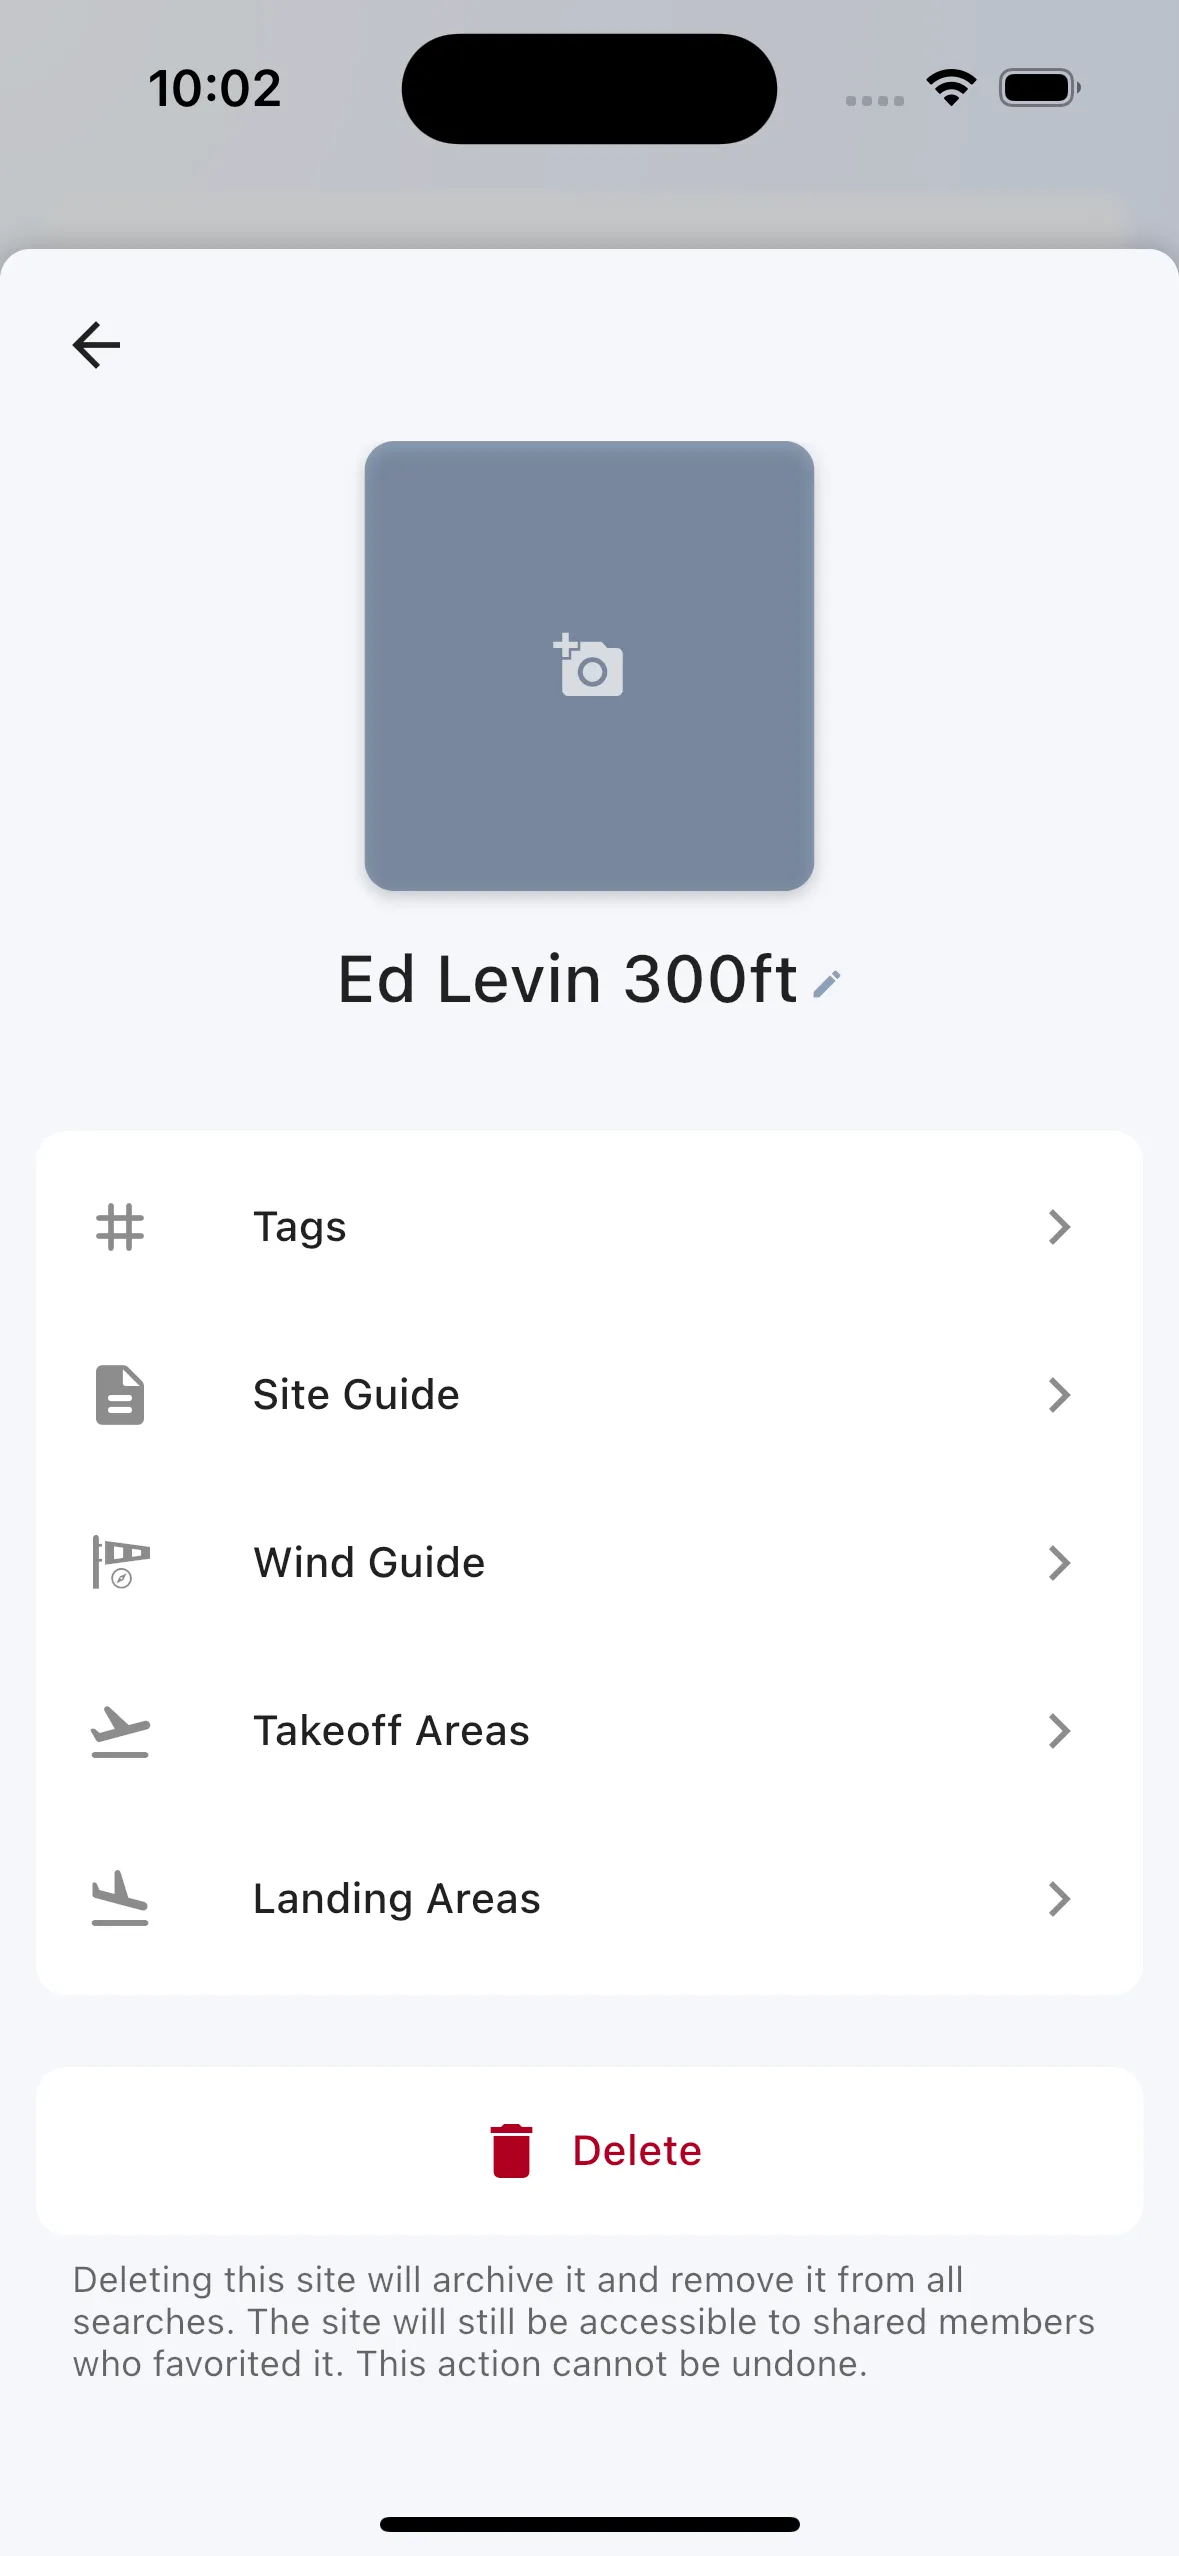
Site admins have access to edit the following site details:
Tags - Tags are used to help pilots find sites that are suitable for them. You can add tags to a site to help pilots find the site. You can also remove tags that are not relevant to the site.
Site Guide - The site guide is a detailed guide about the site. You can add to the site guide to help other pilots that fly at the site. You can also edit the site guide if you see any incorrect information. The site guide has sections for site description, getting there, weather notes, rules, and general comments.
Wind Guide - The wind guide is a detailed guide about the wind conditions at the site that tells Gaggle what the favorable conditions are when determining site flyability. You can set the favorable wind directions and wind speeds for the site.
Takeoff Areas - You can add takeoff areas to the site along with parking locations for each takeoff.
Landing Areas - You can add landing areas to the site along with parking locations for each landing.
Delete Site - You can delete the site if you are the only admin for the site. Deleting a site will remove the site from public search results, but it will still be available to pilots that have favorited the site.
>
Community Page > Friends and Followers
In Gaggle, you can follow other pilots, and they can follow you. You can also mark pilots you are following as friends which gives you more privacy control within the app.
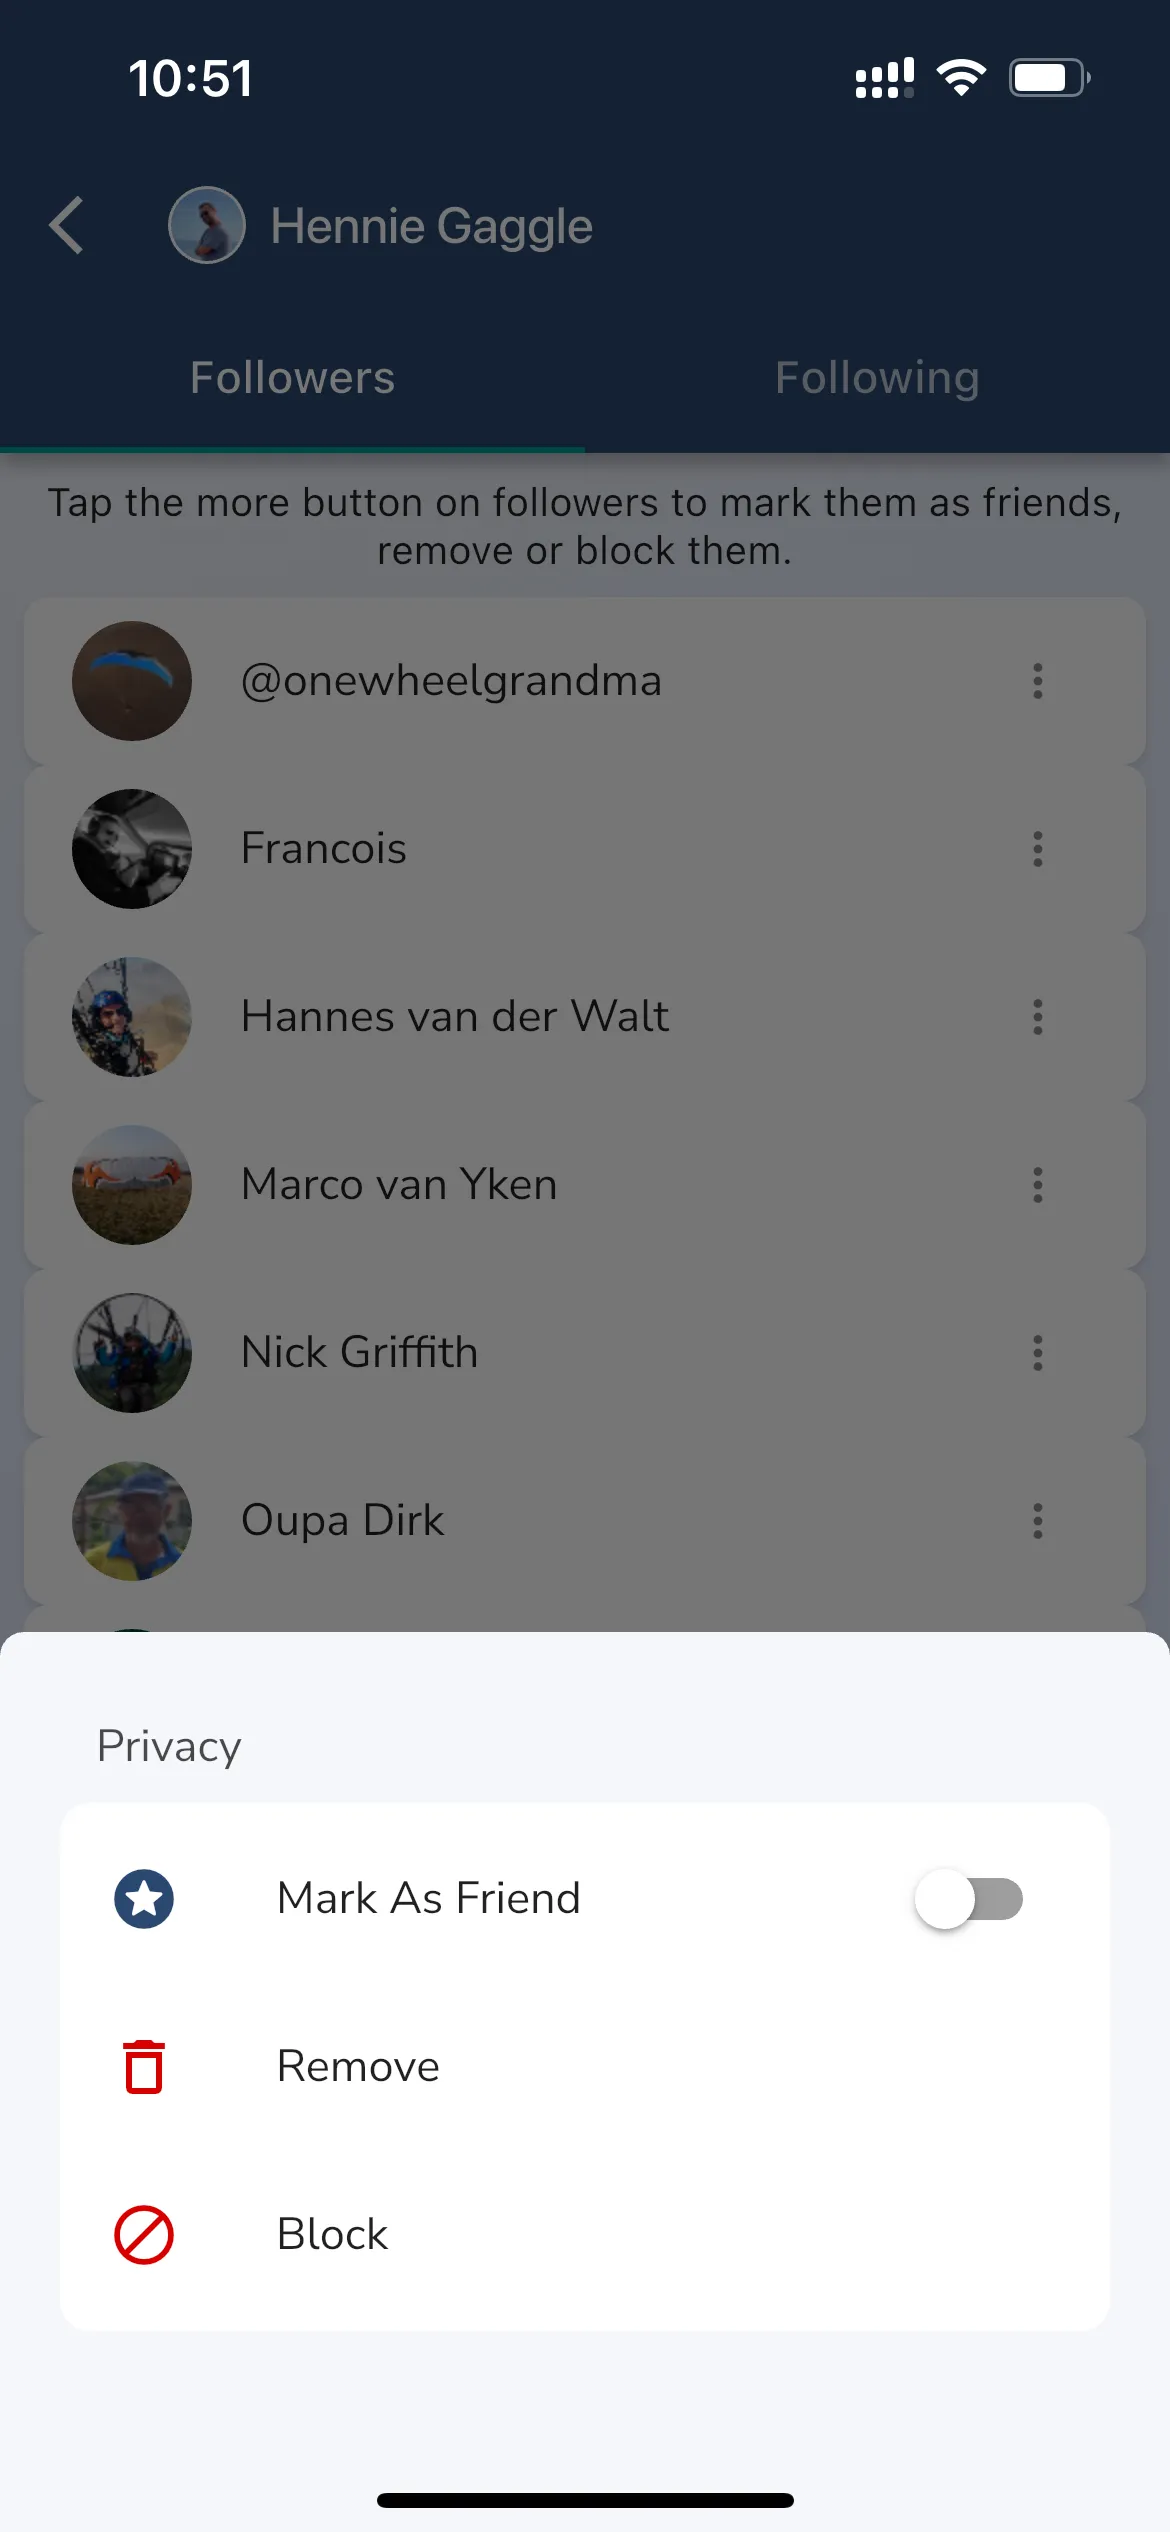
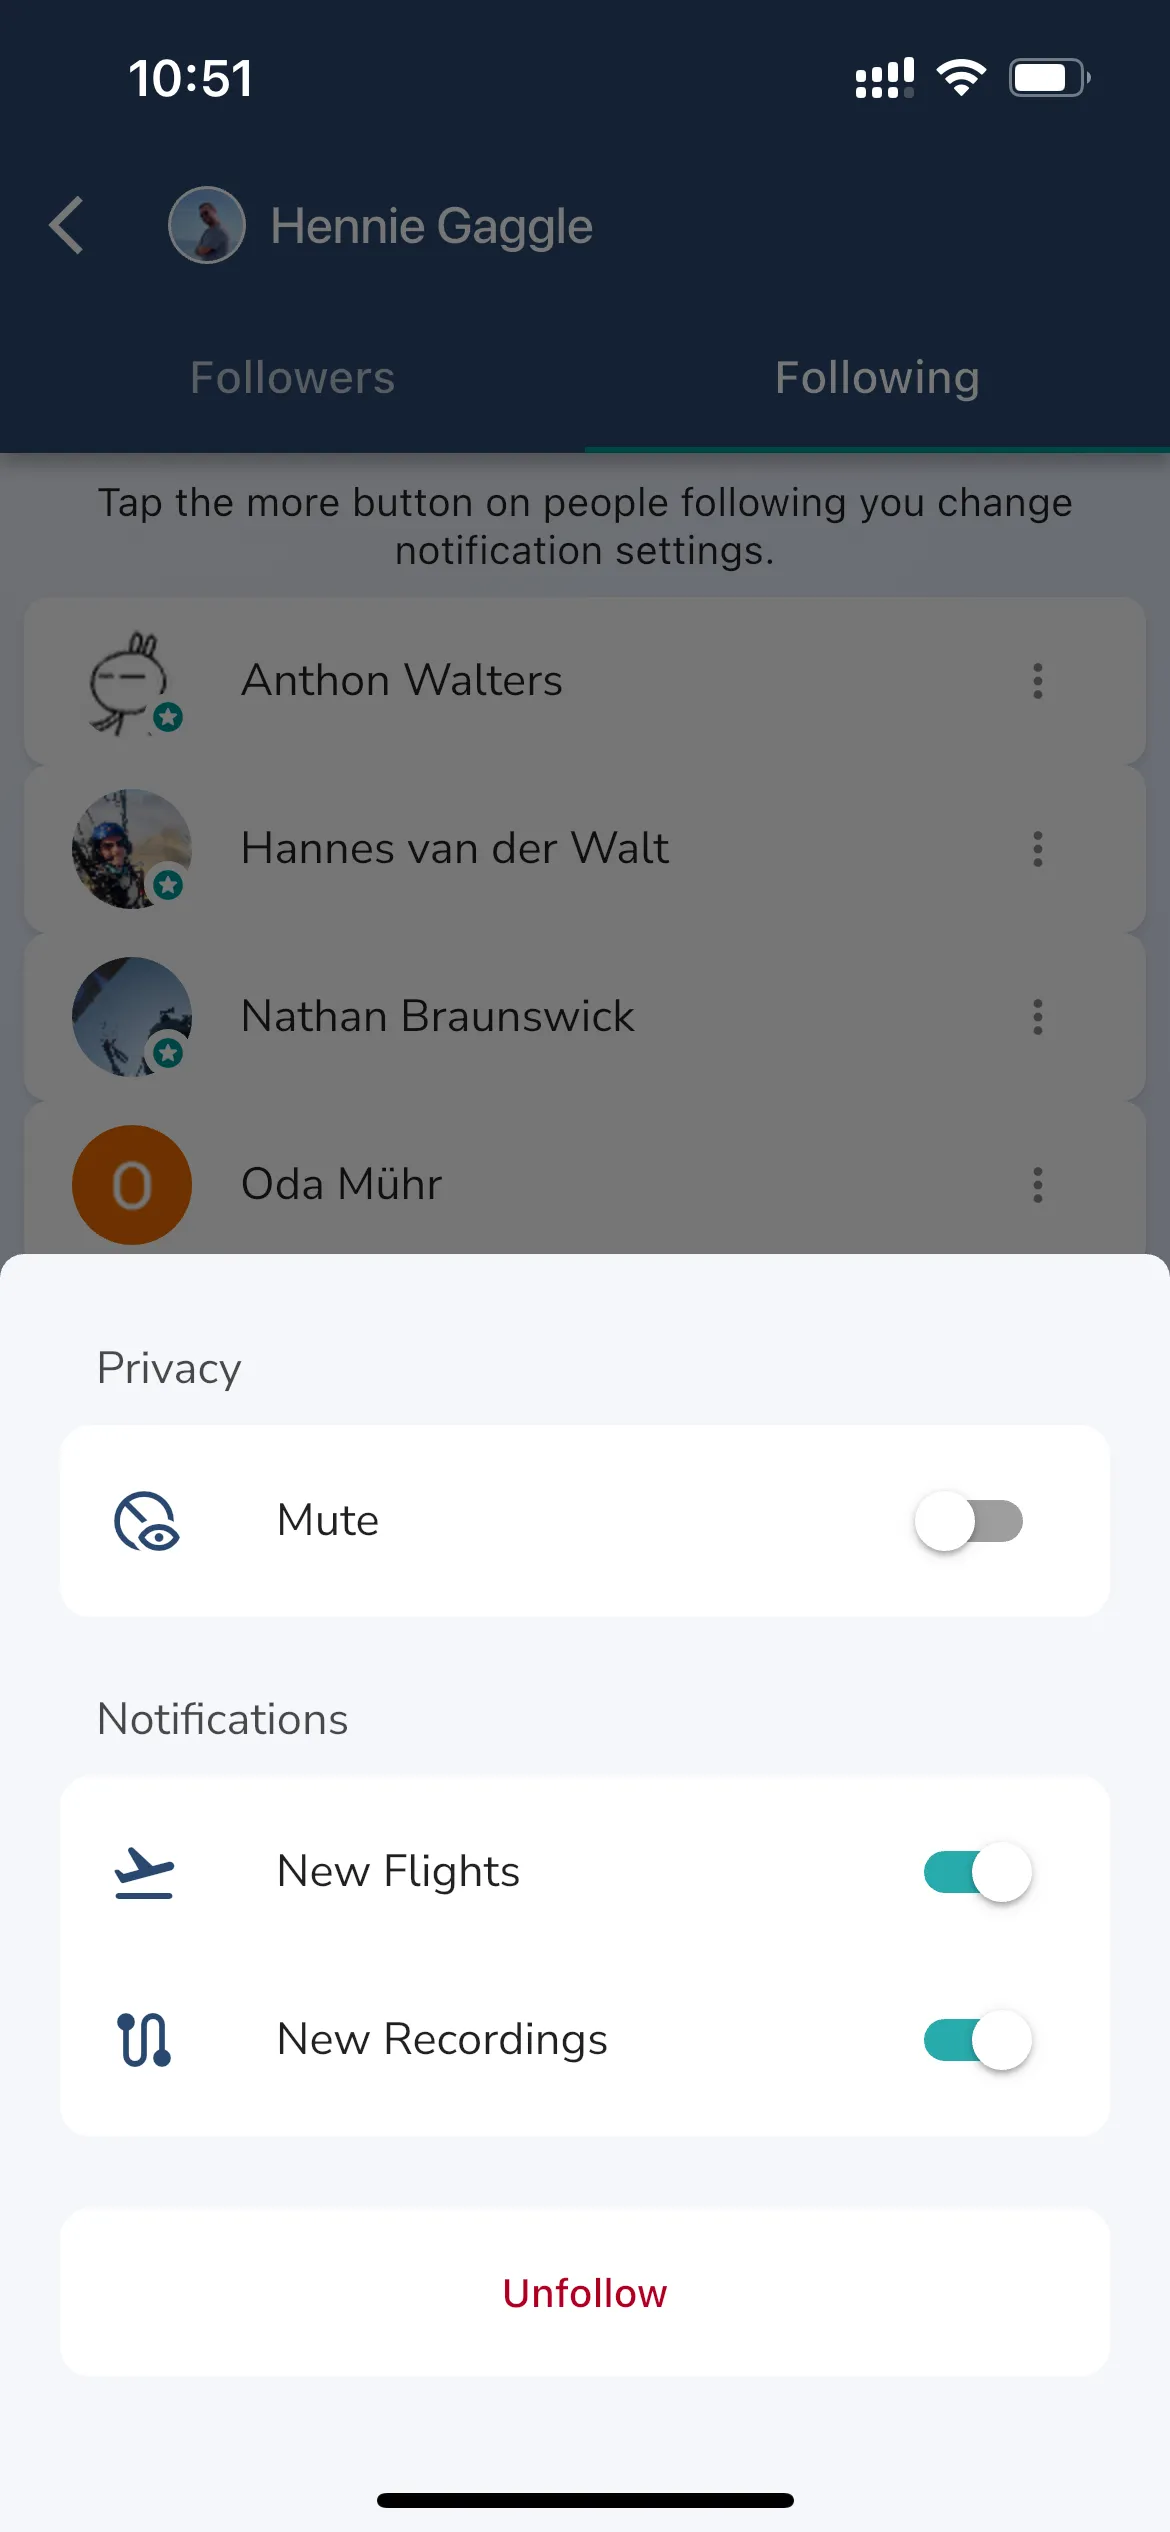
You can access the friends and followers page by navigating to the Profile tab and selecting the Followers/Following numbers next your profile picture, or from the navigation menu on the community page. The page is divided into 2 sections:
Followers shows you a list of pilots that are following you. You can see their profile picture and name. You can tap the 3 dots next to a pilot to open up a menu where you can:
You can see a list of pilots that you are following by switching to the Following tab. From here you can see the pilots profile picture and name. You can tap the 3 dots next to a pilot to open up a menu where you can:
>
Communite Page > Groups > Select a group > Hall of Fame Tab
All groups have a built-in hall of fame. The hall of fame will automatically track the flight statistics for group members to see who have performed their best in any given year. Statistics are tracked for all group members with a Gaggle subscription. Statistics will only be tracked for flights shared with the group.
A new hall of fame will be created for every year and flights are only counted for the year in which they were flown. You can access the hall of fame by tapping on the Hall of Fame tab in the group details page.
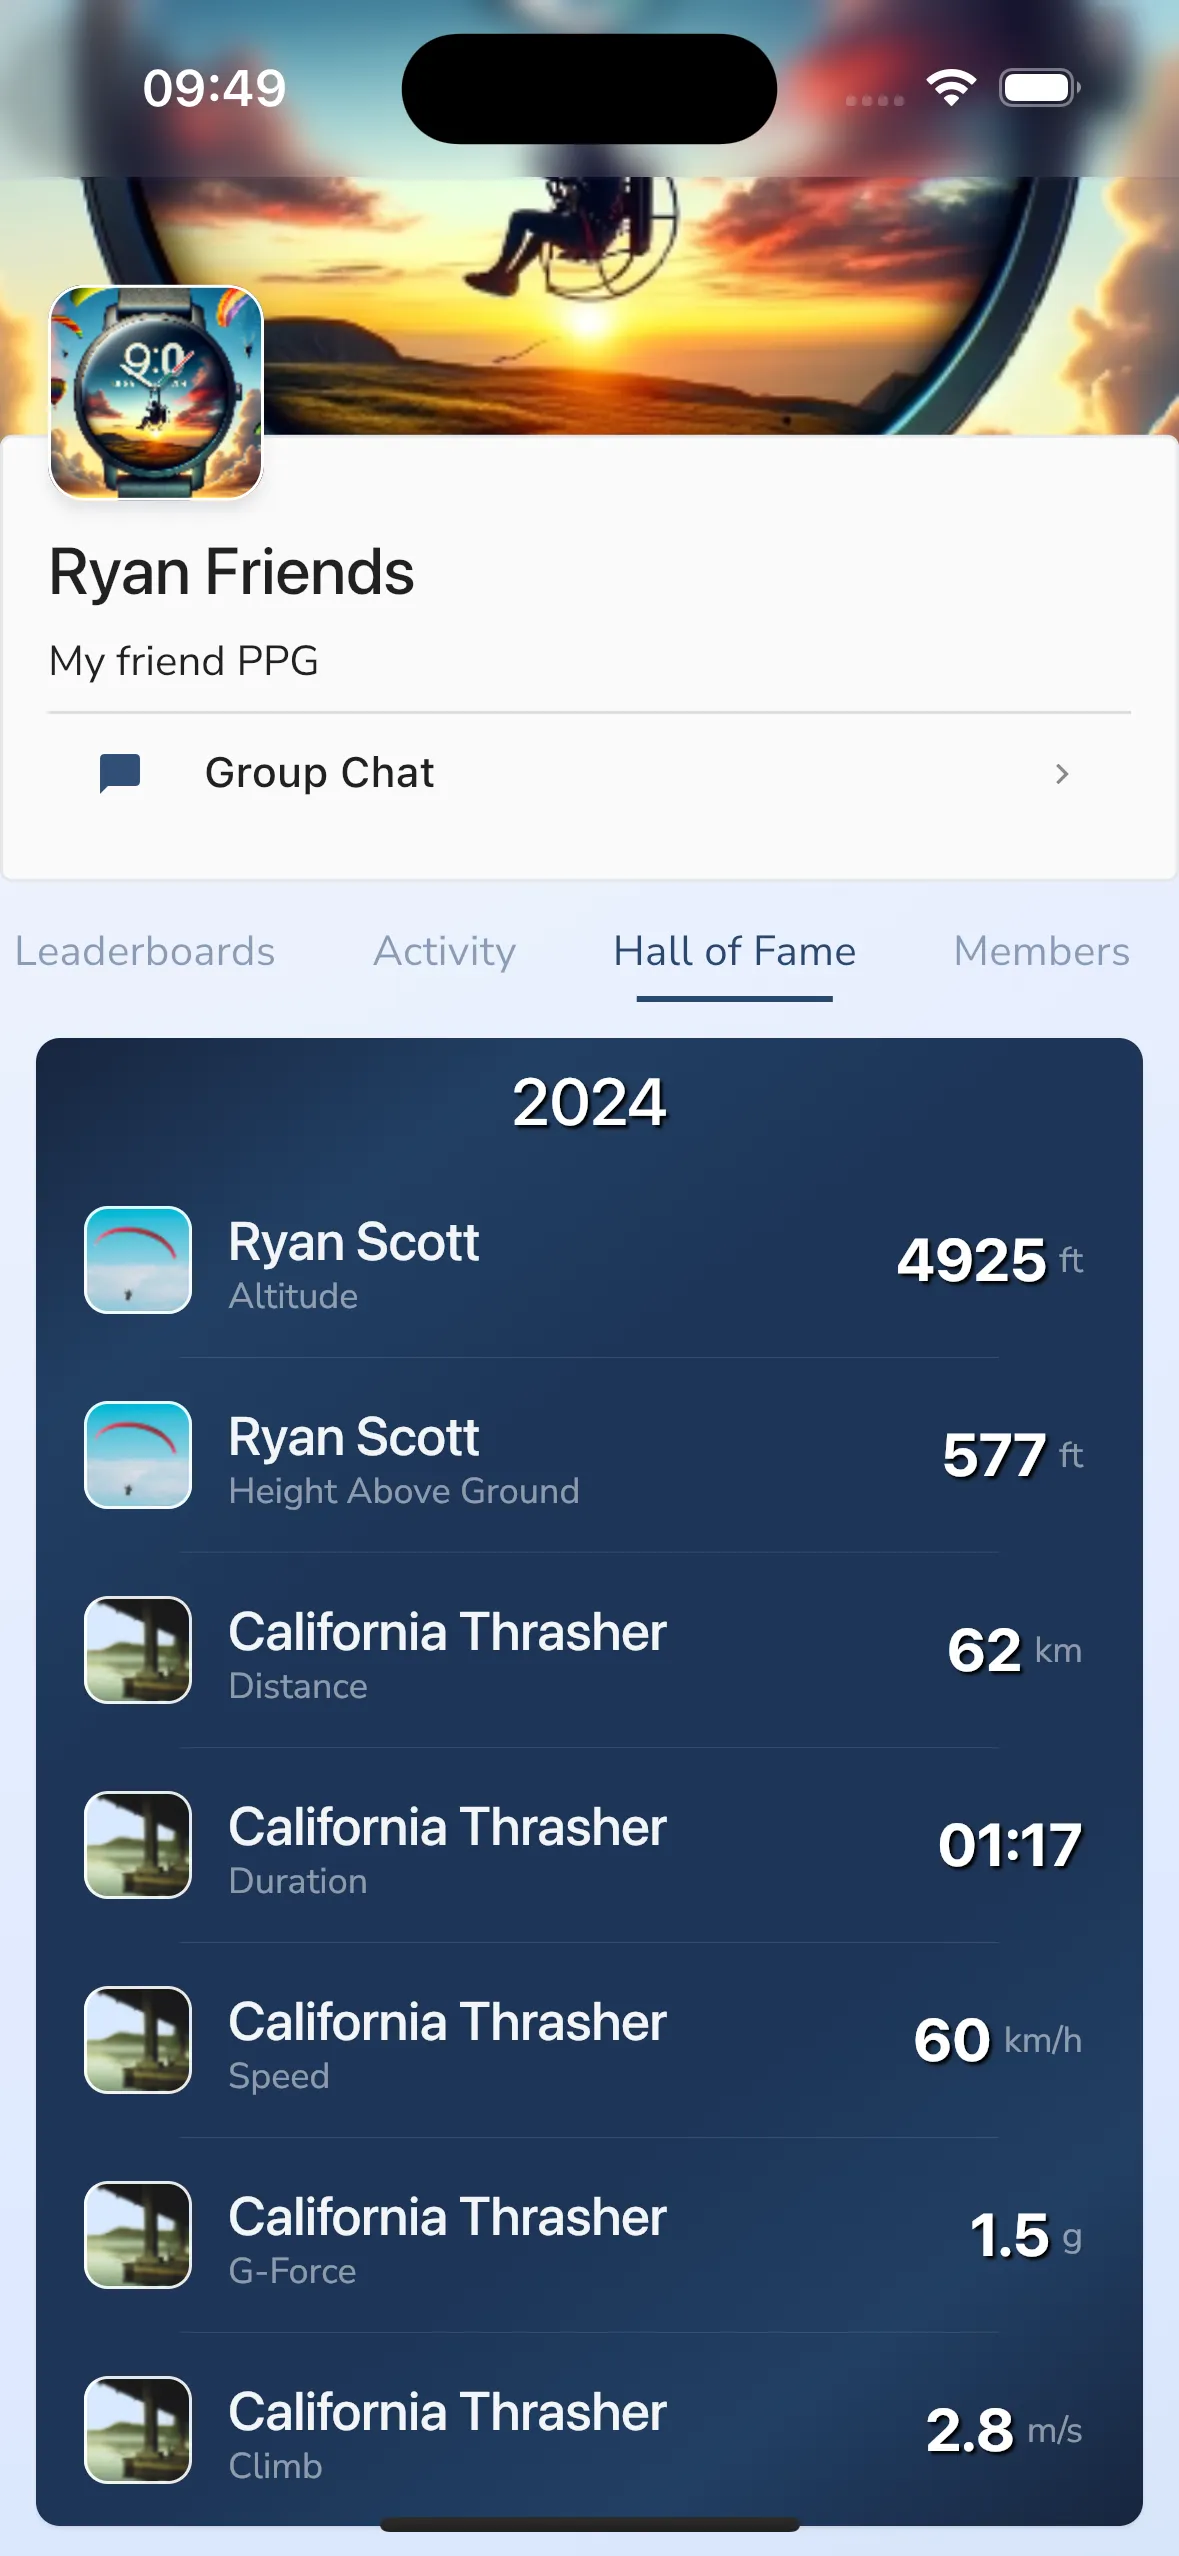
The hall of fame will show the best pilots in the group for the following statistics:
The hall of fame works differently to other stats in Gaggle. It aims to give you a bit more bragging rights, so it’s more lenient in many cases than the other stats in Gaggle, and it will in some cases show higher values than for instance the personal bests section under achievements which aims to be more accurate and only show the best of the best for your personal flights aiming to push you to new heights.
We are also focused on only adding valid flights to the hall of fame so we only track stats that meet the following conditions:
The hall of fame after your flight is uploaded to the server and the stats are calculated. This is usually done within a few minutes after the flight is uploaded.
No, the hall of fame only started considering flights from 25 March 2024 onwards.
No, the hall of fame is only available for the group you are a member of.
The hall of fame uses different criteria to calculate the stats than the personal bests section. The personal bests section aims to show the best of the best for your personal flights, while the hall of fame aims to give you a bit more bragging rights and is more lenient in many cases. The hall of fame also only shows flights that meet certain criteria to ensure that only valid flights are shown. Some flights, like imported flights, are private by default and won’t be shared to the group and won’t be considered for the hall of fame.
Imported flights are private by default and won’t be shared to the group and won’t be considered for the hall of fame. You can share imported flights with the group by editing the flight and changing the privacy settings to groups or everyone.
If you see a flight in the hall of fame that you think is not valid, please report the flight to the pilot, so they can remove the flight from the group by making it private.
>
Community Page > Groups > Select a group > Leaderboards tab
Any group in Gaggle can keep track of the best pilots in the group by using leaderboards. Leaderboards are a great way to see who is performing the best in the group and to give pilots a bit of extra motivation to push themselves to new heights or to have a bit of friendly competition with other pilots in the group.
To create a leaderboard in a group, go to the group details page and tap on the Leaderboards tab. You can then create a new leaderboard by tapping on the Create Leaderboard button. You can then select the type of leaderboard you want to create and the stats you want to track. You can also set a name for the leaderboard.
Leaderboards are a subscription only feature, and you need the Adventurer subscription to create and view leaderboards in a group. Pilots will with the Frequent Flyer subscription will be able to score on leaderboards but not create or view them.
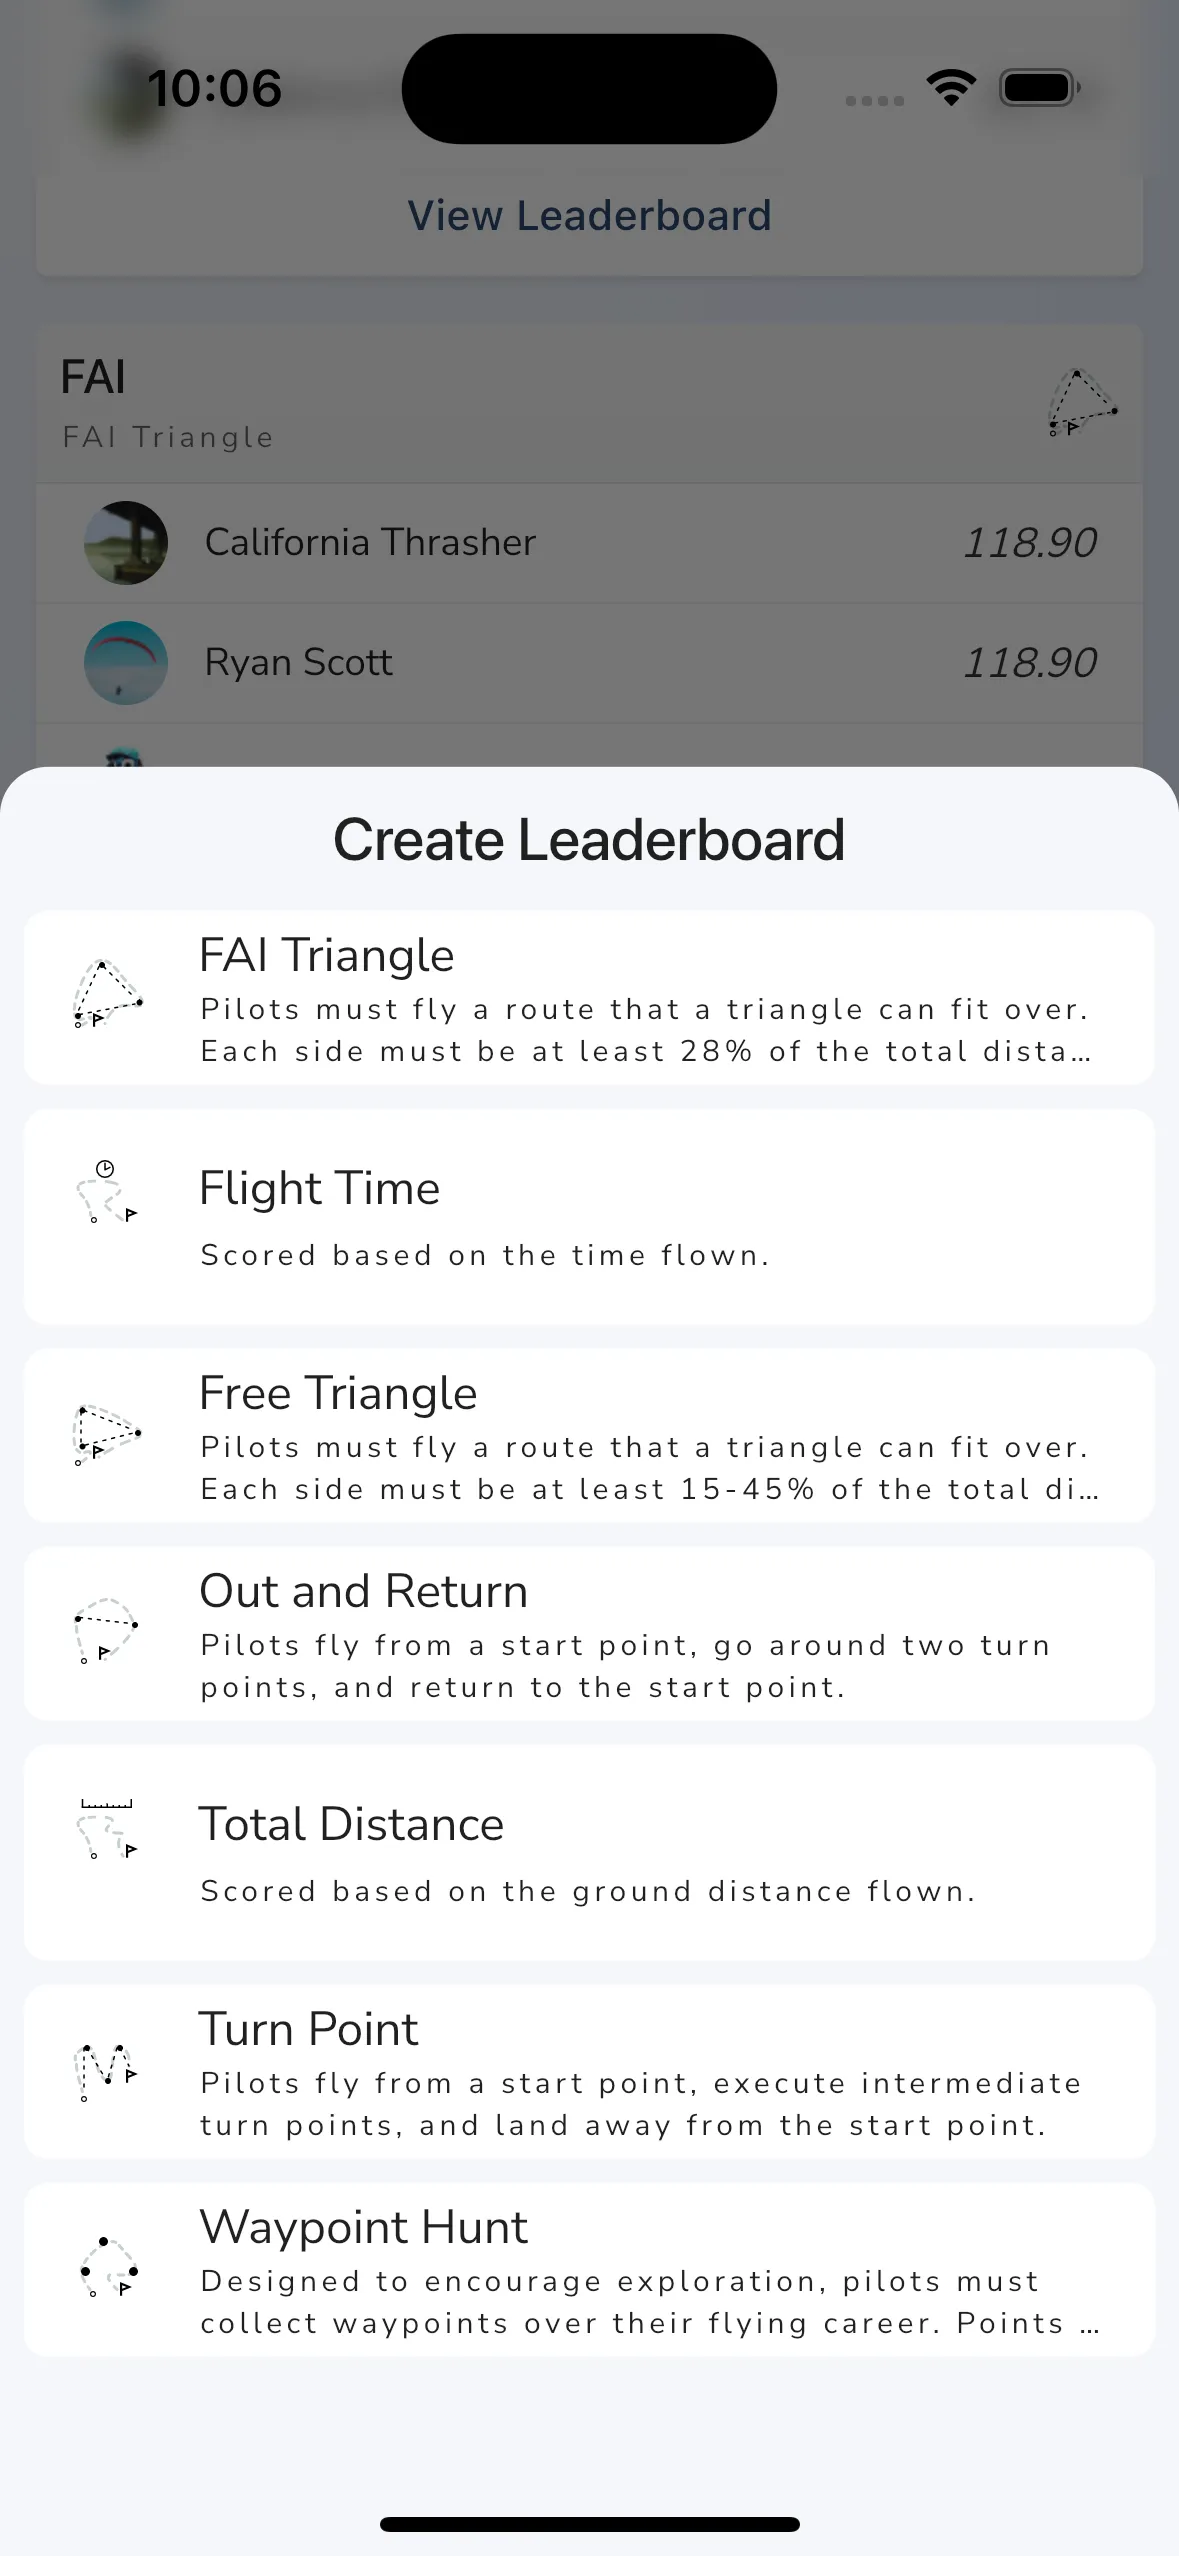
You can create a new leaderboard in the group by tapping the Create Leaderboard button. Creating leaderboards requires an Adventurer subscription.
When creating a leaderboard you have to choose which kind of leaderboard you want:
Any new flights added to the group after the leaderboard is created will be scored and added to the leaderboard.
Some leaderboards cannot be edited once they are created, but you can delete a leaderboard if you want to create a new one.
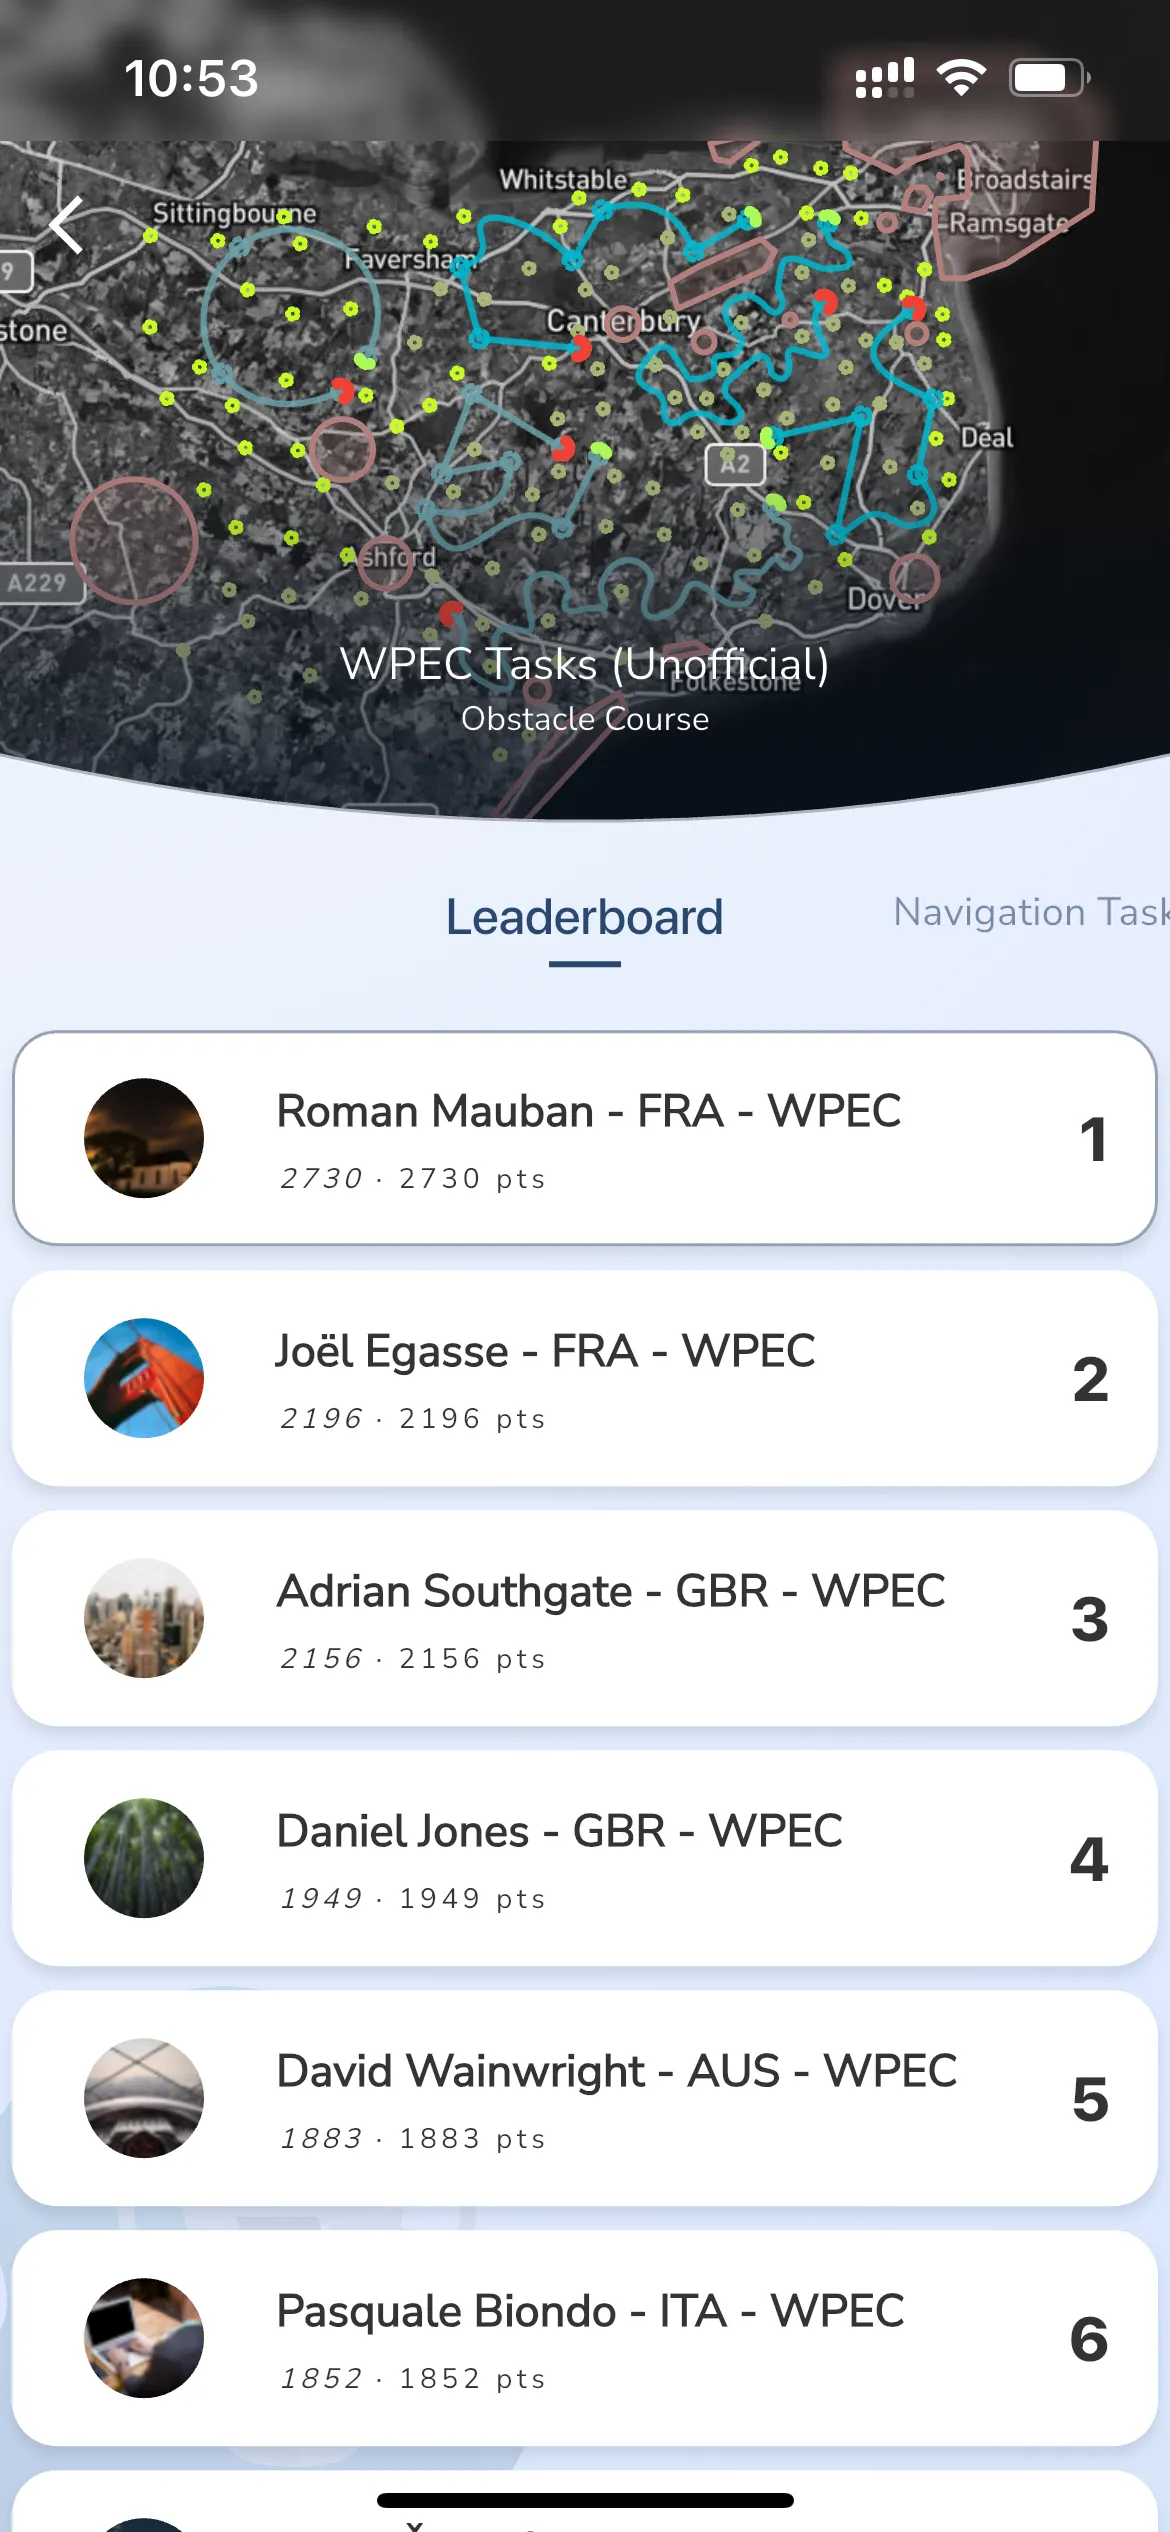
You can view a leaderboard by tapping on the View Leaderboard button for the leaderboard you want to view. The leaderboard will show a list of all the pilots that have scored points for that leaderboard.
You can tap on the pilot to see and overview of the flight that scored points for the leaderboard. Tapping a second time will open the flight details page for that flight where you can also replay the flight.
You can view the details for the leaderboard by tapping on the details tab on the leaderboard page. The details tab will show you the scoring parameters. Group admins can also delete the leaderboard by tapping on the delete button.
No, most leaderboards cannot be edited once they are created, but you can delete a leaderboard if you want to create a new one.
Any new flights added to the group after the leaderboard is created will be scored and added to the leaderboard where they meet the task and scoring criteria for that leaderboard.
Yes, imported flights can be added to the leaderboard if they meet the task and scoring criteria for that leaderboard. By default, imported flights are set to private, and you need to share the flight with the group to have it considered for the leaderboard.
If you see a flight in the leaderboard that you think is not valid, go to the group activity page and tap the 3 buttons on the flight to unlink it from the group. The flight will then be removed from the leaderboard.
>
Community Page > Groups
Groups in Gaggle are perfect for a group of friends that frequently fly together or for family members that want to keep a watchful eye on their loved ones while they go flying. Most pilots are part of the following types of groups:
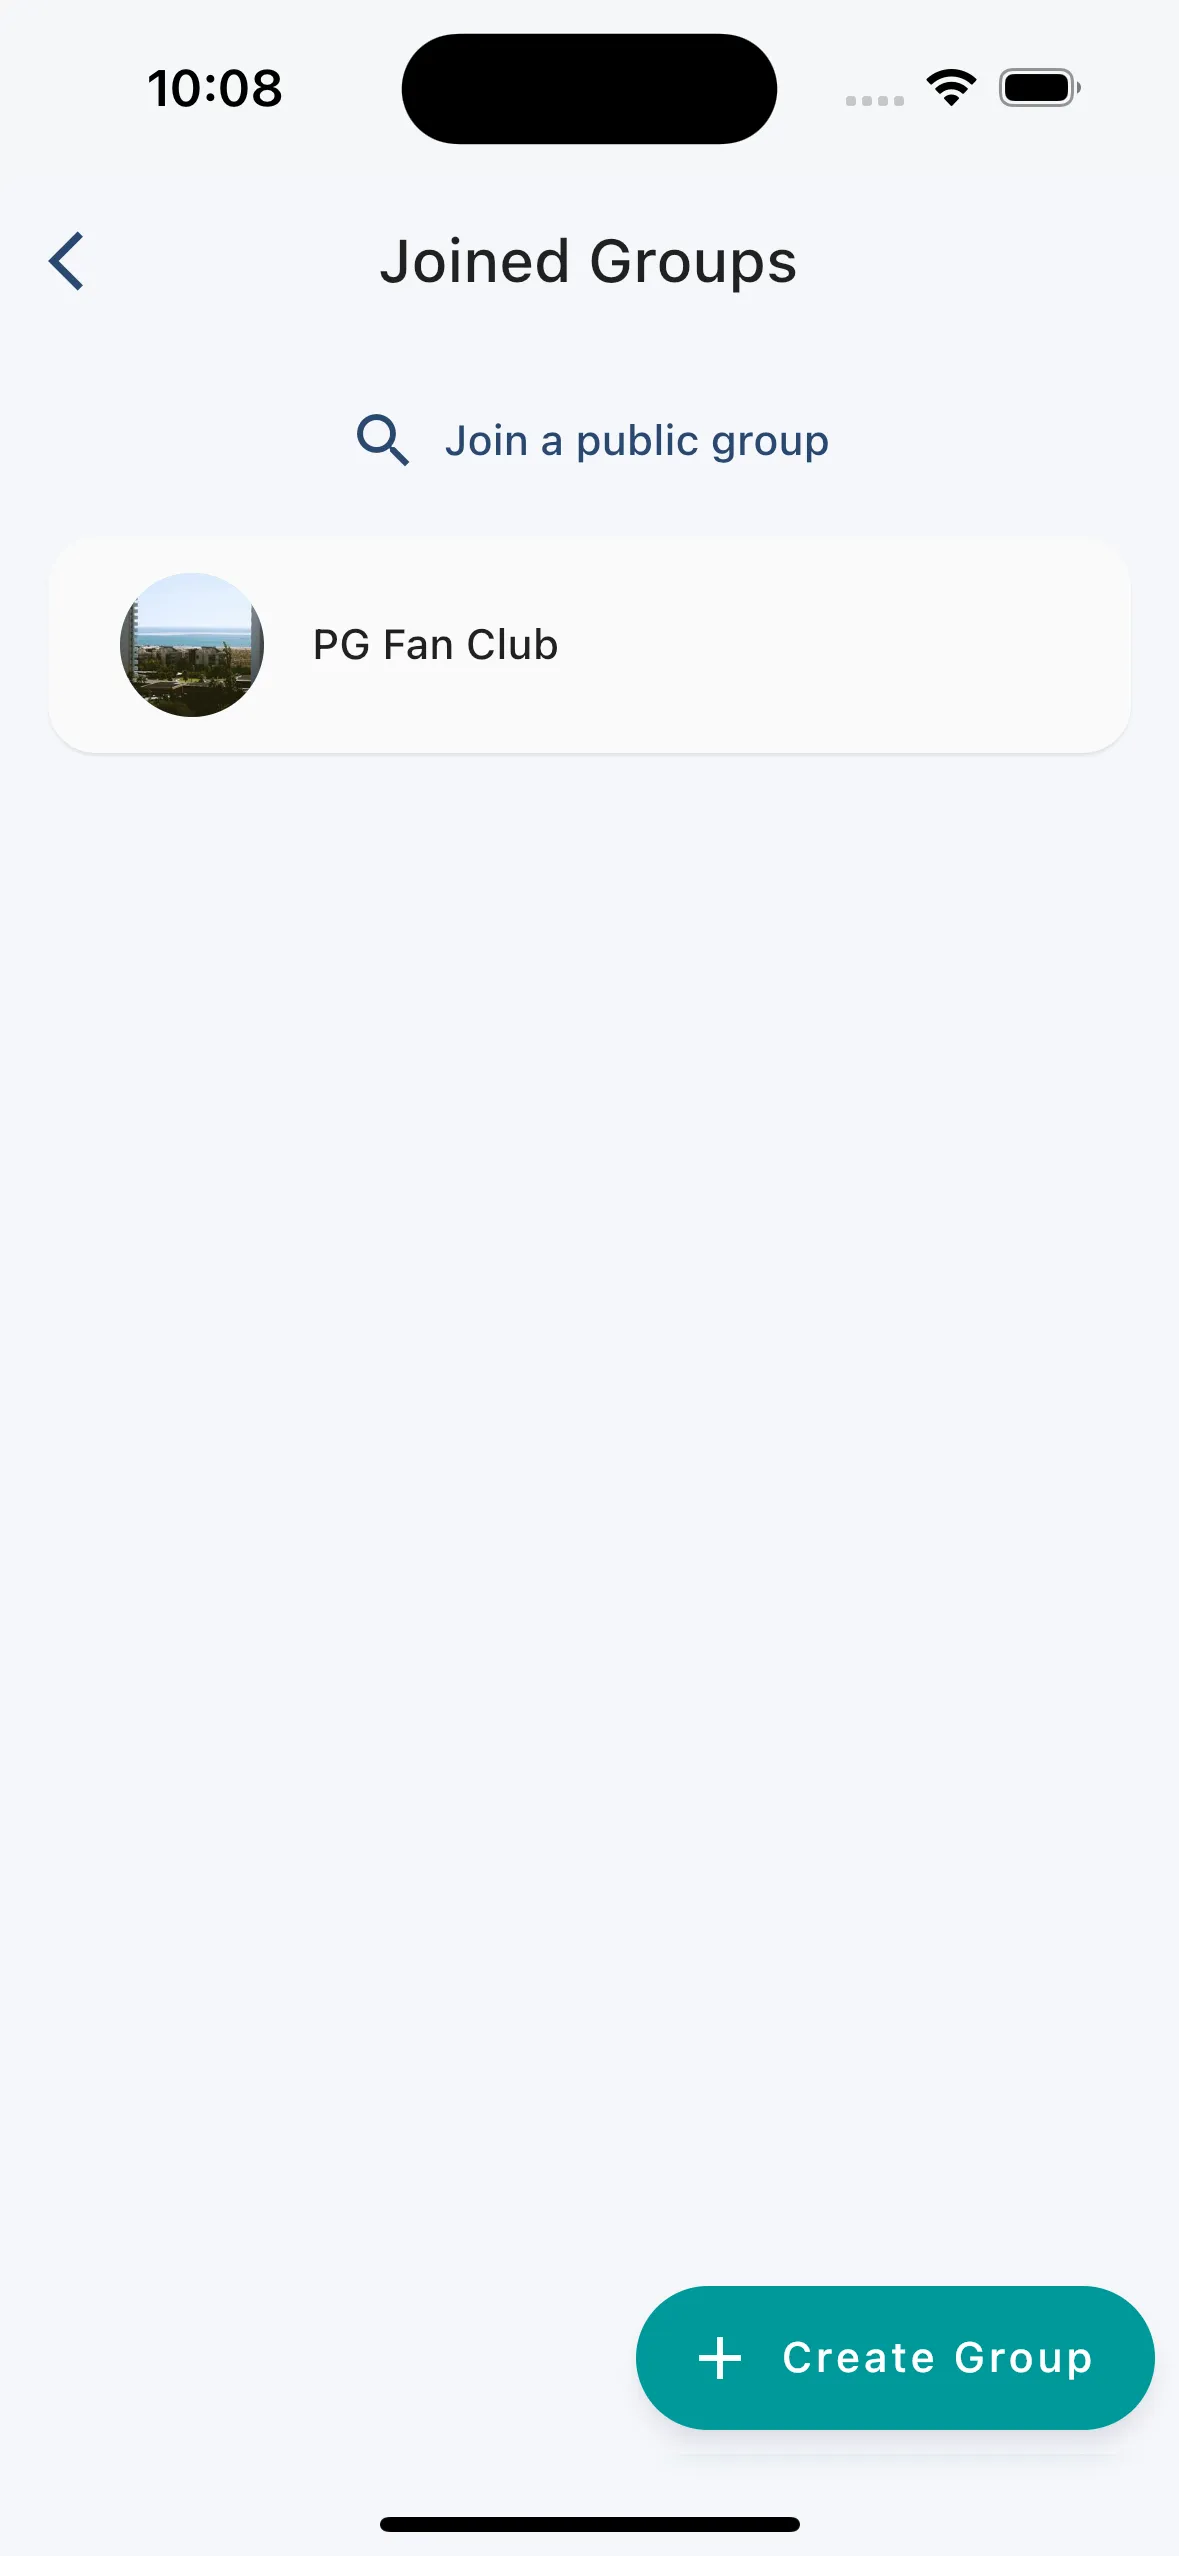
The group list shows you all the groups you are a member of. You can tap on any of the groups to open up the group details page. You can also tap on the Create Group button to create a new group. To join a public group you can tap on the Join a public group button and then search for a group to join.
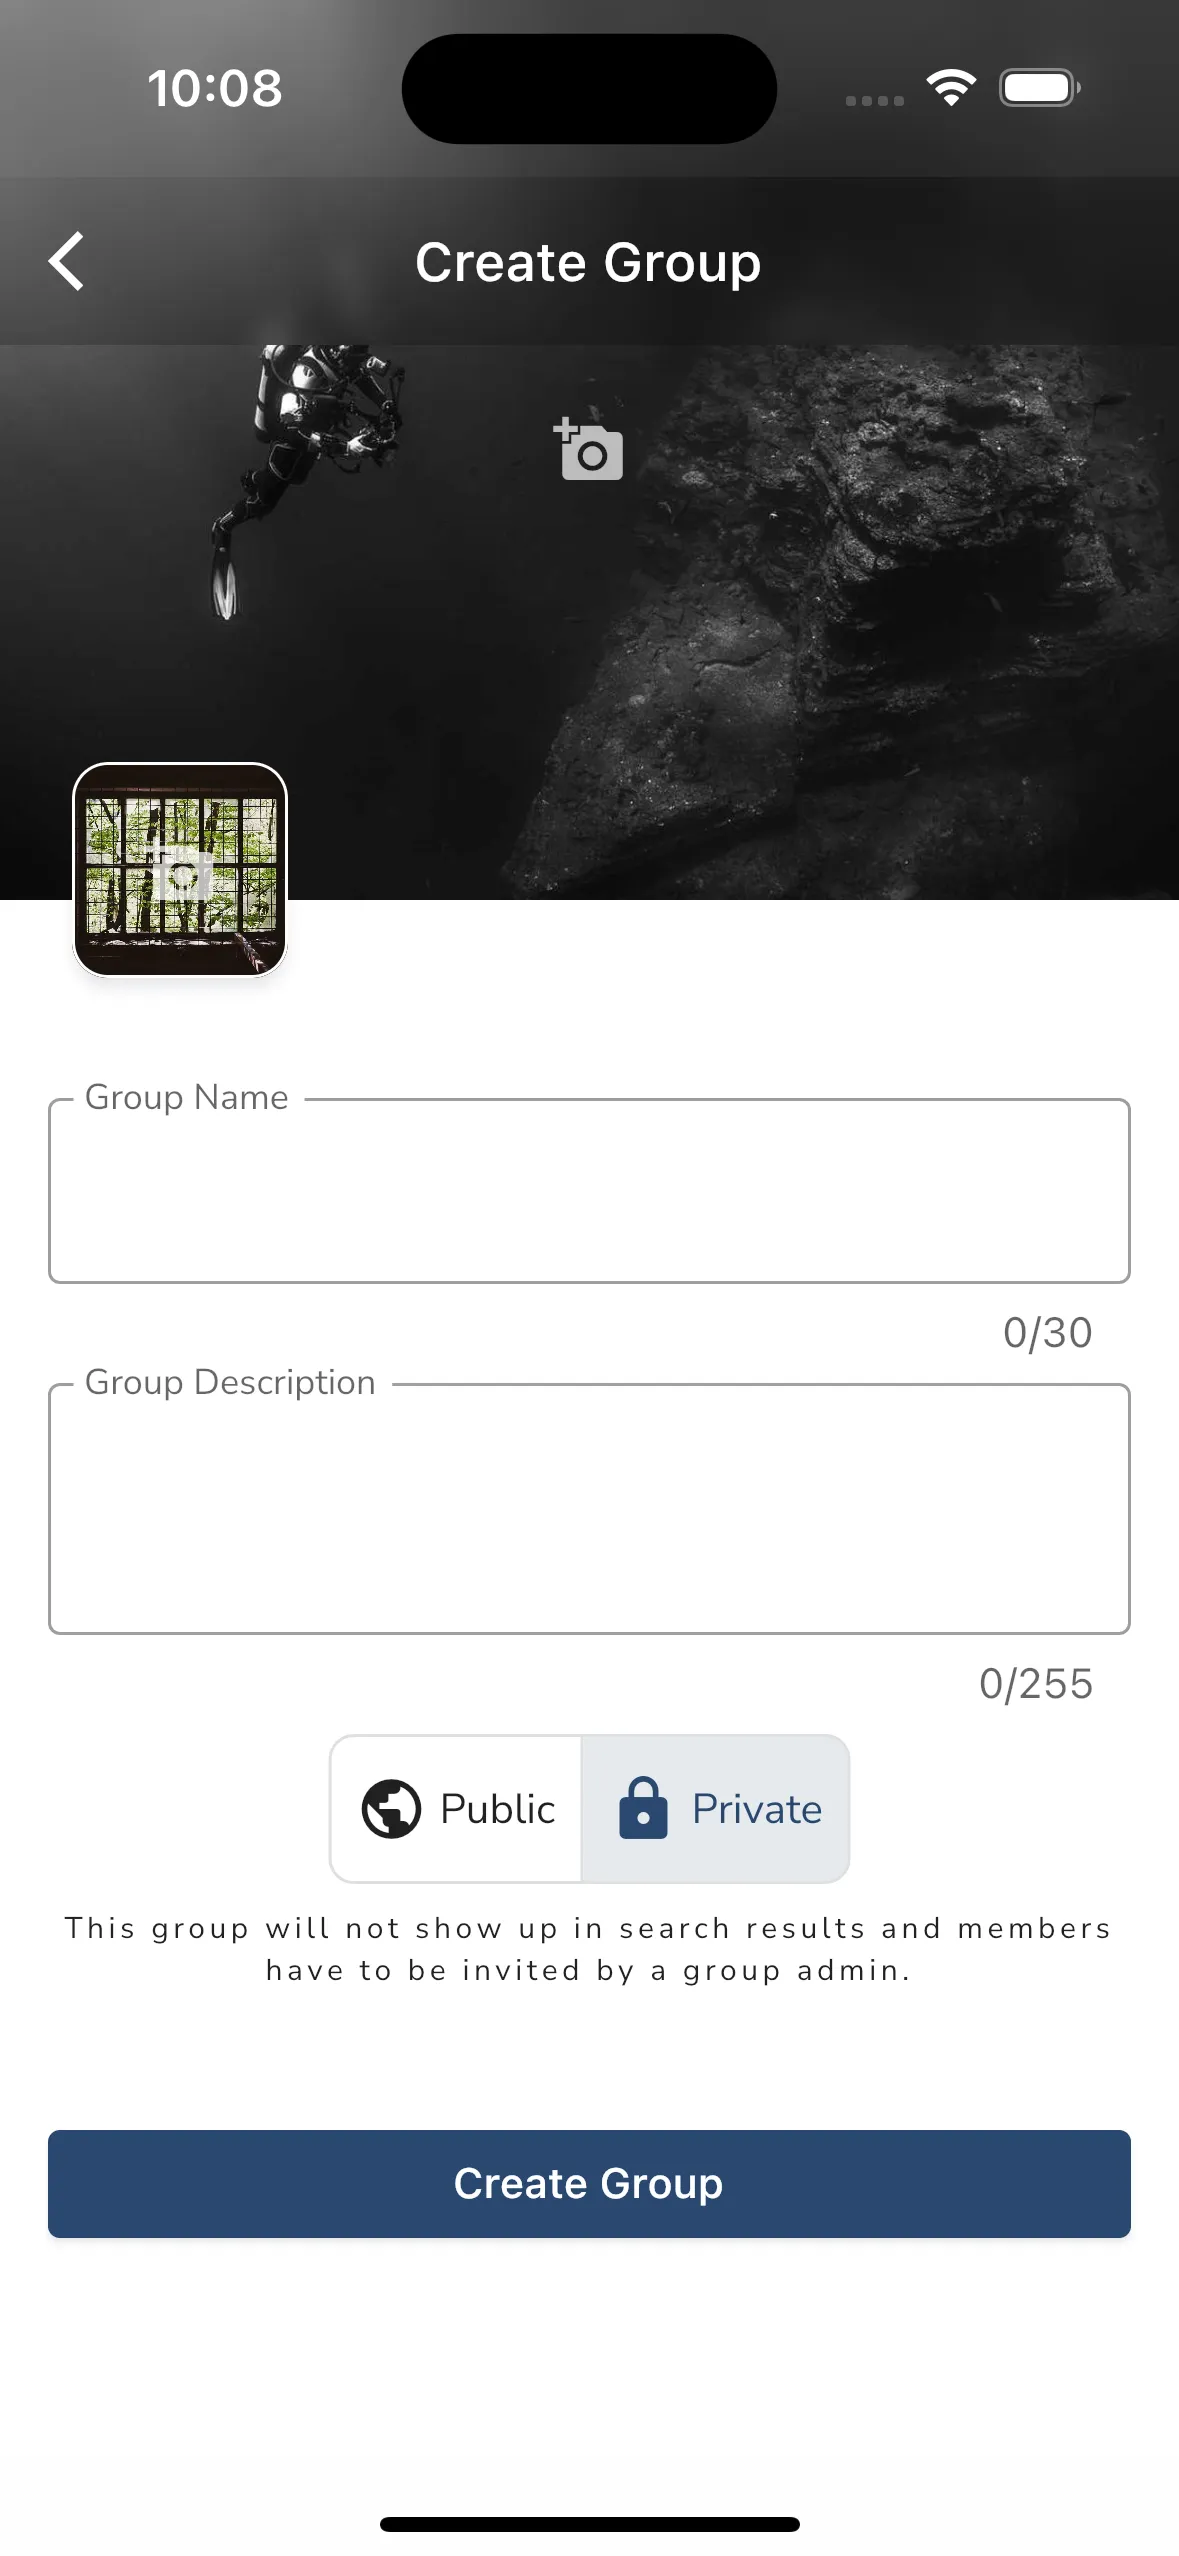
If you want to make your own group in Gaggle, go to the Community screen, then select My Groups. In the My Groups screen, tap on the Create Group button to open the screen where you can create a new group. To make a group, you must provide a name, description, and possibly an image that will be utilised for the group. You can also decide if a group should be public or private. If a group is public, anyone can join the group.
Once a group is created you can share an invite link to the group with other pilots. If a group is private, you must invite members to join the group. Once you have created a group, you can invite members to join the group by sharing the group invite link.
You can also change additional privacy settings for a group after it’s created like whether new members need approval before they can join the group.
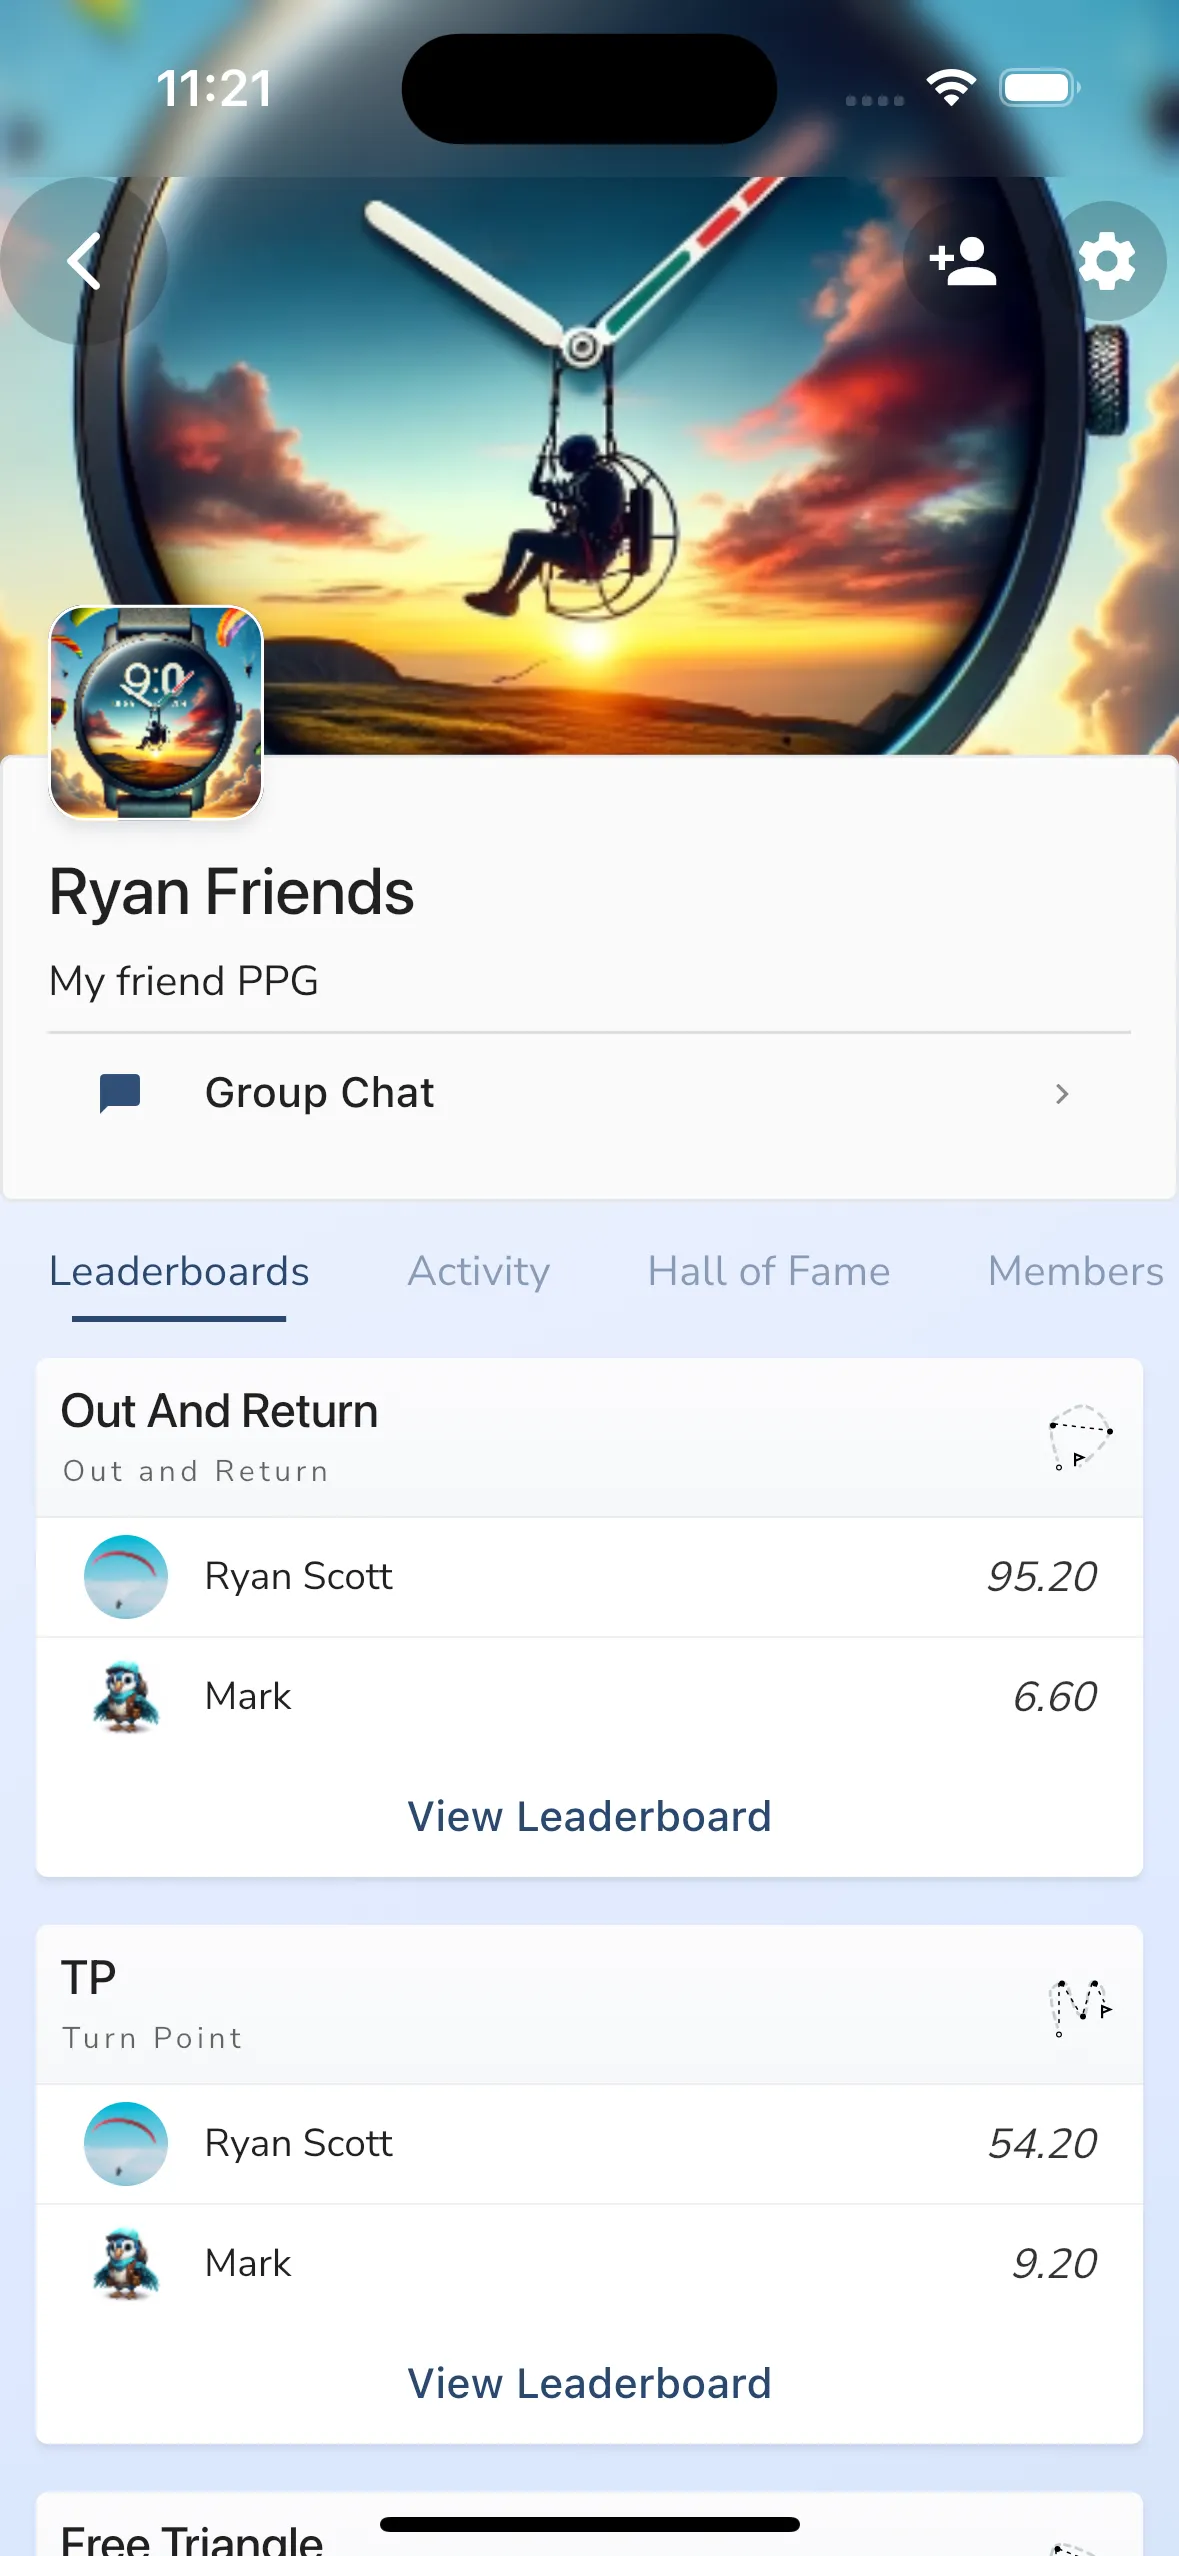
The group home page shows you the following information:
Group Details - The group details section shows you the name of the group, the description, and the group image.
Group Navigation - The group navigation section allows you to view the group members, go to the group chat, or you can see the live location tracking of any group members currently flying.
Leaderboards - The group leaderboards section shows you the leaderboards for the group. You can tap on any leaderboard to view the leaderboard details. Group admins can create new leaderboards by tapping on the Create Leaderboard button.
Activity - The group activity feed shows you flight recordings from pilots in your group. The feed is in chronological order showing flights from newest to oldest. You can tap on any flight in the activity feed to open up the flight recording viewer.
Hall of Fame - The hall of fame section shows you the pilots that performed the best in the group for the following statistics: Altitude, Height Above Ground, Flight Distance, Flight Duration, Maximum Speed, Maximum G-Force, and Maximum Climb Rate.
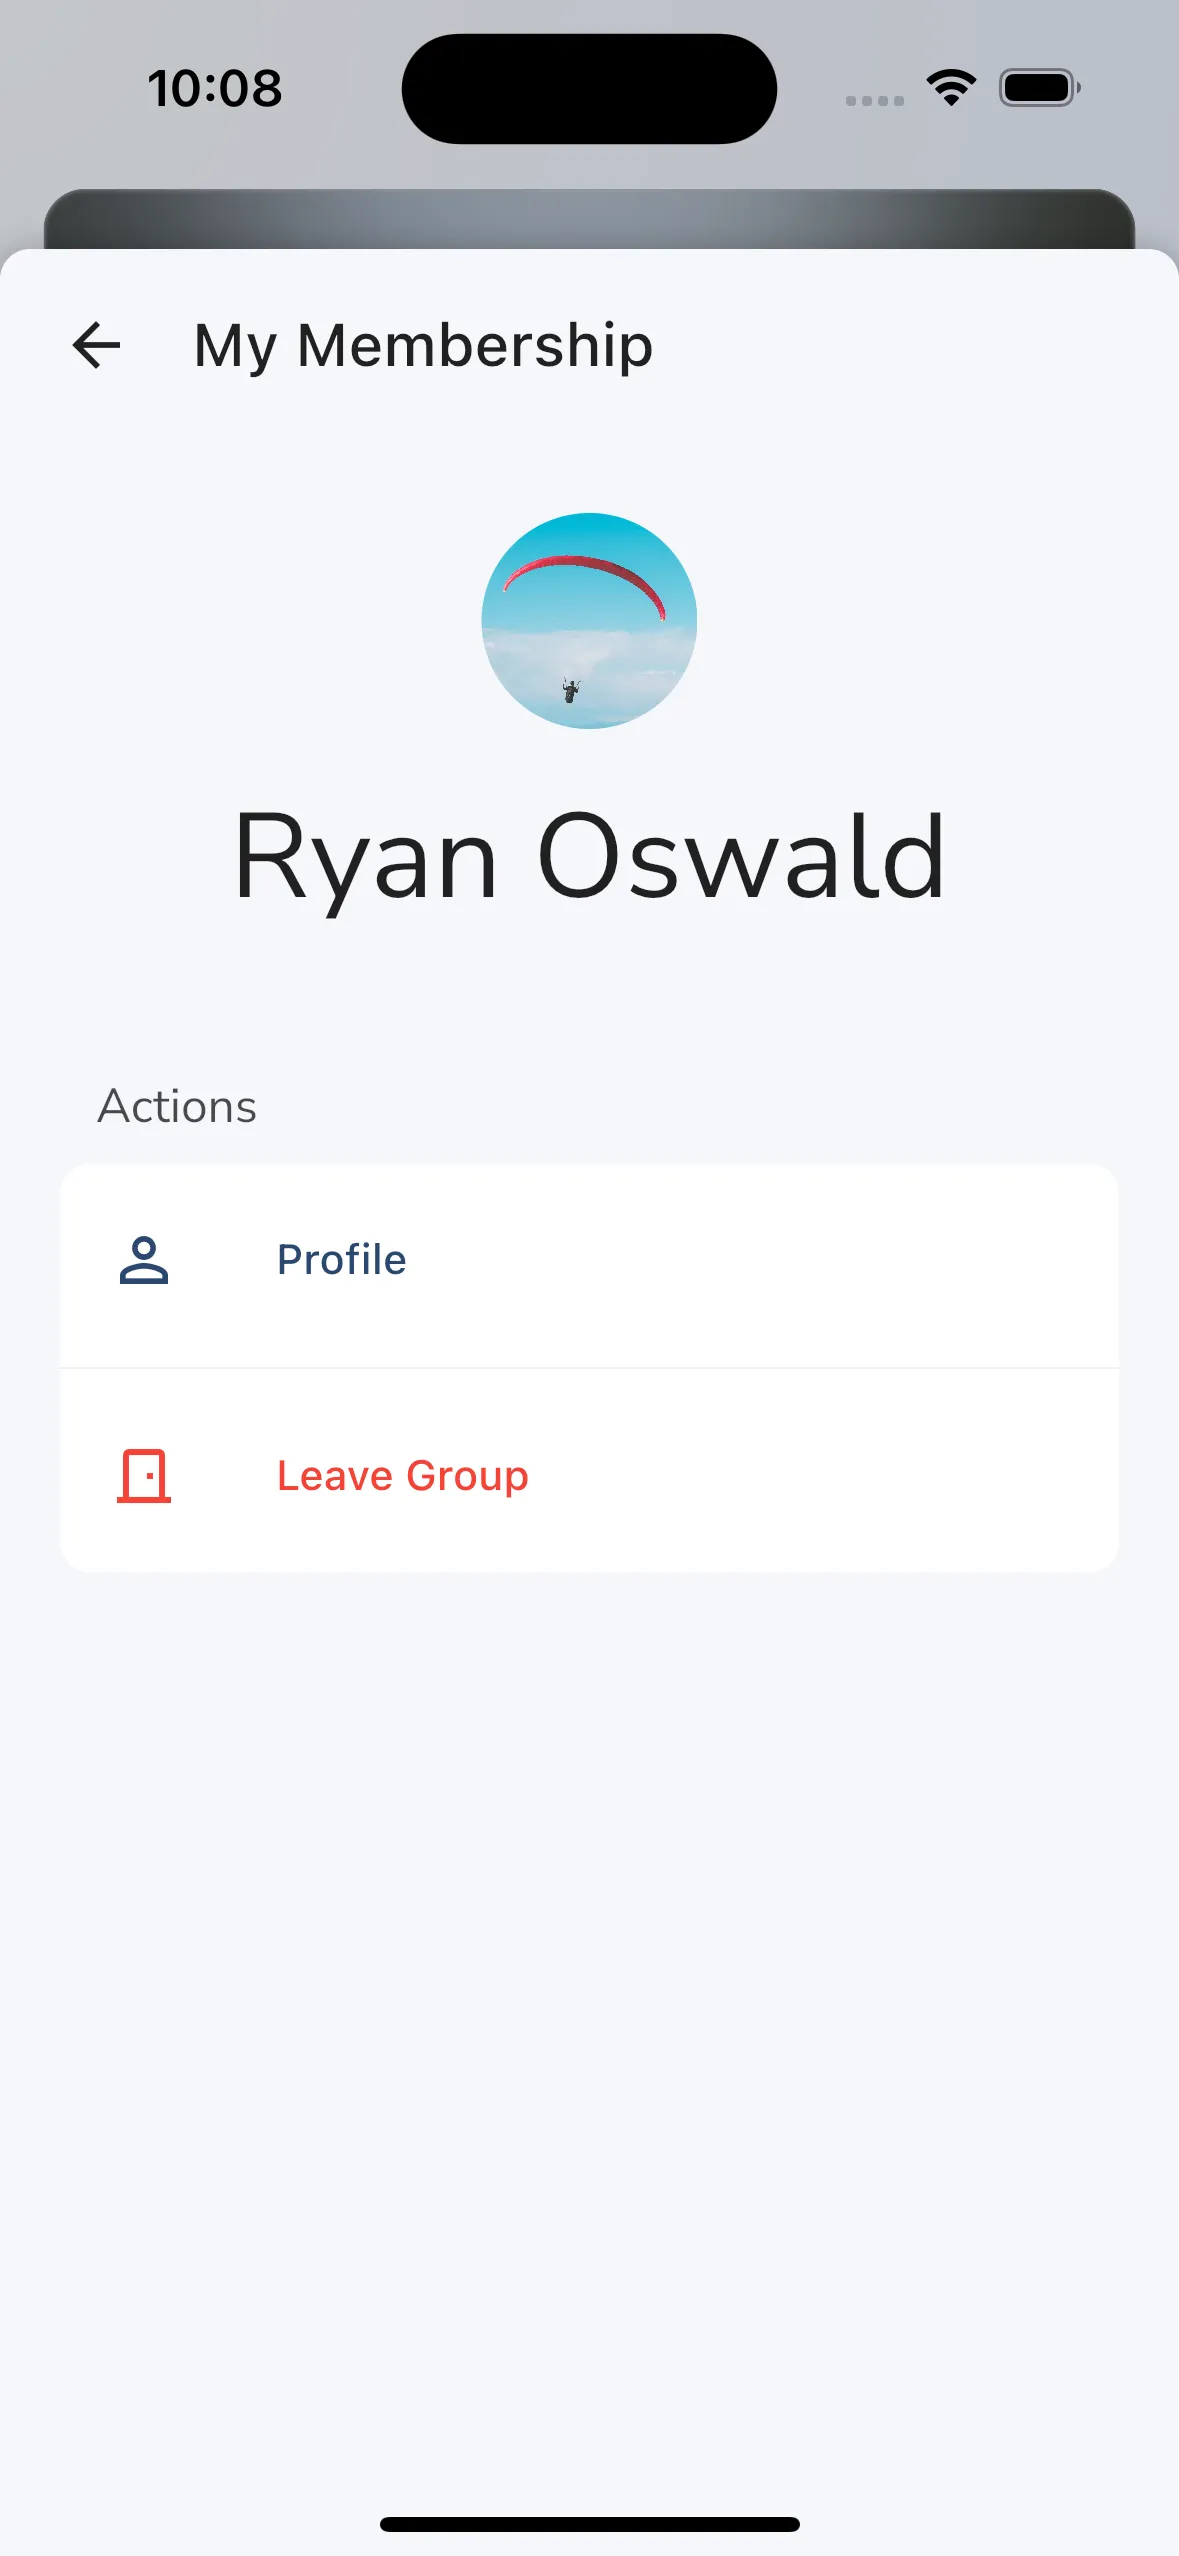
Members - The members section shows you all the members in the group. You can tap on any of the pilots in the list to open up their membership details where you can then remove them from the group. Members can also leave the group from their membership details page.
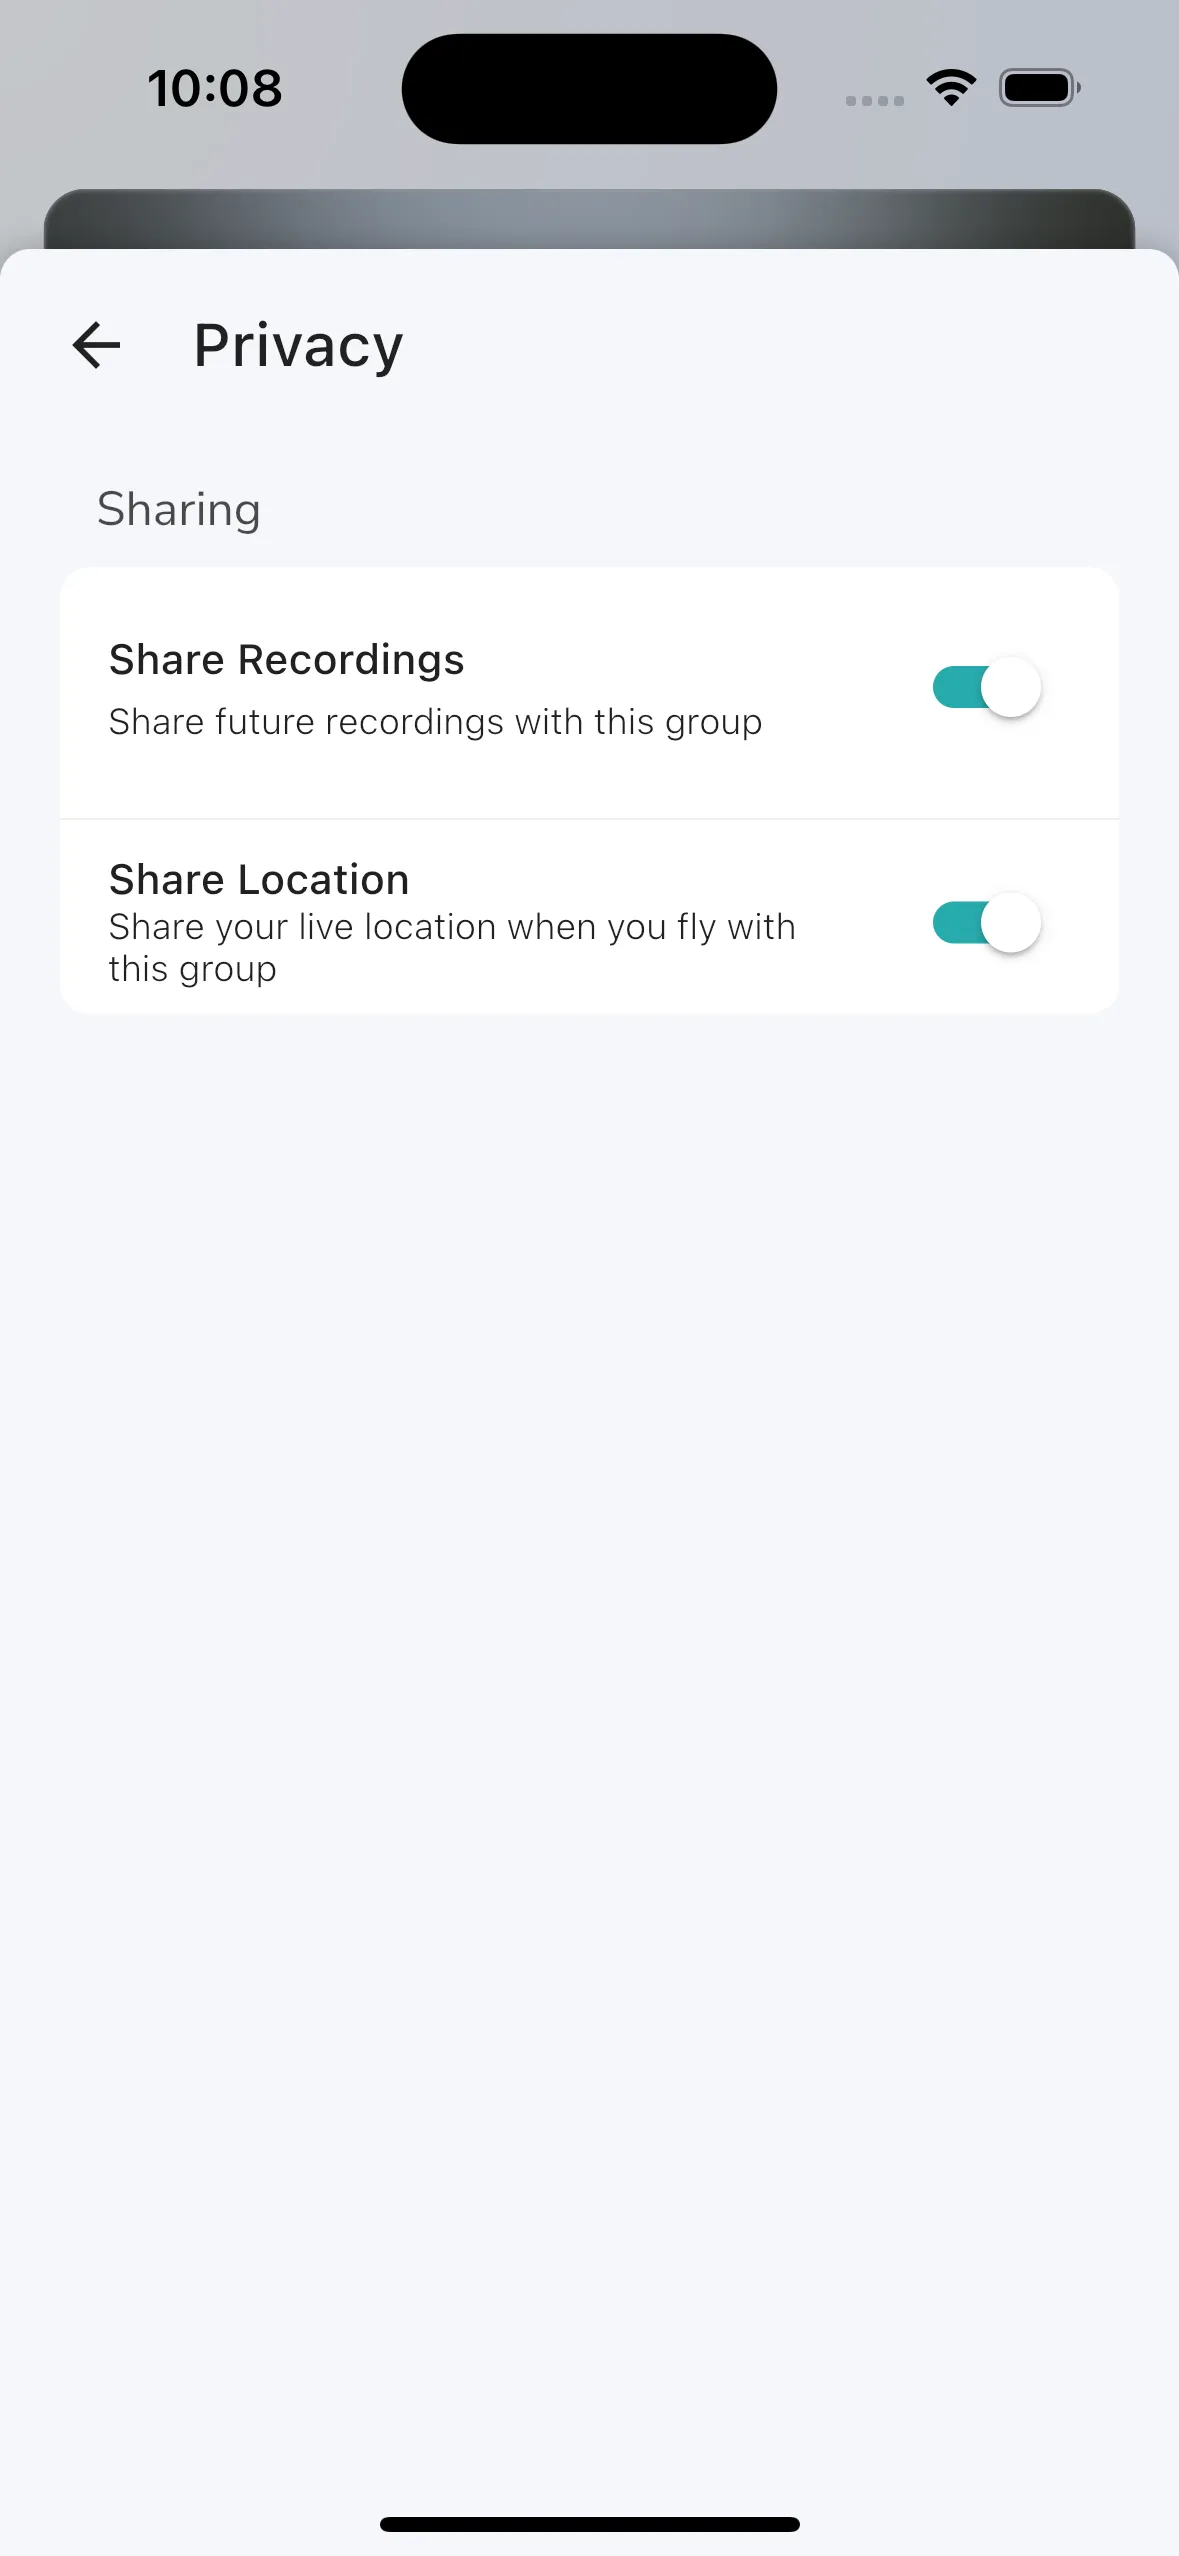
Every group member has their own privacy controls for a group. This allows you to choose if you want to share your live location and recordings with the group.
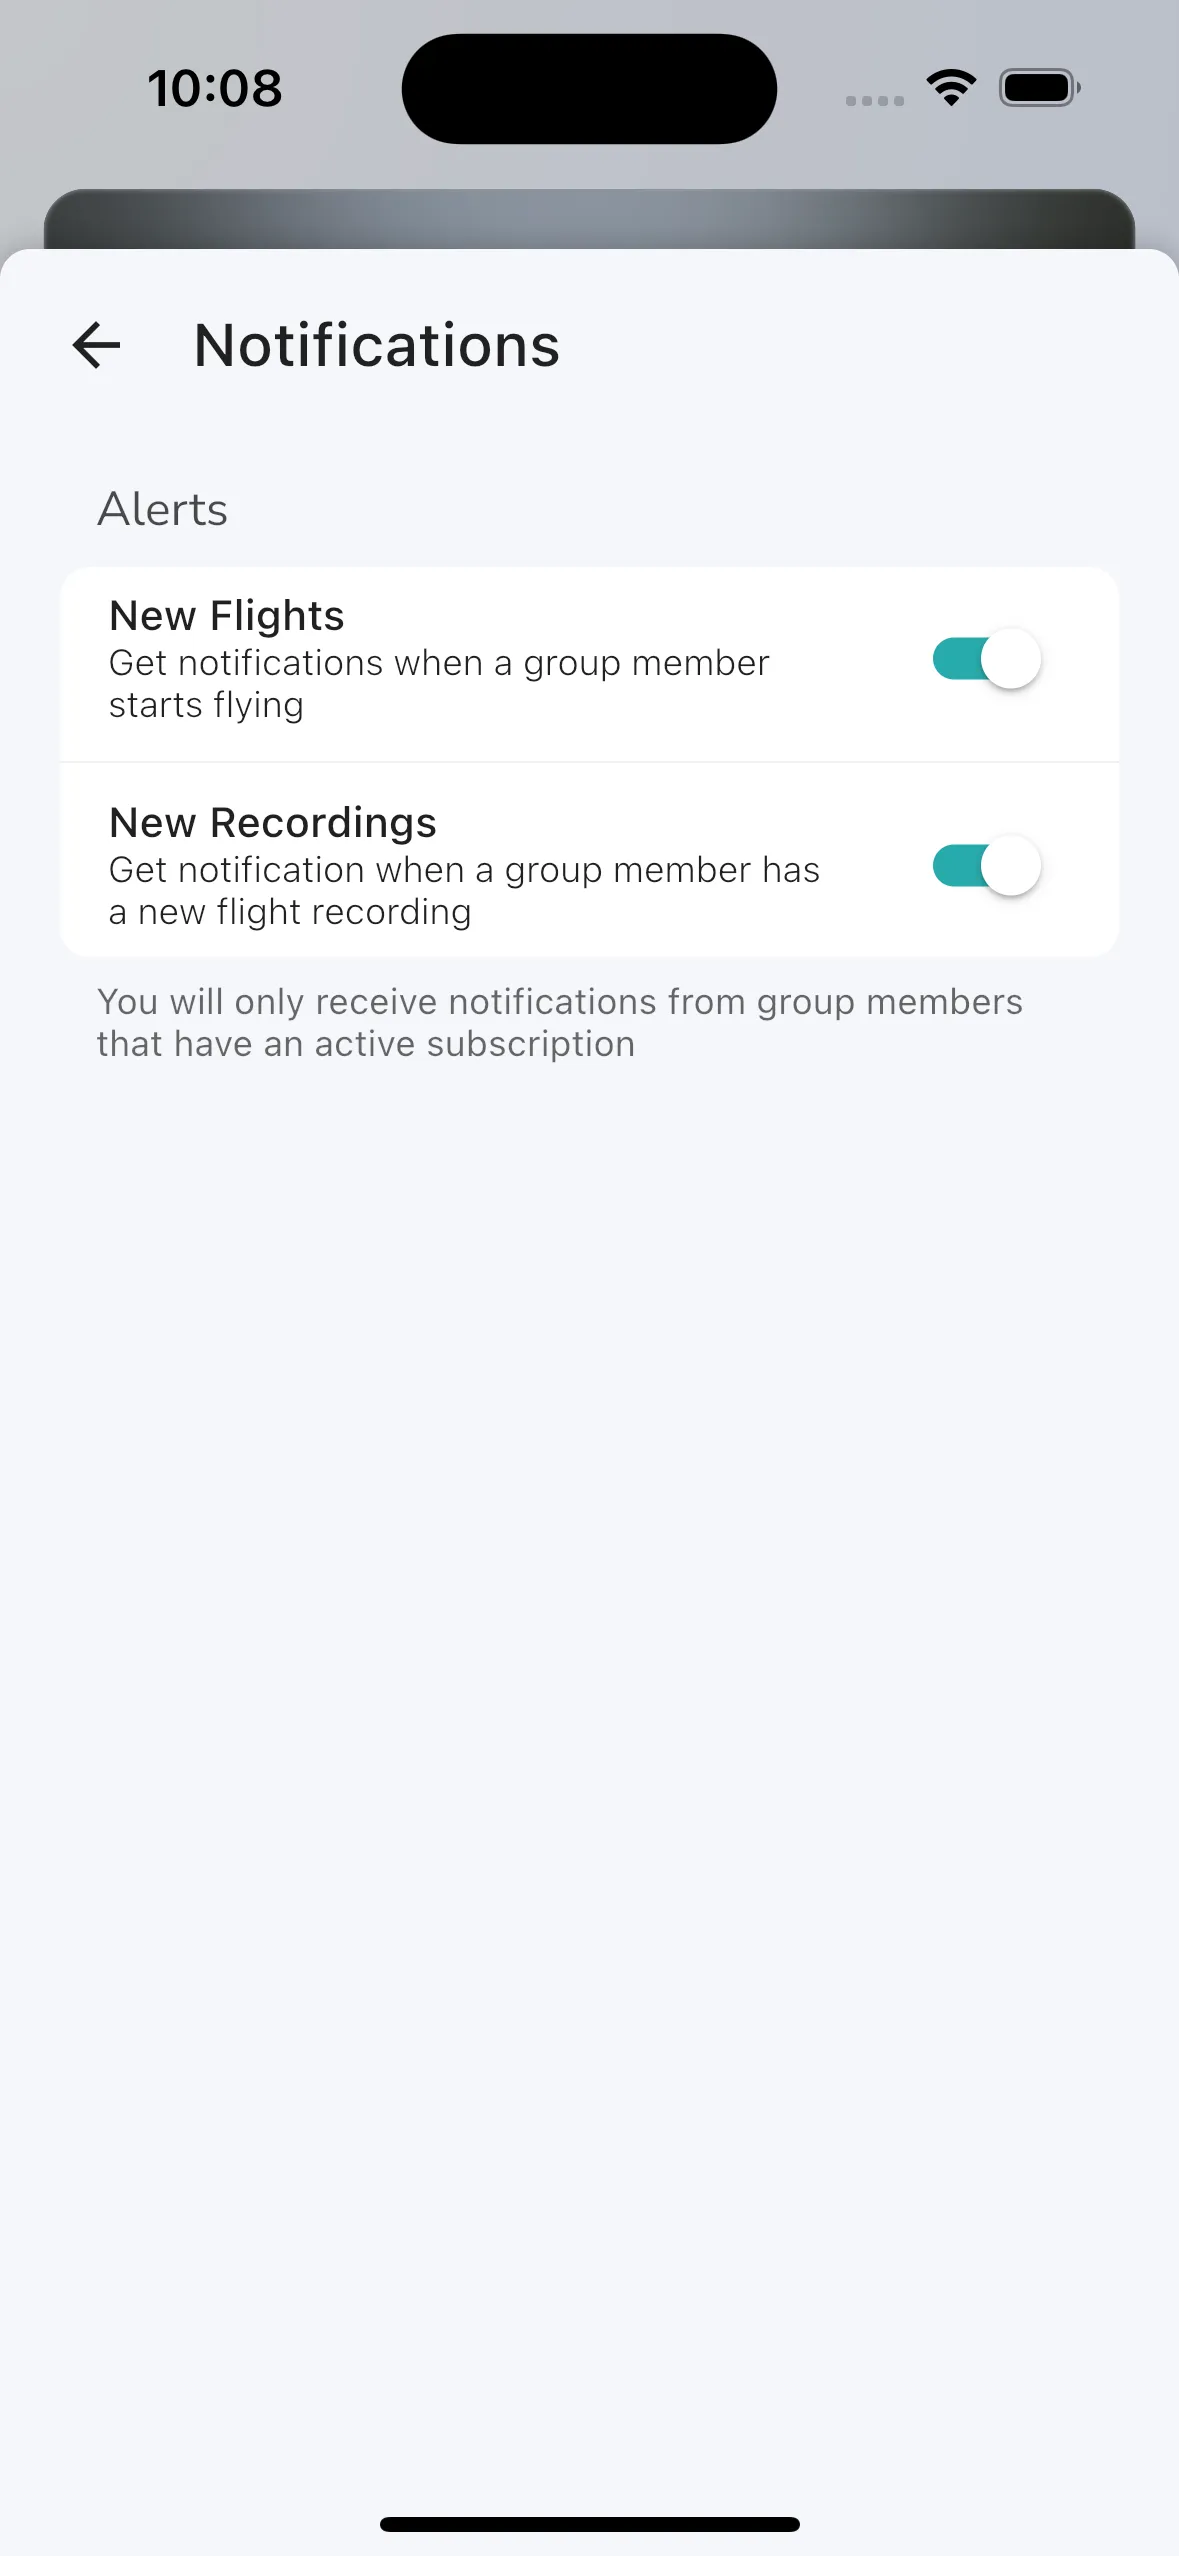
Every group member has their own notifications controls for a group which allows you to choose if you want to get notifications when other group members start flying or recorded a new flight.
>
Home Page
The Gaggle home page tries to surface information that is relevant to you. It is divided into 3 sections:
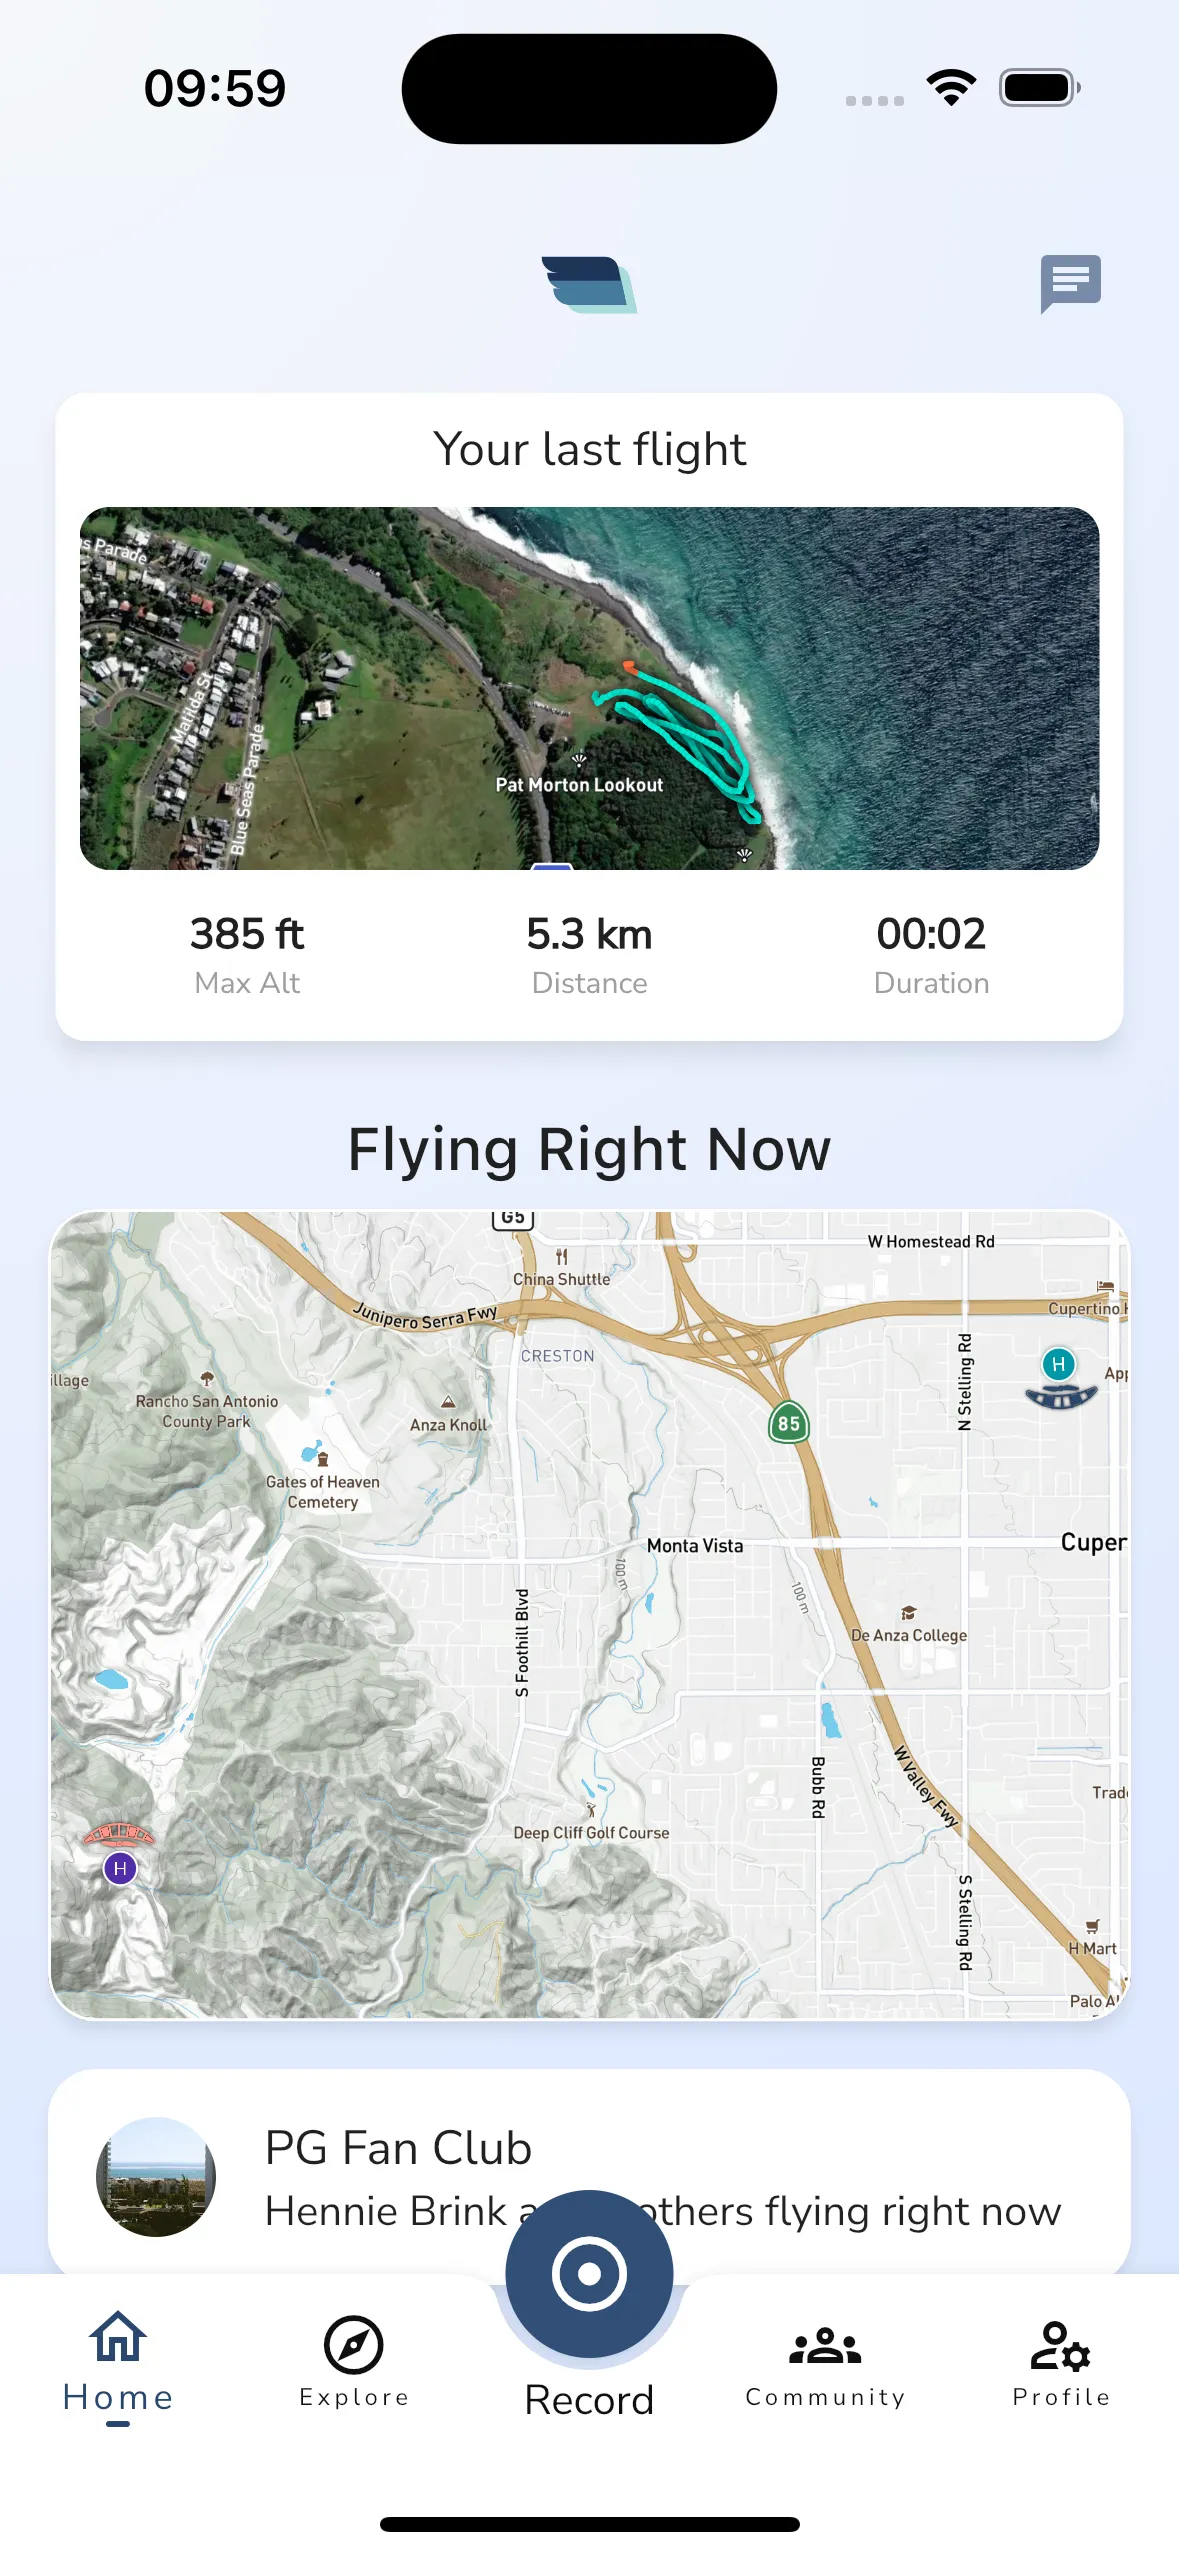
At the top of the page you will see an animation of your last flight you’ve recorded with Gaggle along with some basic details about the flight. You can tap the flight to open up the flight recording viewer.
This list will only show pilots in your groups and your friends, and it is hidden when there are no pilots flying. You can tap on any of the pilots to open up the live tracking viewer.
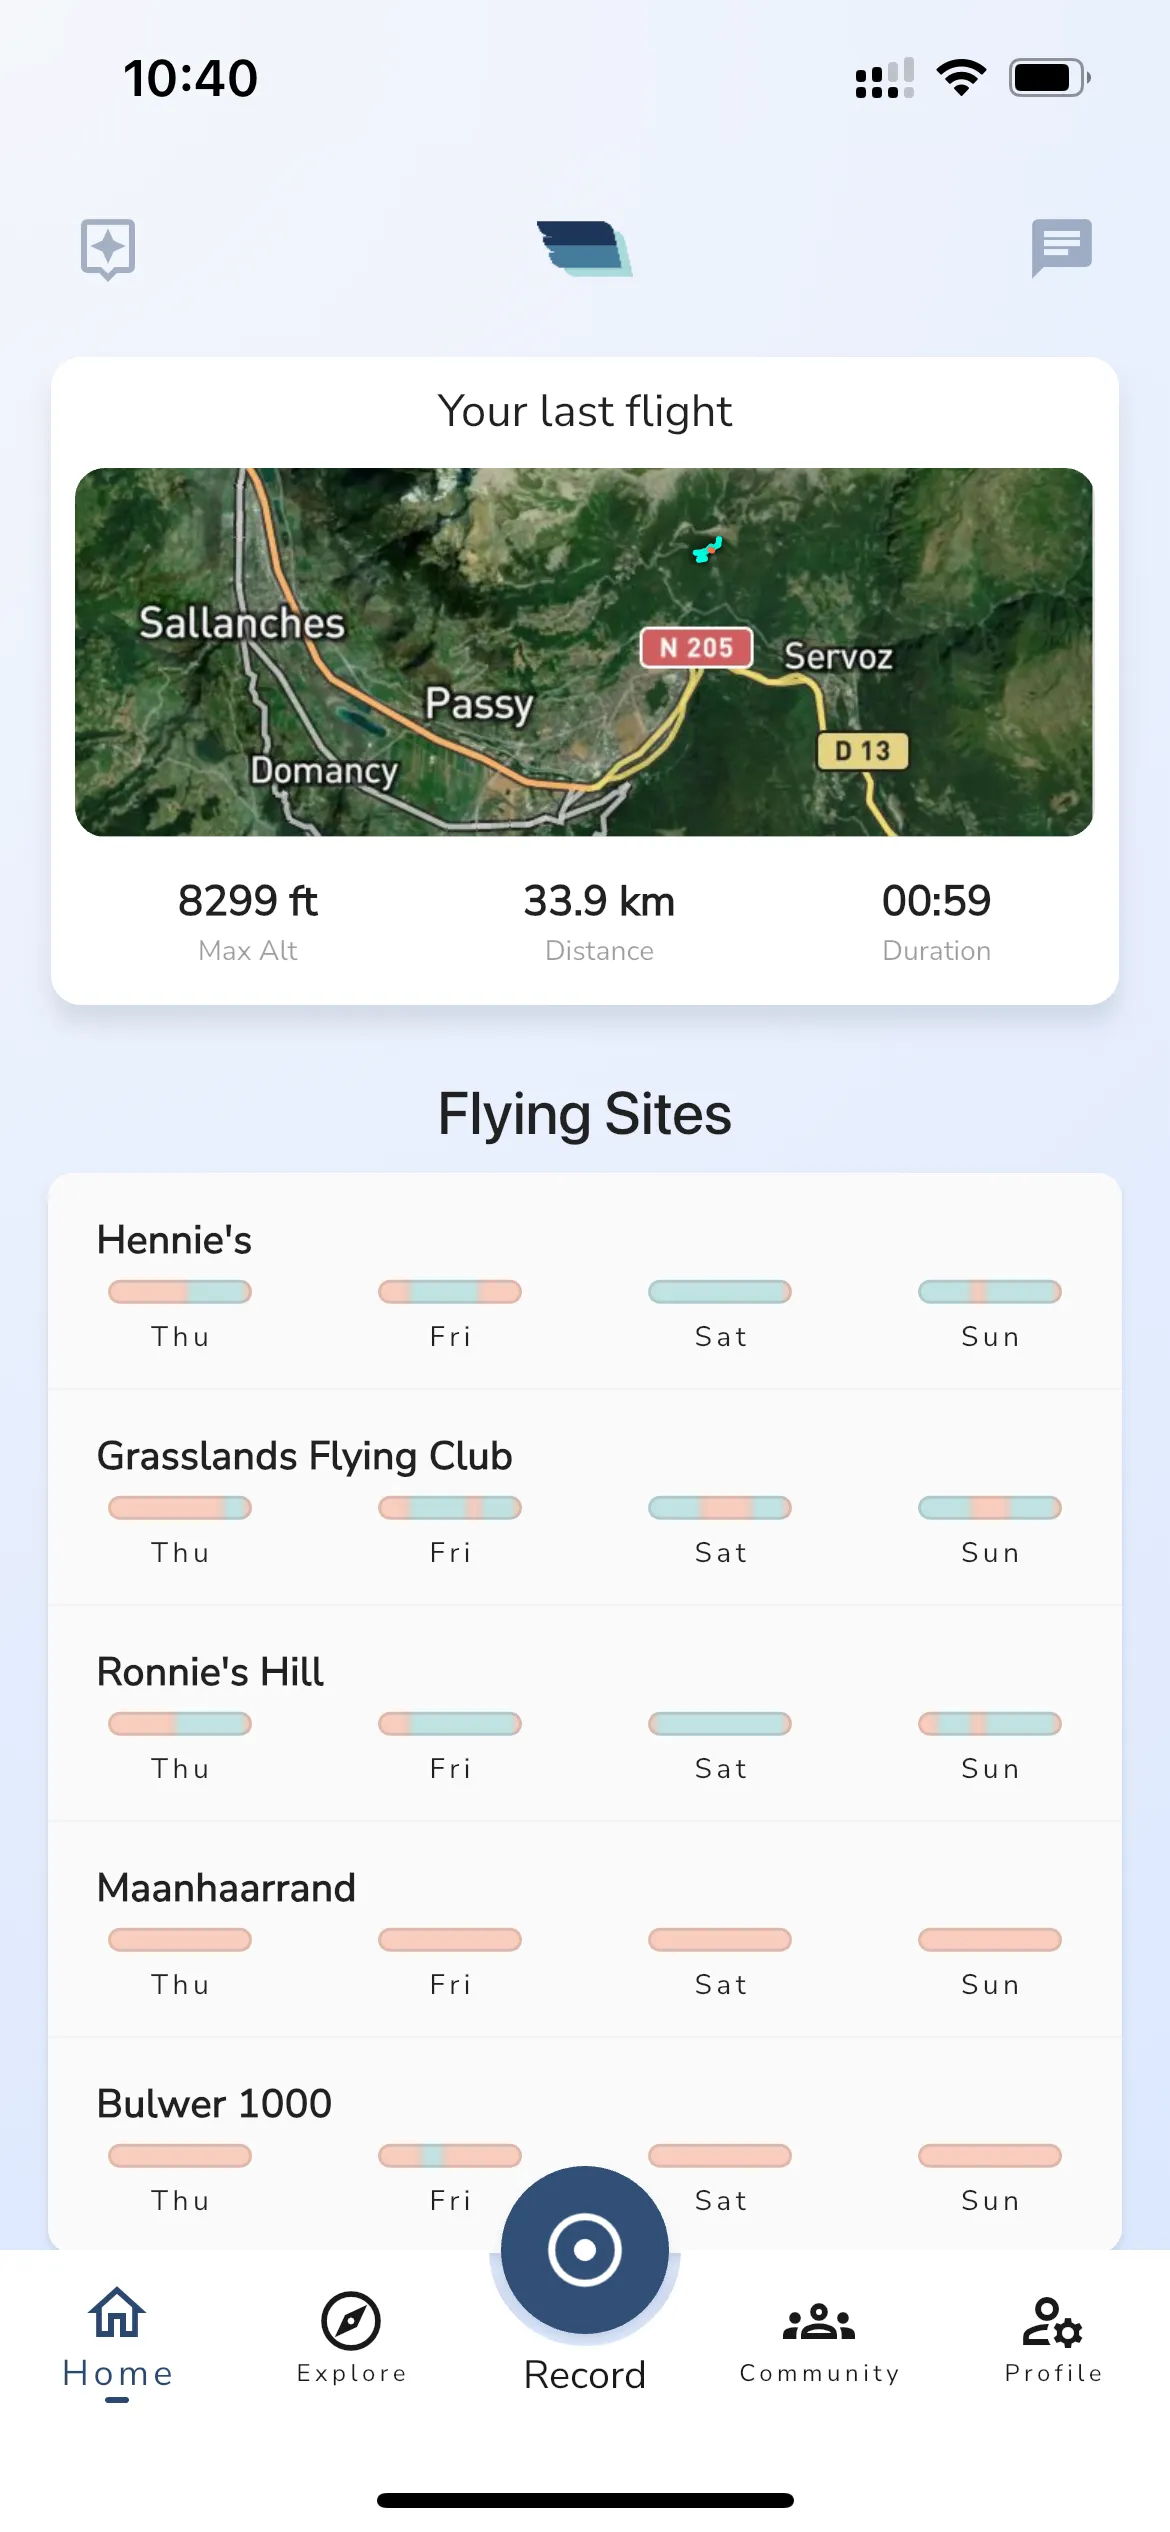
When you favorite a flying site it will show up on the home page. You can tap on any of the flying sites to open up the details page for that site. The home page will show a basic forecast outlook for the site to show you if it will have any flyable conditions in the next week.
When there is a possibility of flyable conditions you the bar will show a green color, when there are no flyable conditions it will show a red color.
>
Profile Page > Settings > Integrations > Incoming
Incoming integrations allow you to send data to Gaggle from other services. This is useful for sending live tracking data, recordings, and other information to Gaggle from other devices. Speak to your device manufacturer or app developer to see if they can integrate with Gaggle.
POST: https://api.flygaggle.com/incoming/liveTracking
HEADERS:
Body
JSON Model
Example Request:
{
  "sessionId": "12345698",
  "heading": 180.5,
  "latitude": -28.5074,
  "longitude": 27.1278,
  "altitude": 4000.0,
  "speed": 16.5,
  "reportTimeUtc": "2024-05-21T17:00:00Z",
  "battery": 0.75,
  "windDirection": 90.0,
  "flightStatus": 1,
  "status": 0
}
POST: https://api.flygaggle.com/incoming/recordings?type=igc
HEADERS:
Body IGC Content: text/plain - UTF-8
Example Request:
AXNA160699
HFDTEDATE:010524,01
HFPLTPILOTINCHARGE:Sean Wheller
HFCM2CREW2:NIL
HFGTYGLIDERTYPE:Ozone Geo 6
HFGIDGLIDERID:NKN
HFDTMGPSDATUM:WGS84
HFRFWFIRMWAREVERSION:3.0.3+2196
HFRHWHARDWAREVERSION:1.0
HFFTYFRTYPE:Naviter,Oudie N
HFGPSRECEIVER:UBLOX,MAX-M8Q,72,50000
HFPRSPRESSALTSENSOR:BOSCH,BMP390L,9150
HFALGALTGPS:GEO
HFALPALTPRESSURE:ISA
HFCIDCOMPETITIONID:NKN
HFCCLCOMPETITIONCLASS:NKN
HFTZNTIMEZONE:2.0
I023638FXA3940SIU
J020810WDI1113WSP
LXNA::VEHICLE:1
LXNA::ACTIVITY:fly
LXNA::LOGSTART,GSP,VARIO
LXNA::PHASE:onGround
E113616ATS101386
B1136163424129S01914571EA002230023900710
LXNA::AVGSATSNR:33
LXNA::BAT:discharging,84%,3.973V,-882mA
B1136173424129S01914571EA002230023900710
B1136183424129S01914571EA002230023900710
B1136193424129S01914571EA002230023800710
B1136203424129S01914572EA002230023800710
B1136213424129S01914571EA002230023800710
B1136223424129S01914571EA002230023800710
<...rest of IGC>
>
If you have airspaces downloaded for your region, then Gaggle will show you an airspace widget when you are close to an airspace. This widget only shows the information for the airspace that Gaggle determines to be the most relevant to show you based on your proximity, direction of travel, and altitude. There is no way to change or configure this behaviour at the moment. To see the information for all airspaces nearby, you can tap the airspace widget.
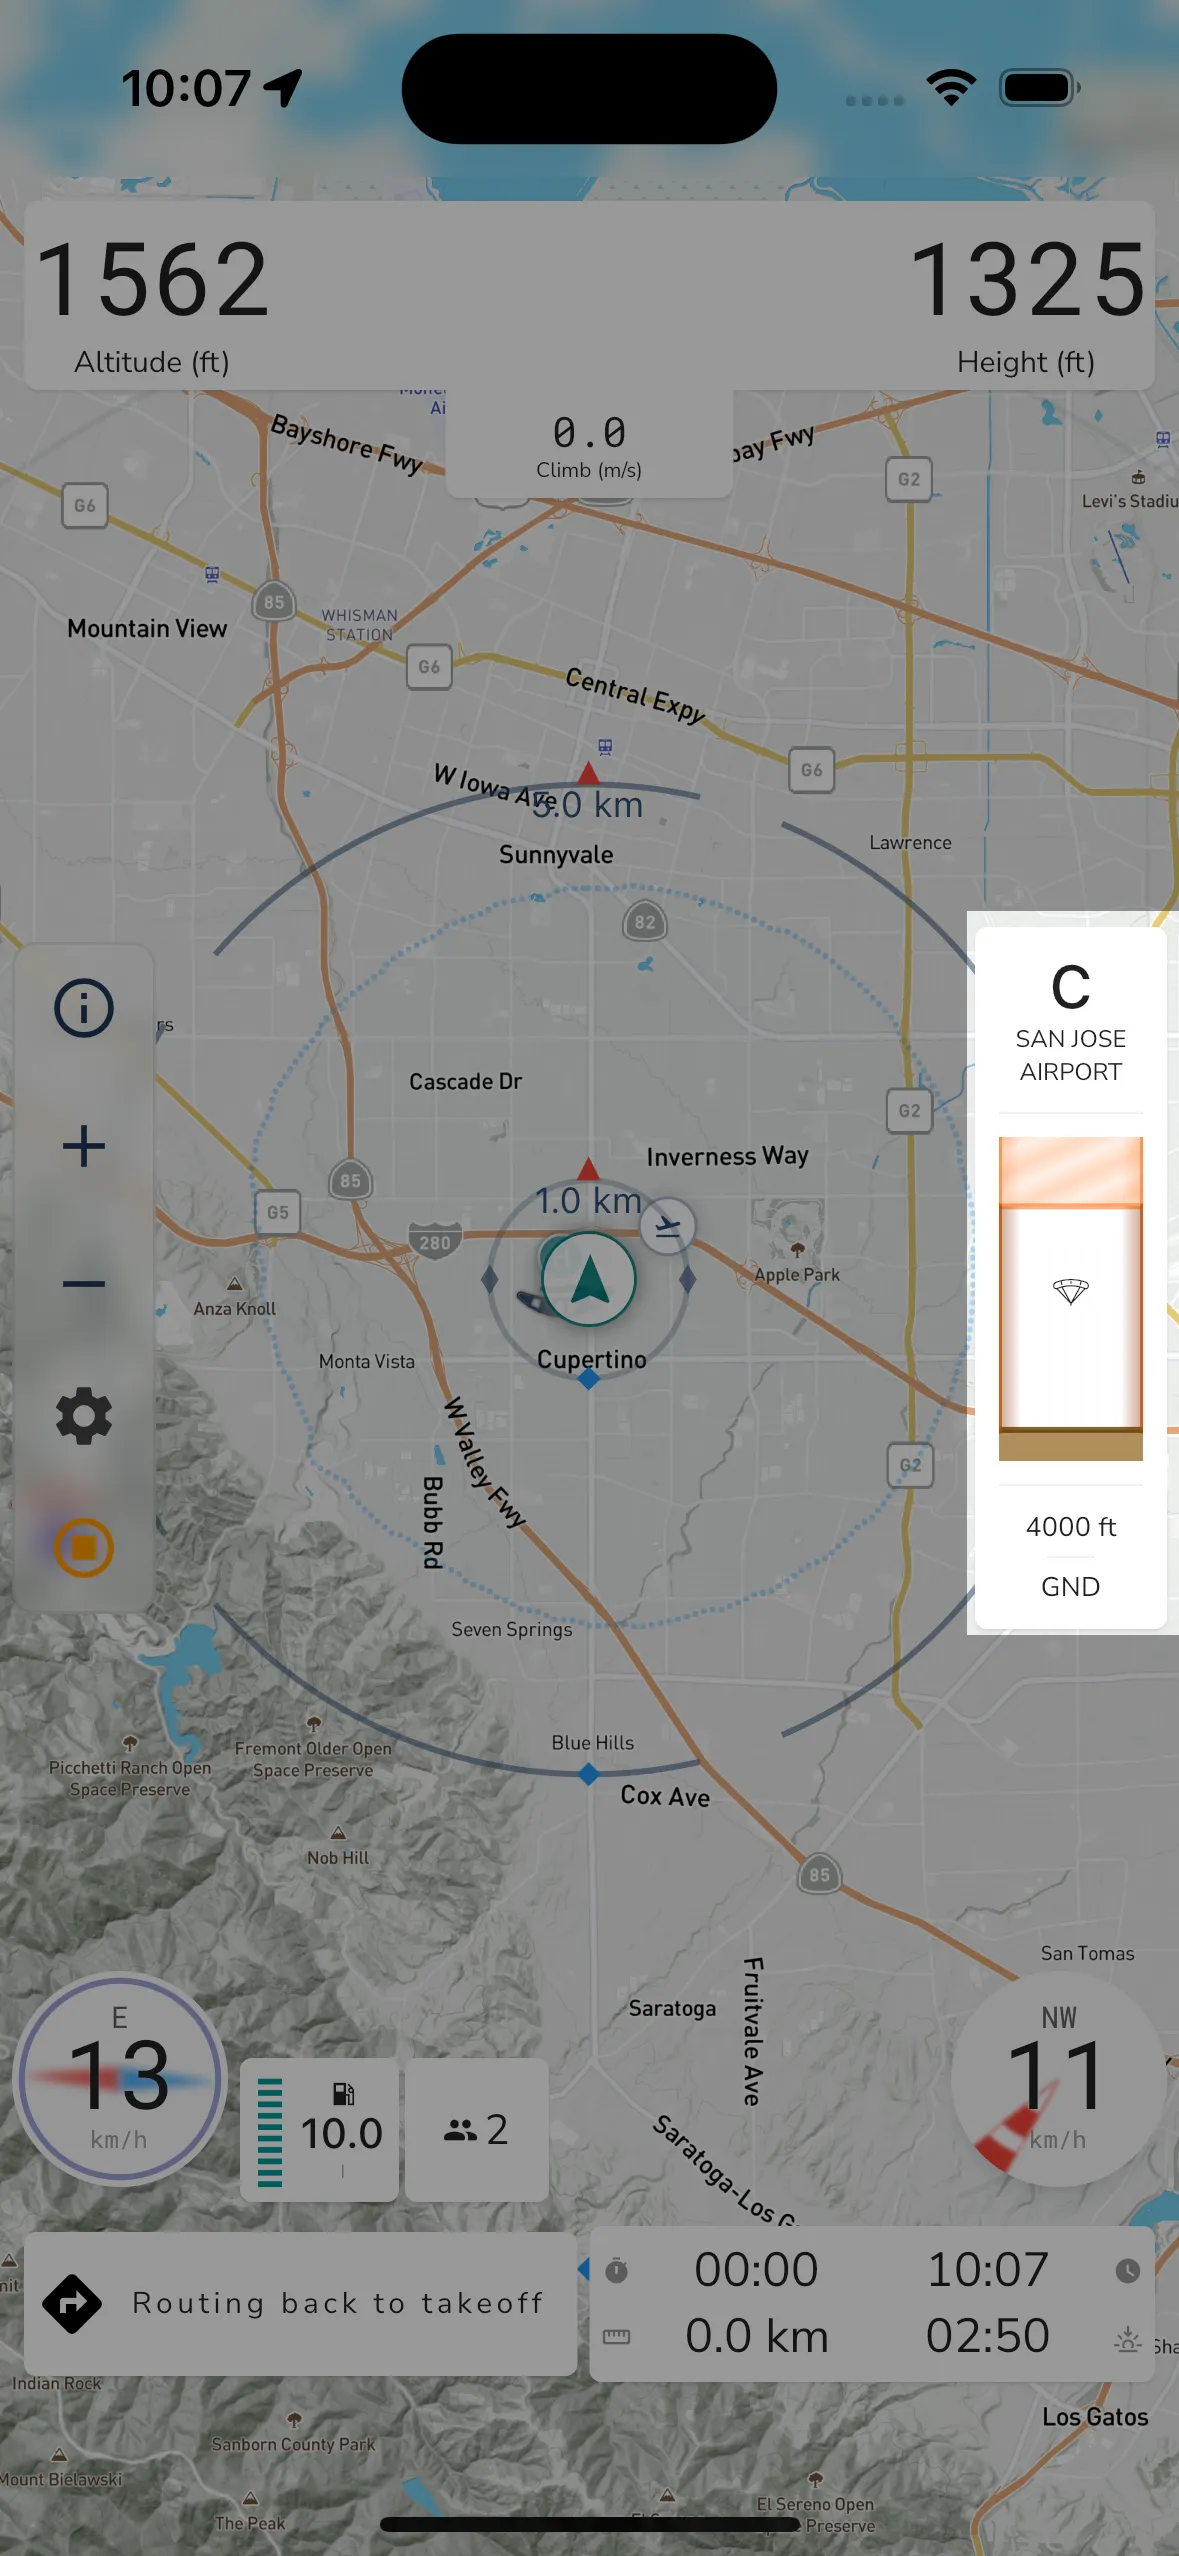
Class: At the very top of the widget Gaggle shows the class of the most relevant airspace currently displayed.
Name: Underneath the class is the name of the airspace that Gaggle is currently displaying to you.
Visual Guide: Underneath the name is a visual guide for airspaces. Gaggle will show you vertical area for airspaces above, below, and near you based on your altitude. The widget shows a total vertical area of 1000 meters, so it will show airspaces 500 meters above and below you. There are a few different ways in which Gaggle displays airspaces:
Upper Limit: The upper limit for the currently displayed airspace is shown here in 2 possible formats:
Mean Sea Level: The limit will show in your configured unit of measure for altitude.
Flight Level: The limit will start with an FL value.
Lower Limit: The lower limit for the currently displayed airspace is show here with 3 possible formats:
Mean Sea Level: The limit will show in your configured unit of measure for altitude.
Flight Level: The limit will start with an FL value. GND: Airspace starts at ground level.
Along with the airspace widget, airspaces are also shown on the map. When the airspace is closer to the ground it will have thicker border, and the higher the airspace is from the ground ,the thinner its borders will be. Similar to the widget, the airspace is drawn with stripes if you are not in the airspace, and it will be drawn with a solid filled color if you are in the airspace.
Operating Hours: Some airspaces have operating hours in which they are applicable. Gaggle will use the configured hours to show and hide airspaces depending on if they are applicable for your current time when you are flying. If you see airspaces that are showing that shouldn’t be it might be that their operating hours haven’t been configured correctly, and you can make the needed operating hour updates directly on OpenAIP.
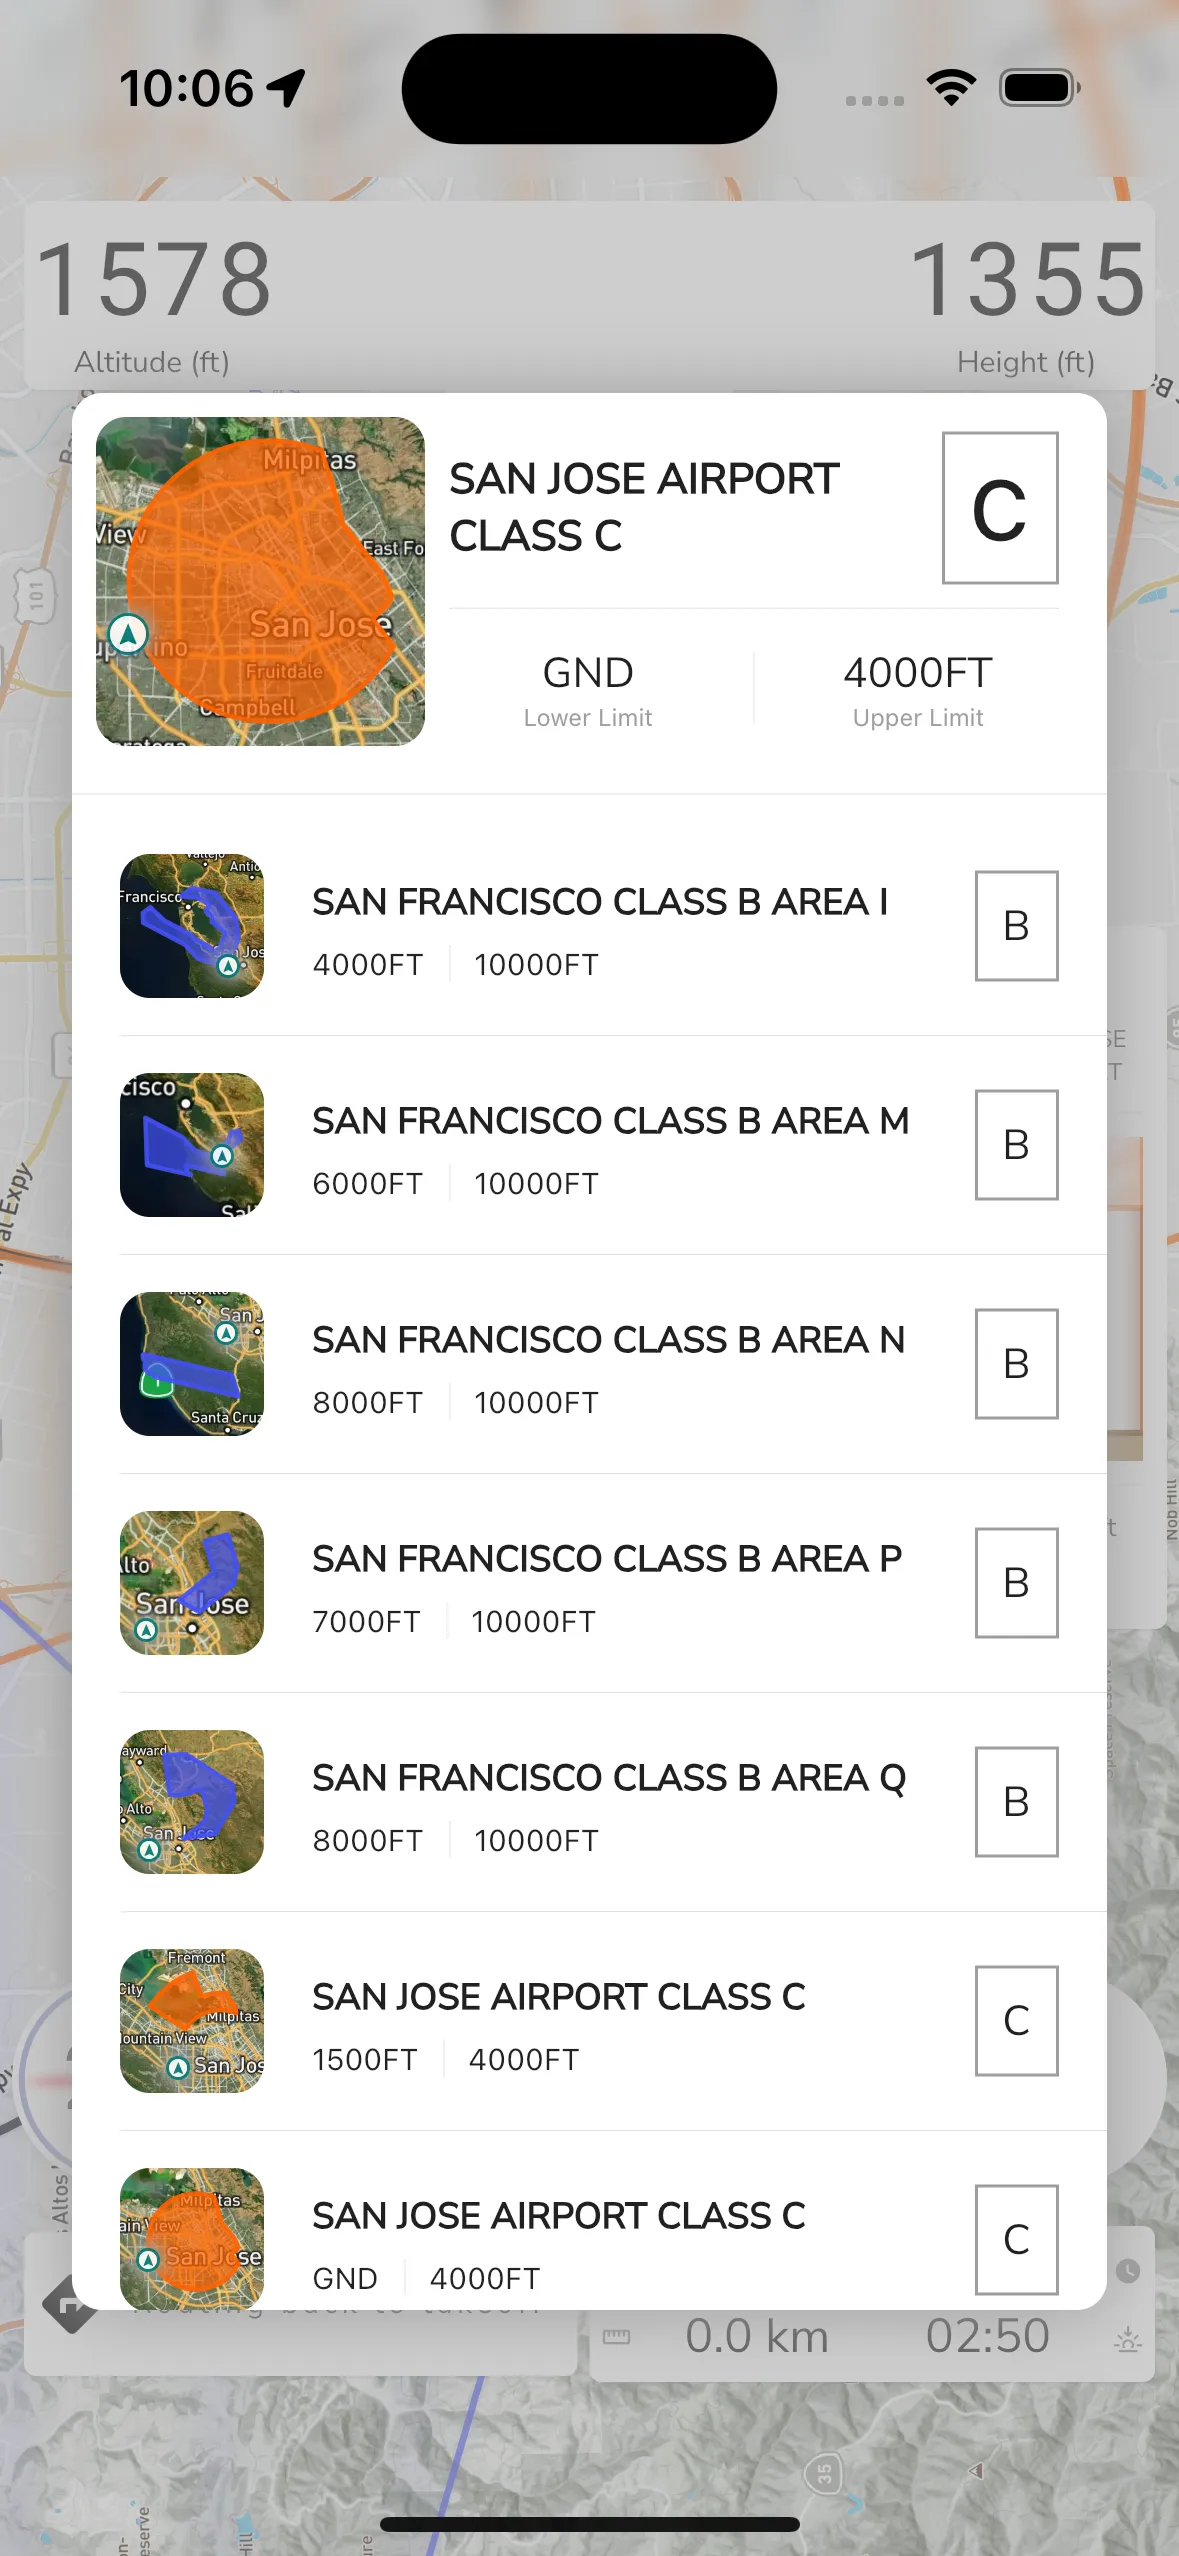
Tapping the airspace widget when it is shown will bring up the airspace viewer so you can see all the airspaces near you. At the top of the widget are the details for the current airspace that Gaggle is currently showing on the widget. Tapping on any of the airspaces on the list will then display the details at the top so you can have a better view of the airspace information.
>
Gaggle has an altitude widget that will show you important information about your altitude.
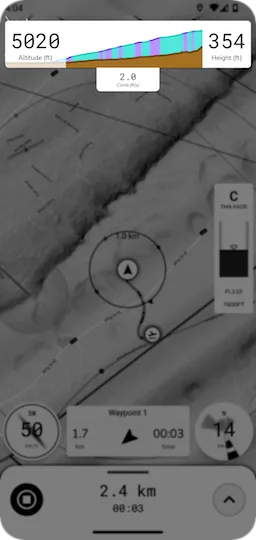
A note about Pressure Altitude
When you are on the ground, Gaggle will automatically use your current elevation on the ground as the starting altitude and set your QNH to match the current elevation. Therefore, you start a recording in flight we don’t know your exact altitude and Gaggle will default to using the GPS altitude (MSL) instead of the pressure altitude. Since conditions change during the day as you fly, Gaggle will also automatically adjust your QNH every few minutes to make sure it trends towards your GPS altitude and doesn’t deviate too much.
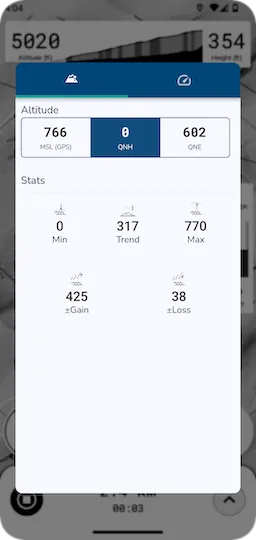
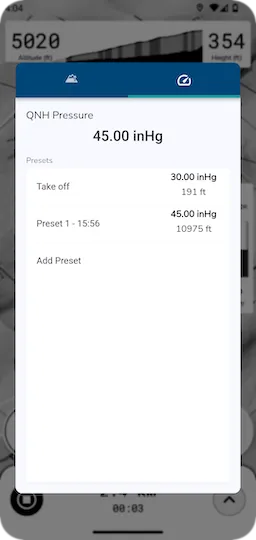
If Gaggle has access to pressure values from a barometer then an additional tab is shown where you can quickly configure new QNH values. Tapping a preset value will select that pressure to use when calculating the pressure altitude (QNH). Note: Setting your own QNH values will disable the feature where Gaggle automatically adjusts QNH over time.
>
You can tap anywhere on the map or simply move it around to access to the flight controls and settings.
If configured correctly, Gaggle will automatically stop your recordings once Gaggle has determined that you landed. If a flight was recorded, Gaggle will go into an idle waiting state waiting for another take-off once you land, if no take-off is detected for 5 minutes then the recorder will shut down completely. This means that you don’t have to remember to shut down Gaggle once you finished your flight since it should shutdown automatically while you pack up your gear. Note about one-wheels: Because of the auto start/stop and idle behaviour of Gaggle, one wheels can trigger the flight recording to start and then stop causing Gaggle to shut down before you start your flight.
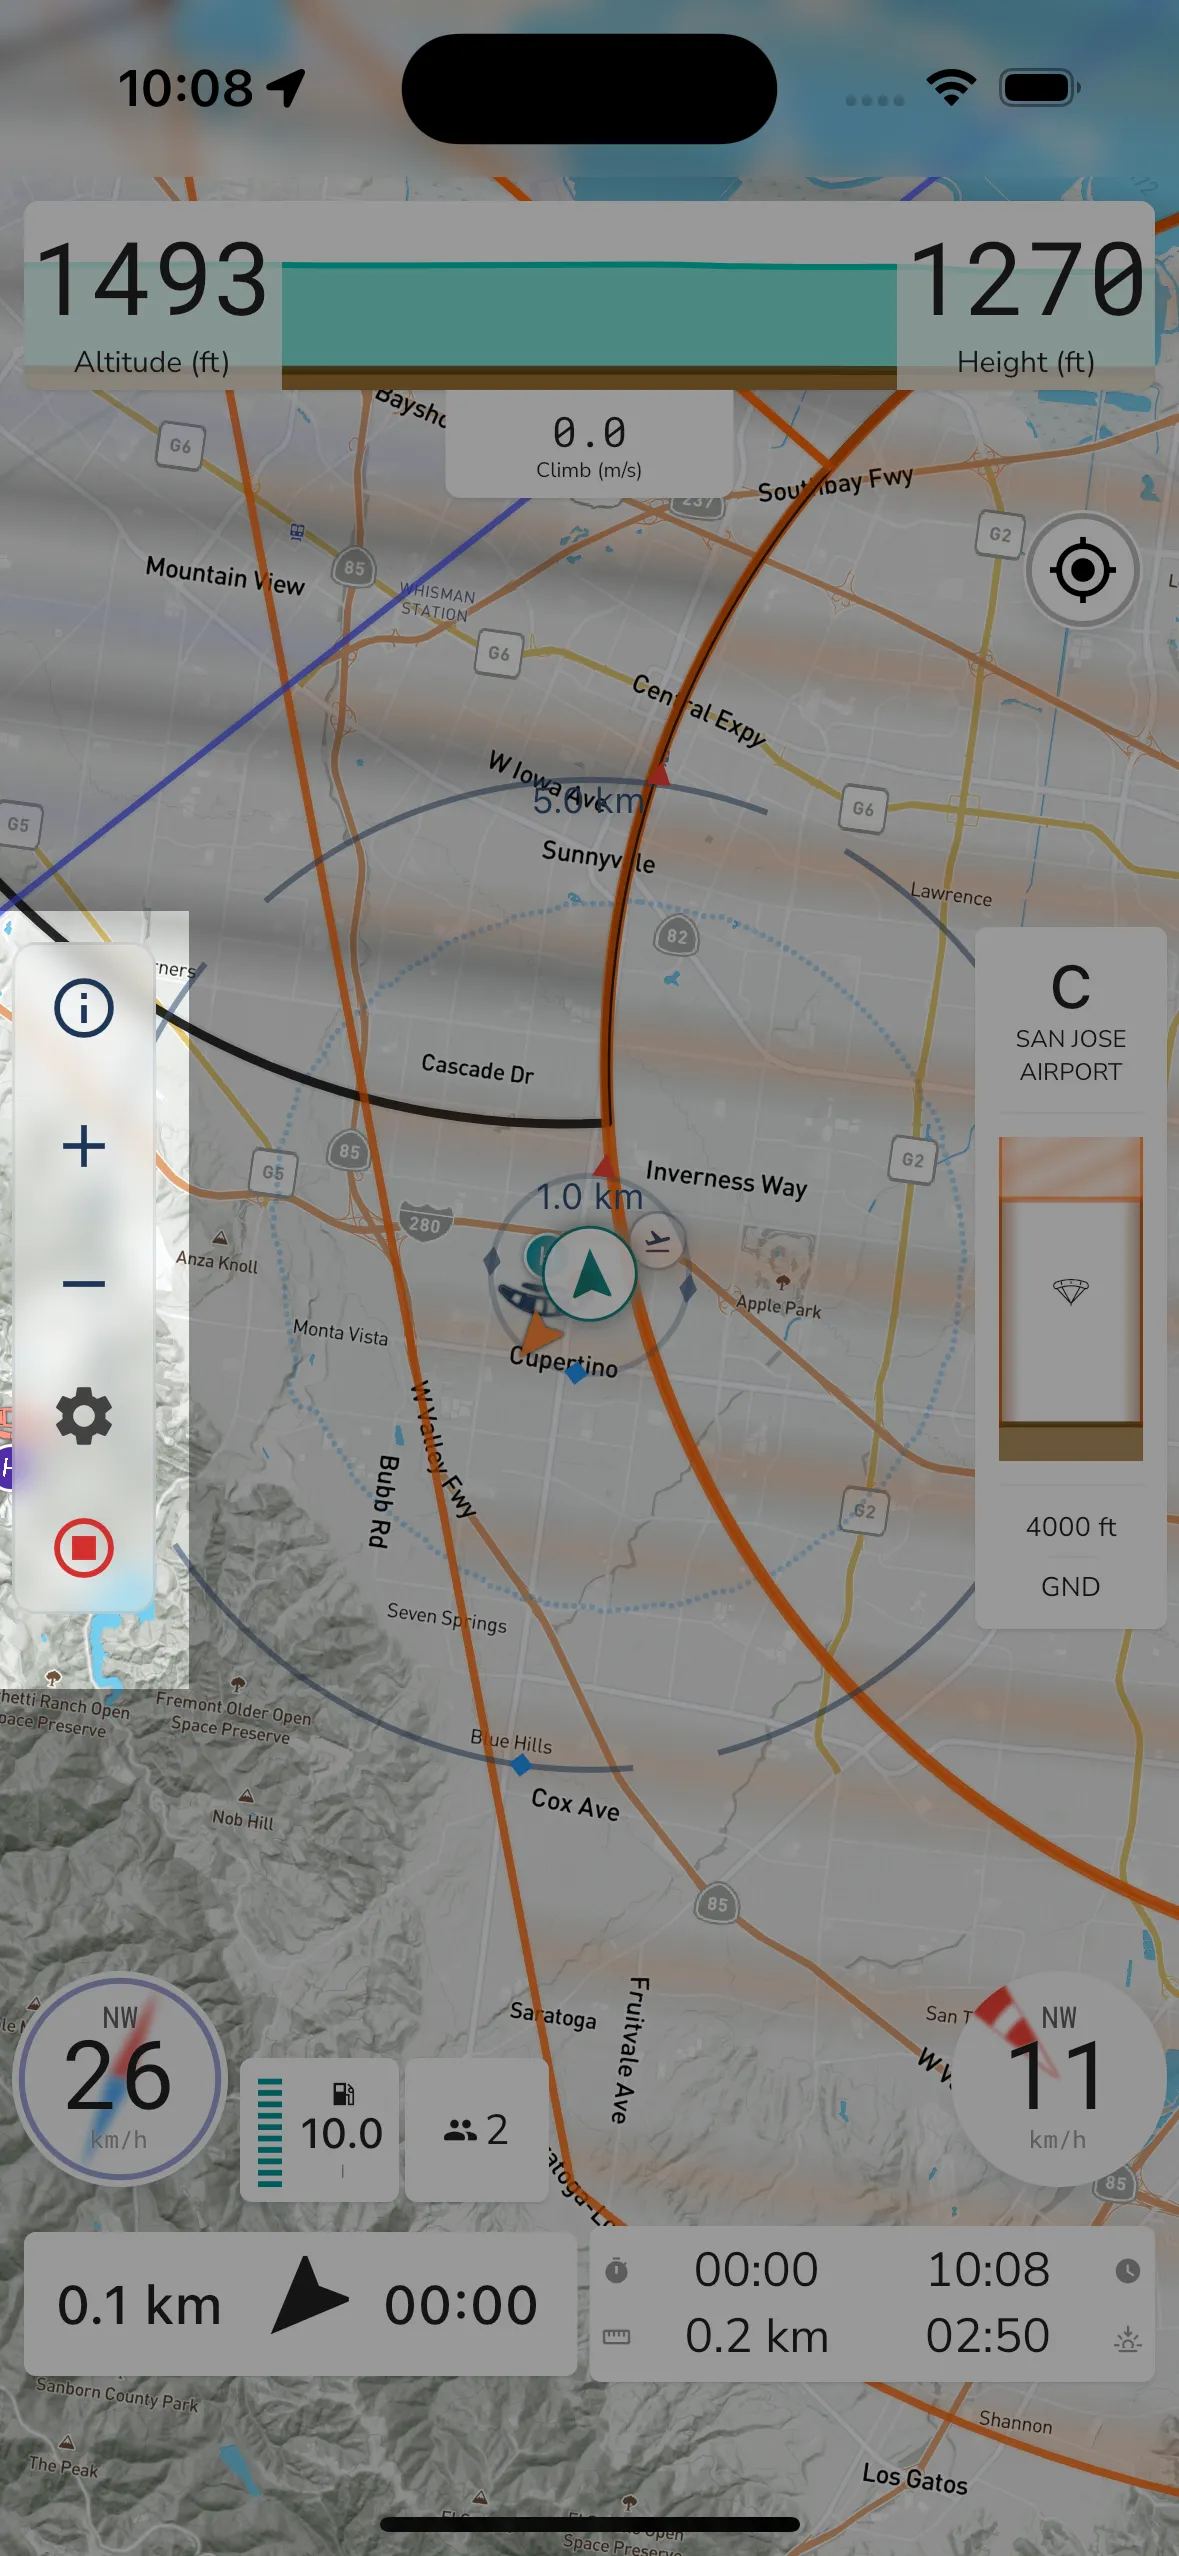
Info: Show information for the current location where you tapped on the map.
Zoom In: Zoom in on the map.
Zoom Out: Zoom out on the map.
Settings Toggle: Tap the gear button to bring up the flight control settings where you can configure the widgets that Gaggle shows and also where you can access settings for units of measure and map orientation.
Recorder Status: At the bottom of the flight control list is the flight recorder button. This starts off as orange while Gaggle is waiting for you to take-off. Once you start flying and the flight recording is started, the button will turn red, indicating that Gaggle is busy recording your flight. Tapping this button will show a dialog asking you if you want to stop the flight recording.
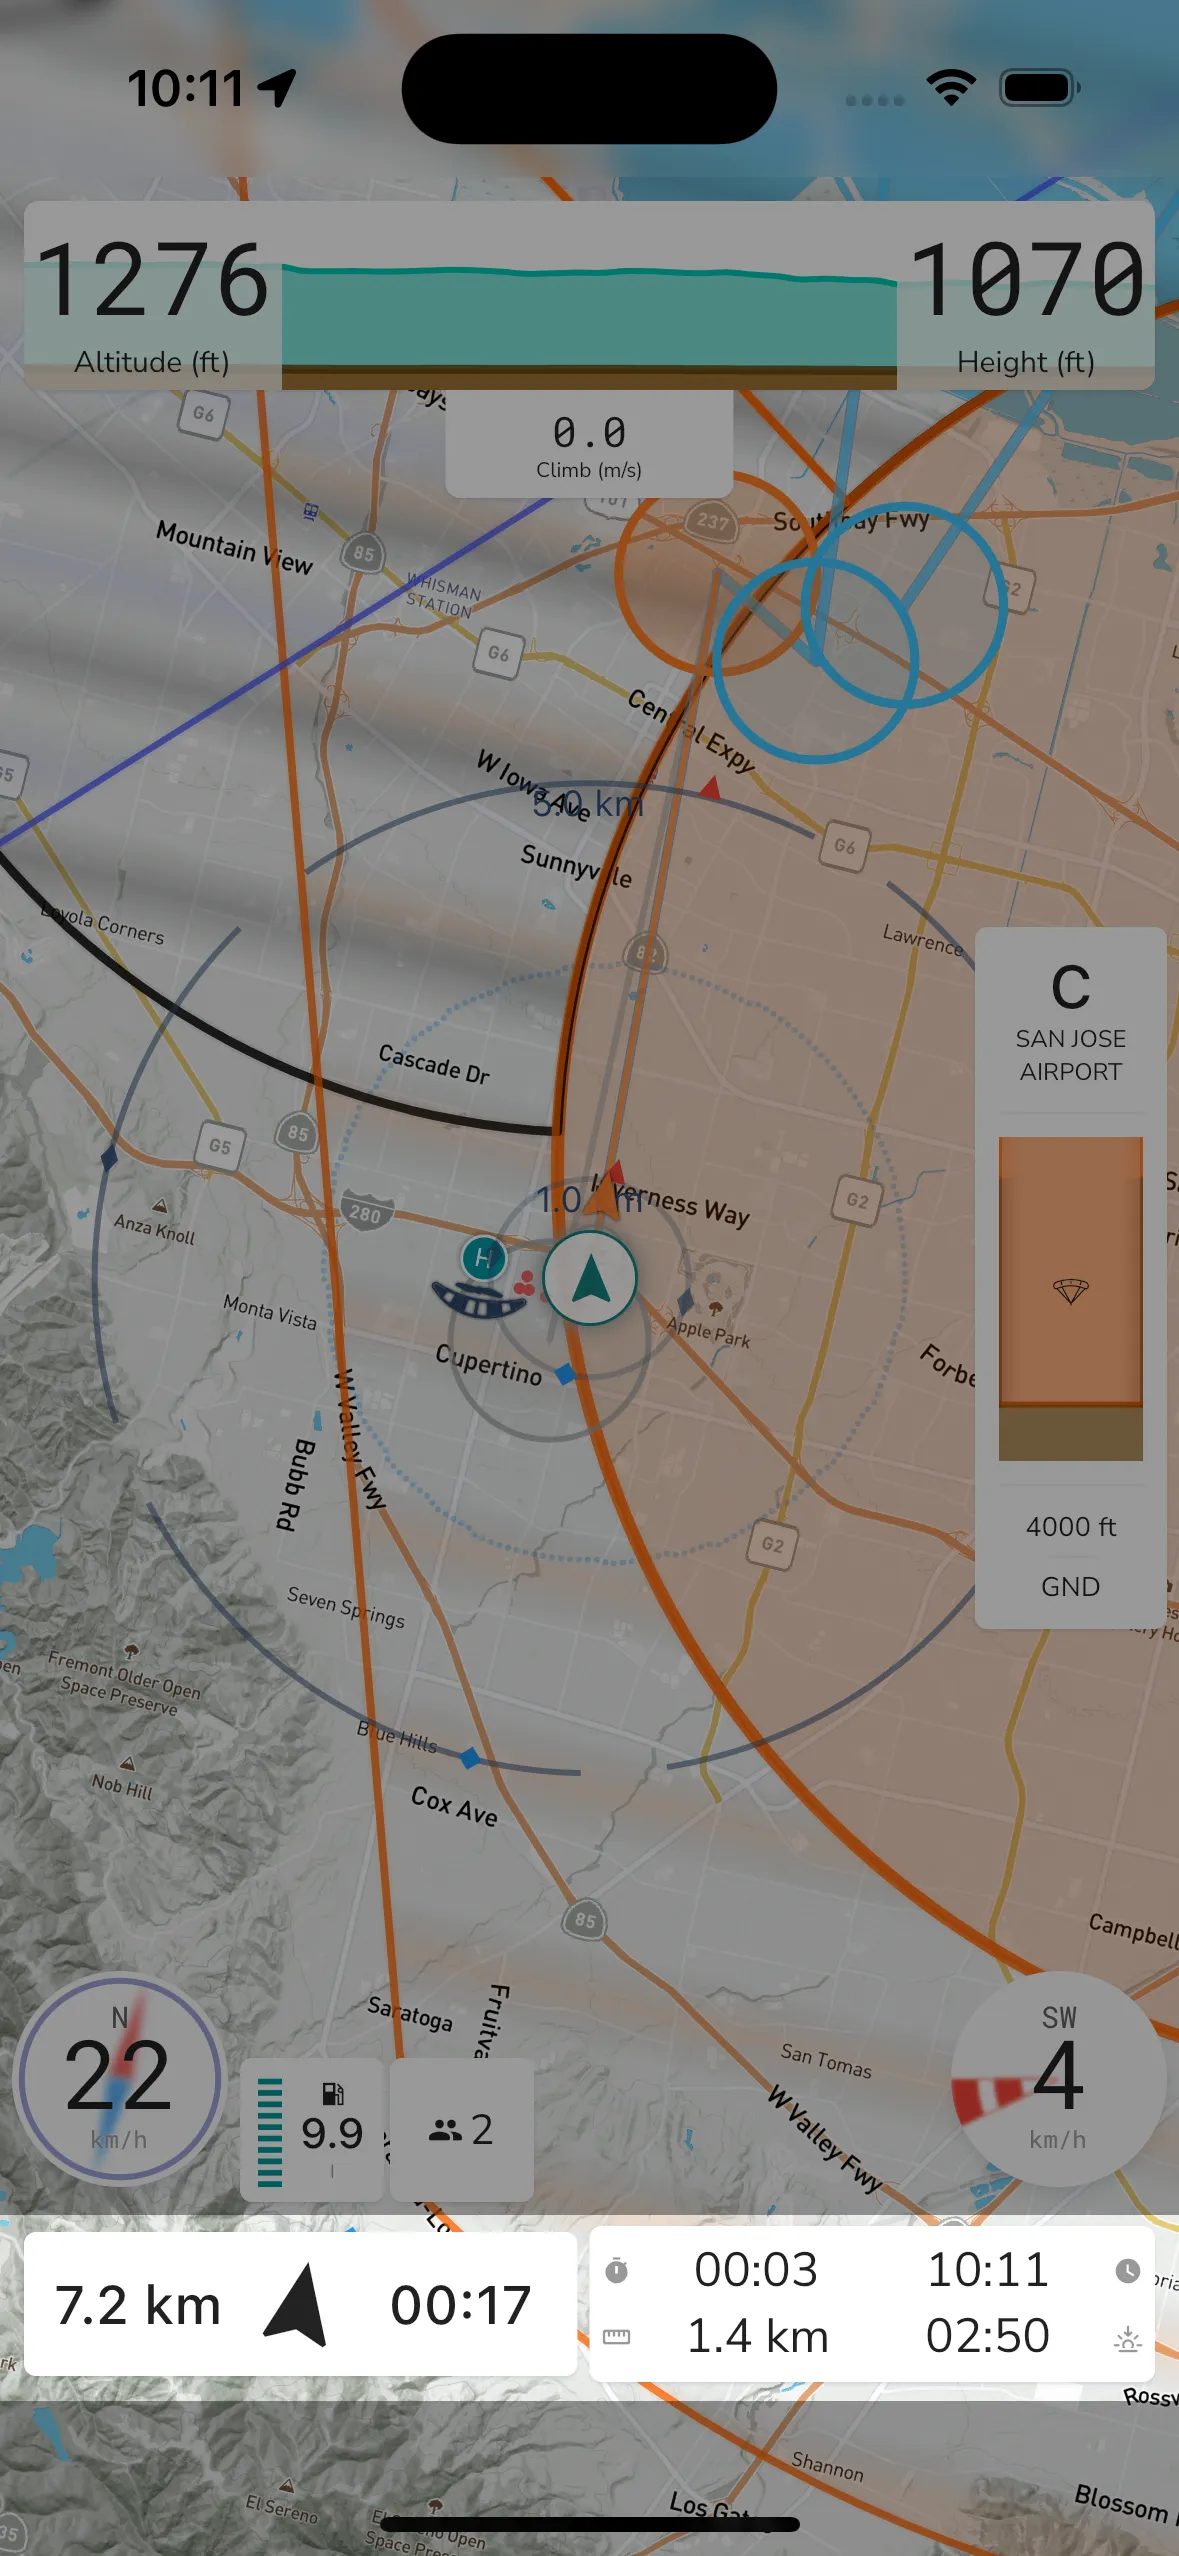
At the bottom of the page you get additional information for the current flight.
On the left hand side is the navigation widget showing you the time, distance, and direction to the next waypoint.
On the right hand side you get your flight stats showing you (front top left to right):
>
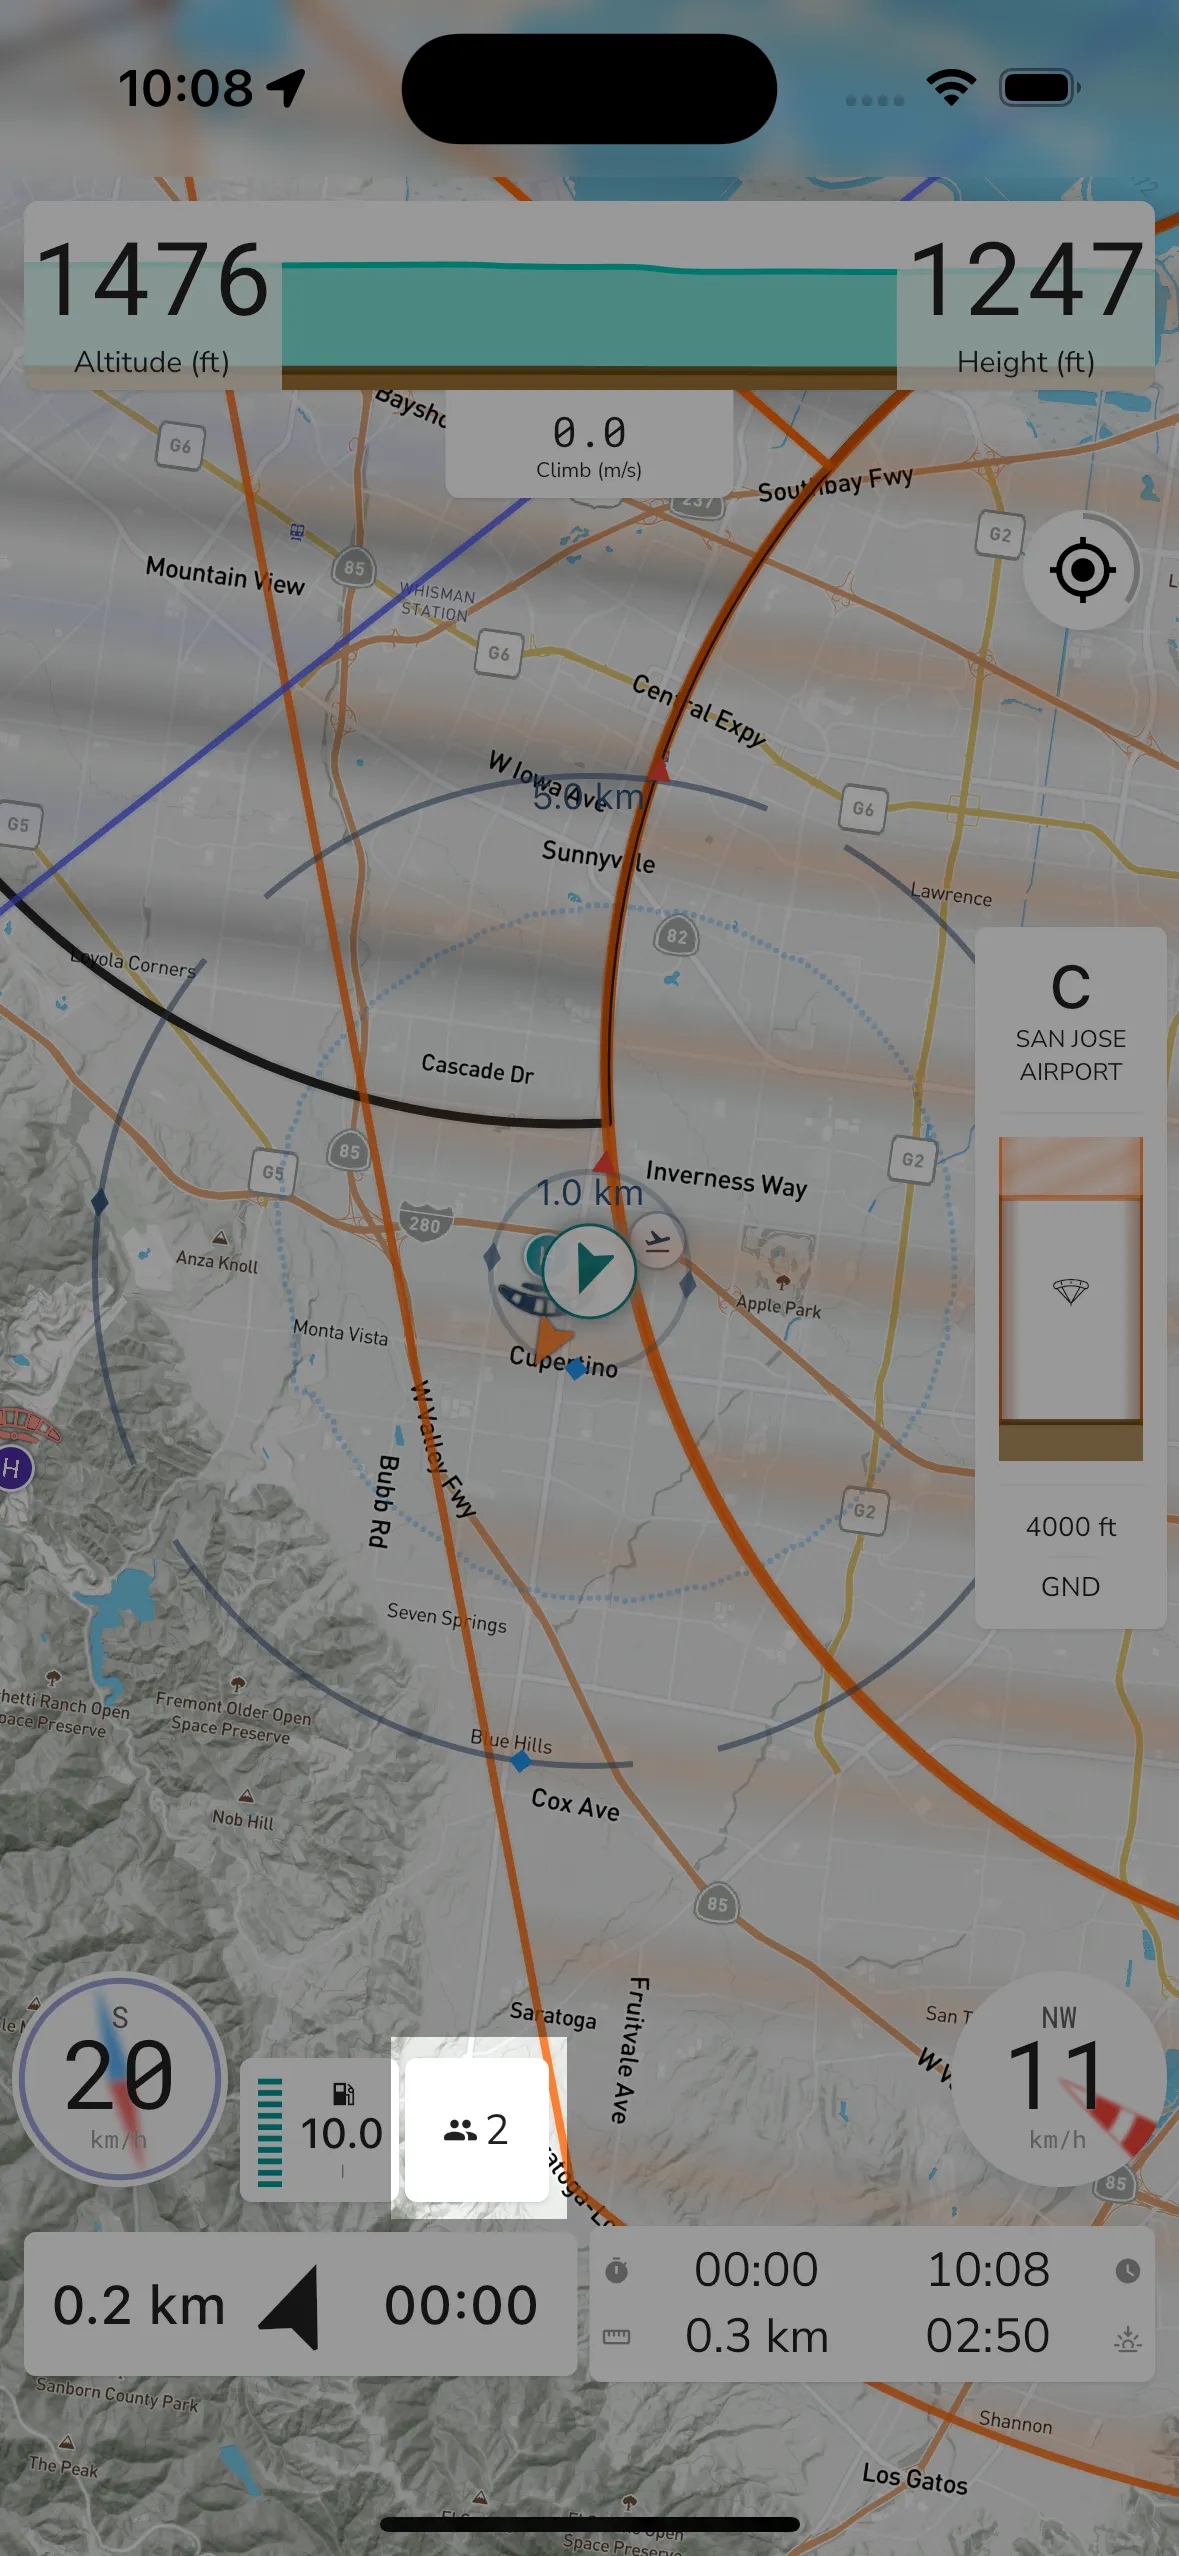
When flying with friends it’s a good idea to make sure you are part of the same group. Gaggle will recognise friends from your groups and show you a friends widget (left of the airplane one) above the waypoint widget that you can tap to see more details about your friends. When you tap this widget a new view is opened showing additional details about your friends.
The details for the currently selected friend are shown in an enlarged view. This view shows you their location relative to yours, their altitude, speed, and the distance from you. You can also tap the message icon in the top right to send a message to that friend.
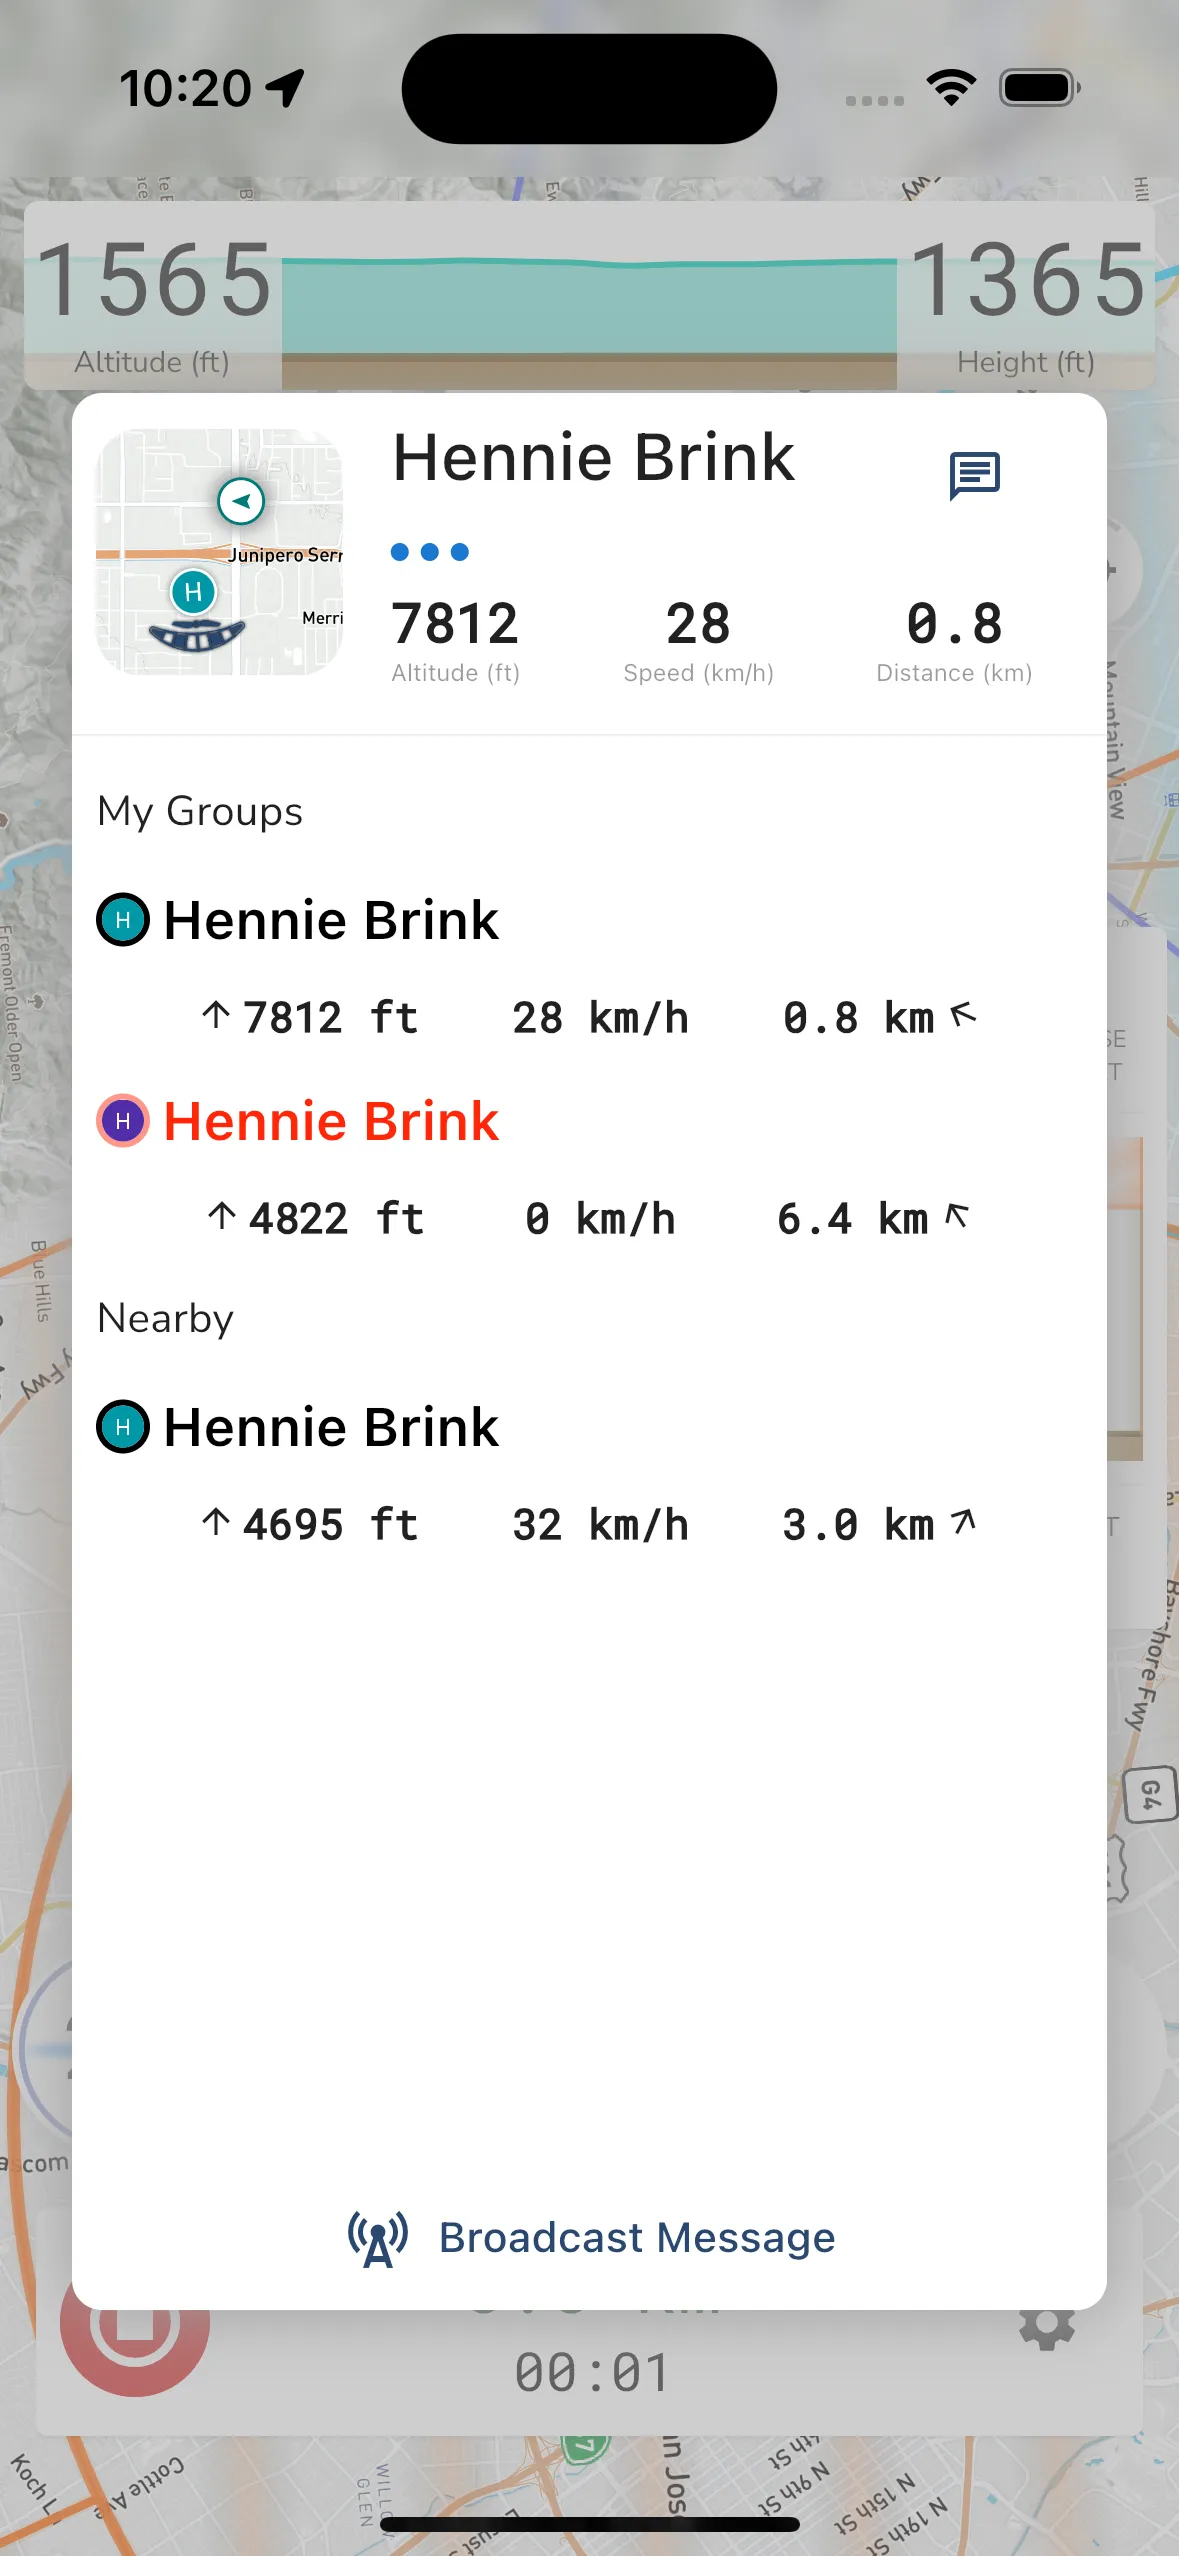
A list of all your friends are shown here. Each list item shows your friends name in the color of their wing (if they set it), and also their altitude, speed, and the distance from you. Tapping a list item will place that friend at the top and you can then message that friend.
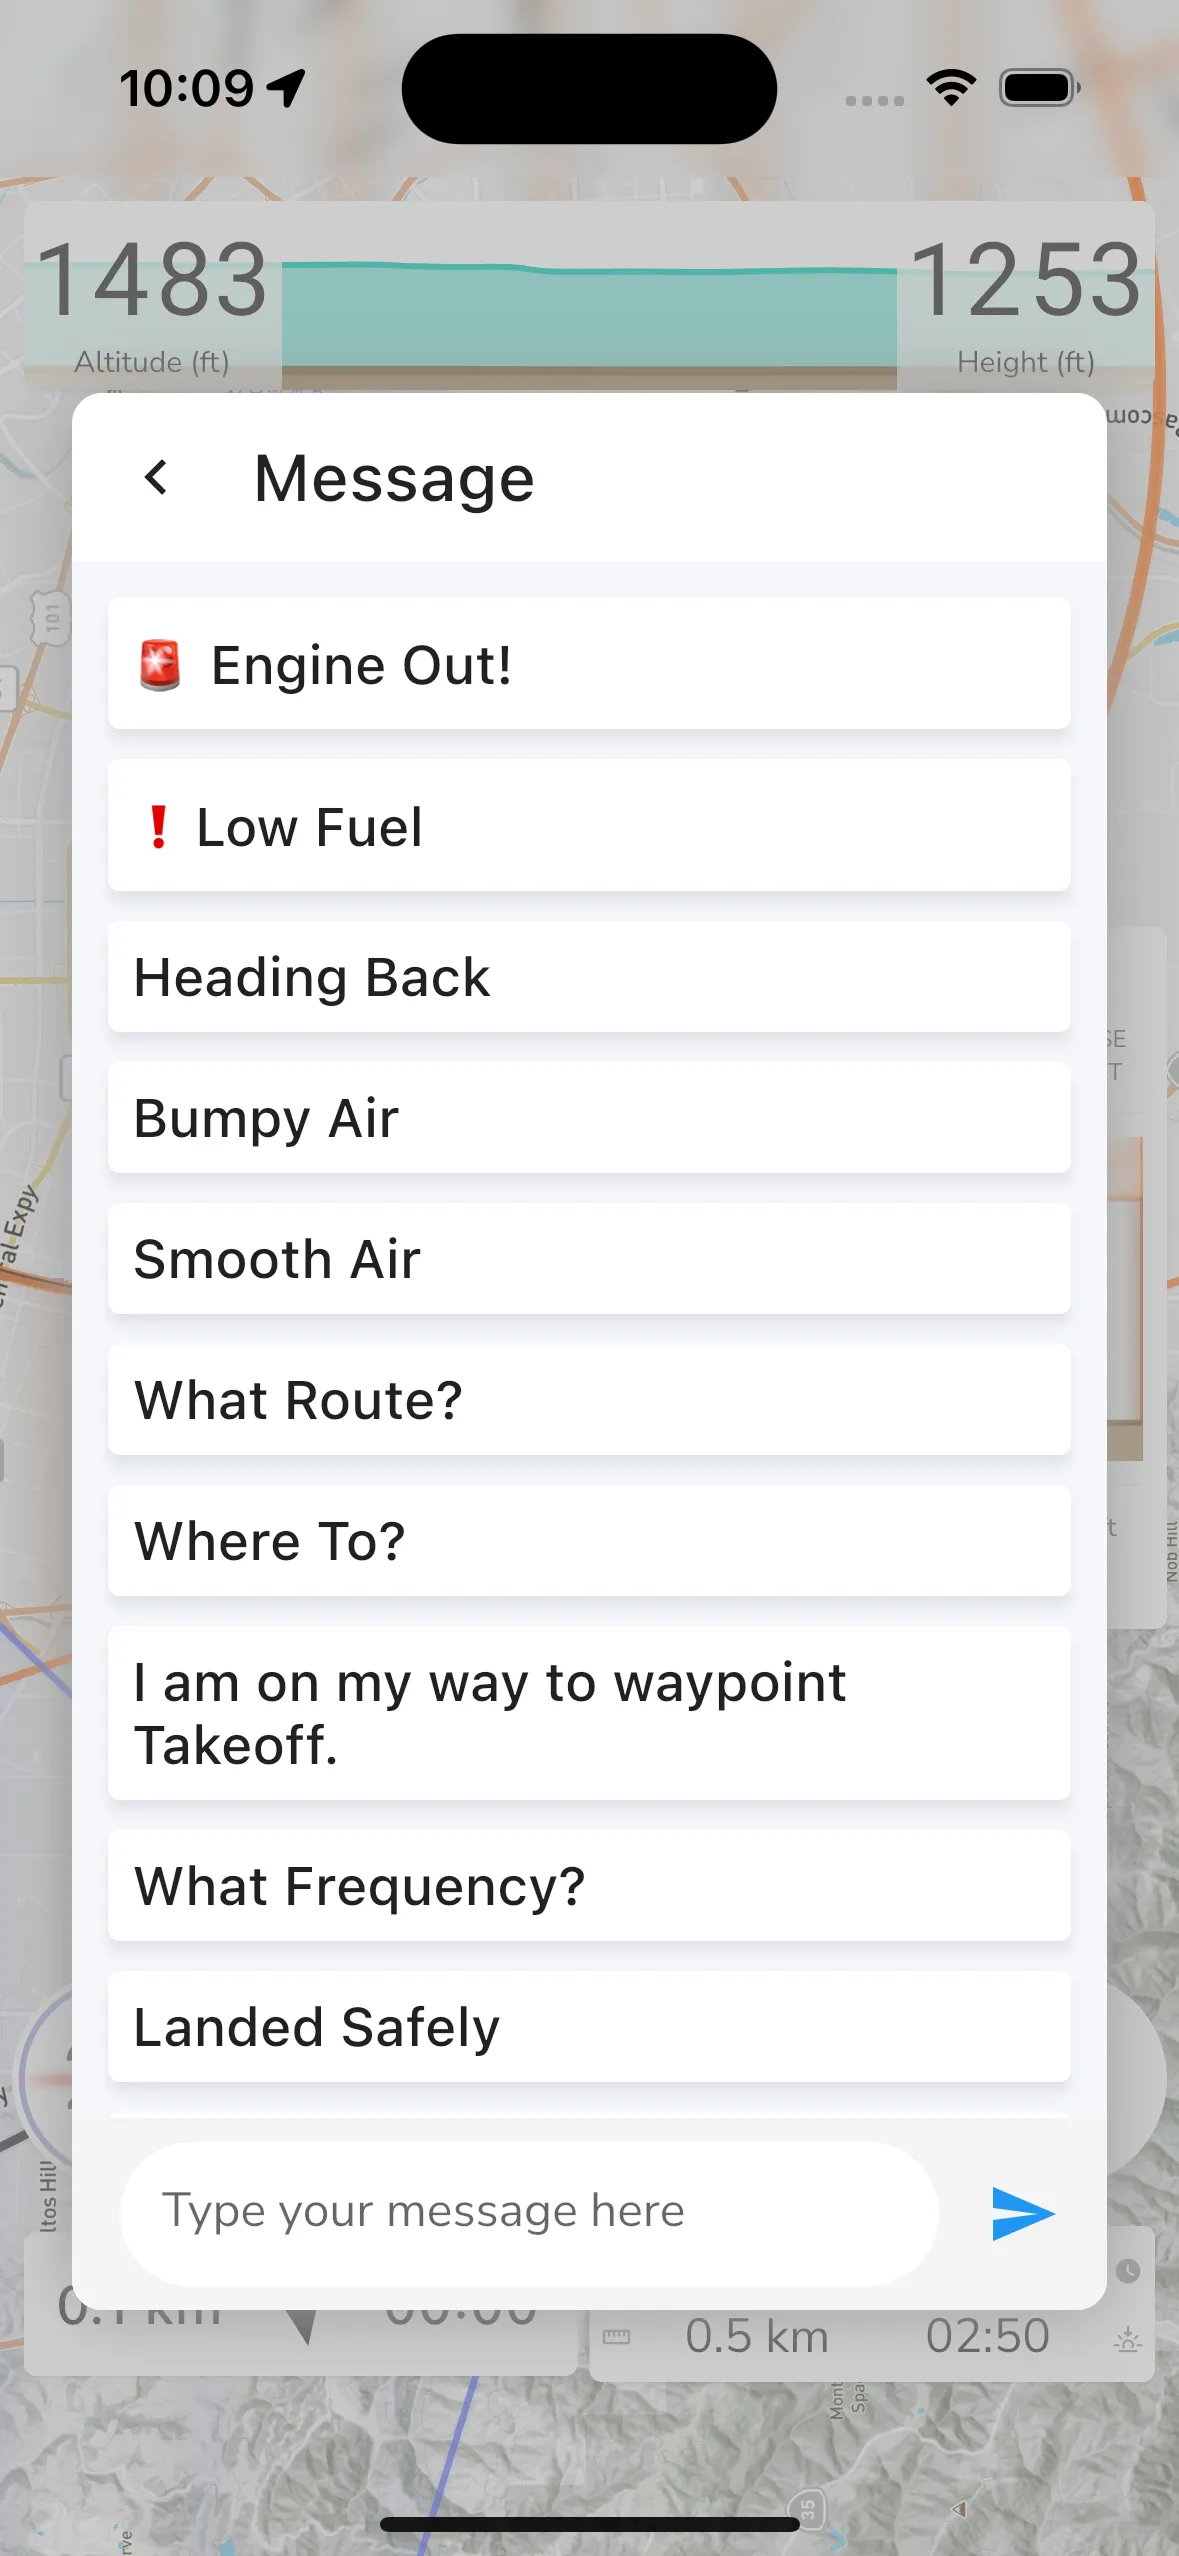
While in flight you can message individual friends or send broadcast messages to everyone.
Broadcast Message: At the bottom of the view beneath the friend list is the broadcast option. When you broadcast a message it is sent to all the friends actively flying in your vicinity.
Quick Message: Gaggle has some predefined quick messages that you can quickly tap to send. When sending a message tap the quick message option (left of the input text area) and you will be presented with the predefined message list.
Receiving Messages: When a friend sends a message you will see the message displayed on your screen for a minute. You will also get a notification on your phone. If you have audio cues enabled, then the message will be read to you as well.
>
When you’ve configured your fuel tank size in the settings, Gaggle will show you a fuel level widget that you can tap to see more details about your fuel level. When you tap this widget a new view is opened showing additional details about your fuel level and engine.
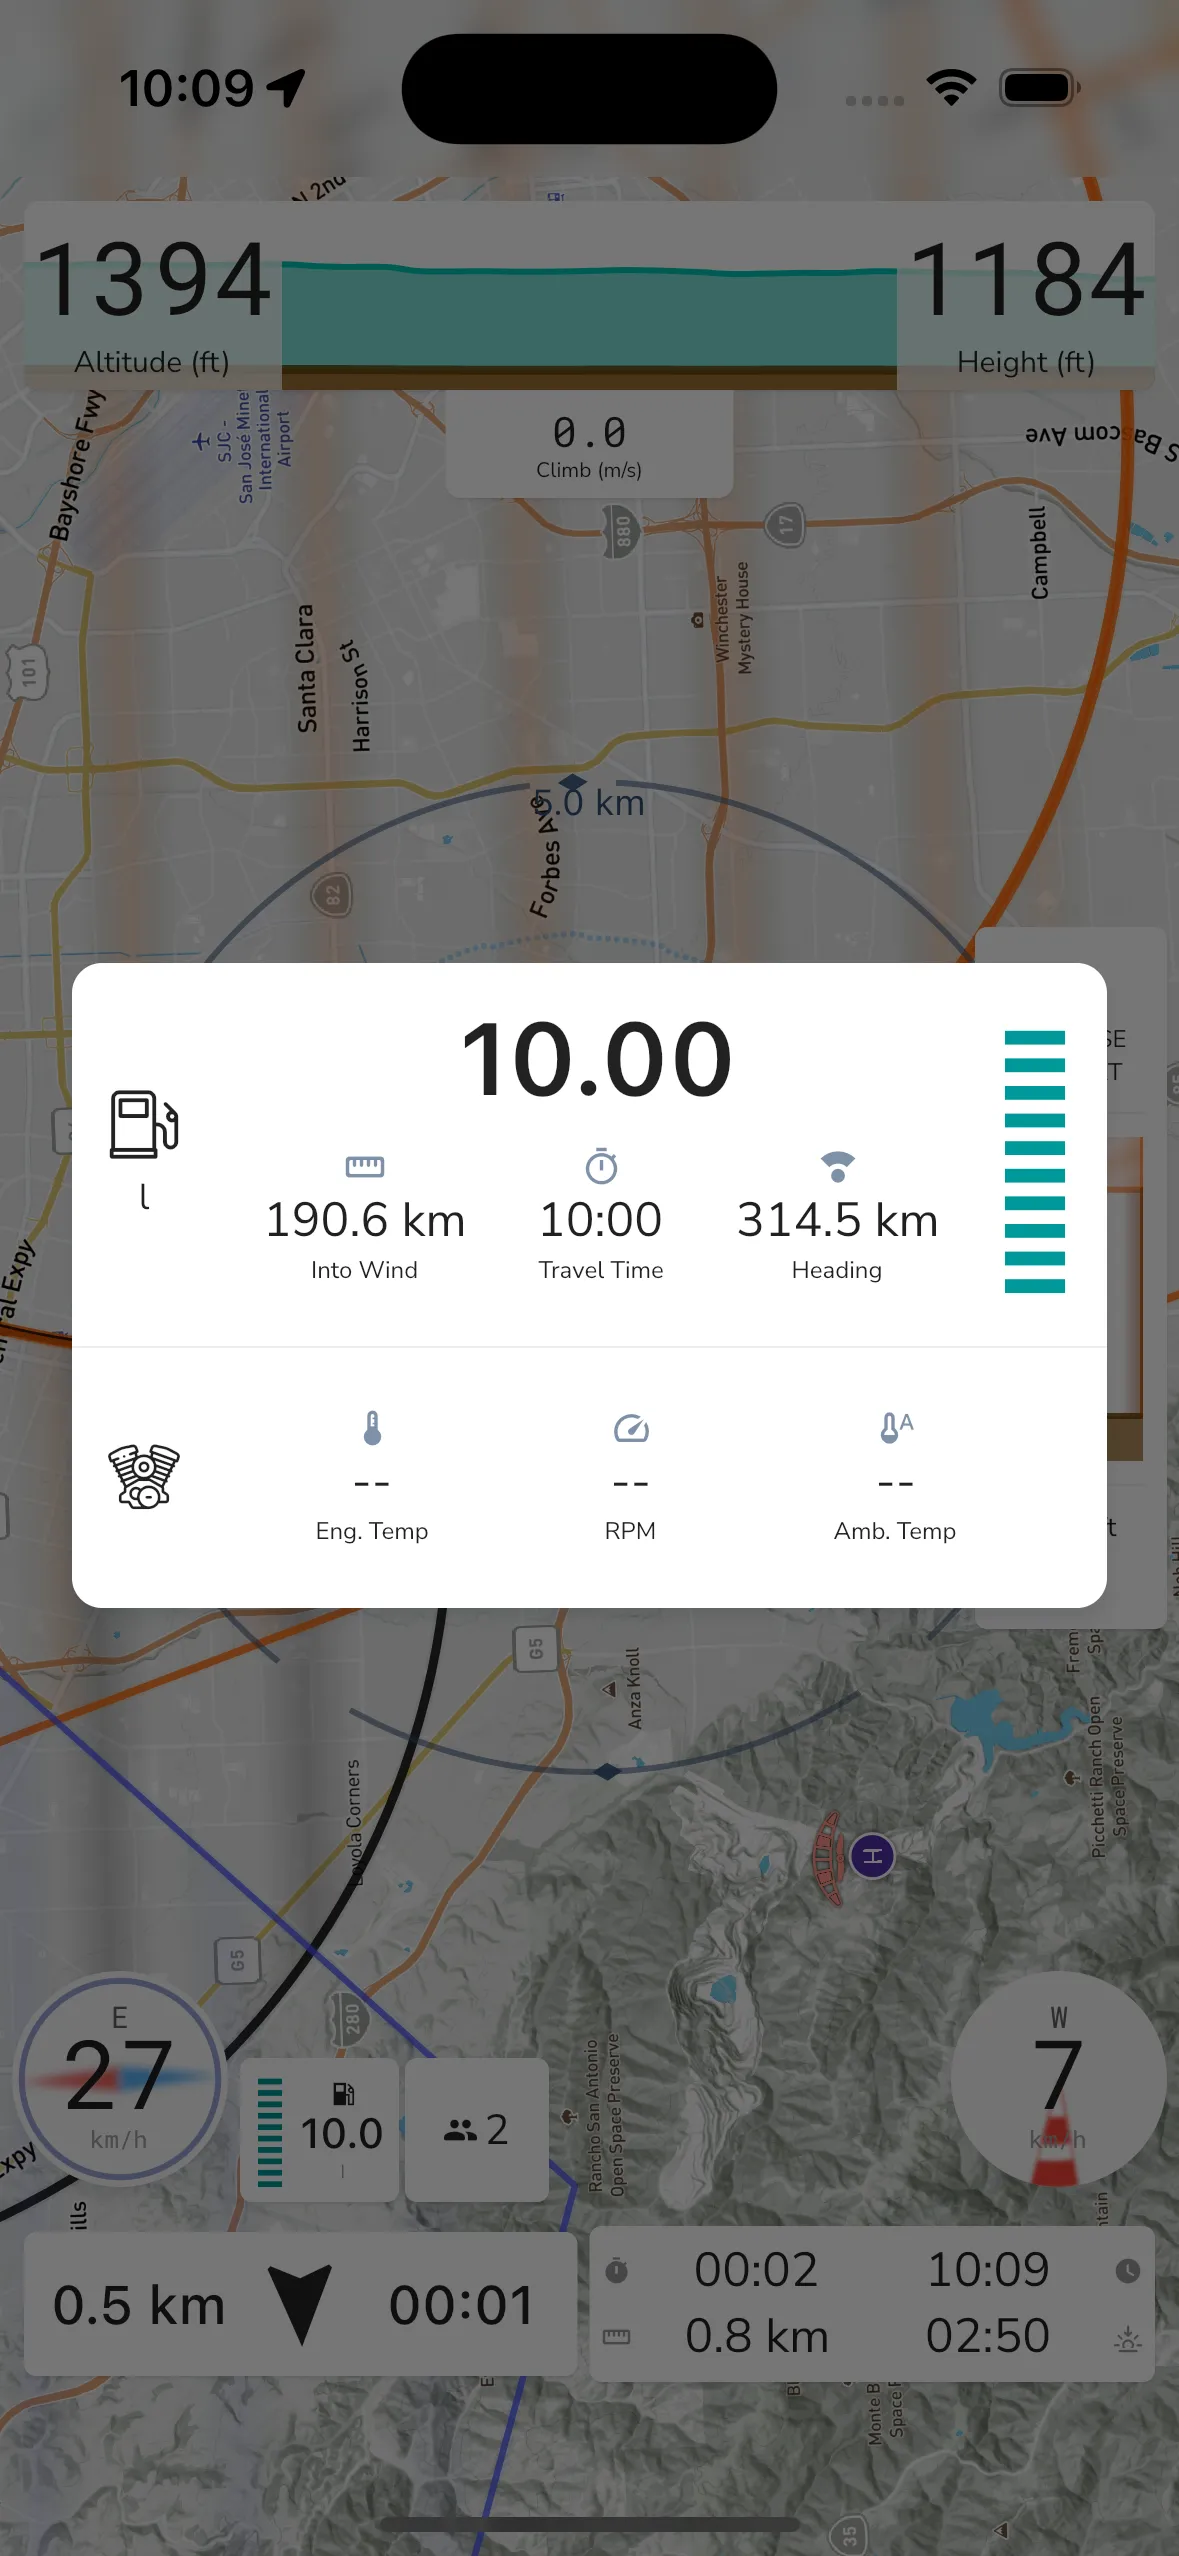
The fuel level display will show you the current fuel level in your tank (estimated), the estimated flight time remaining, and the estimated distance you can fly into wind, and estimated distance you can fly on the current heading. You can tap the fuel level to edit the fuel level.
If you have engine sensors that transmit data to Gaggle then you will also see the engine temperature and RPM displayed here.
>
On the bottom left of the screen you will find the ground speed widget. This widget gives you the following information:
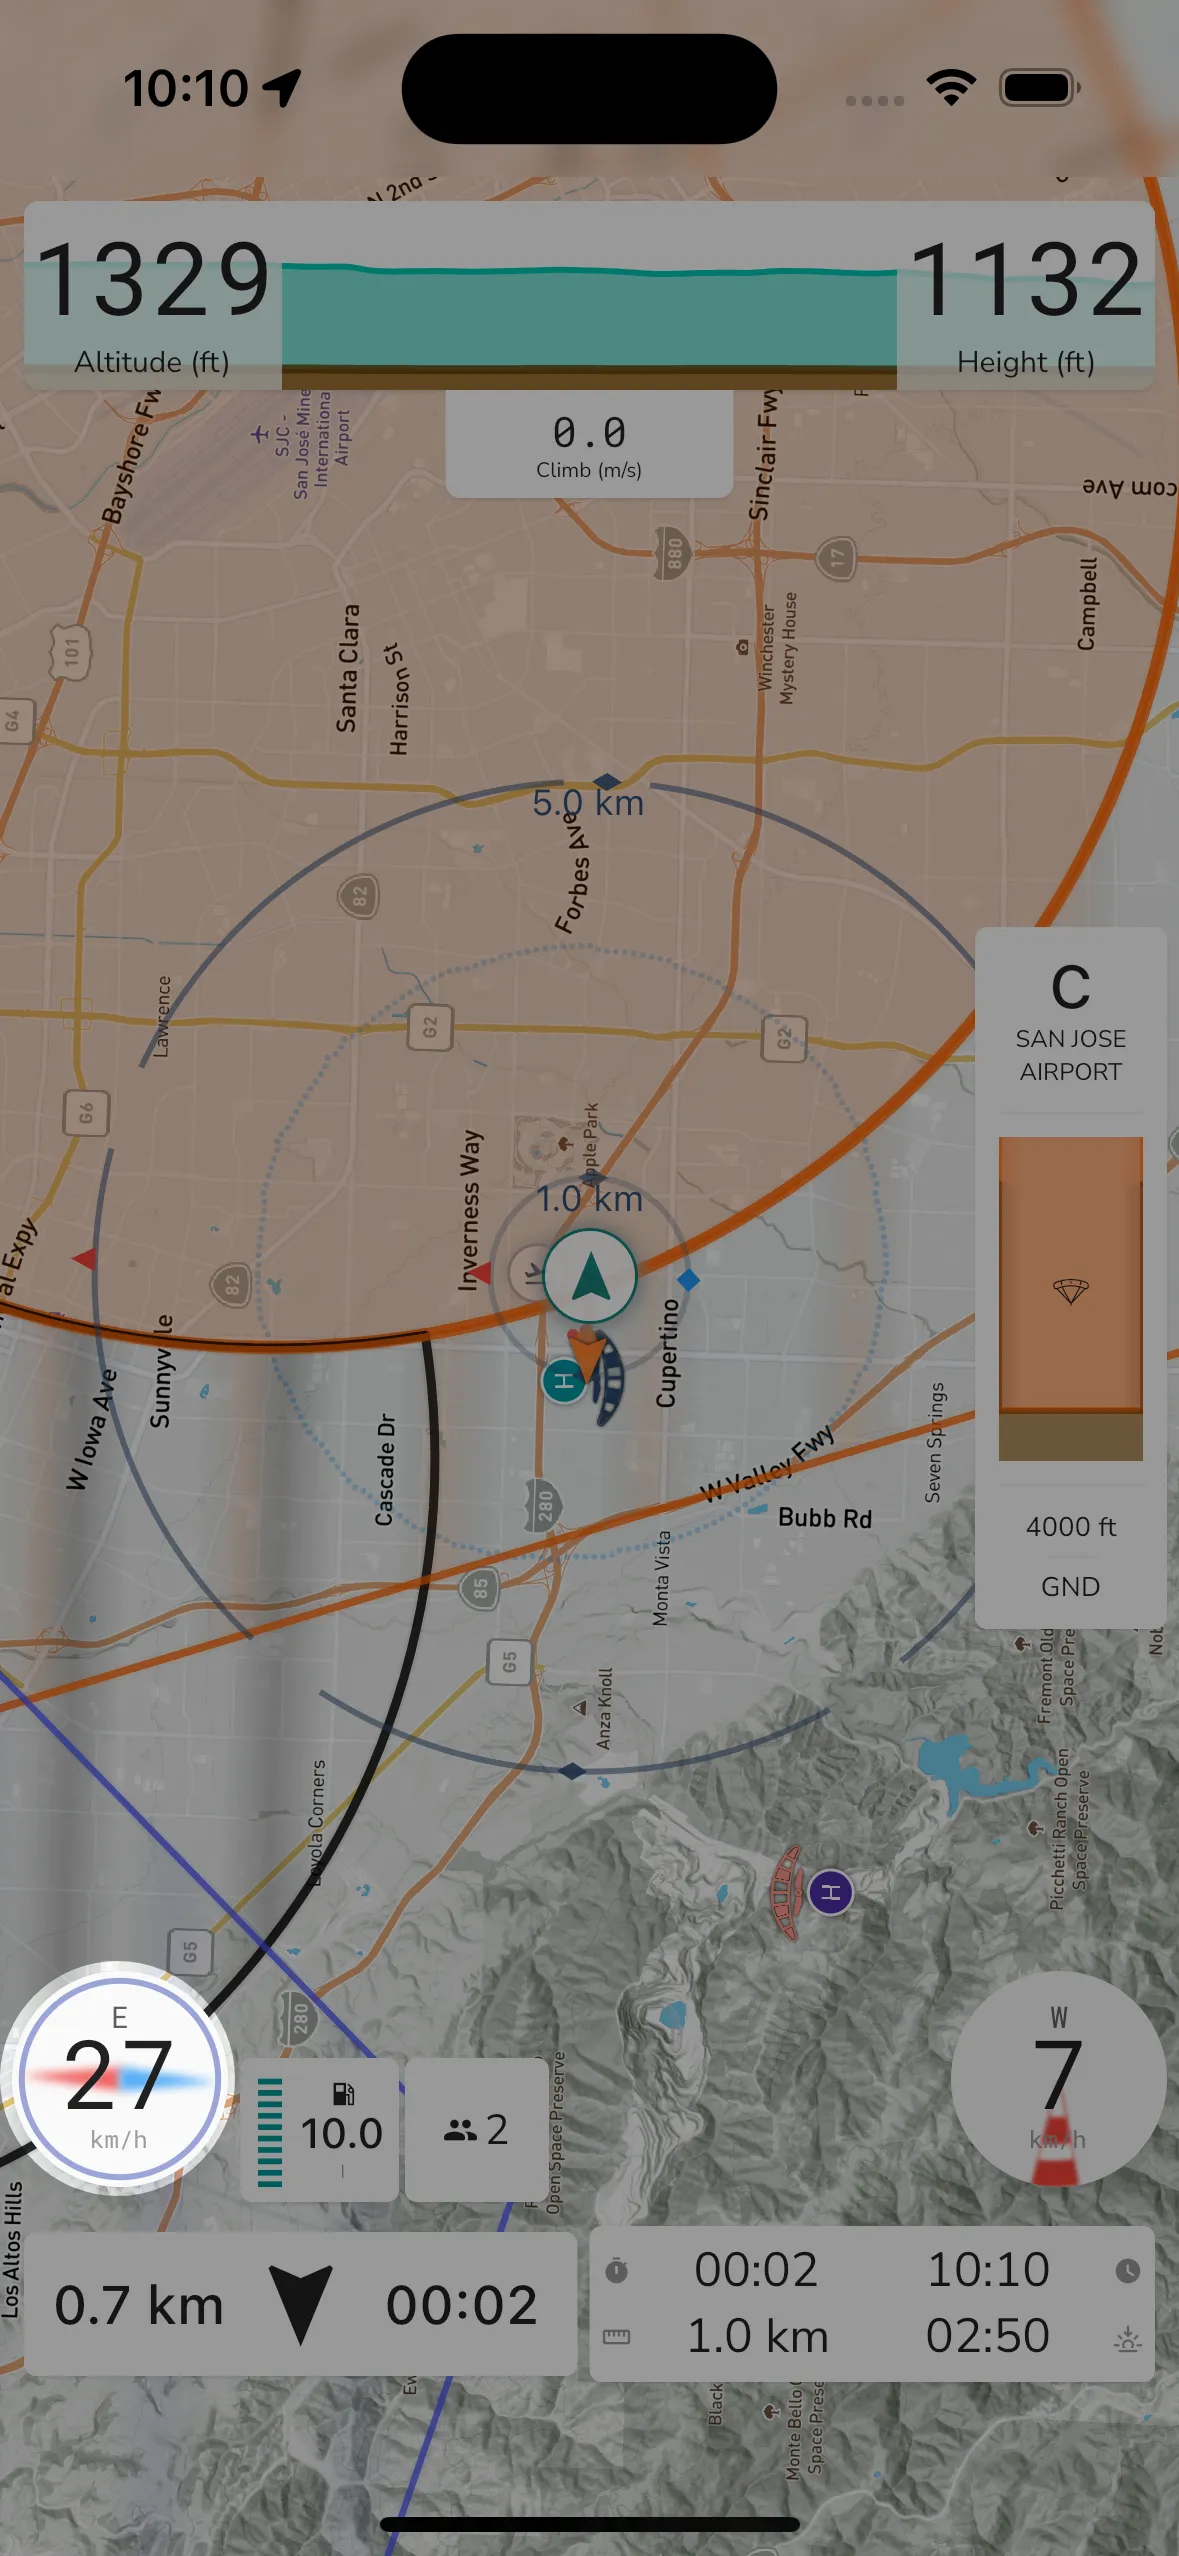
Ground Speed: Your current ground speed as reported by the GPS is displayed here. Because GPS data can jump up and own a lot depending on phones built-in GPS sensor, the data is smoothed out a bit before being displayed to you. Therefore, it will never be 100% accurate but it will be very close to your true ground speed most of the time.
Compass: Behind the ground speed value is a basic compass for you to see your direction of travel. The red arrow indicates North and Blue arrow indicates South. The direction of travel is also displayed as a text value above the ground speed value. While on the ground the compass will use your phone’s internal compass (if available), but once you start flying, this will show you your direction of travel regardless of phone orientation. In high wind speed conditions, the heading obtained from direction of travel would therefore be different from the direction that you are actually facing if you are crabbing sideways.
Fuel Level: If flying a powered paraglider, you have the option of configuring your fuel tank size and average consumption. Before starting your flight you can then set your fuel level and Gaggle will use your configured consumption to calculate the estimated fuel remaining while flying. The fuel consumption you set is used as a baseline, but Gaggle will also take climb and sink into account to increase or decrease estimated fuel burn while flying.
>
Gaggle by default shows a terrain map view with some key items displayed by default. You can configure most of these in the system settings and also change the map layers you want to view.
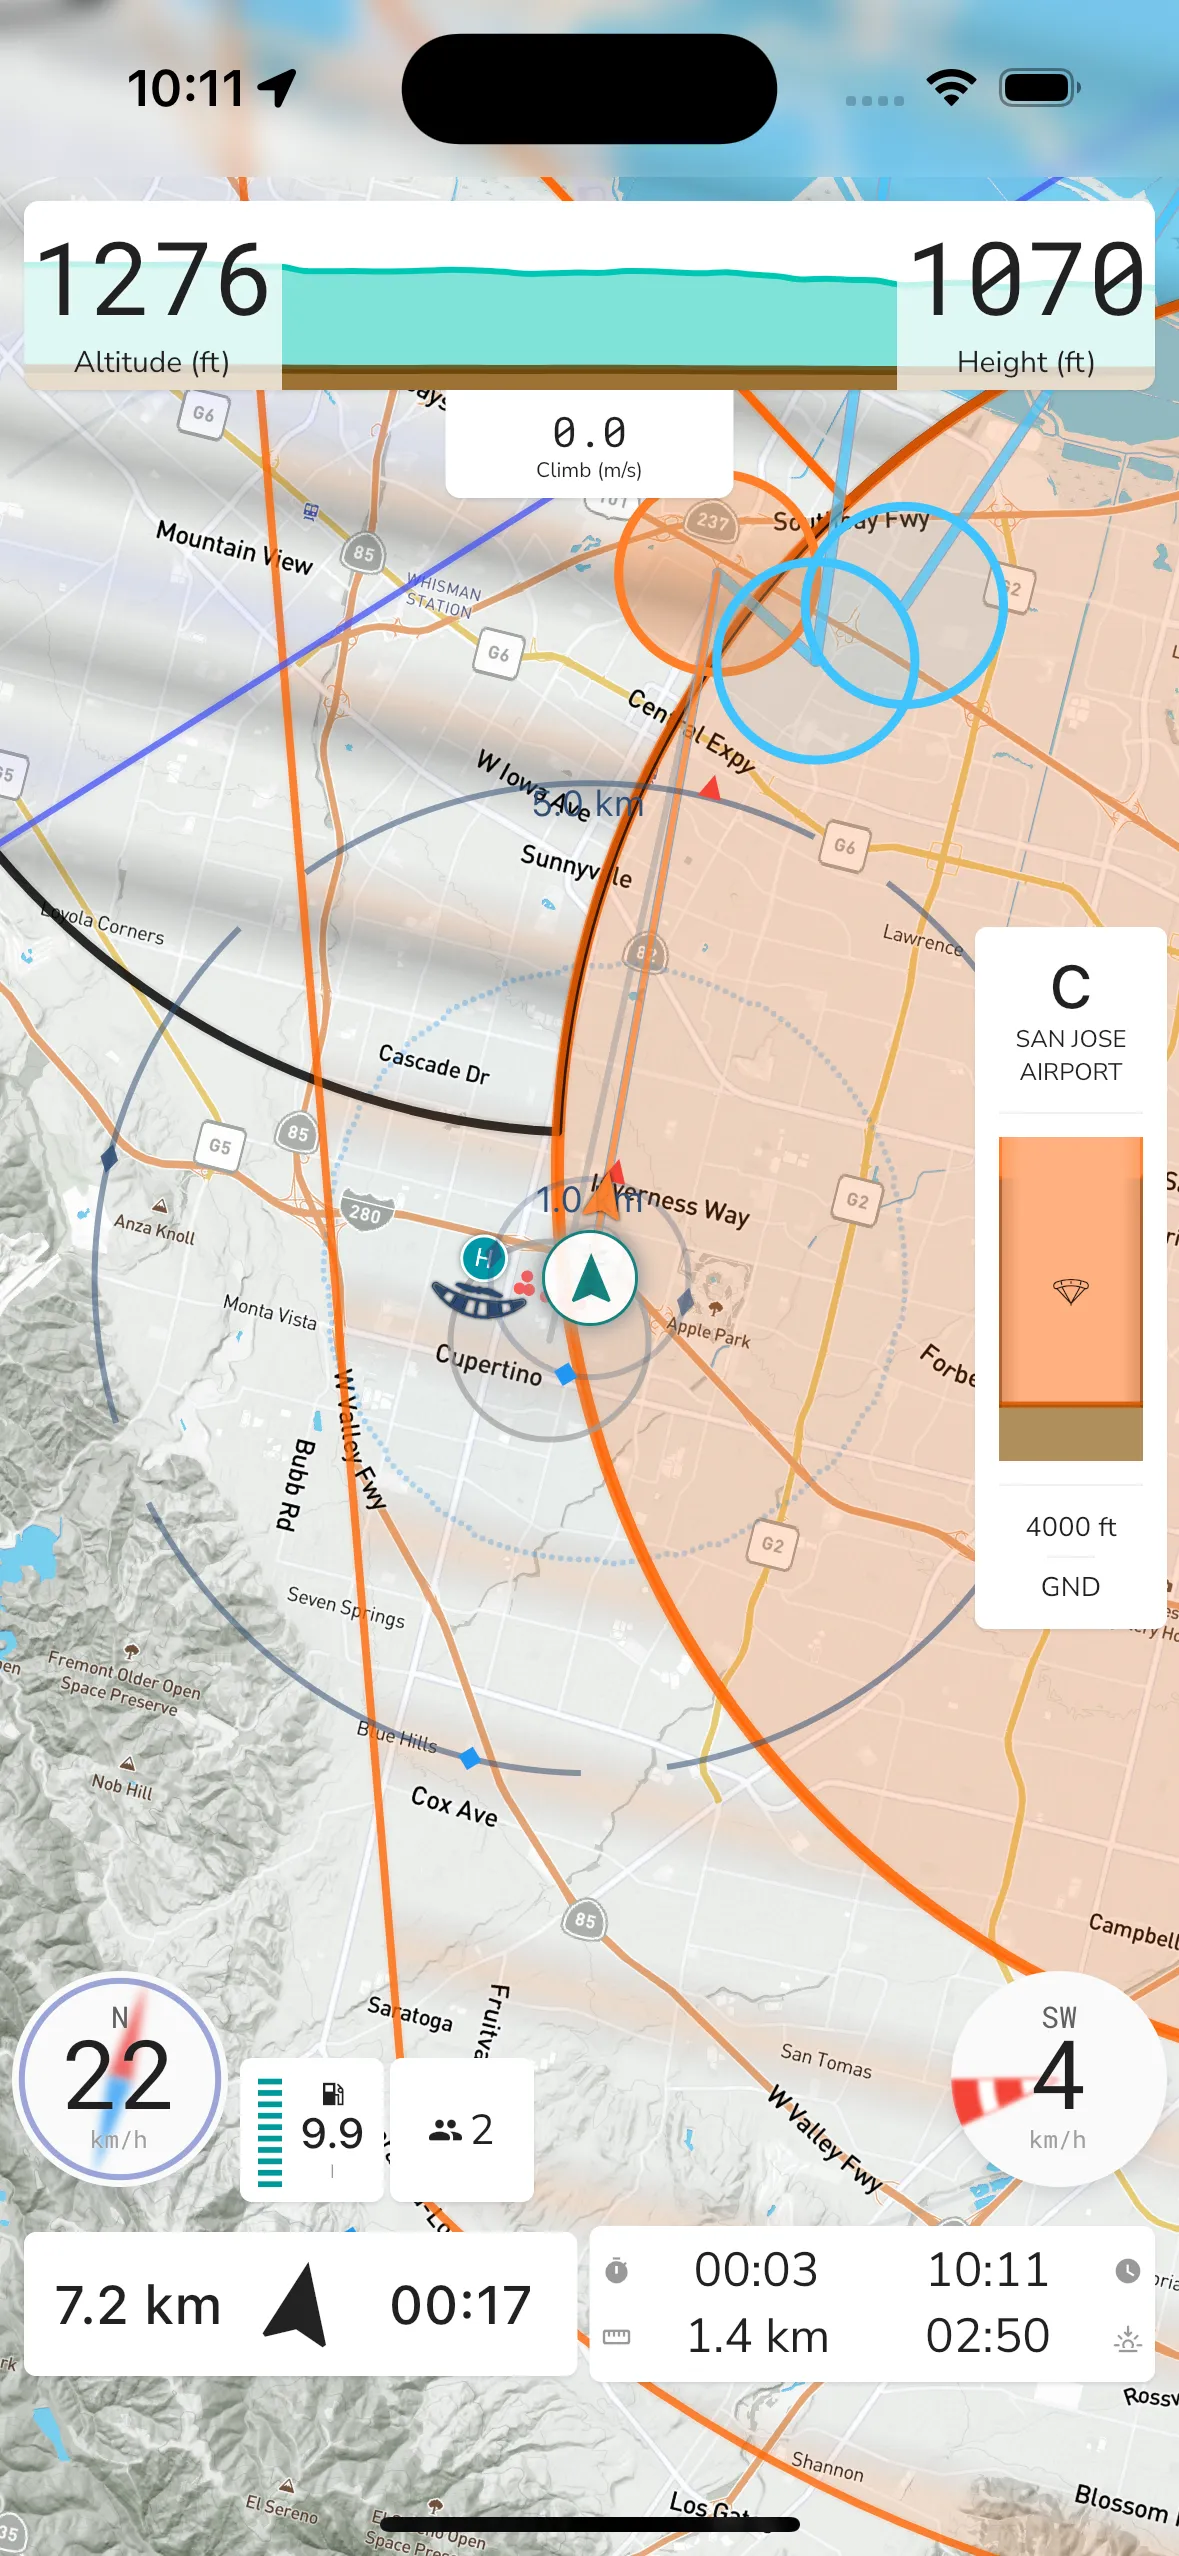
You can change many settings for the map view in the recorder settings, some of the options available are:
Map Orientation: You can configure the map to follow your general heading as you fly, or you can choose to have a north up view where the map will not move around.
Map Layer: Gaggle can show different base map layers. You can choose which one to use by toggling the display settings. There are 3 layers to choose from: satellite, terrain, or sectionals (USA Only). Maps are cached and will work even when you are offline, you must just make sure that you’ve viewed the map for your intended route while being online so that the maps can download before you go into areas with reduced network coverage.
Nearby Pilots: If you have friends flying with you then they will have markers indicating their location and whether they are above or below you. Your friends must also use Gaggle to record their flight for this feature to work.
Flight Path: As you fly, Gaggle will draw a snail trail on the map showing where you’ve flown. The snail trail has the same color coding as the altitude widget and will show the path for the last 30 minutes of flight.
Take-off Indicators: The map will show an indicator marking your last 3 take-off locations which will help you find your way back to your desired take-off location.
Airspaces: If you have airspaces installed for your region then the airspaces would show on the map giving you and indication of where you are allowed to fly.
Waypoints: When flying a route, the waypoints will show on the map indicating your route and where you need to fly to next.
Points of Interest: Public and private points of interest will show on the map. You can tap on any of the points of interest to see more details about them.
Flying sites: Public and private flying sites will show on the map. You can tap on any of the flying sites to see more details about them.
You can tap anywhere on the map to reveal addition controls like map zoom in/out.
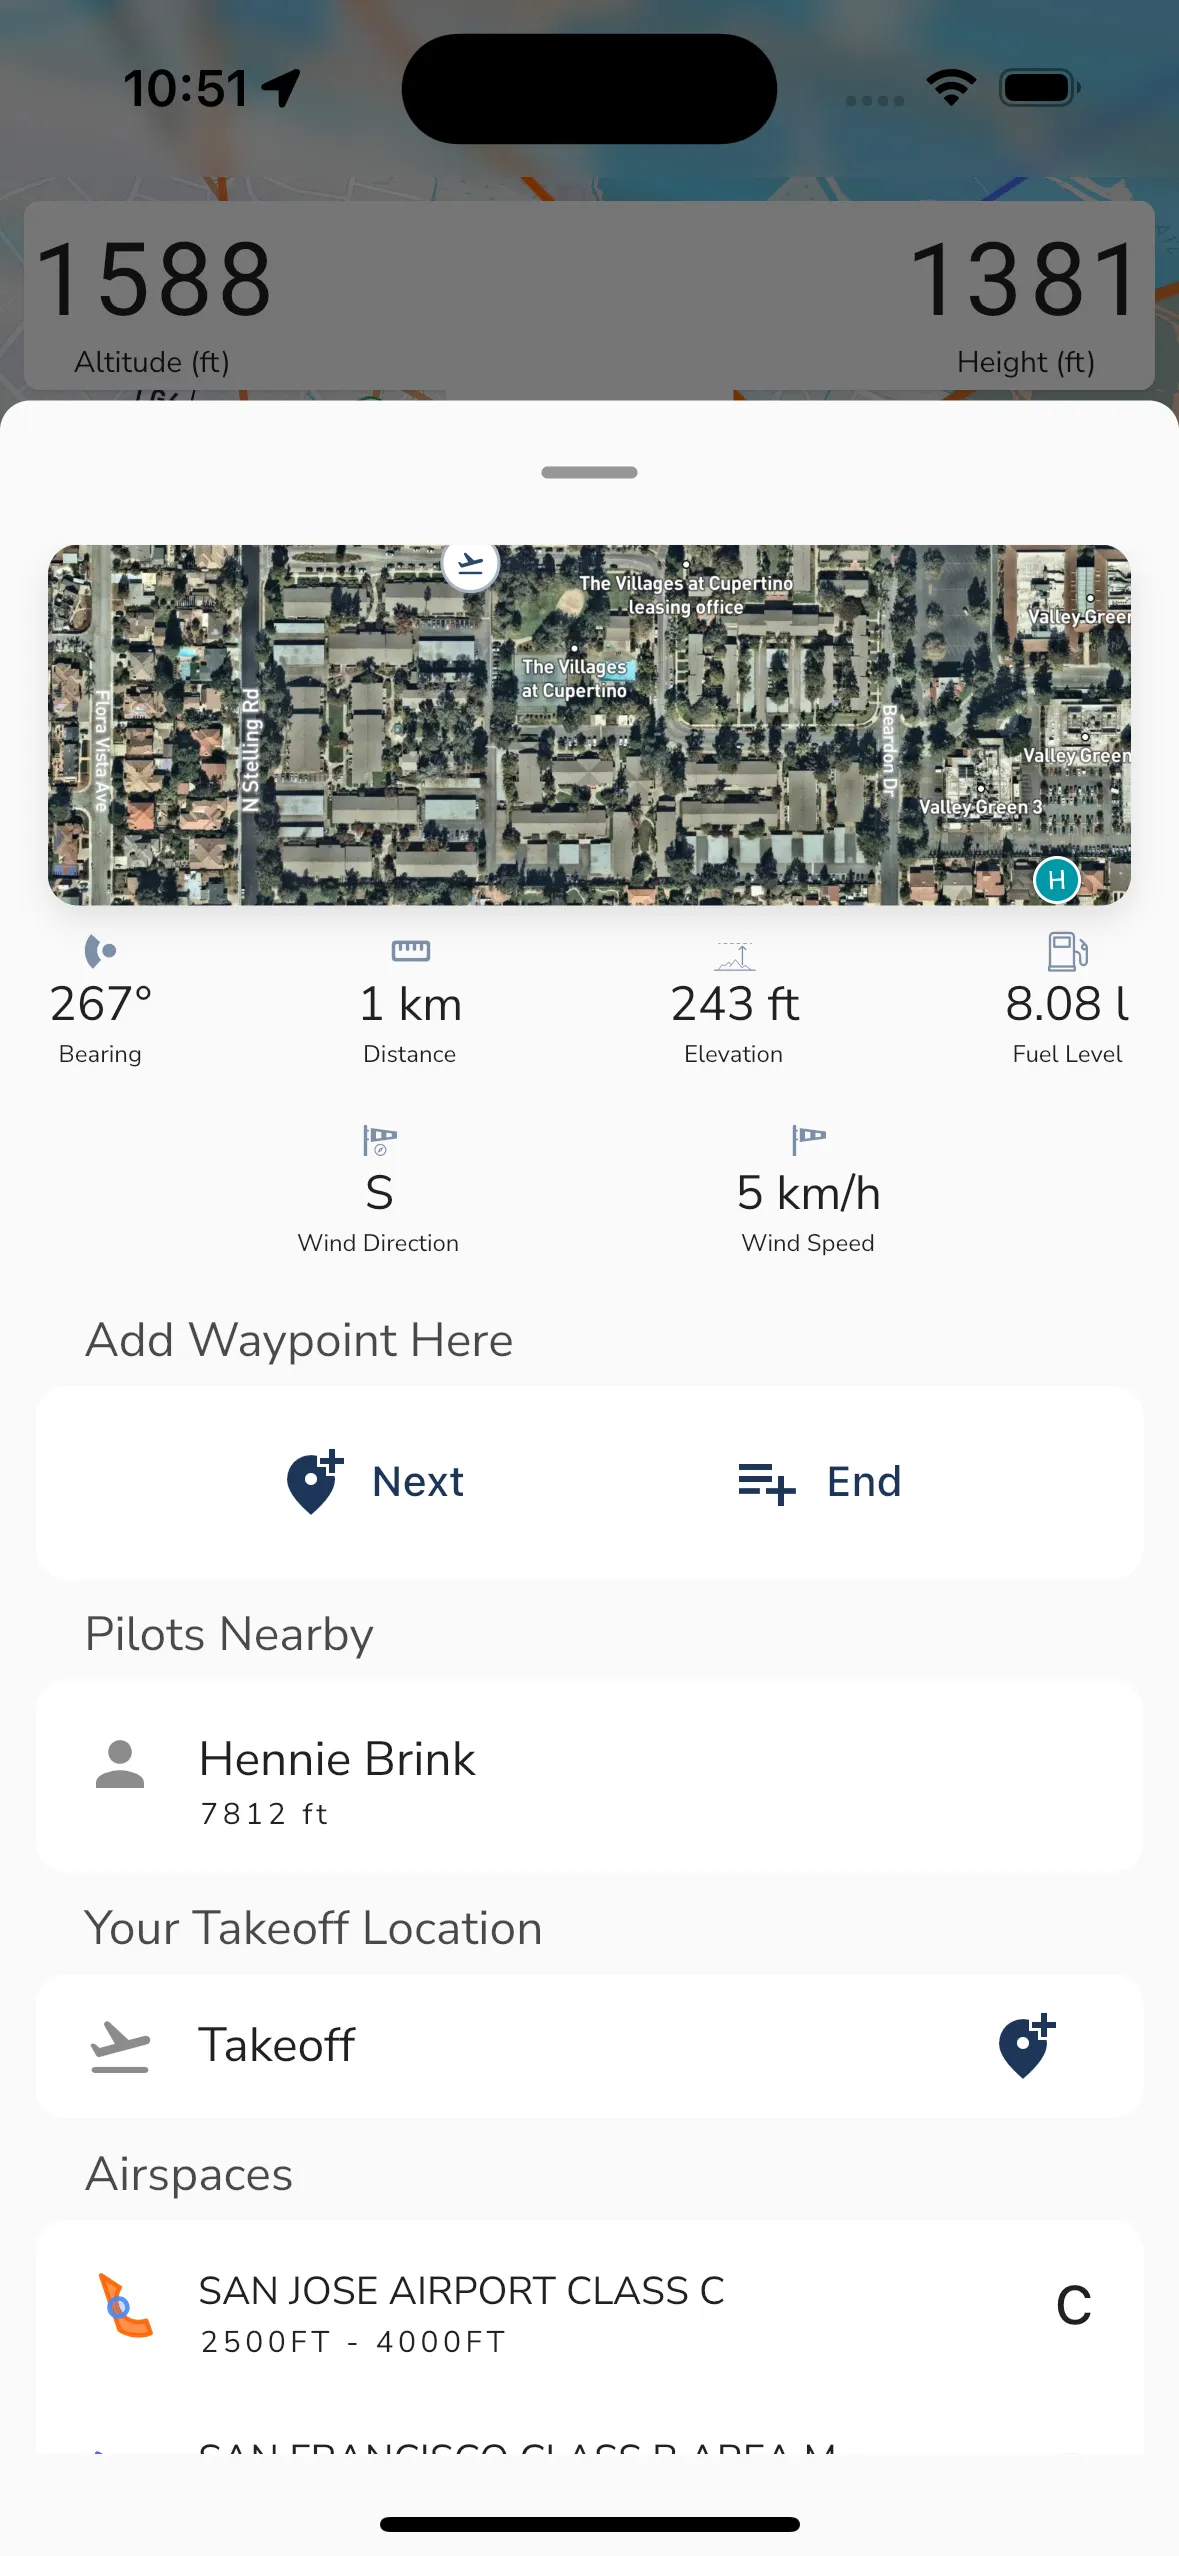
When you long press anywhere on the map you will see a new display showing details for the location you long pressed on. The details shown are:
Bearing: The bearing from your current location to the location you long pressed on.
Distance: The distance from your current location to the location you long pressed on.
Elevation: The elevation of the location you long pressed on.
Fuel: The estimated fuel level at arrival for the location you long pressed on.
Wind: The wind speed and direction at the location you long pressed on.
Add Waypoint: You can tap the add waypoint button to add a waypoint at the location you long pressed on.
Pilots Nearby: If there are any pilots flying near the location you long pressed on then they will be shown here.
Waypoints Nearby: If there are any waypoints near the location you long pressed on then they will be shown here.
Points of Interest Nearby: If there are any points of interest near the location you long pressed on then they will be shown here.
Flying Sites Nearby: If there are any flying sites near the location you long pressed on then they will be shown here.
Airspaces Nearby: If there are any airspaces near the location you long pressed on then they will be shown here.
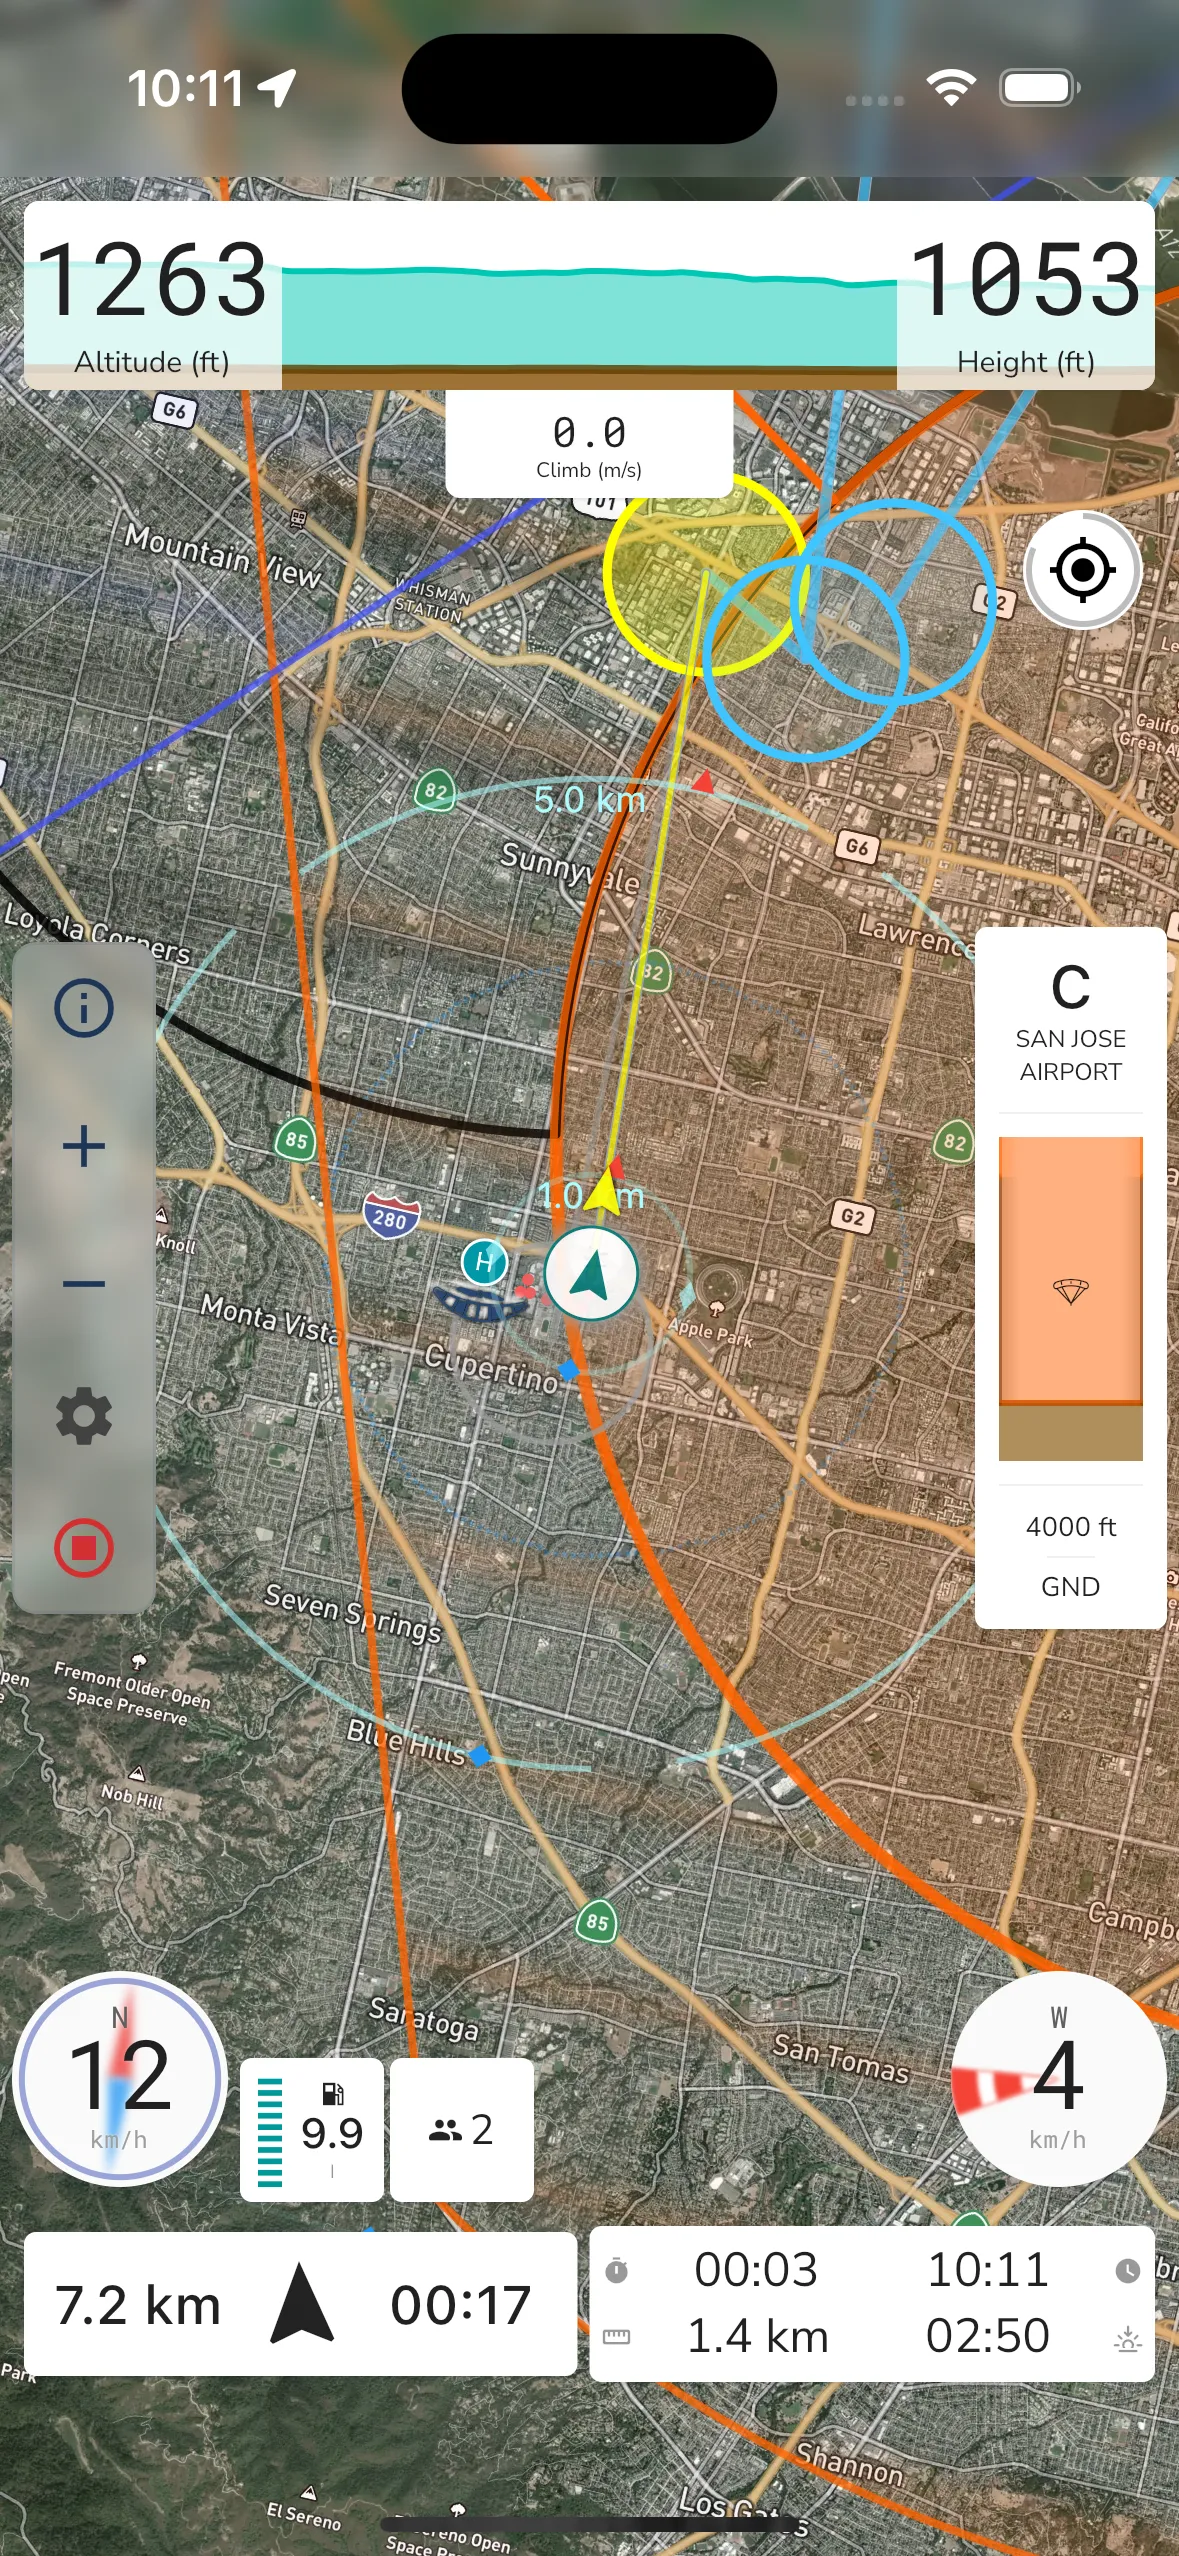
When you change the base map to satellite view you will see the satellite map view. This view shows you the satellite map with the same controls as the terrain map view. Some items on the map will have different colors to make them stand out more on the satellite map.
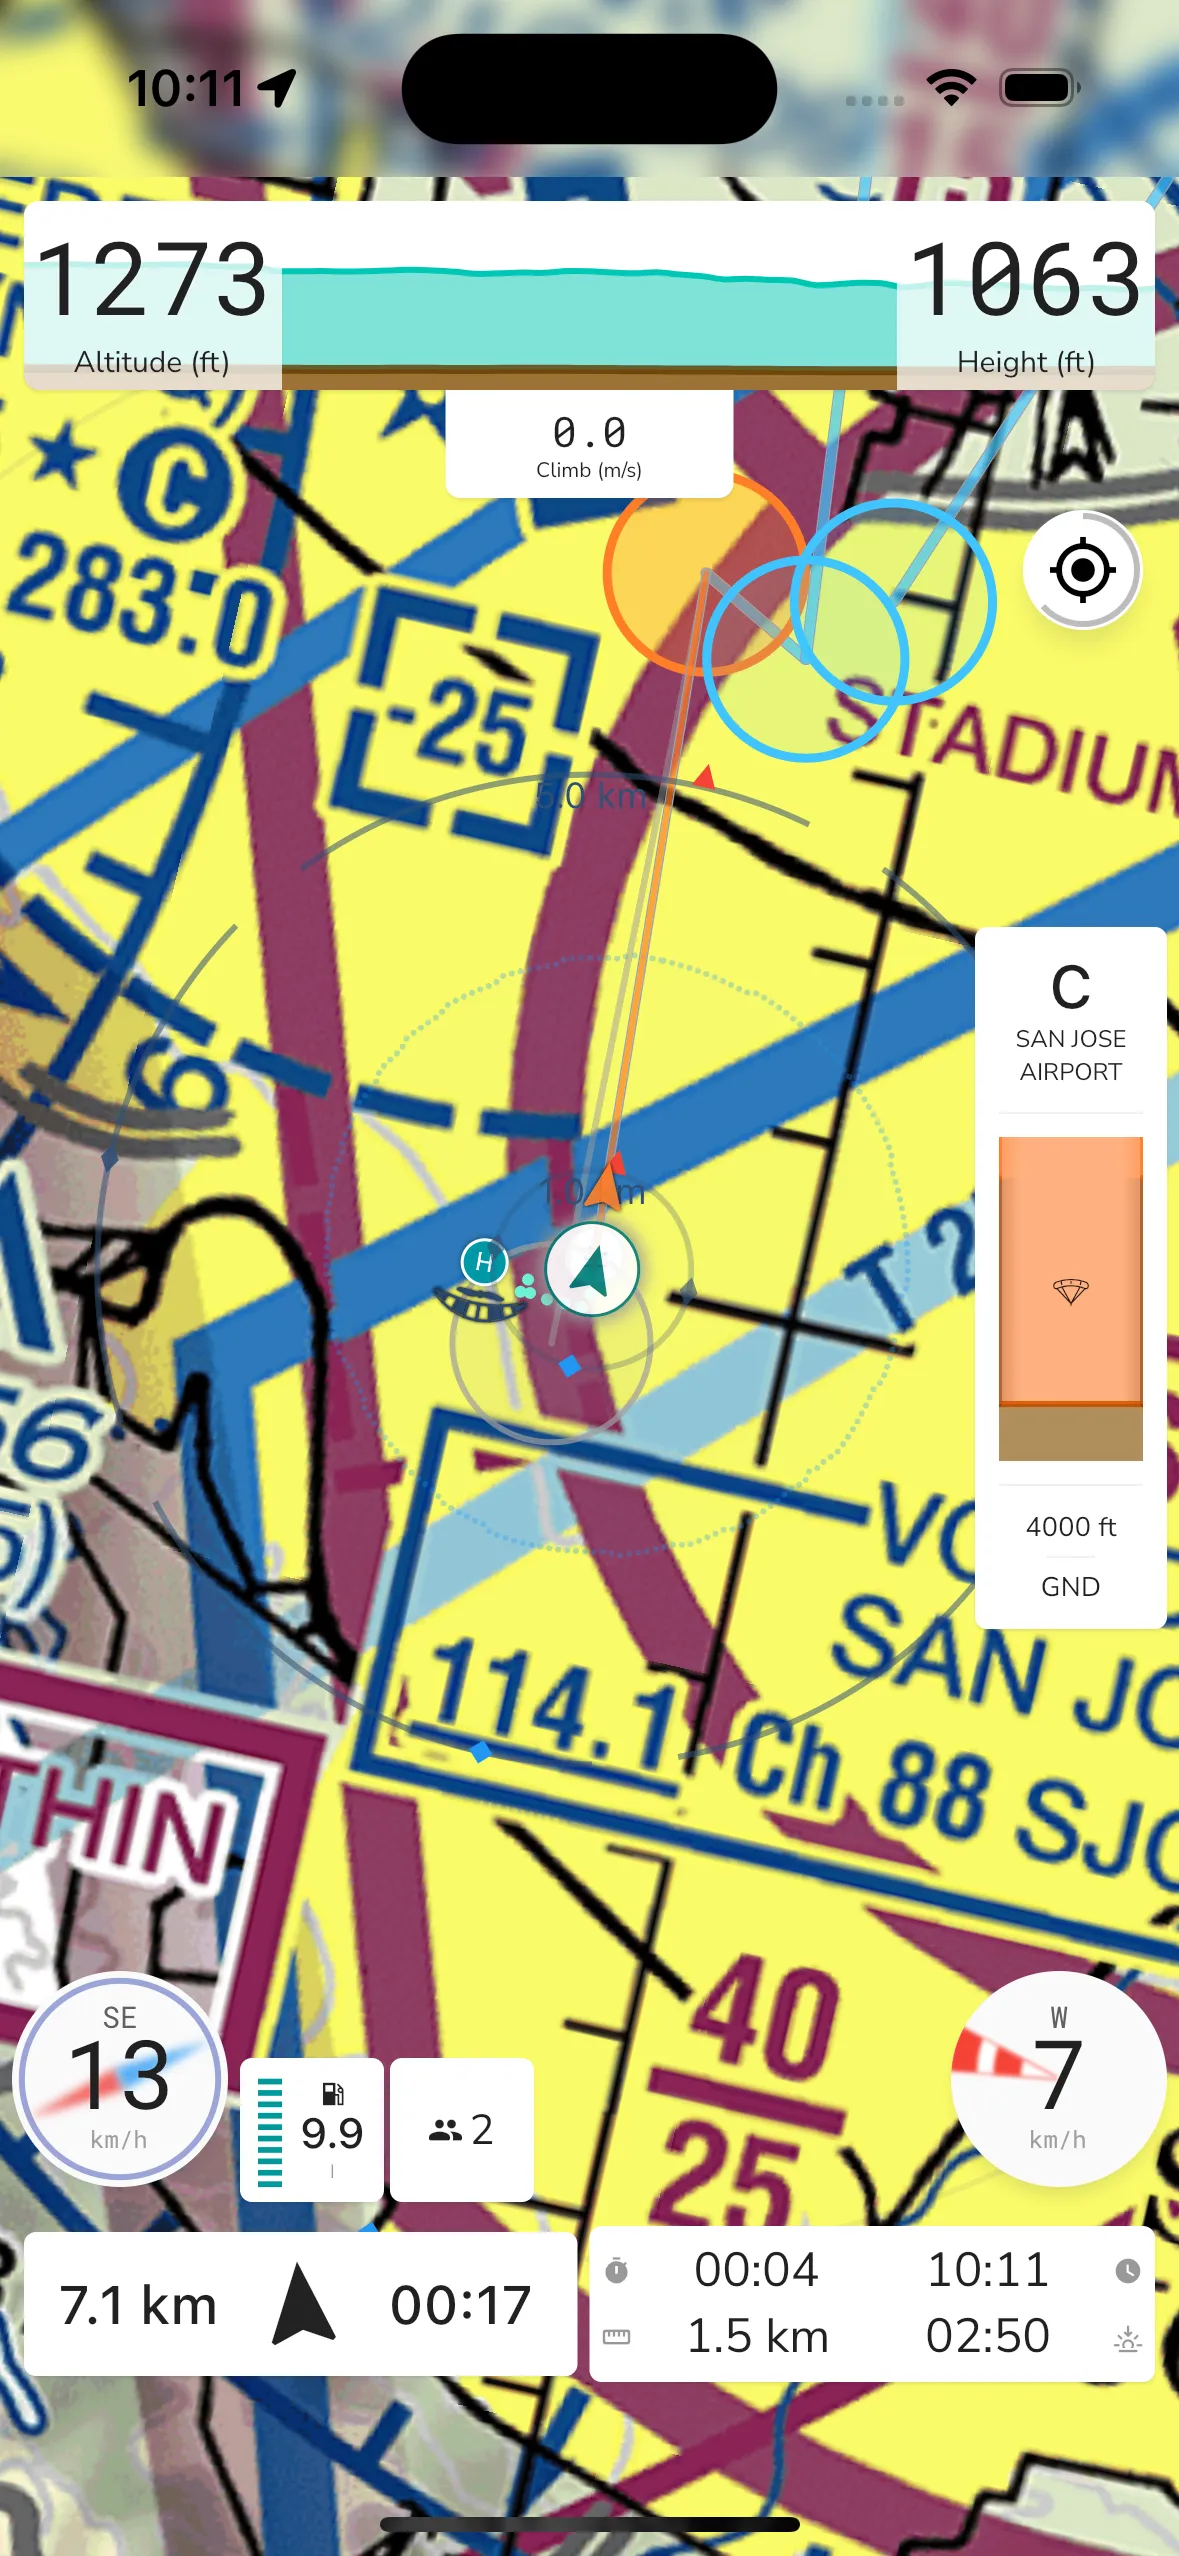
If you prefer to see the sectional map view (USA Only) then you can change the base map to sectional view. This view shows you the sectional map with the same controls as the terrain map view. Some items on the map will have different colors to make them stand out more on the sectional map.
>
Gaggle has support for routes and also a return home which will guide you back to your take-off location. When you aren’t flying a specific route the default behaviour is to make your take-off location your only waypoint that Gaggle will always guide you back to.

Gaggle will show all the waypoints for your route on the map.
The next waypoint is colored in orange (yellow for satellite map view) with a line and arrow pointing to the next waypoint. At the bottom of the screen is the navigation widget show you time, distance, and direction to the next waypoint. Wind conditions are taken into account for travel time calculations.
Upcoming waypoints are colored in blue on the map and also show the distance and travel time to the waypoint.
Previous waypoints are colored in grey on the map.
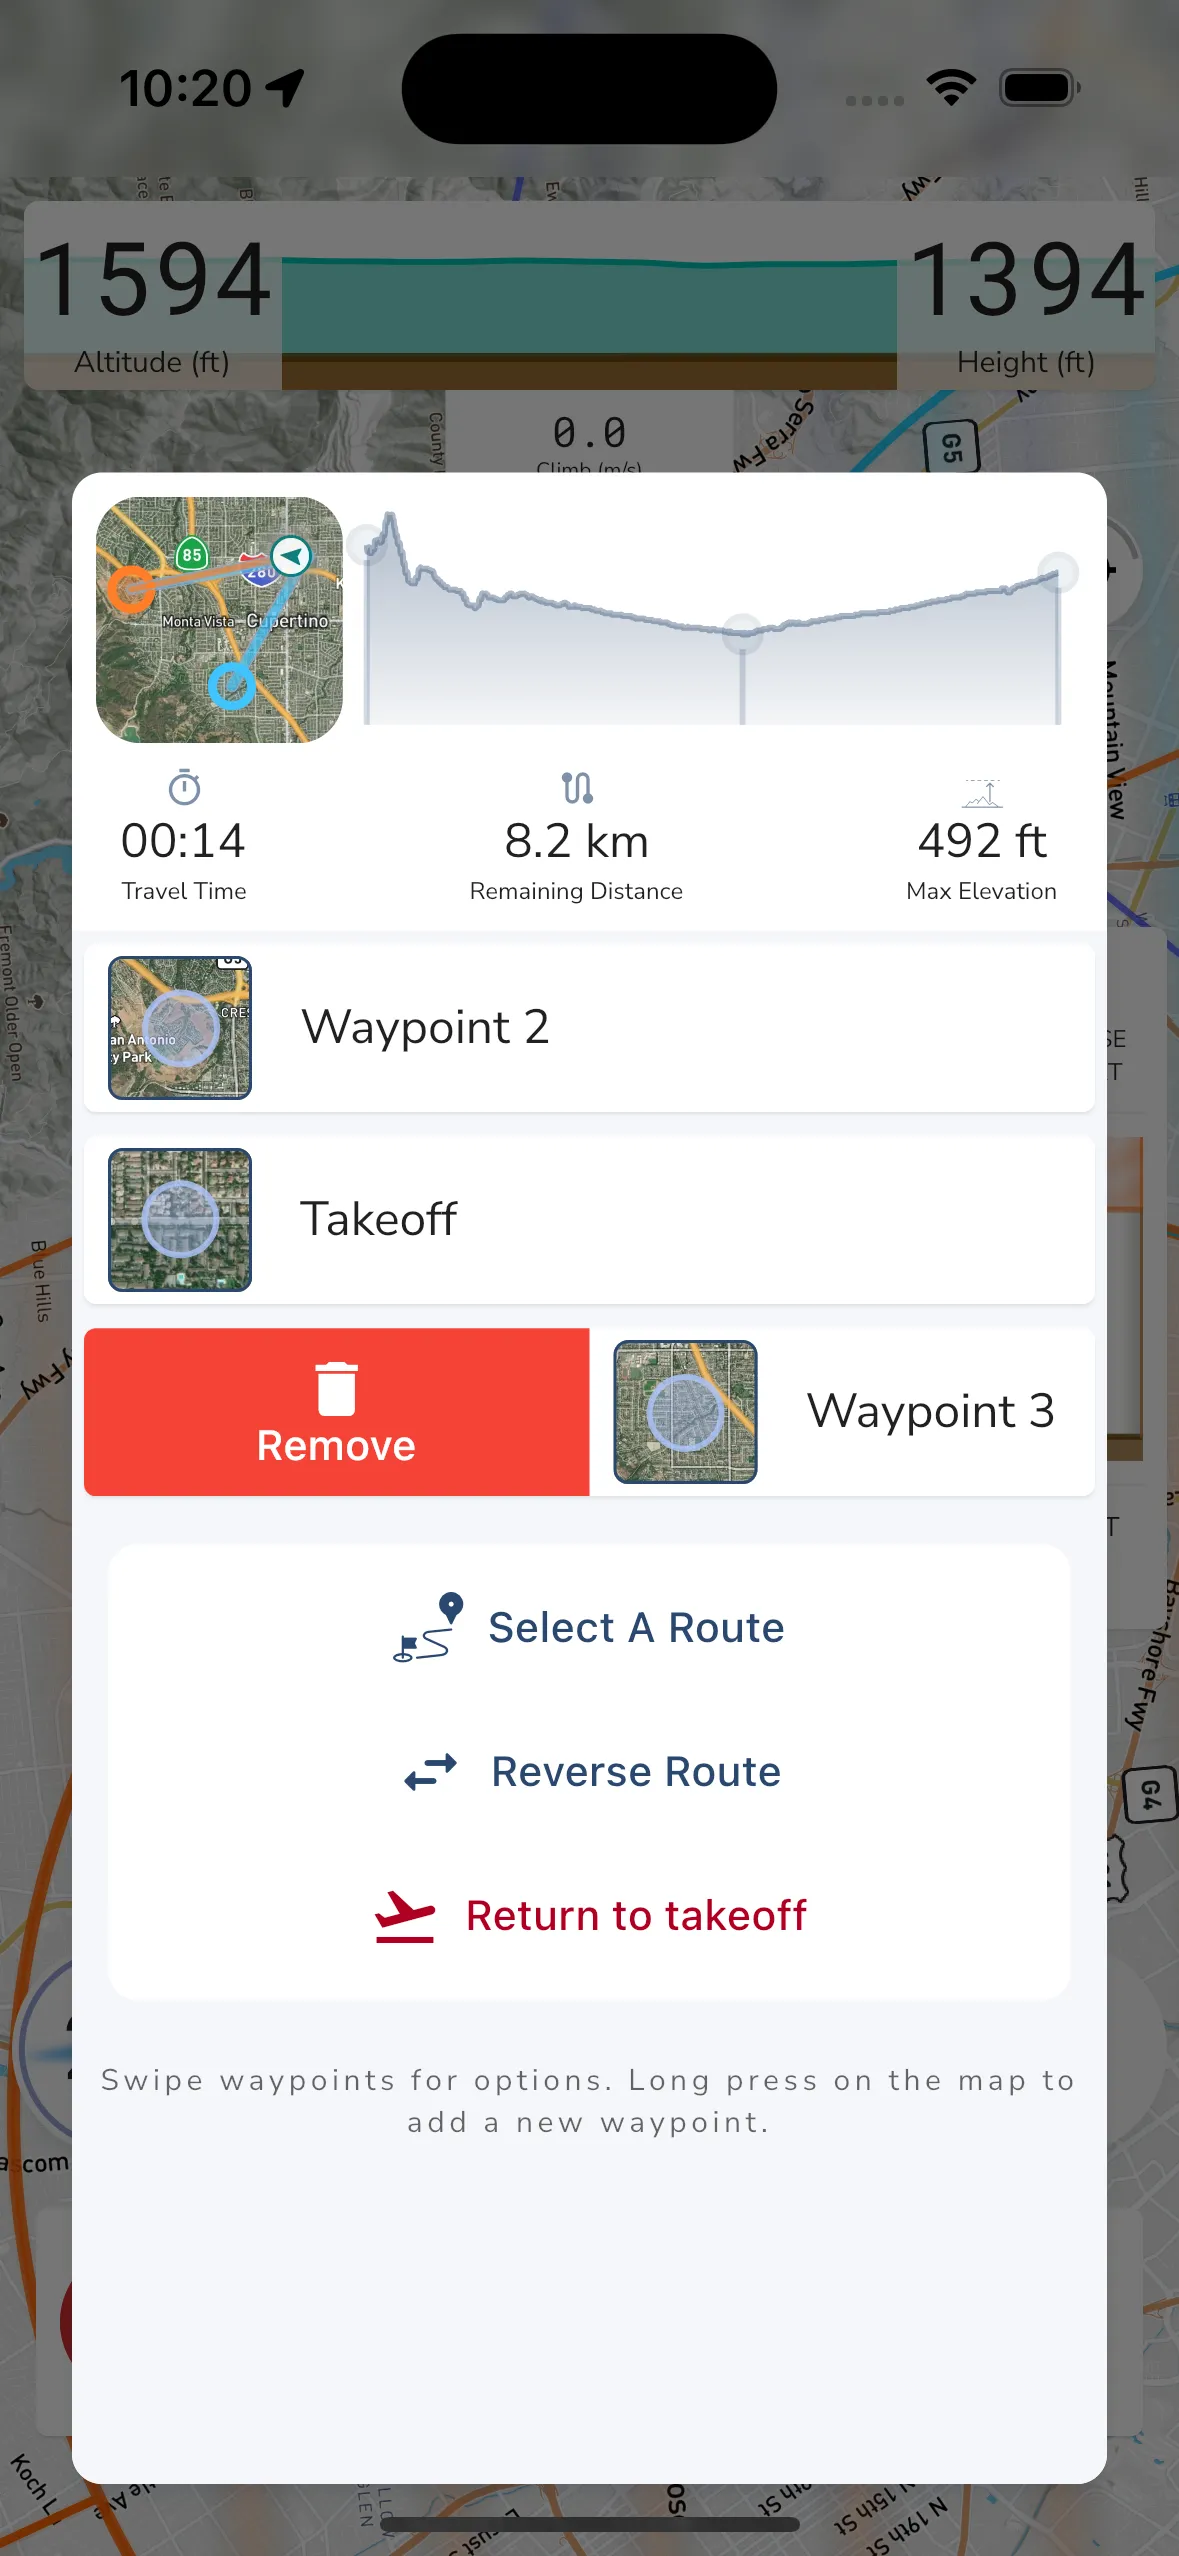
To edit your route waypoints you can tap the navigation instrument. This will open up the route list view. From here you can add, remove waypoints.
The route list shows the following information:
Route Map - A map overview for the entire route along with your location.
Elevation profile - An elevation profile for the entire route. You can tap any point on the graph to see the distance and elevation at that point.
Travel Time - The total travel time for the route.
Remaining Distance - The remaining distance for the route.
Max Elevation - The highest elevation for the route.
Waypoint List - A list of all the waypoints for the route. You can tap any waypoint to see the distance and elevation at that point. Swipe left/right on the waypoint to reveal additional actions like delete.
You have access to the following actions for your current route navigation:
Selected A Route - You can select a new route from the list to start navigating that route.
Reverse Route - You can reverse the current route to navigate it in the opposite direction.
Return to take-off - You can cancel the current route and return to your take-off location by tapping the return to take-off button.
To add waypoints to your route you can long press anywhere on the map and tap the Add Waypoint button.
>
Gaggle has a thermal assistant that can help you to visualise thermals while you are paragliding. While flying, it shows your flight in a simulated 3D space giving you a great mental model for where the thermal core is and the direction that it’s tracking. It’s also a great way to see where past thermals were if you need to hunt for a new thermal. The map automatically zooms in when you start thermalling so that you can better visualise the core, and it will automatically zoom out when you start gliding so that you can better see past thermal locations.
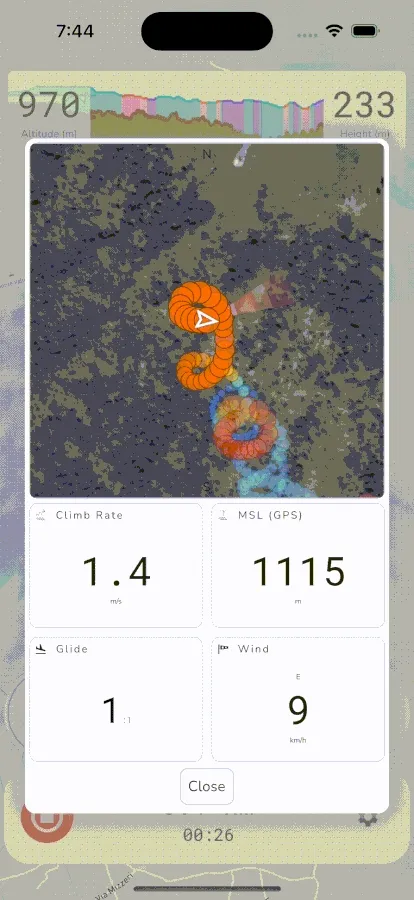
To open the thermal assistant you can tap the climb rate widget or, if enabled, it will automatically open when you start circling in a thermal.
The thermal assistant shows the following instruments:
>
Gaggle comes with a built-in variometer (vario) that can be used to identify lifting and sinking air. The variometer comes with some default settings that should work well for most pilots, but it can be changed to suit your own needs. You can change the following settings for the variometer from the Flight Recorder settings:
Free Flight Enabled: Toggle this on to enable the variometer for free flight aircraft where you need to identify thermals, ridge lift, or other lifting/sinking air. By default, this setting is on.
Powered Flight Enabled: Toggle this on if you want to enable the variometer for your powered flights. By default, this is setting of off.
*Play In Background: If you only want to the variometer to make a sound when Gaggle is running in the foreground then you can toggle this setting off.
Only In Flight: By default Gaggle will only turn on the variometer sound when are in flight, and it will switch it off while you are on the ground. You turn this off if you want the variometer to be enabled while on the ground as well.
Use With External Vario: If you have an external variometer connected through bluetooth then Gaggle will not use the built-in variometer. You can disable this setting if you want the Gaggle variometer to make a sound even when another variometer is connected through bluetooth.
Volume: You can change the volume of the variometer. The variometer is dependent on your phones volume, so if your phone is at 50% volume then the variometer can only go up to a maximum of 50%.
Thresholds: You can change the thresholds for when Gaggle starts making sound with the variometer. If you want to be notified of weak lift you can set the climb rate threshold to 0. Thresholds can be configured for climb rate and sink rate.
Responsiveness: Everyone has different needs from their variometer. New pilots might want a very responsive variometer that sounds the moment lift is encountered and more seasoned pilots might want a calmer variometer that only indicates average lift over a longer period of time. On Gaggle, you can configure the responsiveness of your variometer through the responsiveness slide. The more the slider is moved towards the right the more rapidly Gaggle will indicate vertical movement.
Accelerometer: It’s possible to use the built-in variometer without a barometer in your phone. When no barometer is available Gaggle will use your GPS altitude as the baseline measurement for lift and use the accelerometer for increases responsiveness and accuracy. This also works when you do have barometer built in, but it may not be needed depending on your specific device hardware.
>
Gaggle has a wind speed widget that will you show the current wind speed and direction. The widget displays the current speed and above that the direction that the wind is coming from.
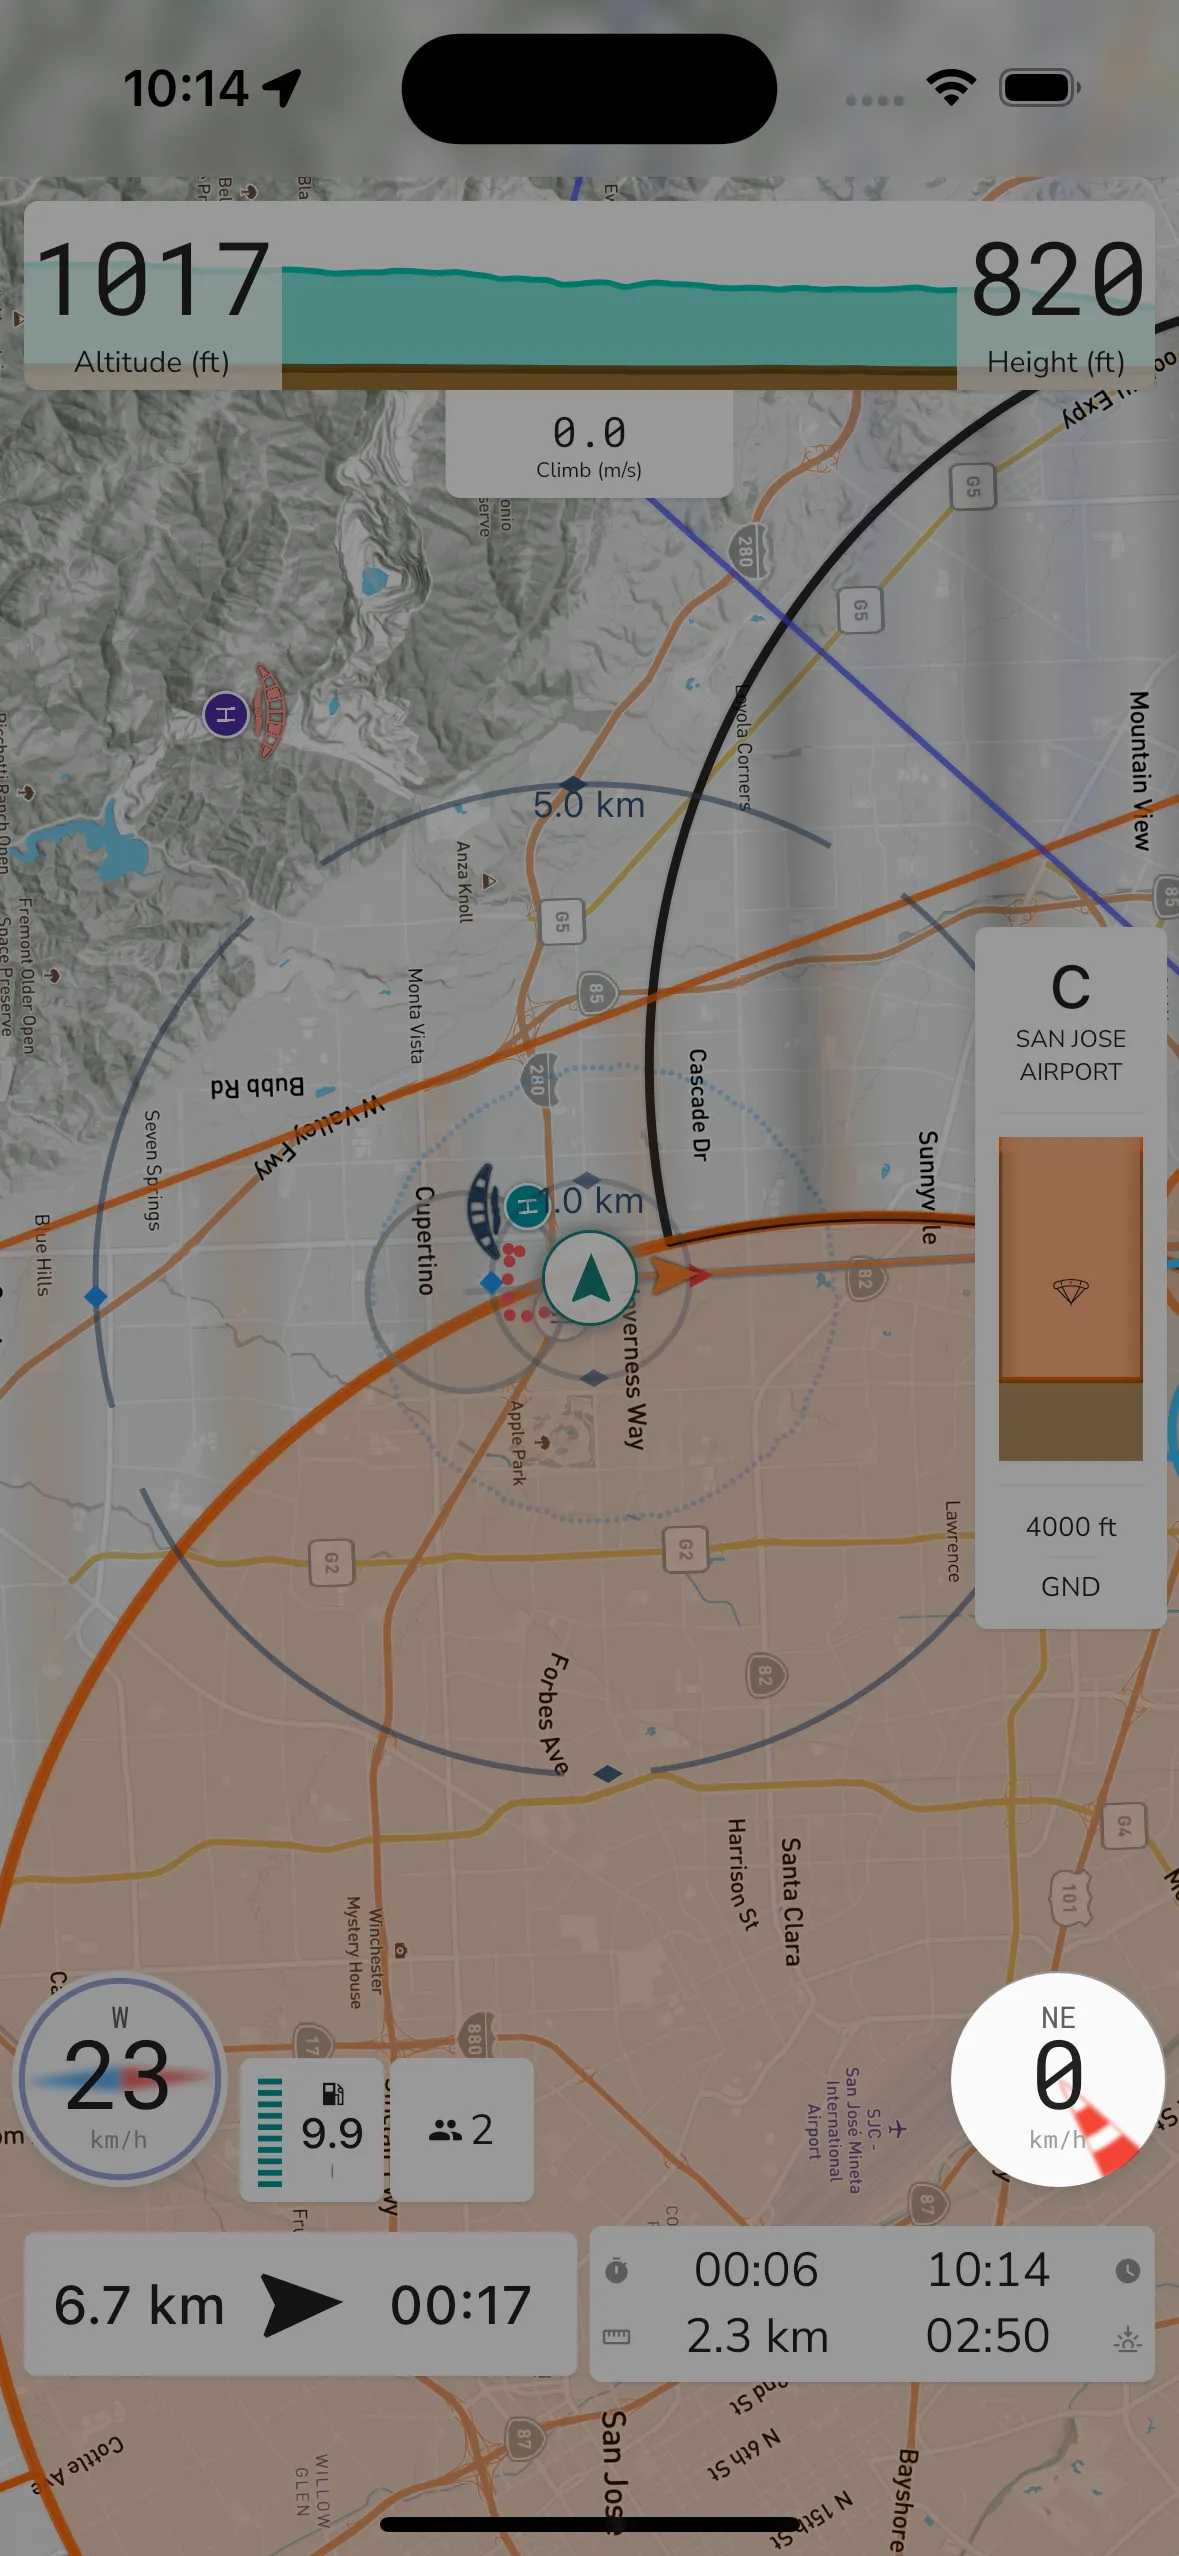
Behind the wind speed is a visual indicator of the wind direction. This indicator will orientate itself based on your compass when on the ground, and it will orientate itself based on your direction of travel while flying. When flying directly into wind, the indicator will turn from red to green, indicating the ideal landing direction. Note: In strong wind conditions this can be incorrect due to your direction of travel being impacted based on the wind speed and crabbing. For this reason you should only use the Gaggle wind speed indicator as a guideline, and you should always rely on other wind direction signals in your physical environment as well to determine the real wind conditions.
How wind speed is calculated: If you have an active subscription then your wind speed and direction will start with values obtained from weather services. As you start flying, Gaggle will start capturing your ground speed data as you travel in various directions. Using this ground speed data, a wind rose will start to show behind the widget in a light blue color. The more recent the ground speed data for a direction of travel, the more intense the blue color will be. As the data becomes stale, it will turn grey to show you how confident Gaggle is with the data for a specific direction. About 2 minutes worth of data is stored for each direction of travel. Once Gaggle has enough data for every direction of travel it will then start using the wind rose data to determine wind speed and direction. The direction that you are traveling the slowest in is subtracted from the direction you are traveling the fastest in to then display the wind speed and your fastest direction of travel is used as the wind direction. The most recently speed data sampled is weighted more than older data when doing the calculations so doing 2 gentle 360 degree turns is usually enough to get a decent wind reading.
>
Gaggle has partnered with SafeSky to bring you even more safety with every flight by giving you live traffic updates from other aircraft around you that are equipped with transponders like ADS-B, FLARM, Mode-S, and many more.
In supported countries your position is also broadcast via the SafeSky application to aircraft that are using SafeSky during their flight helping to make them aware of you as well.
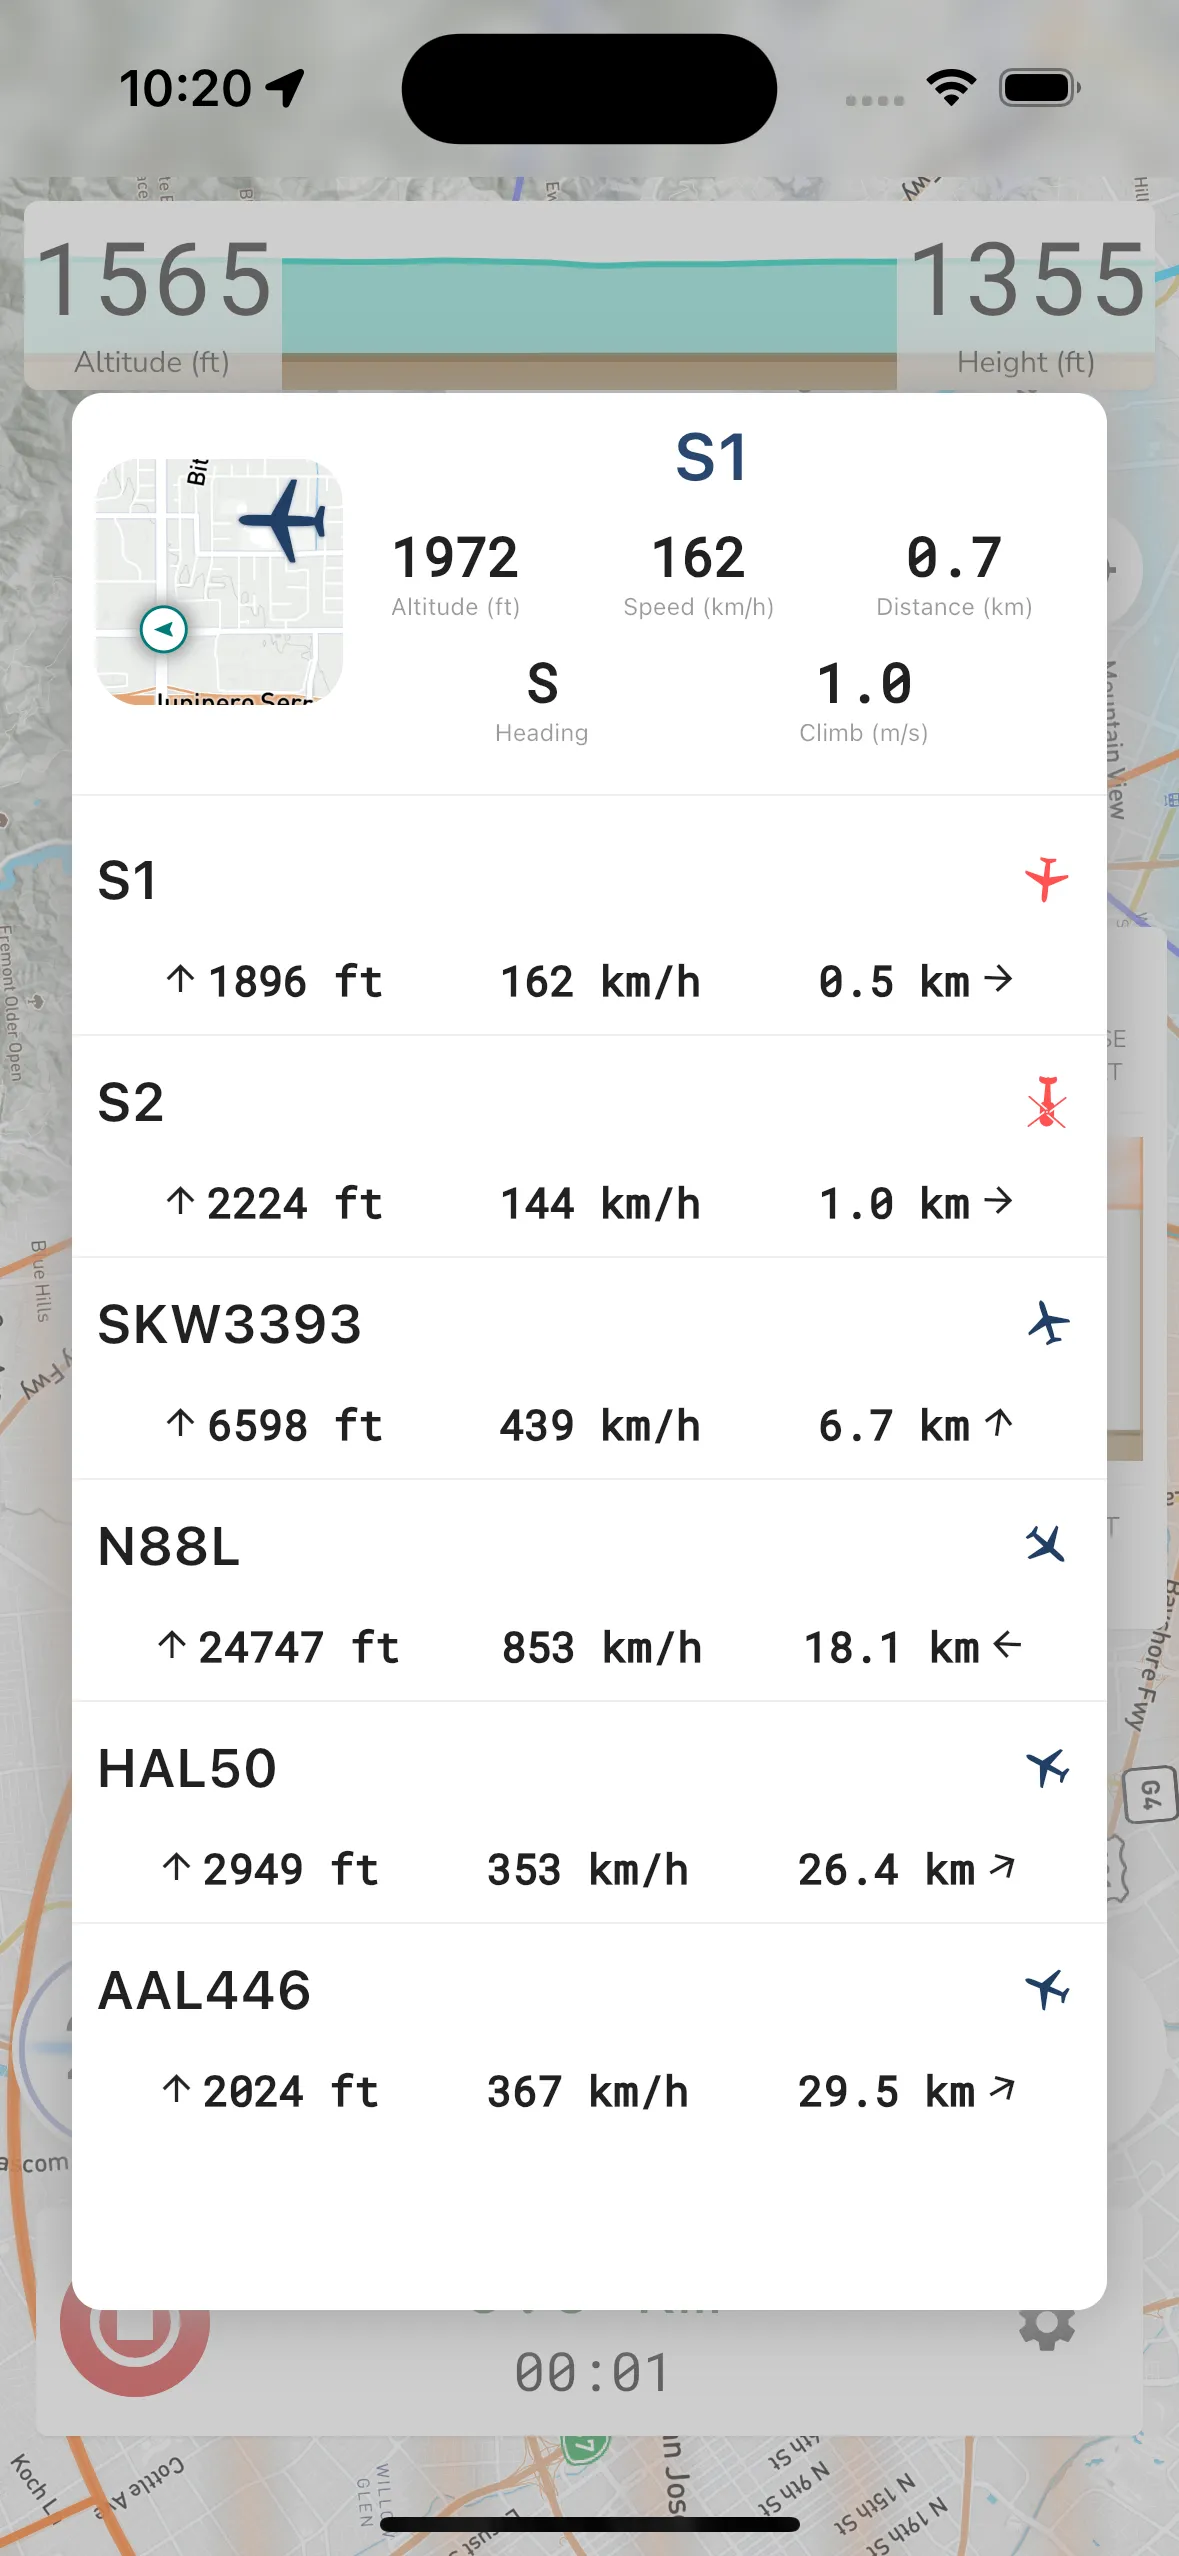
To enable live air traffic you need to enable the SafeSky integration from the Flight Recorder Settings. You can specify your call sign that will be displayed to other SafeSky users, so they can contact you on the radio (where applicable). If you want additional privacy you can enable privacy mode which hides your call sign but still broadcasts your position without personally identifiable information.
To enable live air traffic follow the following steps:
Once enabled, the SafeSky integration in Gaggle you will immediately start getting traffic updates on your next flight. You wil see other aircraft within a 25 km radius around you in real-time and if Gaggle detects an aircraft will be within 1km of the position in the next 3 minutes, an audio cue warning will sound, alerting you about the type of aircraft, its current position, altitude, and travel direction. A typical audio cue will sound like “Warning: Helicopter on your 3 0’clock traveling east at 5000 feet”. The icon will also turn red on the map, so you can quickly see all the aircraft with warnings to look out for.
Live air traffic is a best effort service and reliability is dependent on country, cell reception, base stations nearby and many more variables. You should never rely on Gaggle or SafeSky to make you aware about aircraft. It’s a convenience aid that hopes to enhance your situational awareness. It remains your responsibility to make sure you are observant of your surroundings and to see and avoid other aircraft.
SafeSky works by sending signals received by ADS-B ground stations over the internet to Gaggle. In order for this to work reliably there needs to be a ground station near your location where you are flying (<90km away). Ground stations are fairly inexpensive, and you can easily create your own to receive ADS-B signals that will then be sent to SafeSky and Gaggle. If you want to set up your own base station have a look at ADS-B Exchange and ADS-B Hub on how to set up stations to feed data to their services. Here is a good starting point for ADS-B Exchange: Share your data - ADS-B Exchange (adsbexchange.com)
>
When you are part of a group or if you are near other pilots flying with Gaggle then you can track the live location of those pilots. You can also see the live location of pilots you are following. Live location tracking depends on the privacy config of the pilot.
When you are part of a group you will also get a notification when a pilot in your group starts flying. You can tap on the notification to open up the live tracking viewer.
![]()
When tracking a pilot can see their location on the map. Some additional details about the pilot is shown in the card on the bottom of the page. Some of the details shown include:
Pilot Name - The name of the pilot
Pilot Image - The profile image of the pilot
Battery - The battery level of the pilot’s phone
Aircraft Type - The type of aircraft the pilot is flying
Score - If the pilots is flying in a competition then the score will be shown
Height - The height above ground of the pilot
Speed - The speed of the pilot
You can quickly move between other pilots by swiping left/right on the card.
![]()
In addition to the 2D map view for tracking you can also follow pilots in 3D by tapping the 3D button in the top right of the map. This will show you the pilots in 3D, and you can rotate the map to see the pilots from different angles.
If you are seeing a spinner when trying to track a pilot then it could be due to one of the following reasons:
The live location is updated every 3-5 seconds.
>
Community Page > Meetups
Meetups are a special kind of group in Gaggle that are focused on a specific event or activity. Meetups are great for planning a group flight, a competition, or a social event. You can create a meetup for a specific date and time and invite other pilots to join the meetup. Once the meetup is created, pilots can join the meetup and see who else is planning to attend. You can also see the location of other pilots in the meetup in real-time on the map. Meetups have their own description, location, and time period. Once created only flights recorded during the meetup time period and within proximity of the meetup location will be linked to the meetup.
Meetups mostly behave like groups in Gaggle, and you can learn more about groups in the Groups knowledge base article.
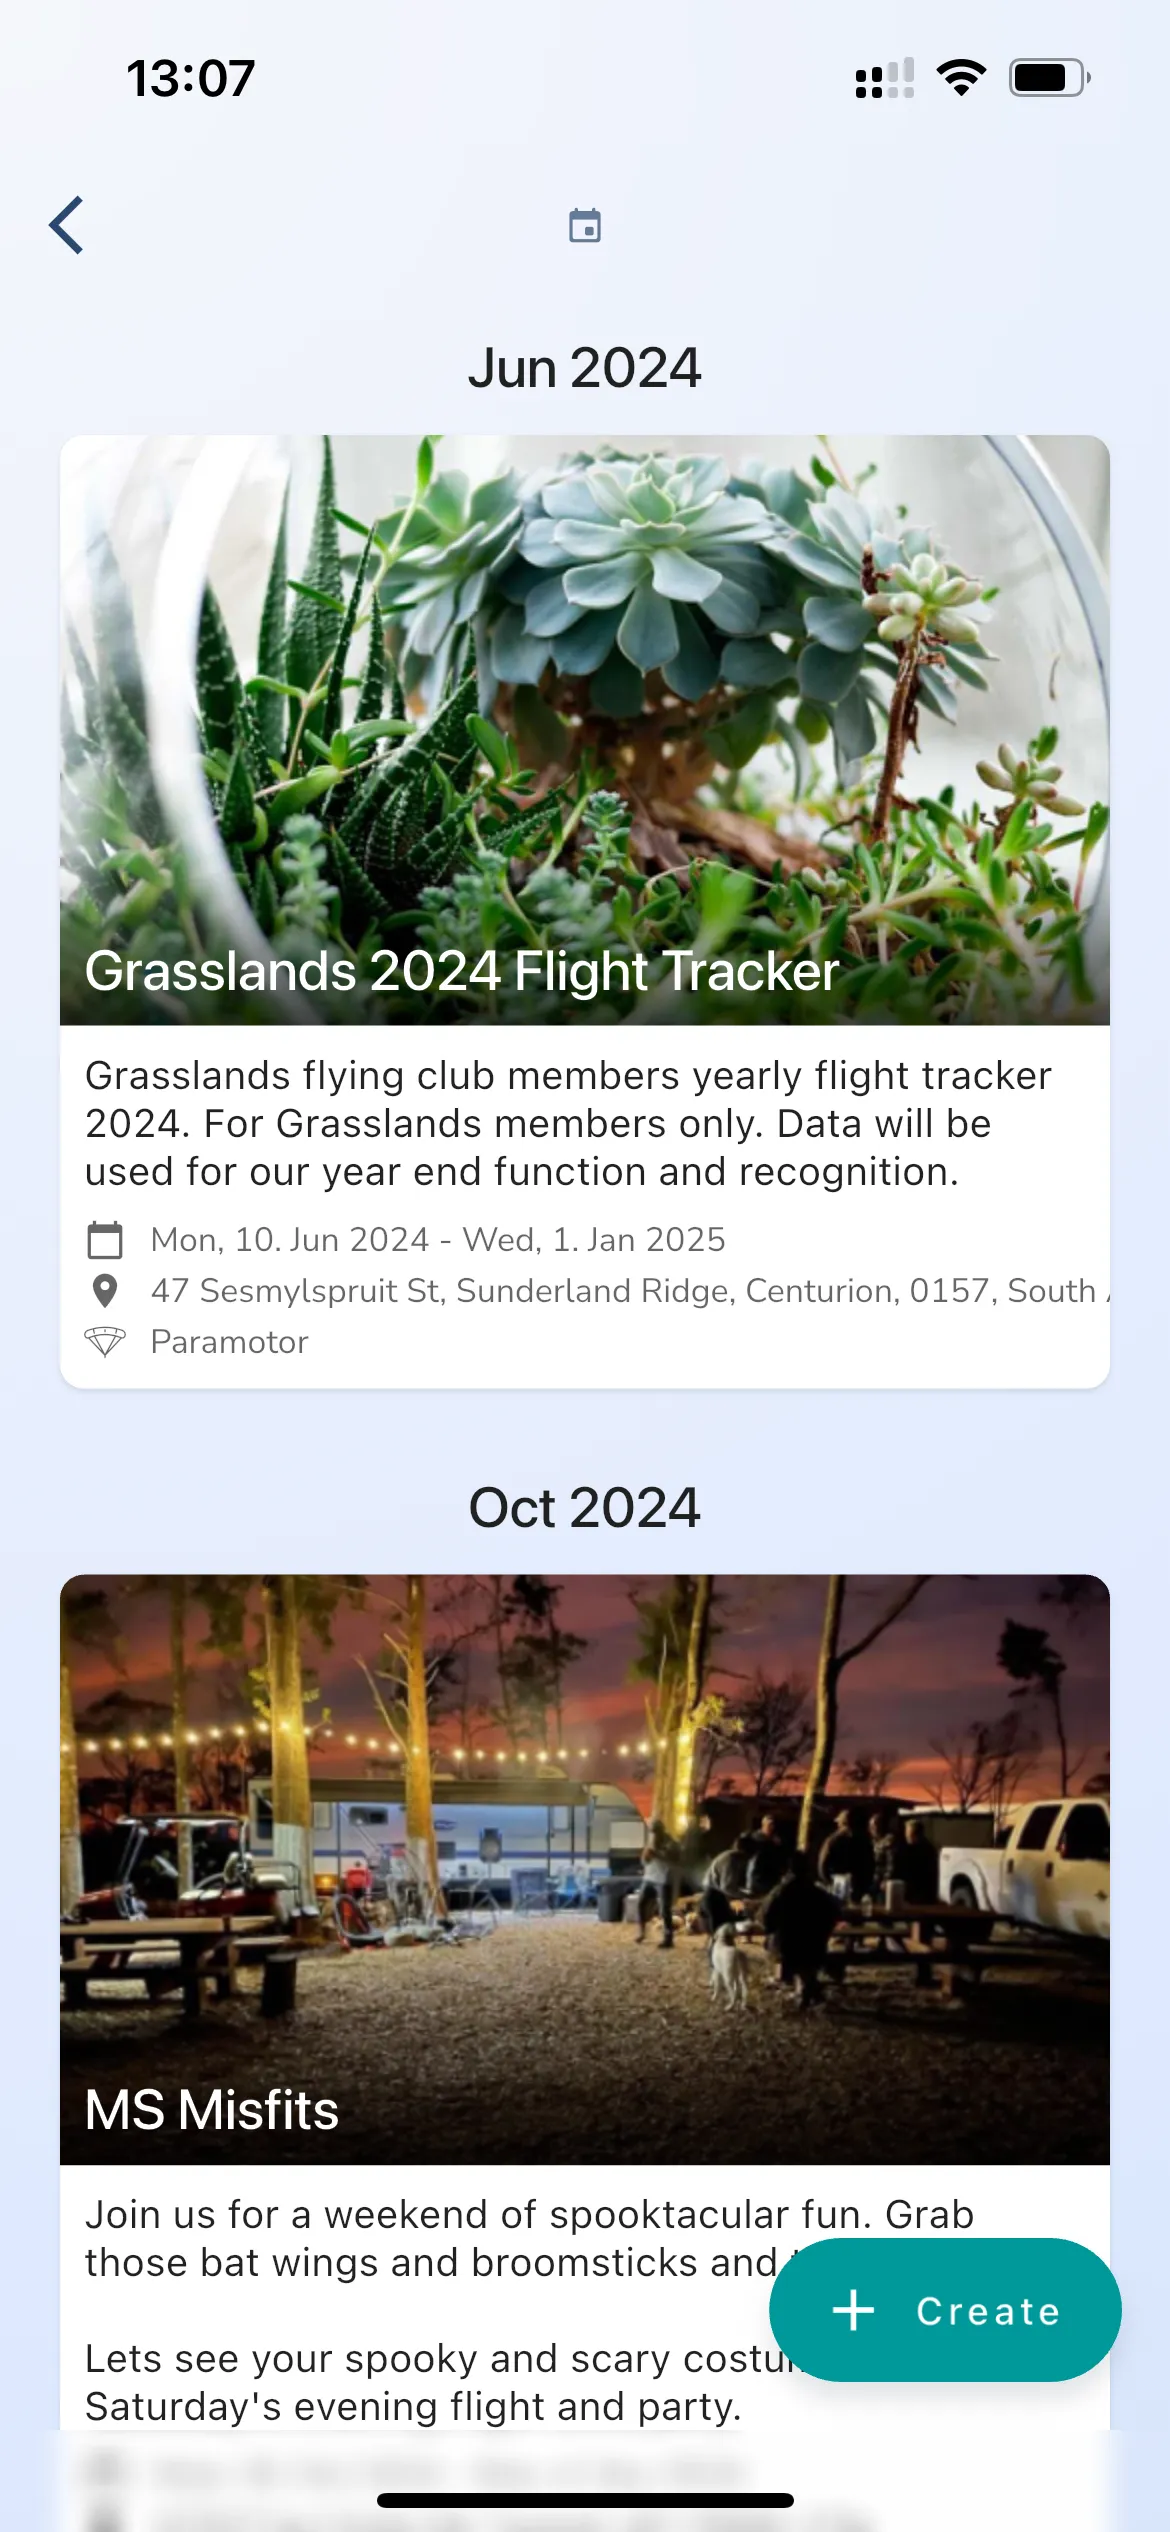
To create a meetup, go to the Community screen, then select Meetups. In the Meetups screen, tap on the Create Meetup button to open the screen where you can create a new meetup. To make a meetup, you must provide a details for the following sections:
To join a meetup, go to the Community screen, then select Meetups. In the Meetups screen, tap on the meetup you want to join. In the meetup details screen, tap on the Join button to join the meetup. You will be asked if you want to join as a spectator or as a participant. If you join as a participant, your flights during the meetup time period and within proximity of the meetup location will be linked to the meetup. If you join as a spectator, your flights will not be linked to the meetup. Once you join the meetup you will get an email confirmation with a calendar invite for the meetup.
>
Where to find this Community Page > My Groups > Select a group > Leaderboards > Create a new Obstacle Course leaderboard
Obstacle Courses are a dynamic competition format in Gaggle. By combining No-Fly Zones, Waypoints, and Navigation Tasks, you can create custom flight challenges that reward skill, accuracy, and planning. This document covers how to set up an Obstacle Course, the detailed scoring rules behind it, and the two scoring methods supported: Best Flight and Best Task.
An Obstacle Course in Gaggle transforms routine flights into thrilling challenges. Pilots collect waypoints, navigate precise routes, and avoid no-fly zones to maximize their scores. This format is perfect for informal meetups, club competitions, and even large fly-in events where organizers want to blend fun and friendly rivalry.
Key Features:
Meetups When an Obstacle Course is created as part of a meetup, all pilots—regardless of subscription status—can participate and submit flights for scoring. This opens up Obstacle Course fun to everyone in your group.
A No-Fly Zone is any area a pilot must avoid, defined by a shape (polygon or circle) on the map.
A Waypoint is a circular area on the map, defined by a center point and a radius.
A Navigation Task is a defined route pilots attempt to follow precisely, made of one or more legs (straight lines or smooth curves).
During flight, events are logged:
Obstacle Courses support two main scoring methods. NFZ penalties apply per flight regardless of the method.
Navigation scoring rewards precision. Here’s the principle:
ScoreFraction ≈ 1 - (DistanceToCenter / HalfCorridorWidth)
DistanceToCenter is how far the pilot is sideways from the ideal line, and HalfCorridorWidth is half the total width of the allowed corridor. If DistanceToCenter is zero (on the line), the fraction is 1 (100%). If the pilot is at the edge (DistanceToCenter = HalfCorridorWidth), the fraction approaches 0.Detailed Constant Speed Scoring:
Constant speed scoring aims to reward pilots who maintain a consistent speed throughout a designated leg.
Speed Data Collection: As a pilot flies the leg, the system collects speed data at various points (sampled points) along the route. For each sampled point within the allowed corridor, the pilot’s speed is recorded and added to a running total for that specific point (speedSum), and a count of readings is maintained (speedCount).
Global Average Speed Calculation (Per Leg): At the end of the navigation task, before finalizing scores, the system calculates a single global average speed for each leg that required constant speed. This average is determined by taking the total of all recorded speed readings (speedSum) across all sampled points within that leg and dividing it by the total count of those readings (speedCount). Formula: Average Speed (Leg) = (Total of all speed readings for the leg) / (Total count of speed readings for the leg)
Constant Speed Score Calculation (Per Sample Point): Points for constant speed are awarded for each individual sampled point on the leg. The score for a single sample point depends on how much its local average speed (the average speed specifically at that point: speedSum / speedCount) deviates from the global average speed calculated for the entire leg.
Calculating Deviation: The system finds the absolute difference between the Global Average Speed (for the leg) and the Local Average Speed (at the sample point). Formula: Speed Deviation = abs(Global Average Speed - Local Average Speed)
Determining Score Percentage: A percentage of the maximum possible constant speed points for that sample point is awarded based on this deviation. The scoring uses a quadratic formula, meaning the further your speed at a sample point is from the global average for the leg, the fewer points you get for that sample. There’s a defined constantSpeedMaxDev value for the task; if the Speed Deviation is greater than or equal to this value, the score for that sample point drops to zero. Formula: Score Percentage = max(0, 1 - (Speed Deviation / constantSpeedMaxDev)^2)
Calculating Sample Point Score: The actual constant speed points awarded for that specific sampled point are the maximum possible points for that sample (constantSpeedScorePerSample) multiplied by the calculated Score Percentage. Formula: Constant Speed Score (Sample Point) = constantSpeedScorePerSample * Score Percentage
Constant Speed Score earned at each individual sampled point is added up to get the total constant speed score for the entire leg.Example Calculation (Illustrative):
Imagine a leg requires consistent speed and has a constantSpeedMaxDev of 2.5 km/h. Each sampled point on this leg is worth a maximum of 5 constant speed points (constantSpeedScorePerSample).
Scenario 1: Flying inconsistently at one point Suppose at a specific sampled point, your recorded speeds average out to a Local Average Speed of 50 km/h. However, the Global Average Speed for the entire leg (calculated from all speed readings) is 40 km/h.
abs(40 km/h - 50 km/h) = 10 km/hmax(0, 1 - (10 km/h / 2.5 km/h)^2) = max(0, 1 - 4^2) = max(0, 1 - 16) = 05 points * 0 = 0 pointsIn this case, the significant deviation from the leg’s average resulted in no constant speed points for this particular section.
Scenario 2: Flying consistently near the average Now, suppose at another sampled point, your speeds average out to a Local Average Speed of 41 km/h, and the Global Average Speed for the leg is still 40 km/h.
abs(40 km/h - 41 km/h) = 1 km/hmax(0, 1 - (1 km/h / 2.5 km/h)^2) = max(0, 1 - 0.4^2) = max(0, 1 - 0.16) = 0.845 points * 0.84 = 4.2 pointsHere, a small deviation resulted in earning most of the available constant speed points for this section.
The total constant speed score for the leg is the sum of the scores from all the sampled points on that leg. This approach rewards pilots who keep their speed consistent relative to their own average speed on that specific leg, rather than requiring adherence to a fixed speed range throughout the entire flight.
Penalties reduce a flight’s score for rule violations.
SubsequentScore = OriginalScore * (1.0 - PenaltyFactor)
PenaltyFactor of 0.1 (10%) is applied, all points earned for waypoints or navigation tasks after that event are multiplied by (1.0 - 0.1) = 0.9, effectively reducing them by 10%.Name: Club Fun Fly Obstacle Course
Objective: Combine elements using Best Flight scoring.
Description:
Meetup Usage: Non-subscribed pilots can participate if the course is part of a Meetup.
Need More Help?
- Check Gaggle Release Notes.
- Join Gaggle community channels (e.g., Discord).
Happy Flying!
>
Explore Page > Points of Interest
Gaggle has a built-in database of points of interest that you can use to discover new places to see from the sky. Points of interest can also act as basic waypoint markers if you don’t want to create a specific route with a set of waypoints. While in flight you can tap on points of interest to add navigation waypoints to them.
The following point of interest categories are available:
You need an Adventurer subscription see public points of interest.
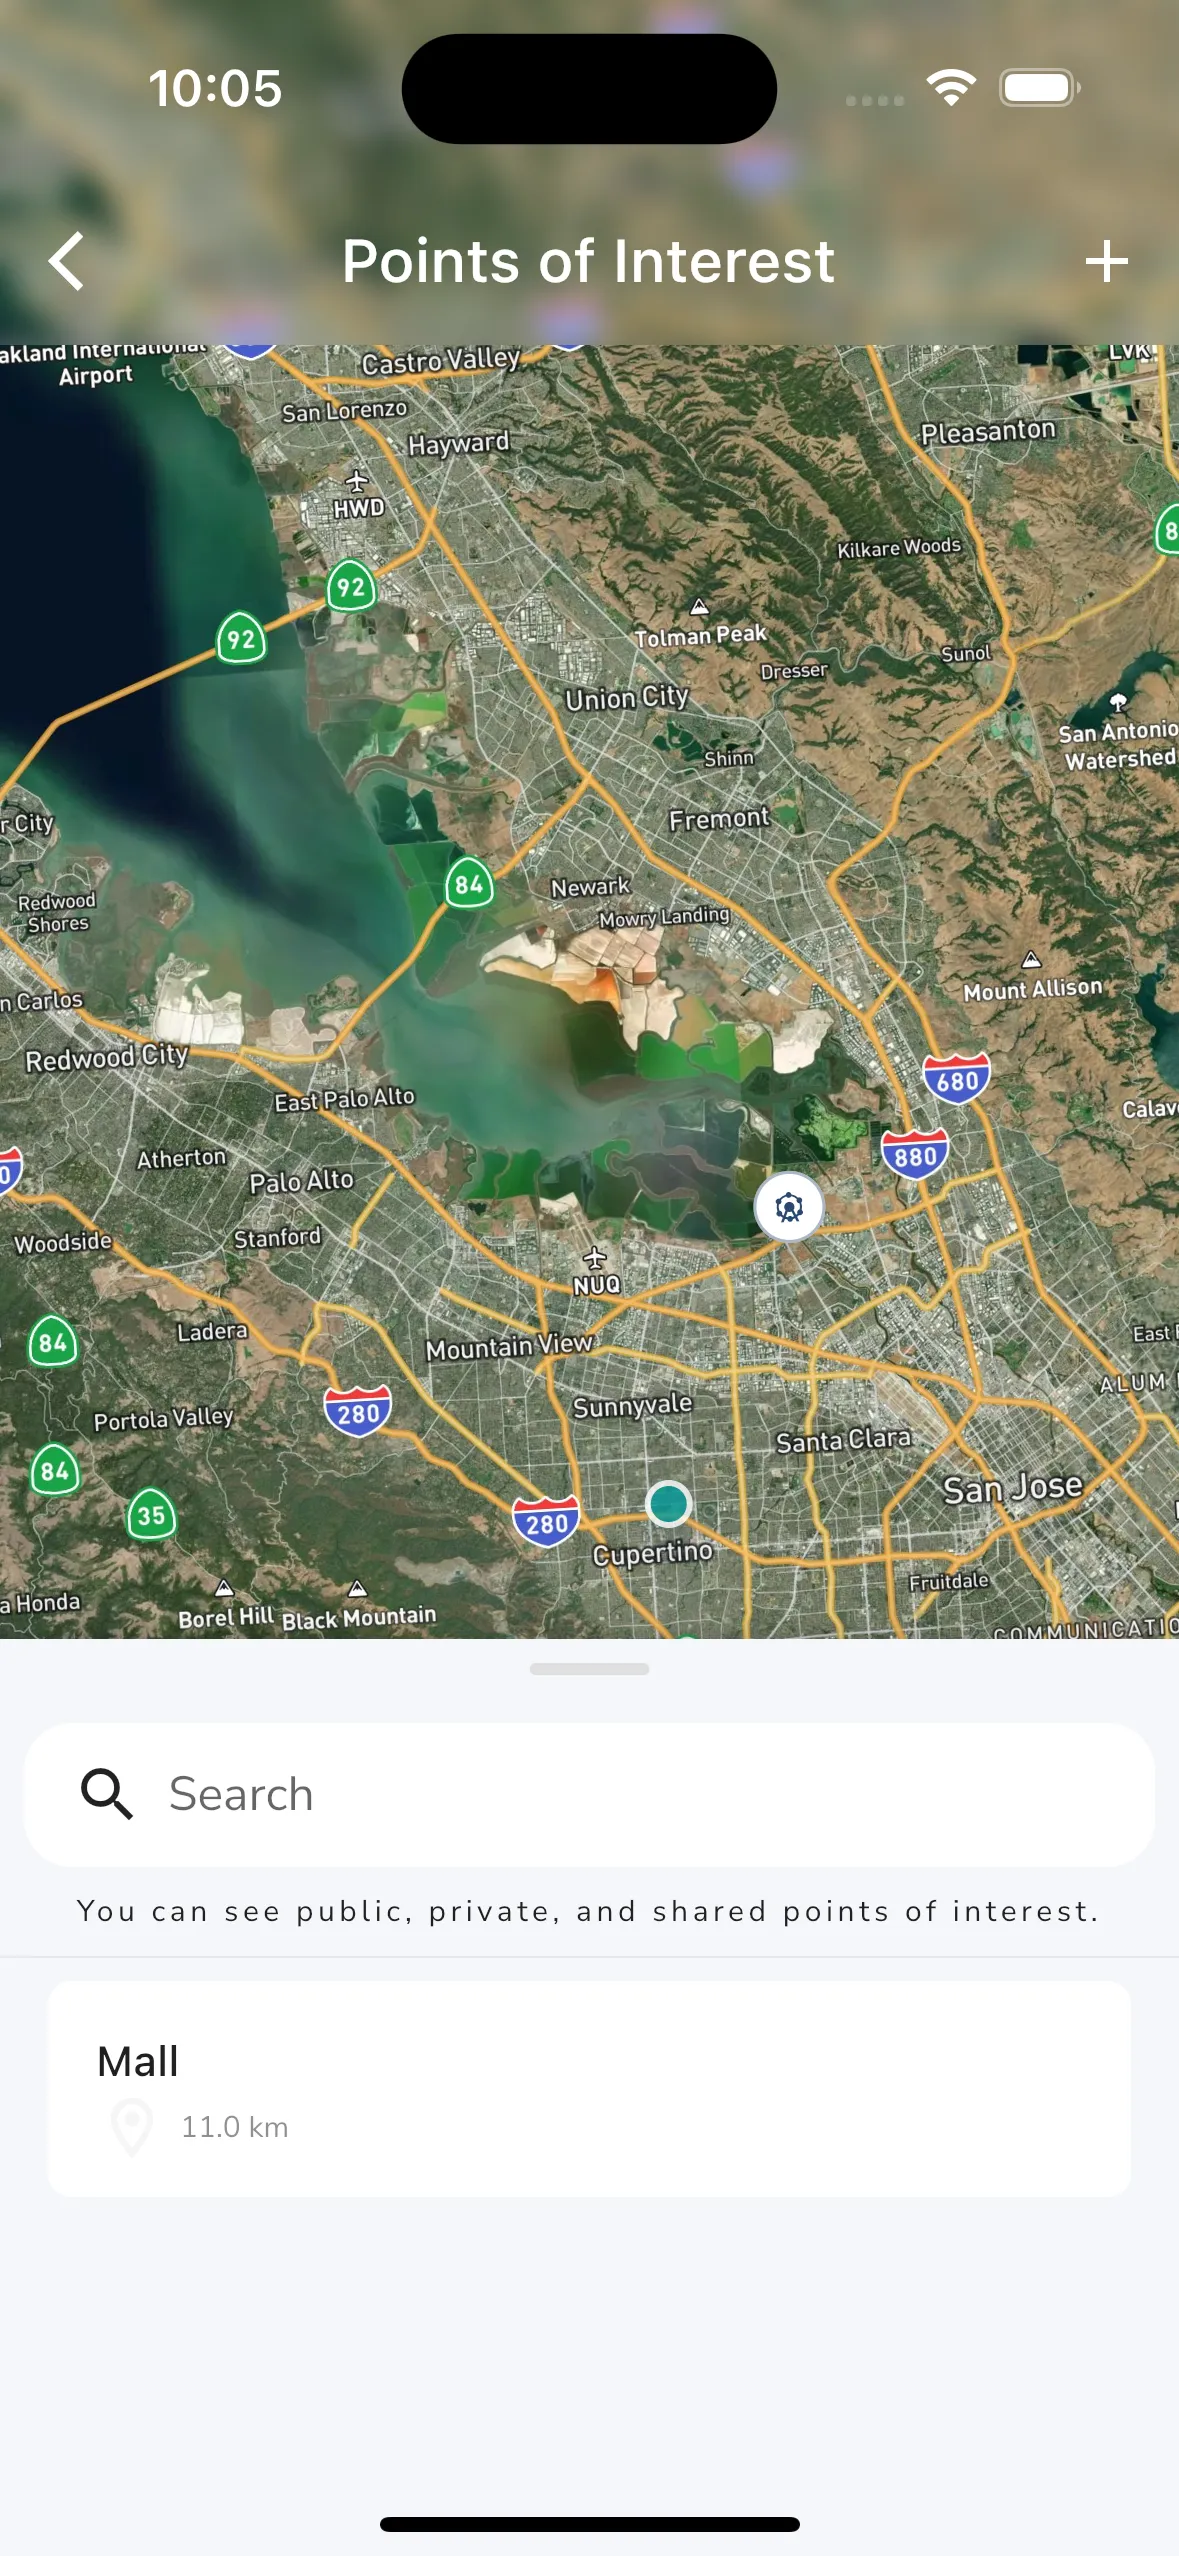
You can explore points of interest nearby by tapping the Points of Interest button on the Explore page. This will open up the points of interest map page. From here you can pan and zoom the map to find points of interest in the area you are interested in. You can tap on any of the points of interest on the map to open up the details page for that point of interest.
When panning the map a new “Search this area” button appears at the top of the map which you can tap to search for points of interest in the area you are currently viewing. At the bottom of the page is a panel that you can drag up to see a list of points of interest in the area you are currently viewing. You can tap on any of the points of interest in the list to open up the details page for that point of interest. You can also use the search box to search for points of interest in the area you are currently viewing.
At the top right of the page is a + button that you can tap to create a new point of interest. This will open up a form where you can enter the details of the point of interest you want to add. When creating a new point of interest you have to choose the GPS location for the point of interest using the map, and then you can enter the rest of the details. The following is required when creating a point of interest:
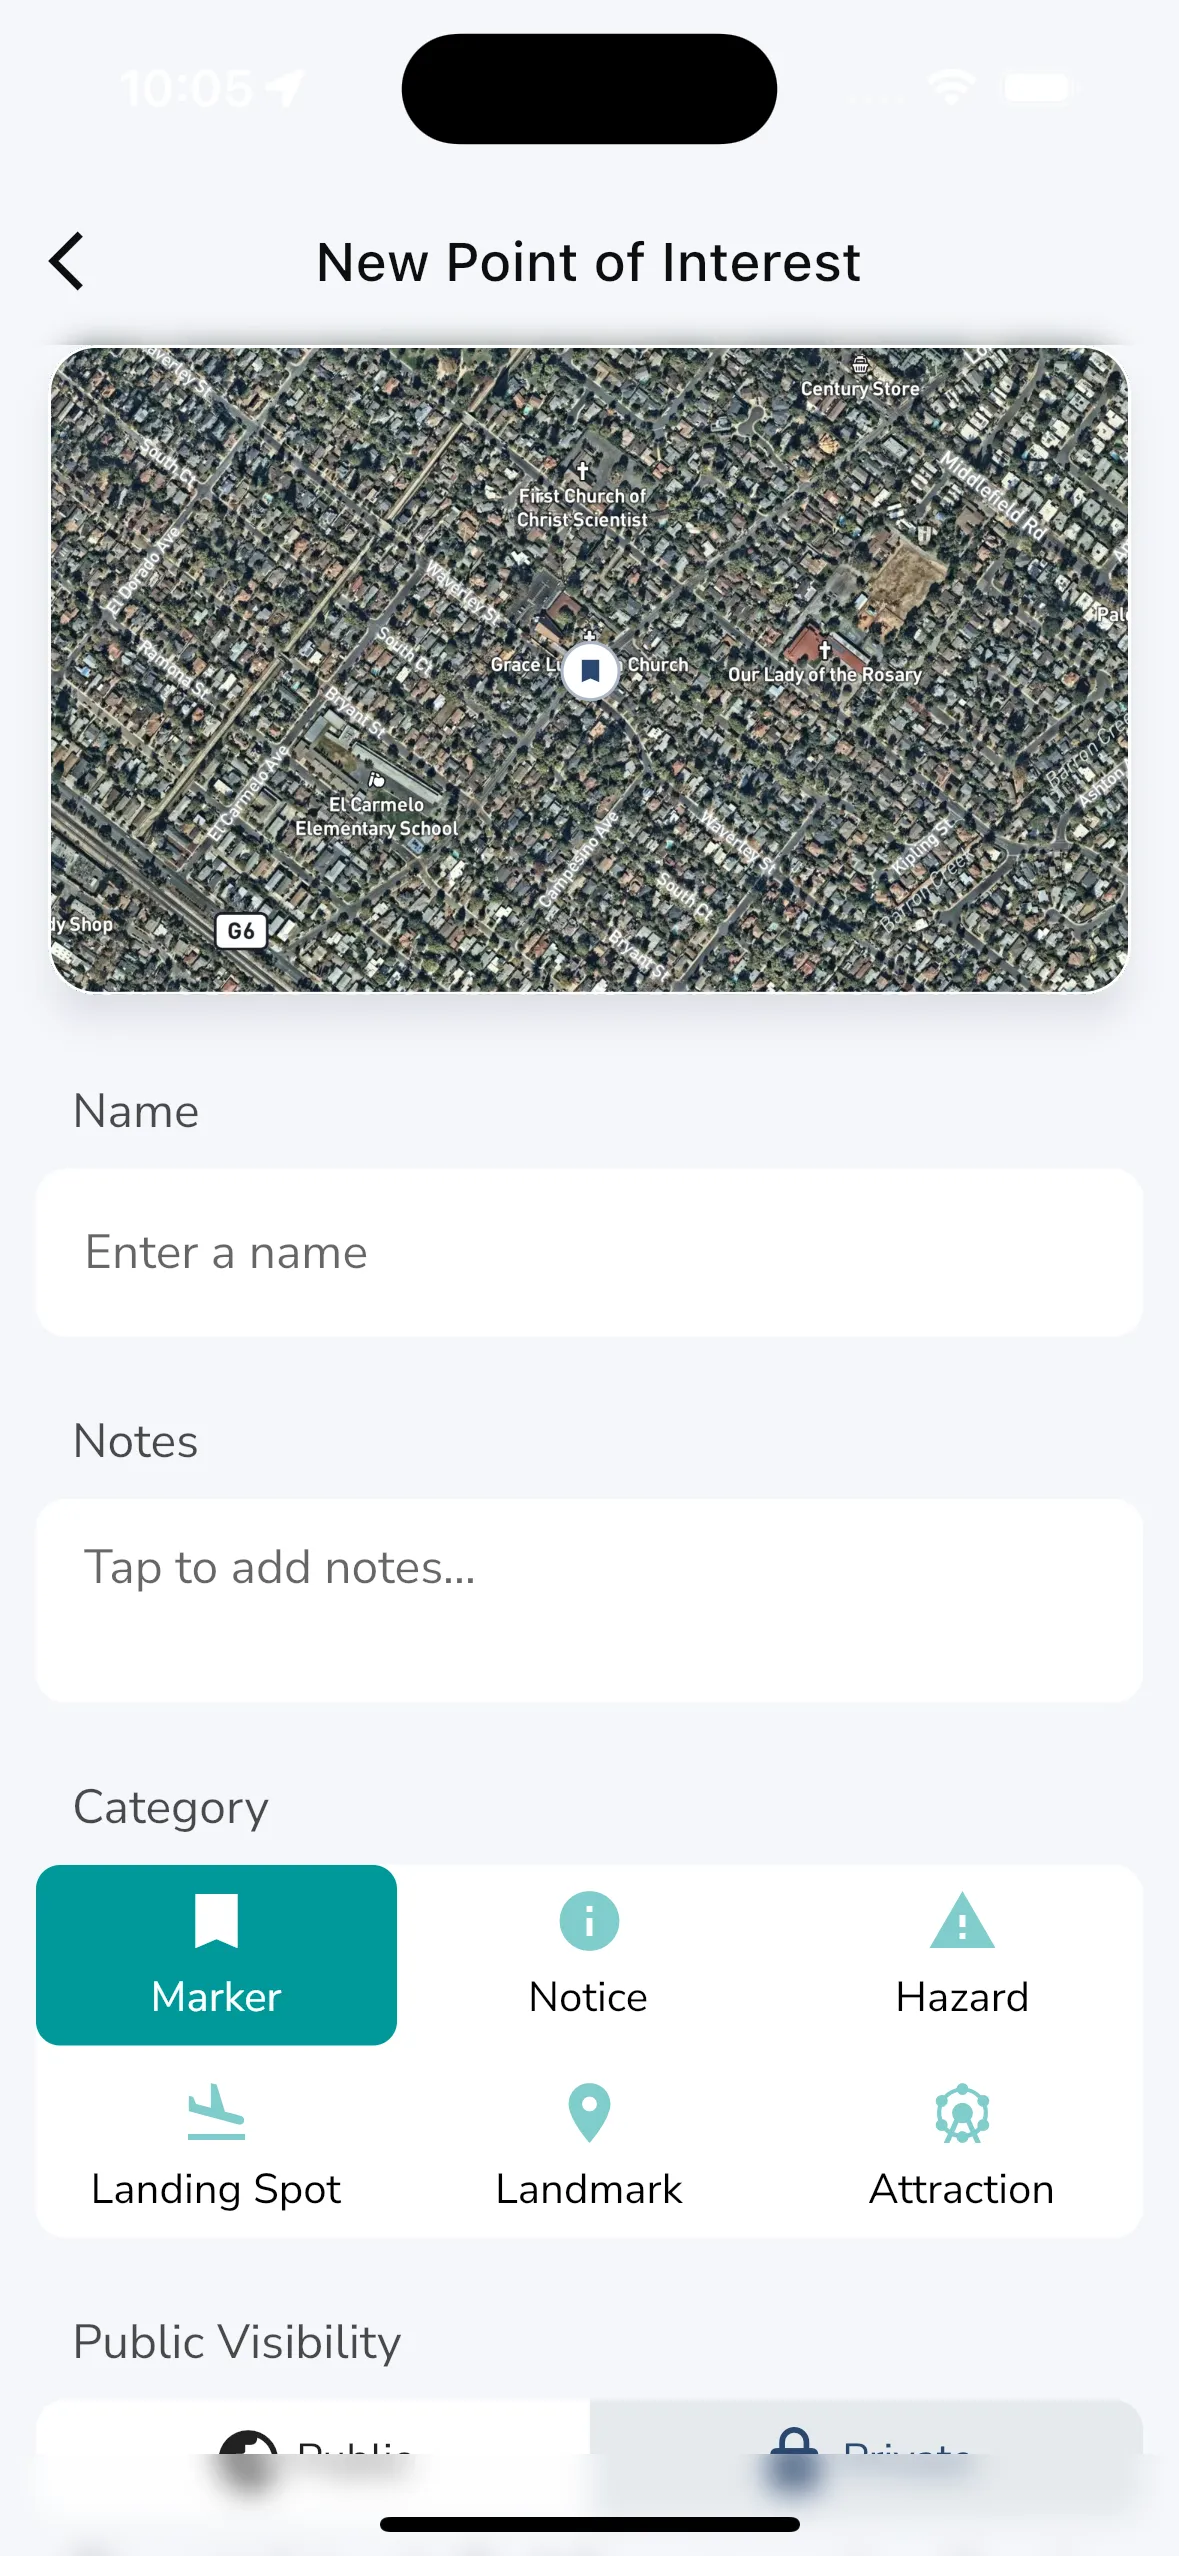
To create a new point of interest you can tap on the + button at the top right of the points of interest map page. This will open up a form where you can enter the details of the point of interest you want to add. When creating a new point of interest you have to choose the GPS location for the point of interest using the map, and then you can enter the rest of the details. The following is required when creating a point of interest:
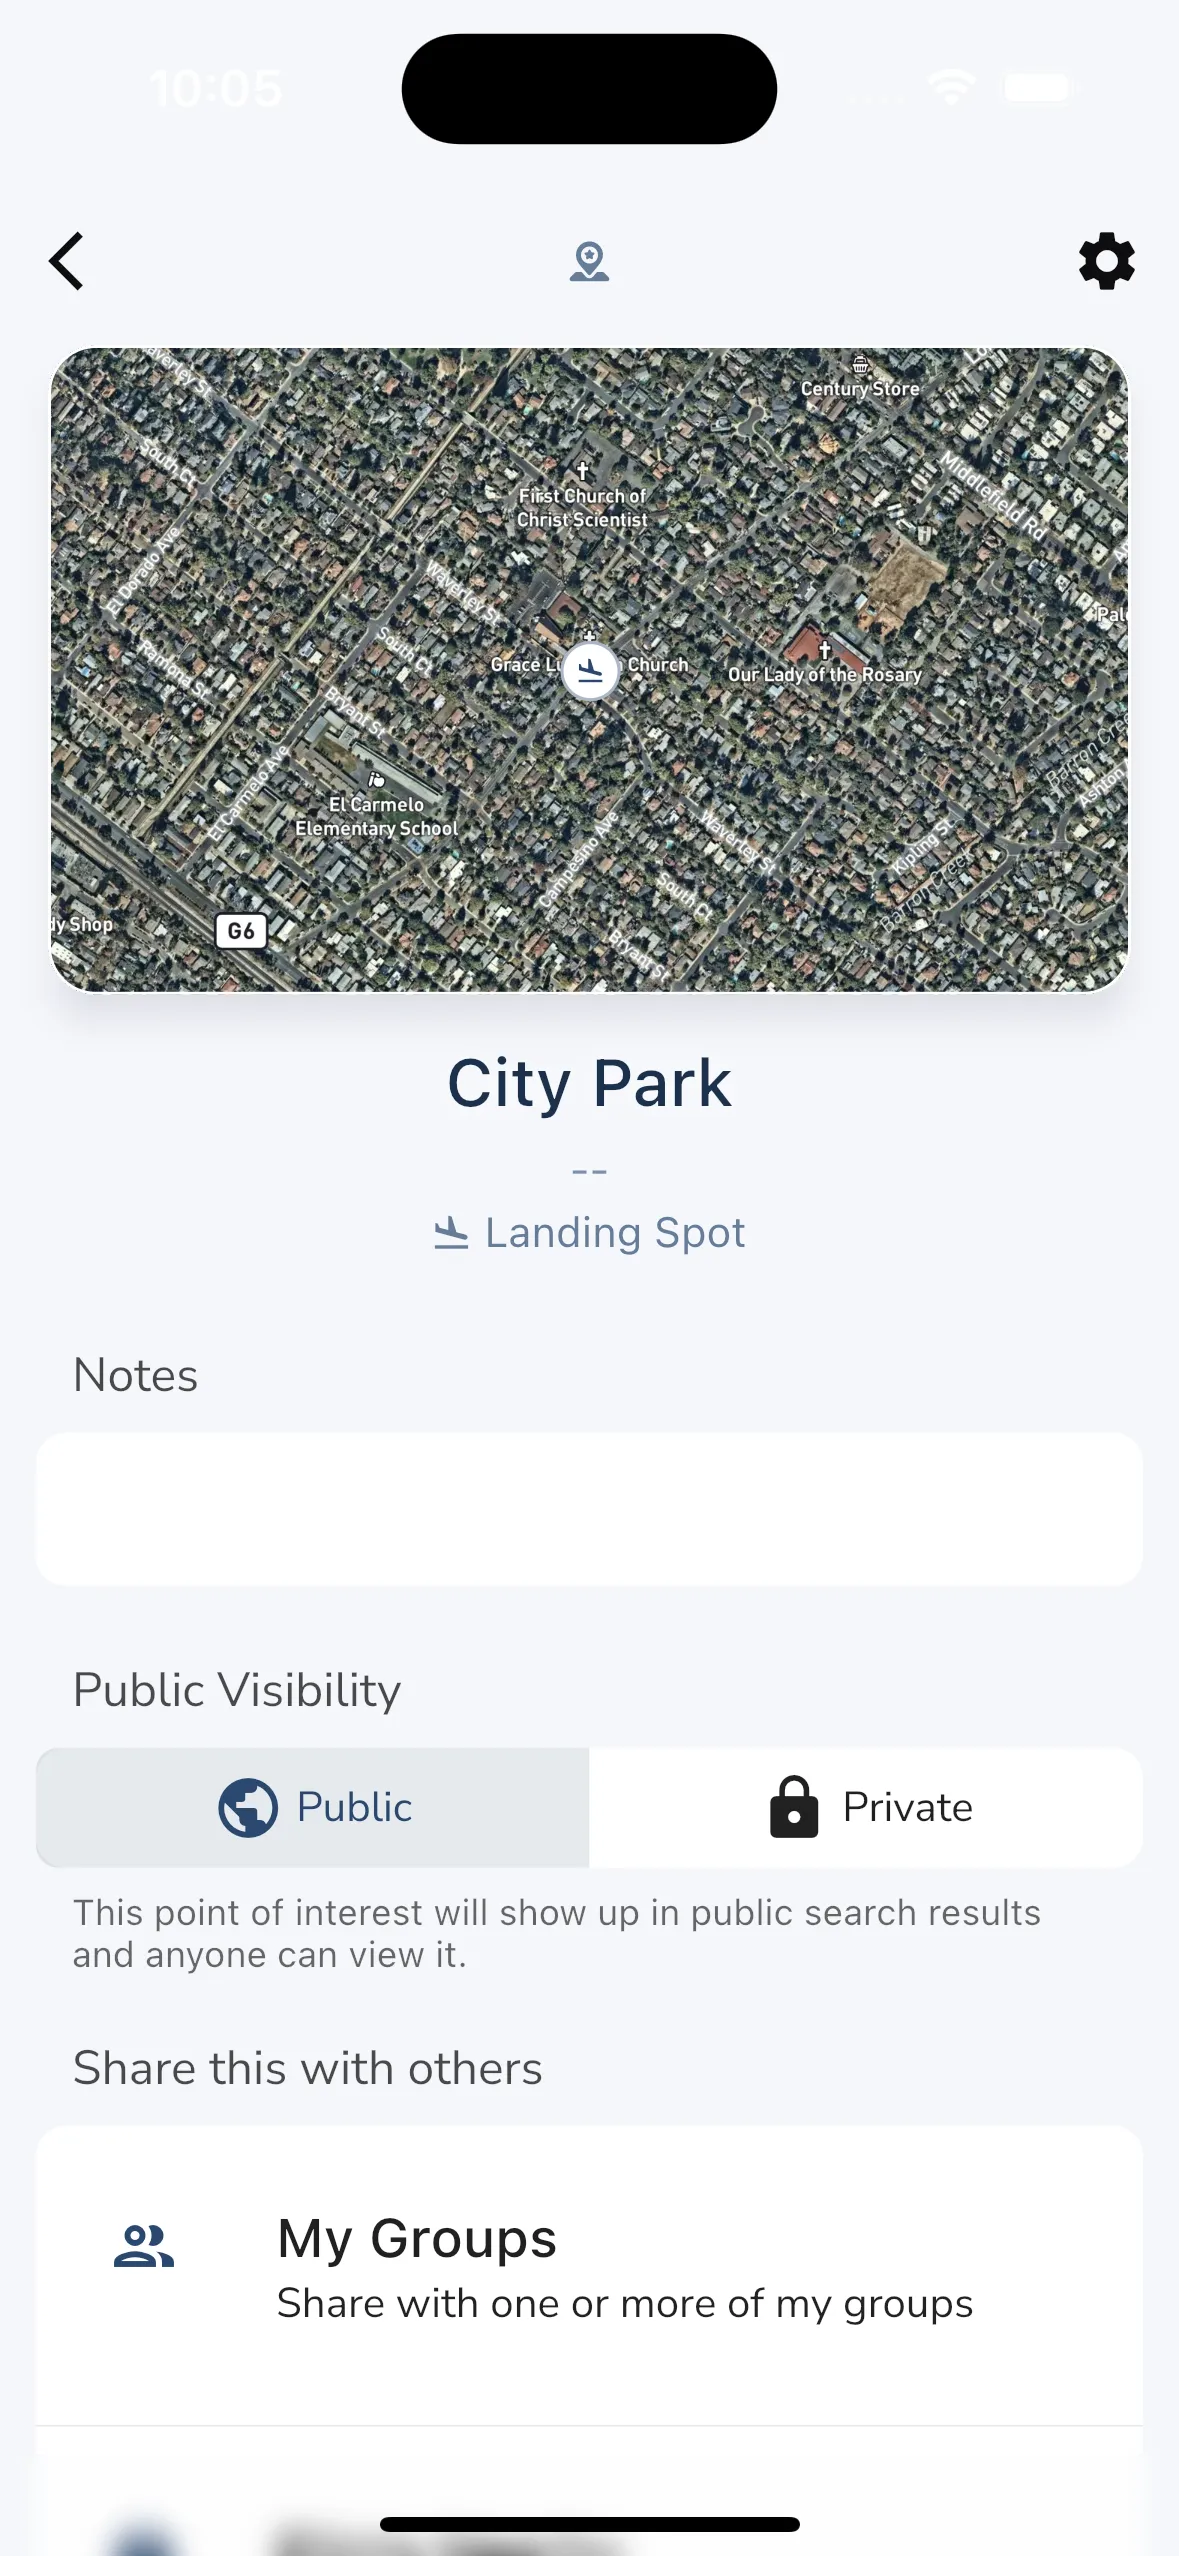
When viewing a point of interest you will see the following information:
Admins for points of interest can also see some basic settings for points of interest like public visibility and sharing options.
>
Profile Page
The profile page is the main entry point for your personal information in Gaggle. It is divided into 3 sections:
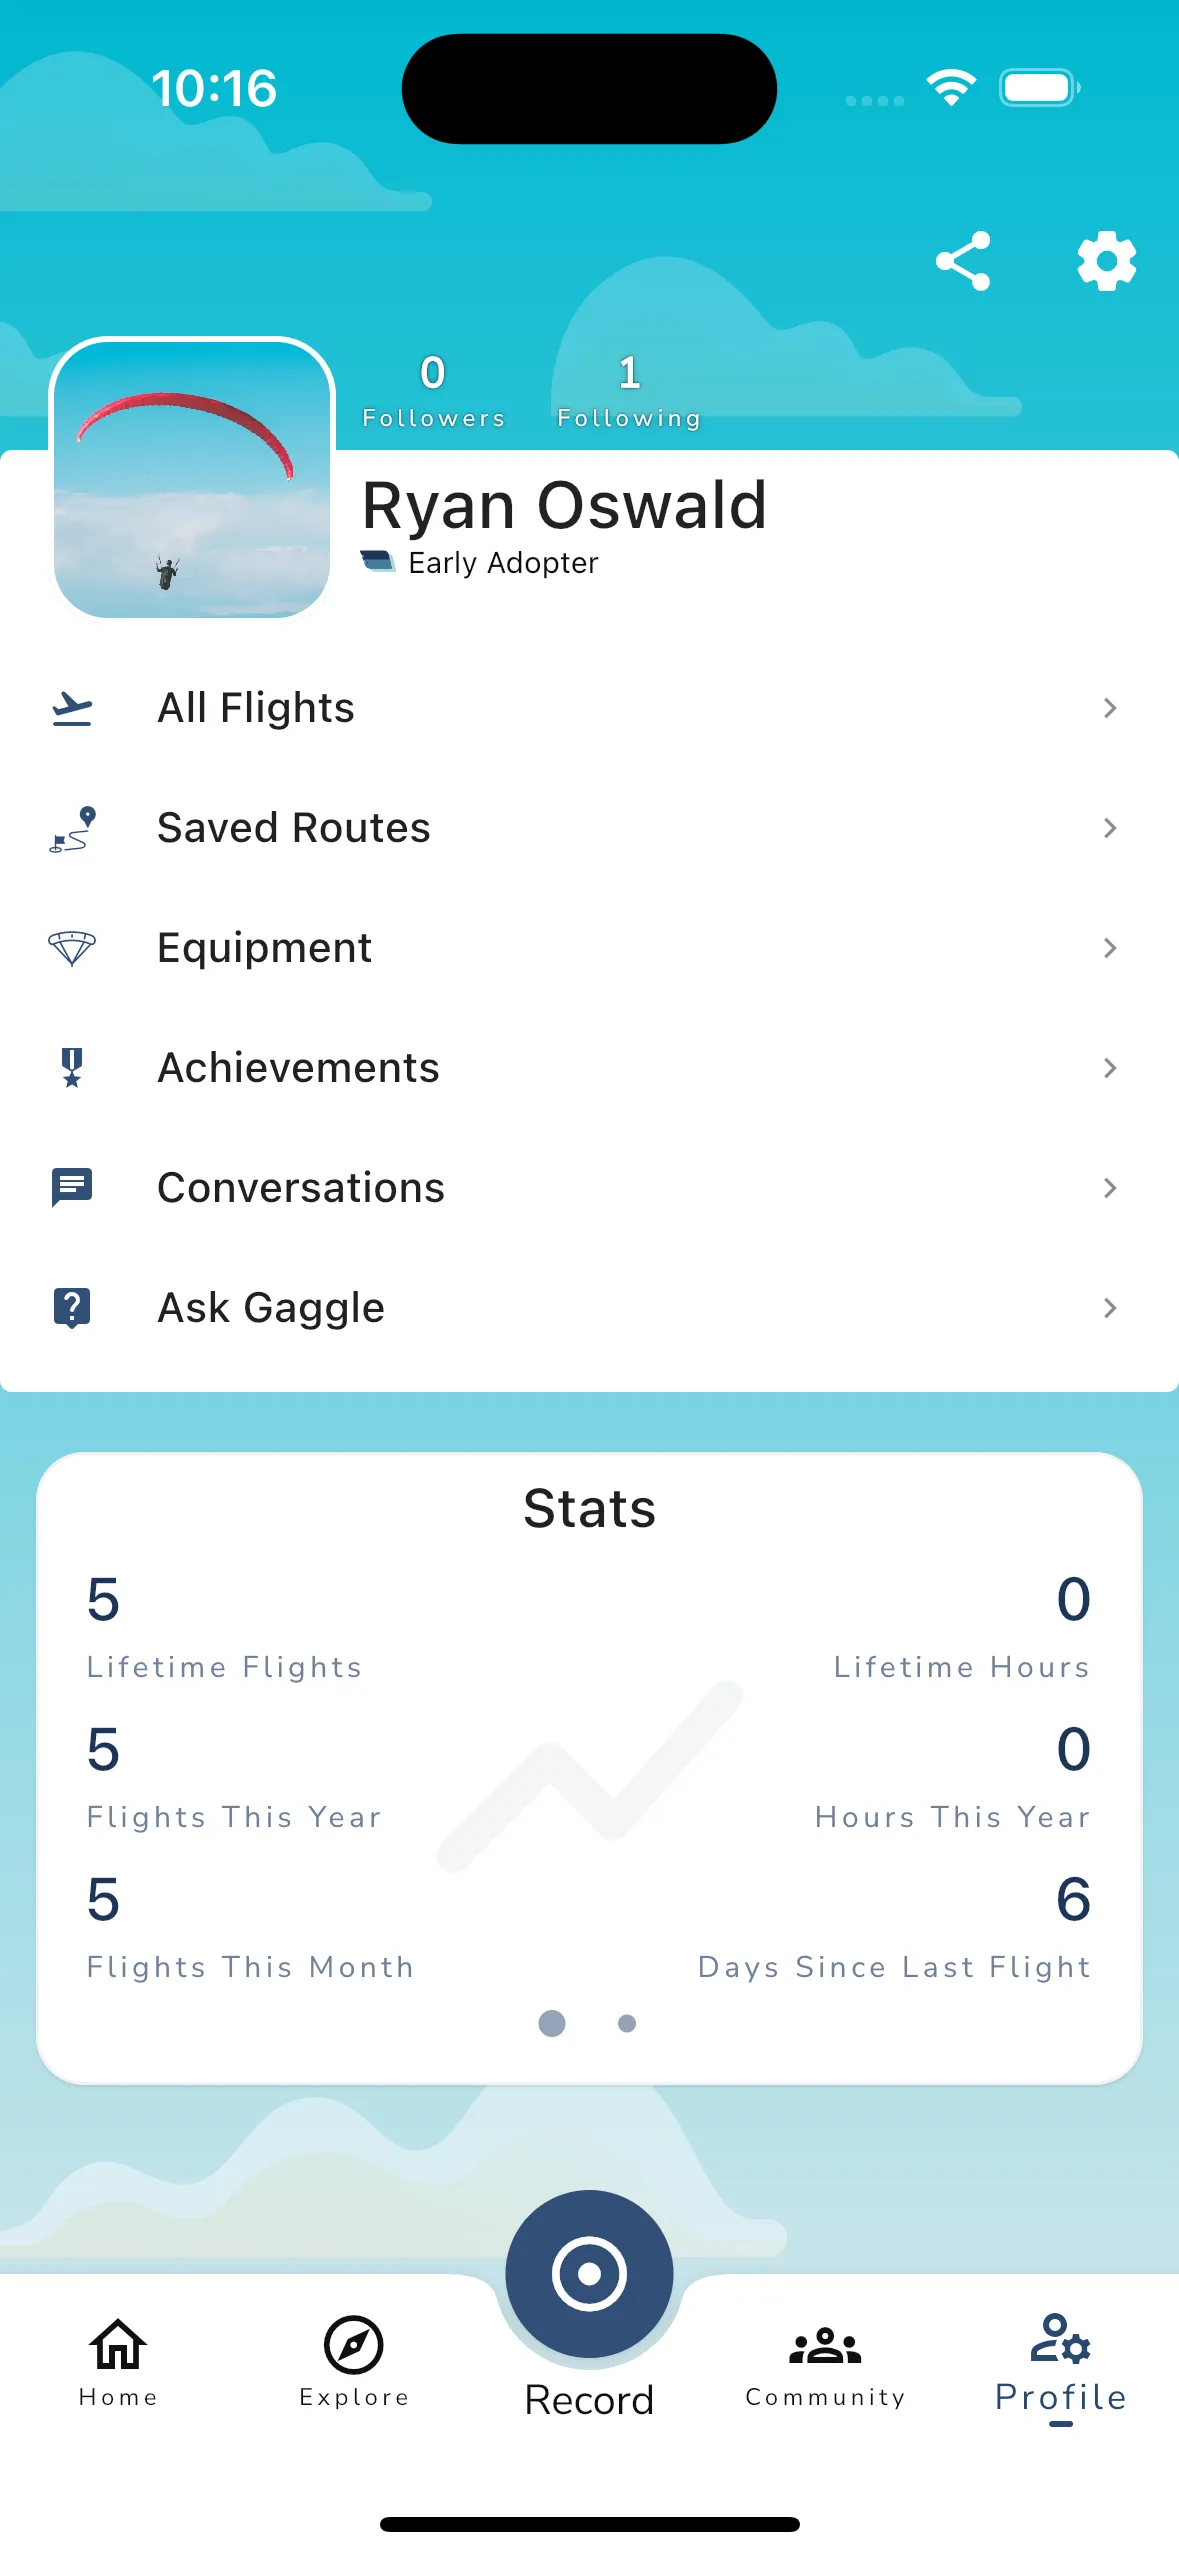
At the top of the profile page are two buttons, one to share your profile with others and another to configure your settings. Beneath that is your following/following count with your profile picture, name, and subscription status. You can tap on your profile picture to open up the account details page where you can change your profile picture.
Under your profile details is the navigation section where you can navigate to:
The stats section shows you some basic stats about your flying career like:
You can swipe on the stats section to see a graph of your flights for the last 6 months.
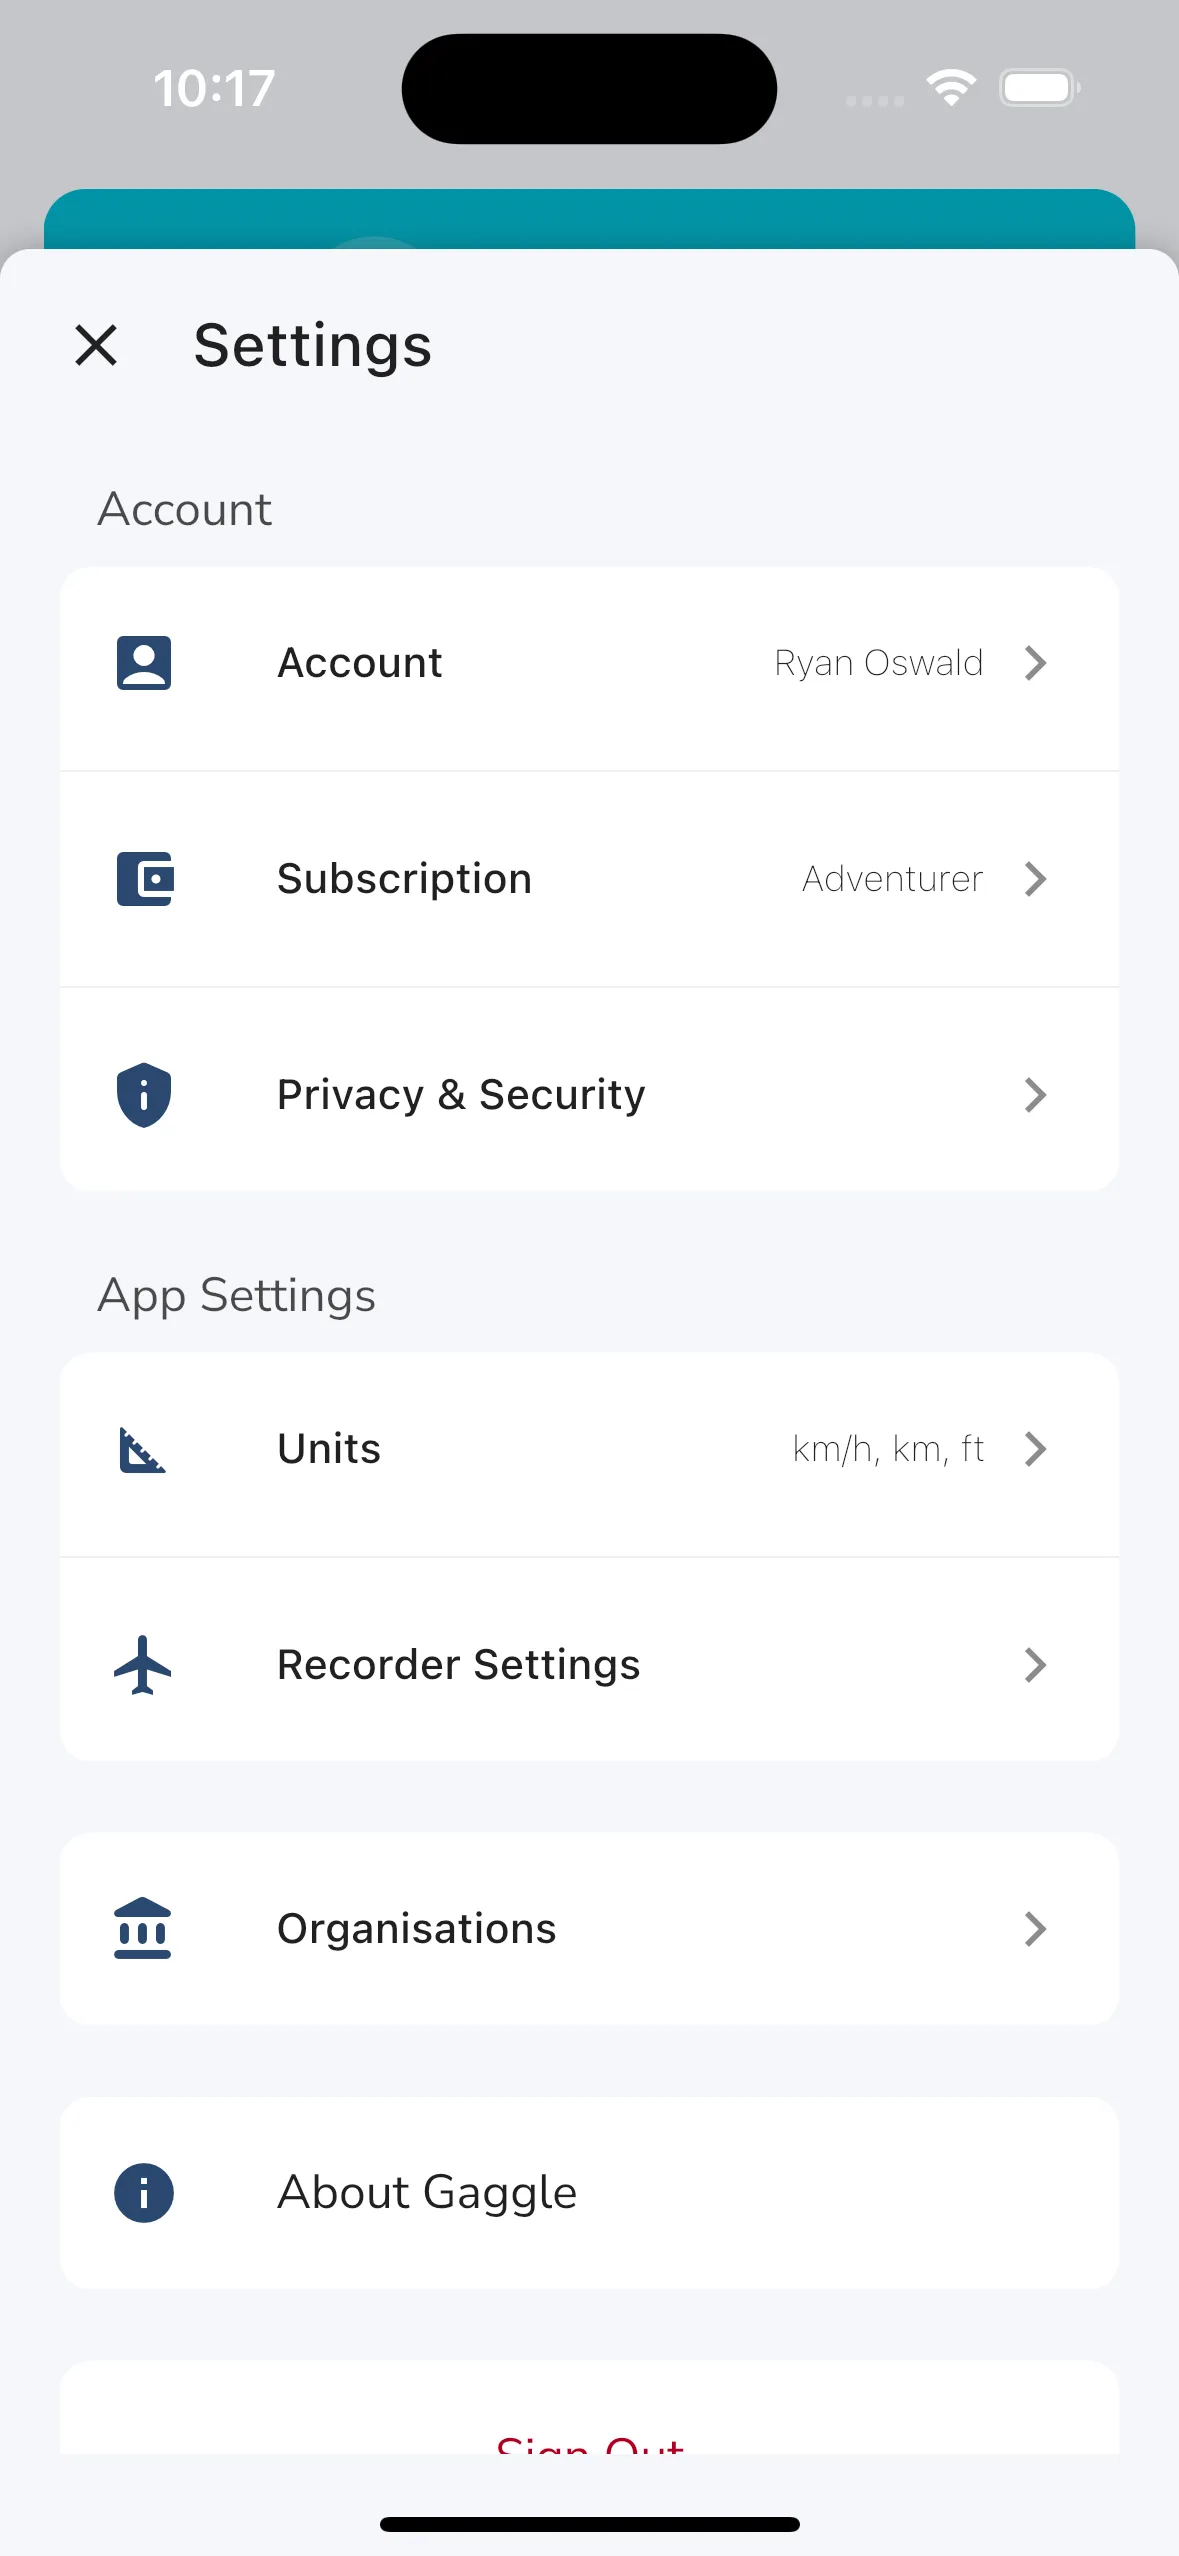
Tapping the settings button opens up the settings for your profile. From here you can:
>
To record a flight with Gaggle you can tap the record button. For your first flight you need to set up some basic details, after which you can tap the start recorder button. Gaggle will wait for a takeoff to be detected and then automatically record your flight until a landing is detected.
Here is an overview of the recording screen.
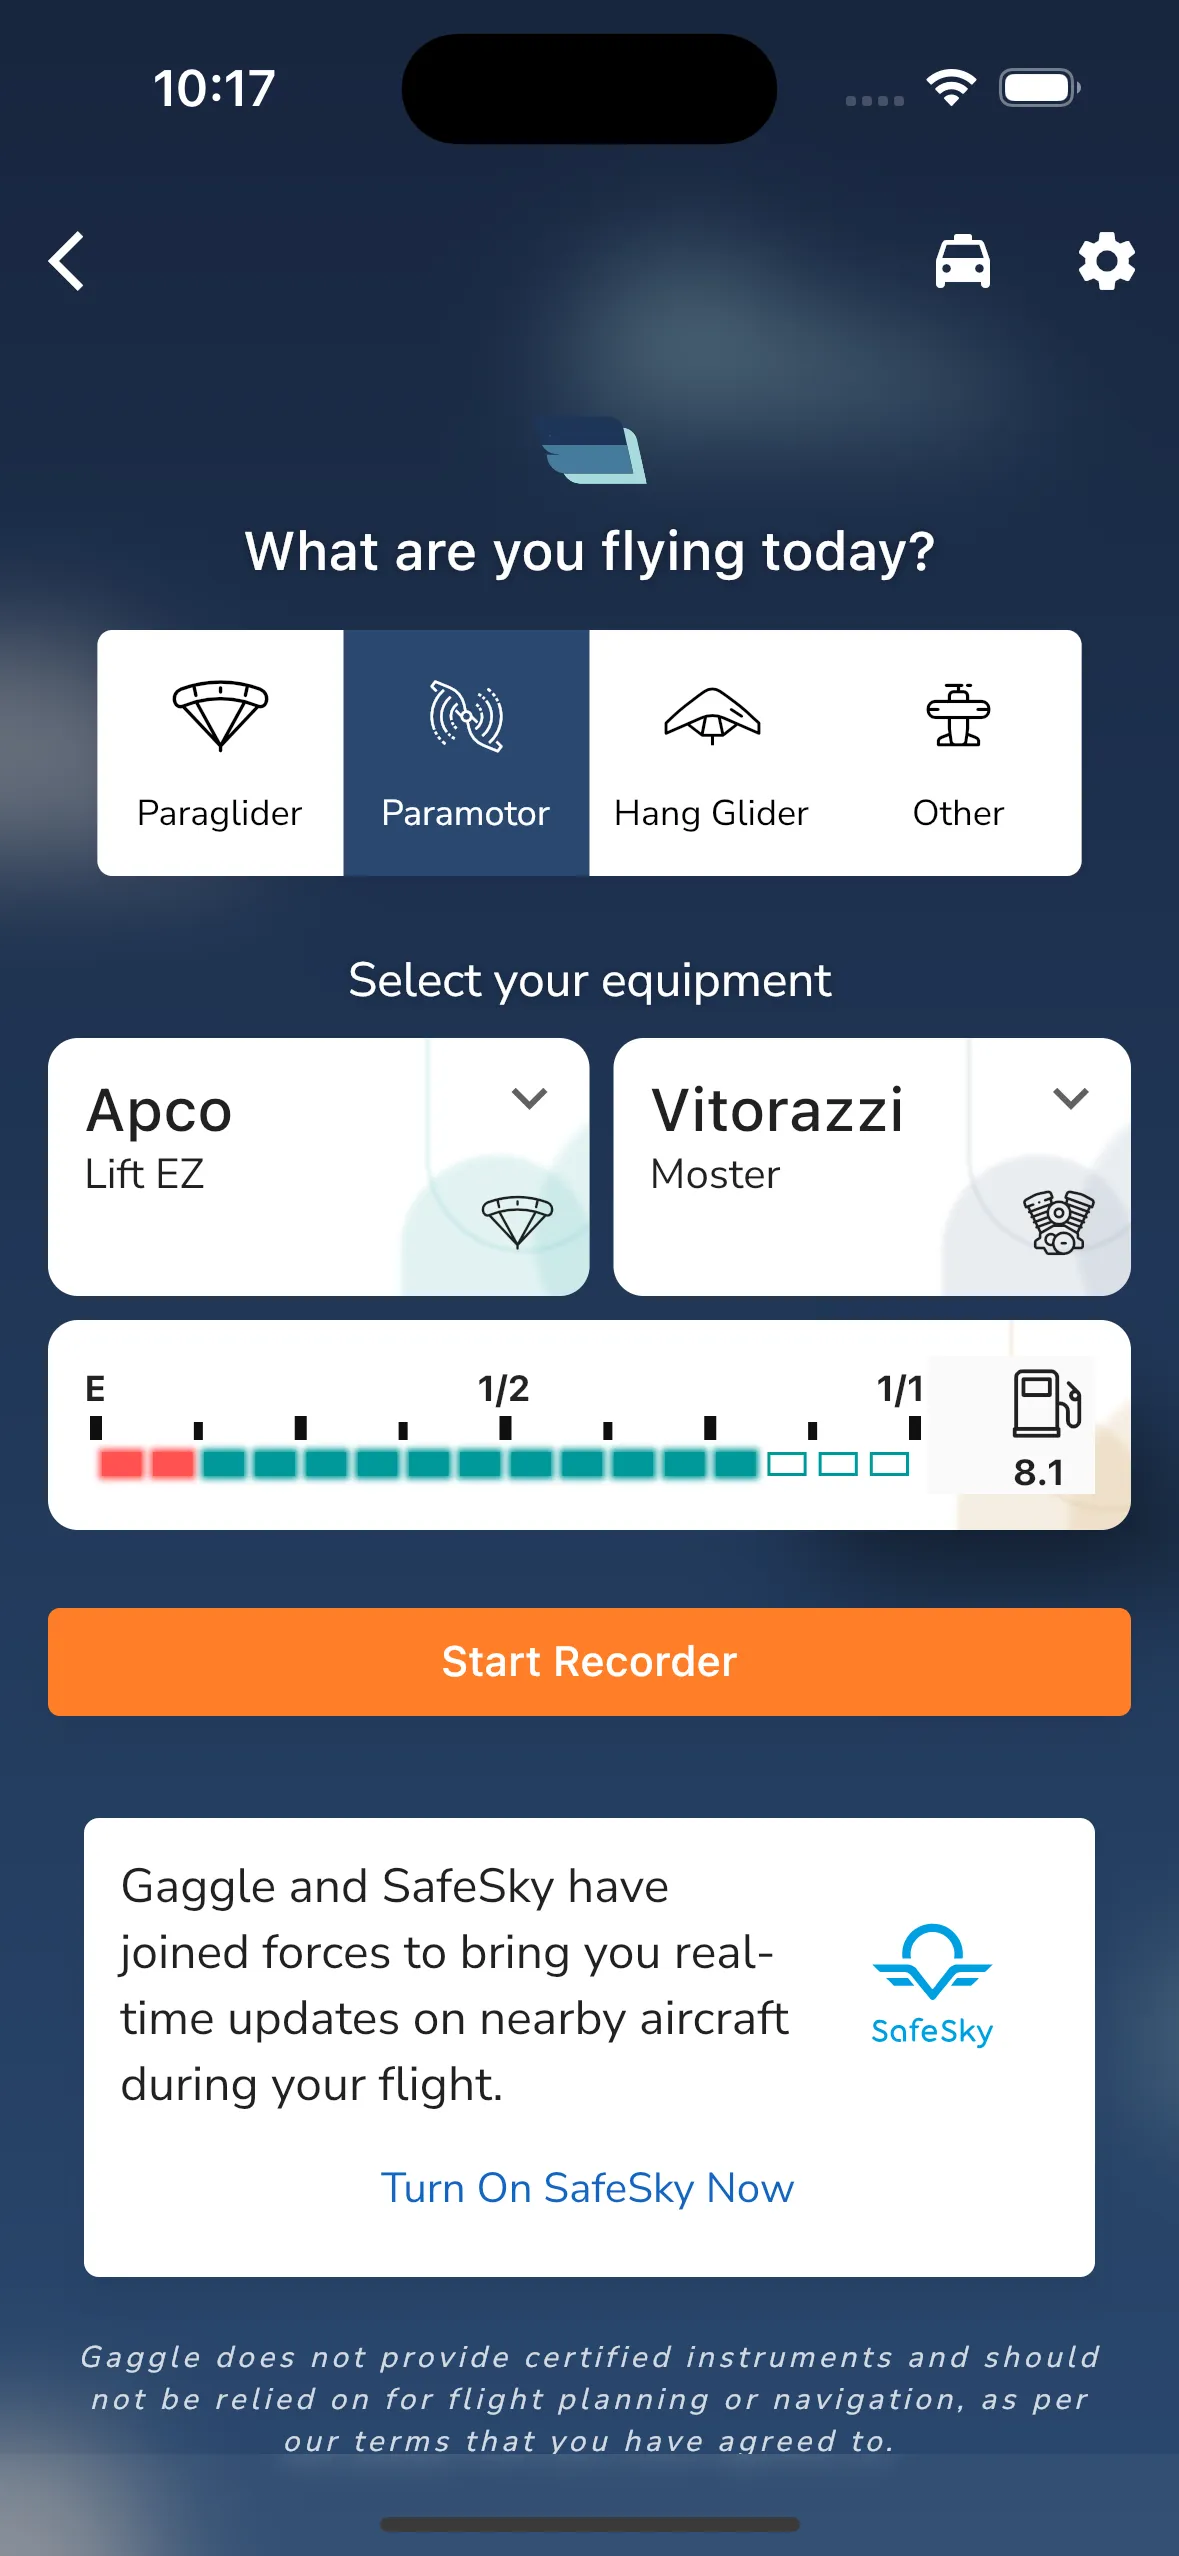
At the top of the page you choose the type of aircraft you will be flying with. This will determine the instruments that are available to you. You can also choose to record a flight with a different aircraft type than the one you are flying with. This is useful if you are flying with a trike but want to record the flight as a paraglider flight.
Next you need to select your equipment. This would be the wing/plane you are flying with and if your type of aircraft supports a separate motor, like a paramotor, you need to select that as well. You can add new equipment from your profile page. To change your wing or motor tap on the equipment name and select a new one from the list.
Some aircraft have fuel tanks associated, if you do then you can enter the fuel tank size and consumption rater per hour. This will allow Gaggle to estimate your fuel level during the flight. Before flying you need to enter your fuel using the fuel gauge. You can tap anywhere on the fuel gauge for an approximate fuel leve, or you can tap the fuel tank icon to enter a detailed fuel level.
If you have groups with Obstacle Courses or other supported navigation tasks created then you can select the task you want to fly. This will give you additional information about the task during your flight.
Once you are ready and happy with the settings you can tap the start recorder button.
If this is your first time flying with Gaggle you need to allow Gaggle to access your location. You can do this by tapping the “Allow” button. You might also get some additional dialogs for more access to other services we might need.
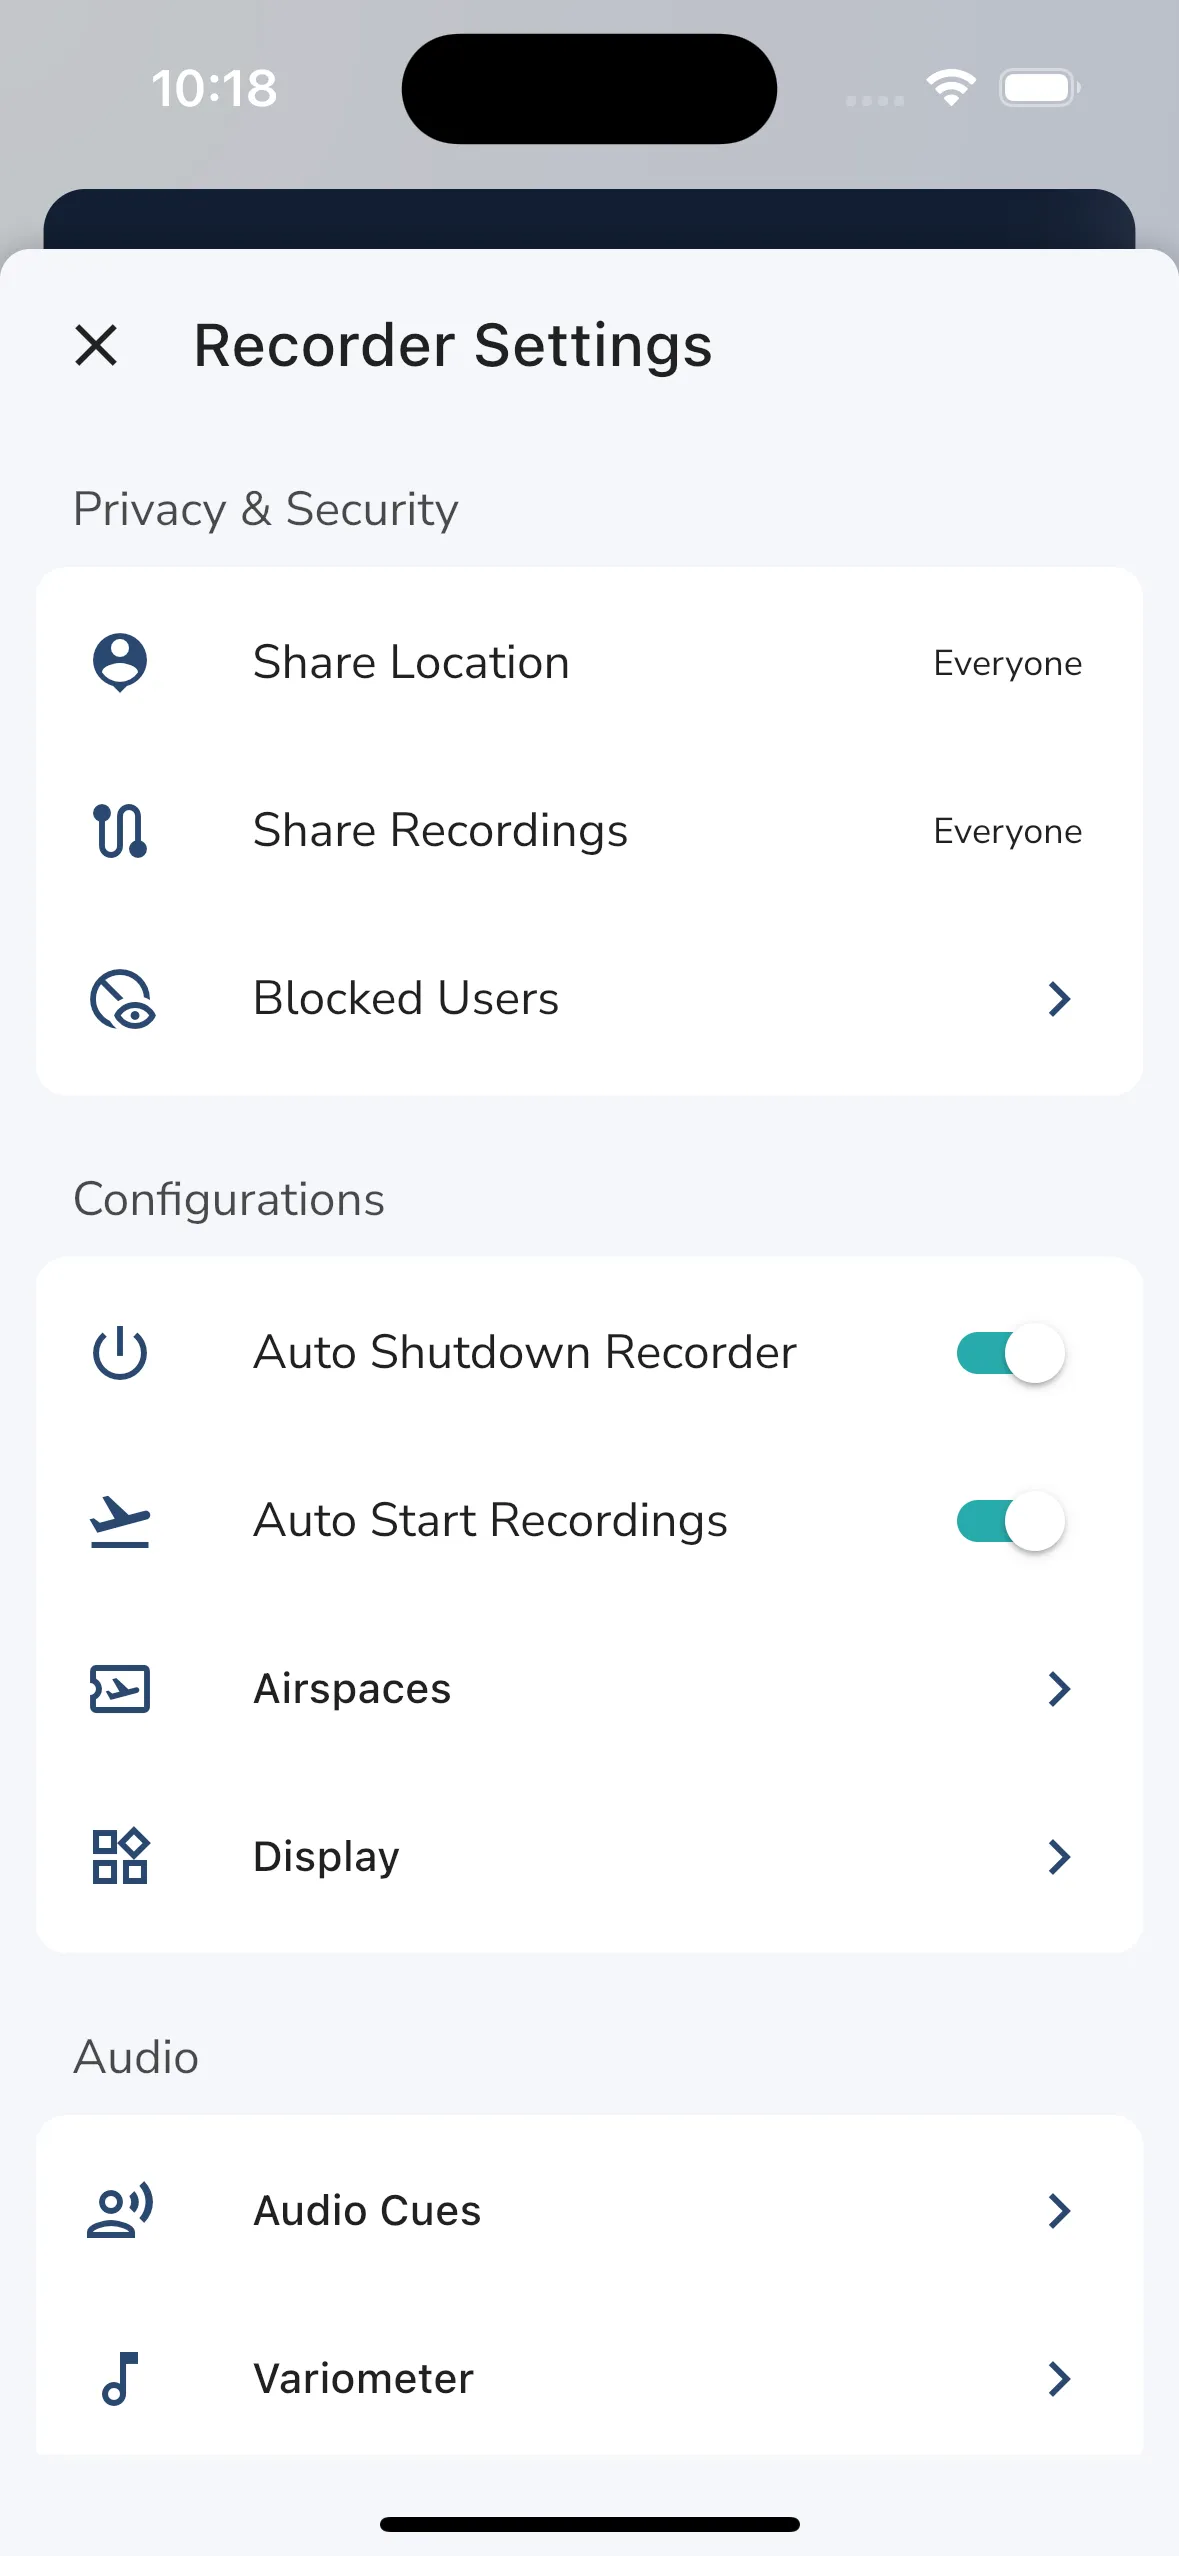
Gaggle gives you a lot of customisation over the recorder and it’s behaviour. Tap the settings button to open the recording settings.
Share Location - This setting allows you to share your live location with other Gaggle users. This is useful if you want to share your location with friends and family. You can choose here who sees your location: everyone, groups, friends, or no one.
Share Recordings - This setting allows you to share your flight recordings with other Gaggle users. This is useful if you want to share your flights with friends and family. You can choose here who sees your recordings: everyone, groups, friends, or no one.
Blocked Users - This setting allows you to see all the users you’ve blocked and unblock them if you want to.
Auto Shutdown Recorder - This setting allows you to automatically stop the recorder after a landing is detected. This is useful if you want to make sure that your drive home isn’t accidentally recorded. The recorder will shut down after 5 minutes for a long flight, and it will shut down after 15 minutes for a short flight.
Auto Start Recordings - This setting allows you to automatically start a new recording after a takeoff is detected. This is useful if you want to make sure that you don’t forget to start the recorder, so you can start Gaggle during your preflights and not worry about it again. This also enables auto landing detected which will end the recording after a landing is detected. Gaggle will continue to listen for another takeoff until the recorder is manually stopped or shuts down automatically based on the above toggle.
Airspaces - This setting allows you to enable or disable airspaces. You can also install airspaces for your country from here. Read more about airspaces here.
Display Units - This setting allows you to change what the recorder looks like in flight. Items that you can here are:
Audio Cues - This setting allows you to enable or disable audio cues. You can also choose the volume of the alerts and which alerts get played during your flight. Learn more about audio cues here.
Variometer - This setting allows you to enable or disable the variometer. You can also choose the volume of the variometer and change different settings related to the variometer. Learn more about the variometer here.
Knock Detection - This setting allows you to enable or disable knock detection to trigger audio cues or to skip waypoints.
SafeSky - This setting allows you to enable or disable the SafeSky integration which gives you live air traffic information. Learn more about SafeSky here.
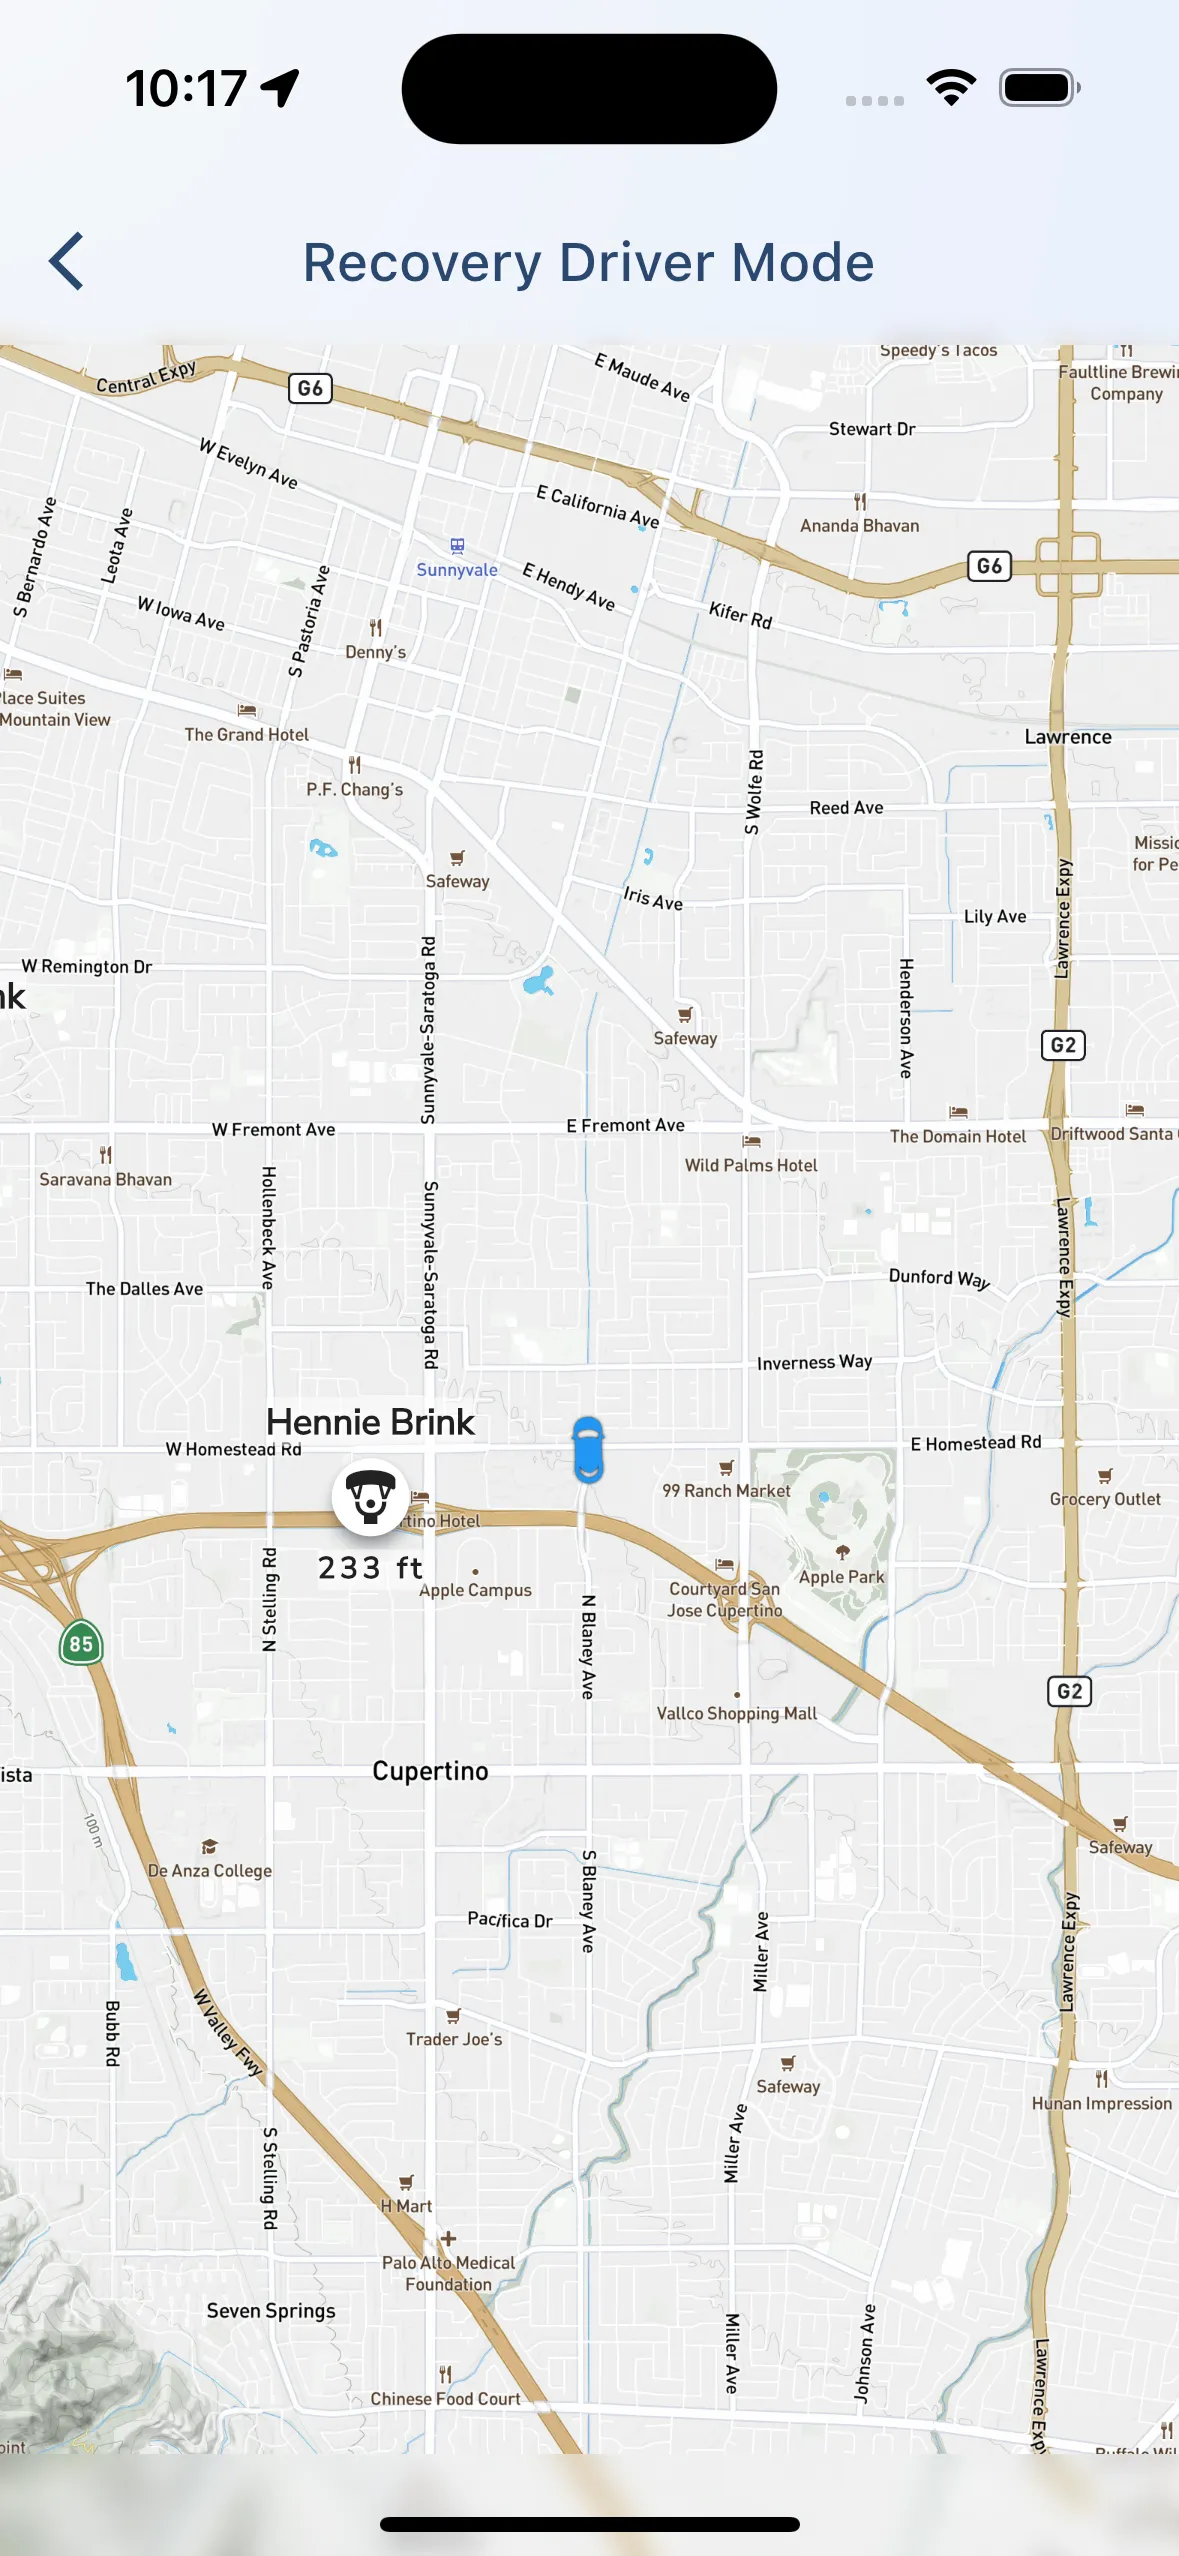
Gaggle has a recovery driver feature that allows recovery drivers to track the location of pilots nearby. You can access this feature by tapping the “taxi” icon on the recording screen. This will open the recovery driver screen.
While viewing the recovery driver screen the recovery driver will see icons for all pilots on the area with their altitude and also an icon to display if they are grounded or not. Tapping on a pilot will open up navigation to that pilot.
When a recovery driver has Gaggle running in recovery driver mode all pilots in the area can see where the recovery driver is by looking at the car icon on their map.
On Android devices some operating systems have aggressive power management techniques that will sometimes kill the Gaggle background recording service in an attempt to save battery power. Gaggle has little control over this process but there are a few things you can do to help:
Gaggle has an auto take off and landing feature built in that works based on ground speed. When your speed exceeds a predefined threshold then Gaggle considers it a take-off and will start a new flight recording. Once your ground speed is below that threshold again Gaggle will consider it a landing (provided your height above ground is less than 30 meters). This can sometimes cause problems for trikes and one wheels when you start the recorder during your pre-flight, and you are still moving around a lot. To work around this you can:
Gaggle as feature built in to automatically shut down a few minutes after a landing was detected. This is a convenience feature that will make sure that recordings of your drive home isn’t accidentally recorded. By default, Gaggle will listen for another takeoff for about 5-12 minutes based on some our algorithms. To work around this you can:
>
Explore Page > Routes
Gaggle has a built-in routes feature that lets you chain waypoints in a route that you can then share with other Gaggle users. You can also use routes to plan your flights and see how far you will be flying.
You can access the routes feature from the Explore page and then tapping the Routes menu item.
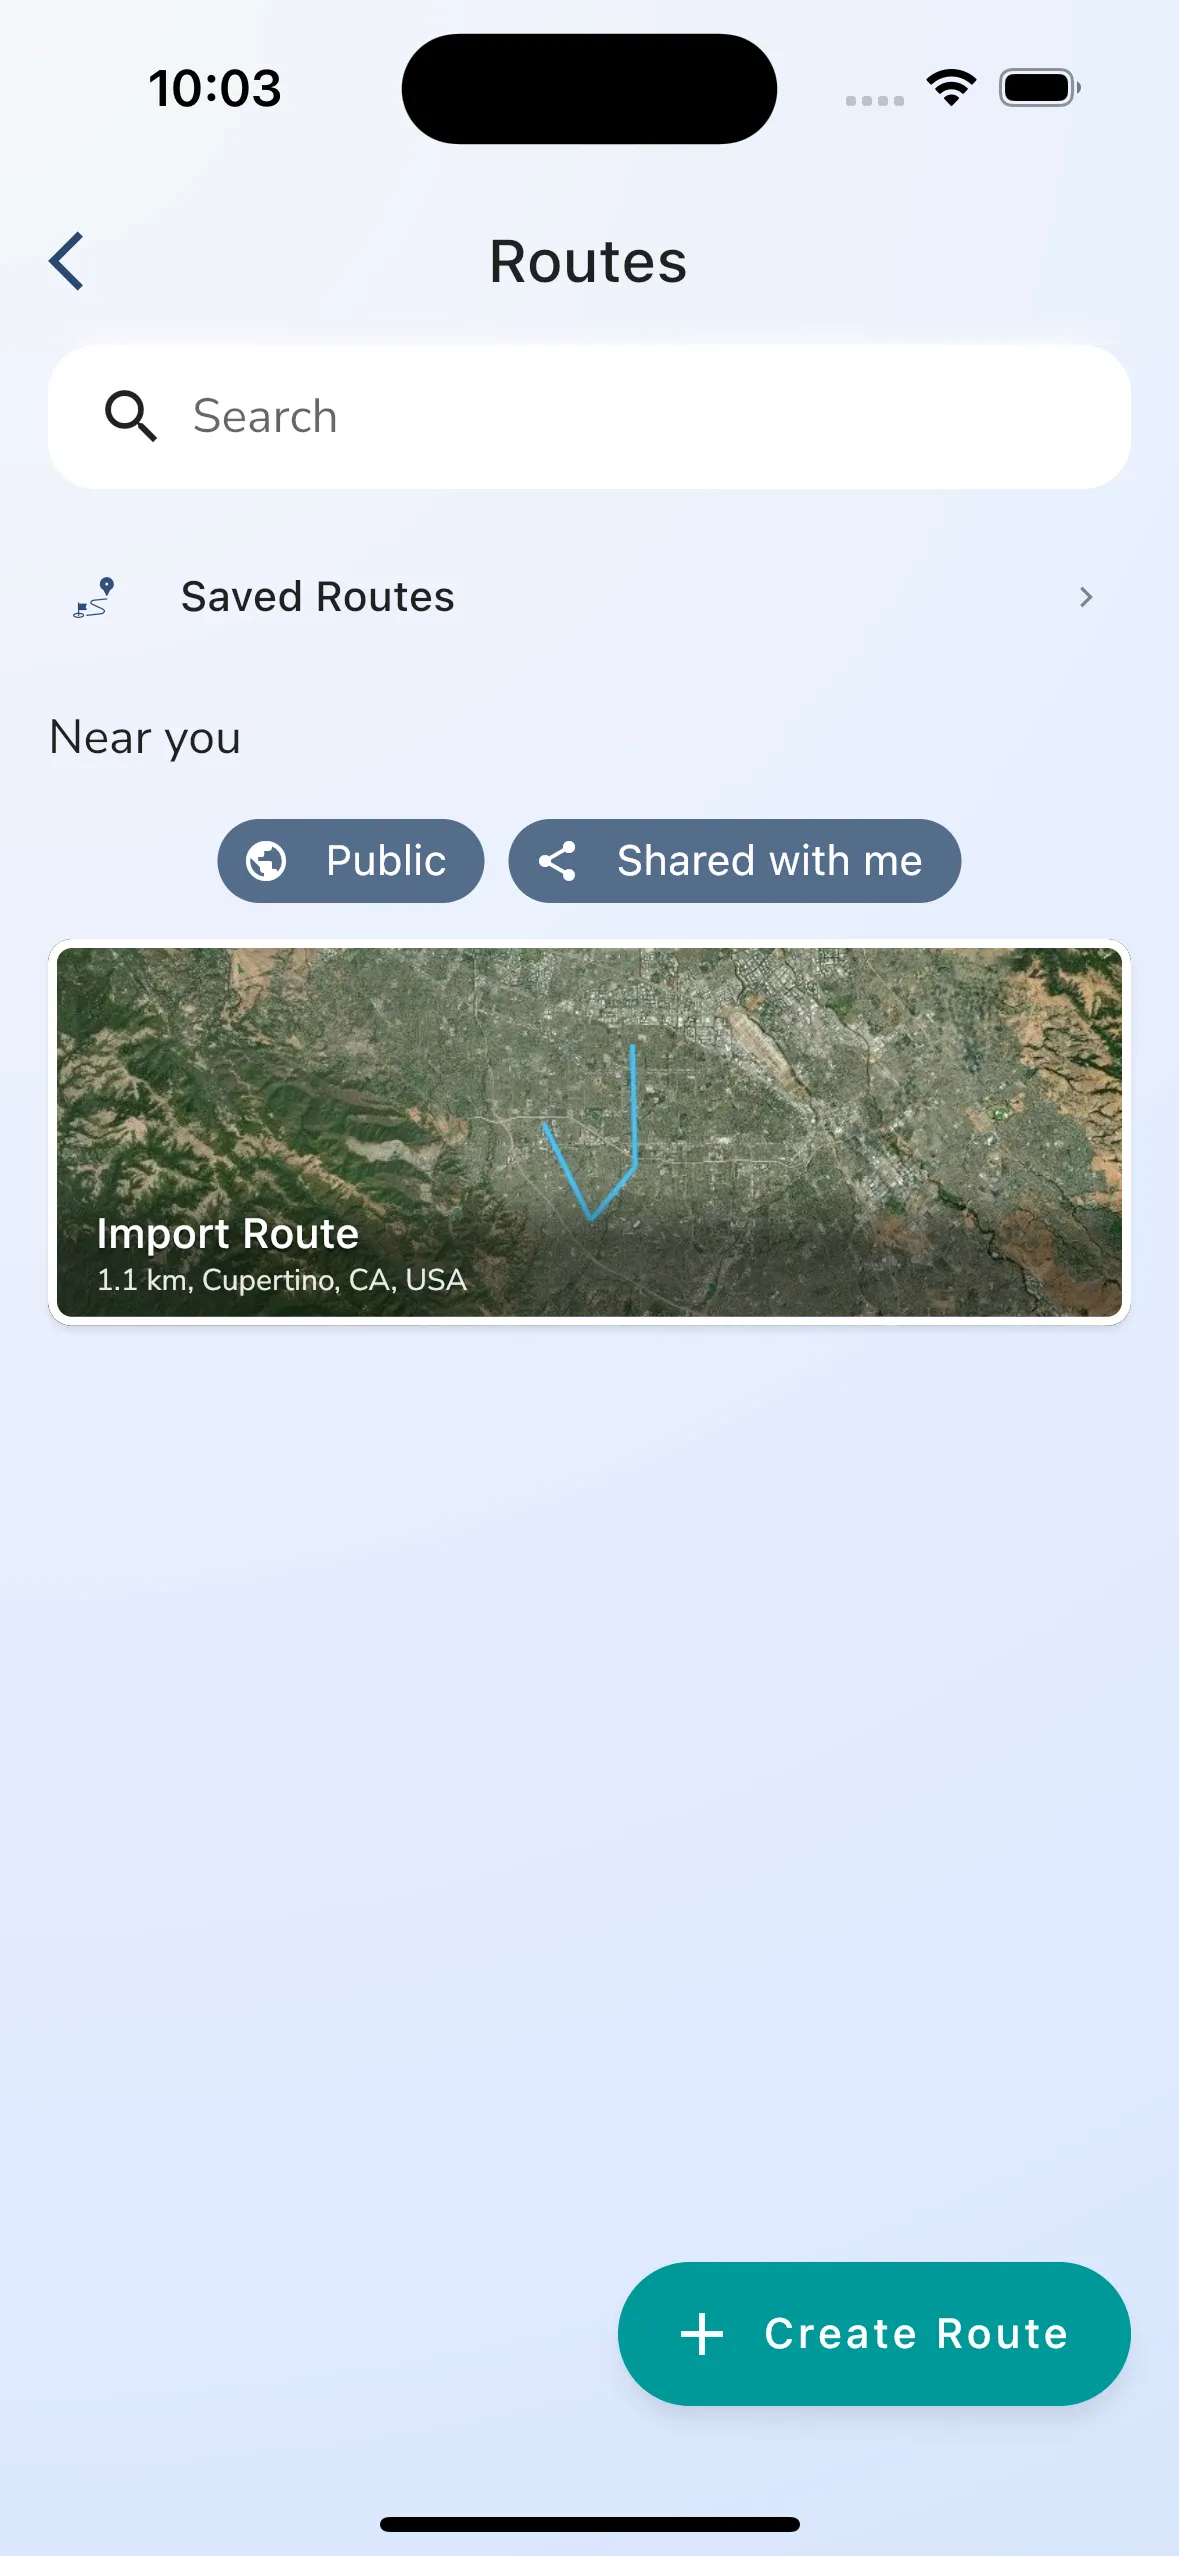
The route list shows you a search box that you can use to search for your own and shared routes. There is a navigation item for “Saved Routes” that will take you to a page where you can see and manage routes that you have saved. Saved routes have a folder structure that you can use to organise your routes.
Gaggle will automatically show routes near you show you can quickly find routes that you want ot fly at the top of the list. You can filter public and shared routes by using the filter toggles provided.
To create a new route tap the “Create Route” button.
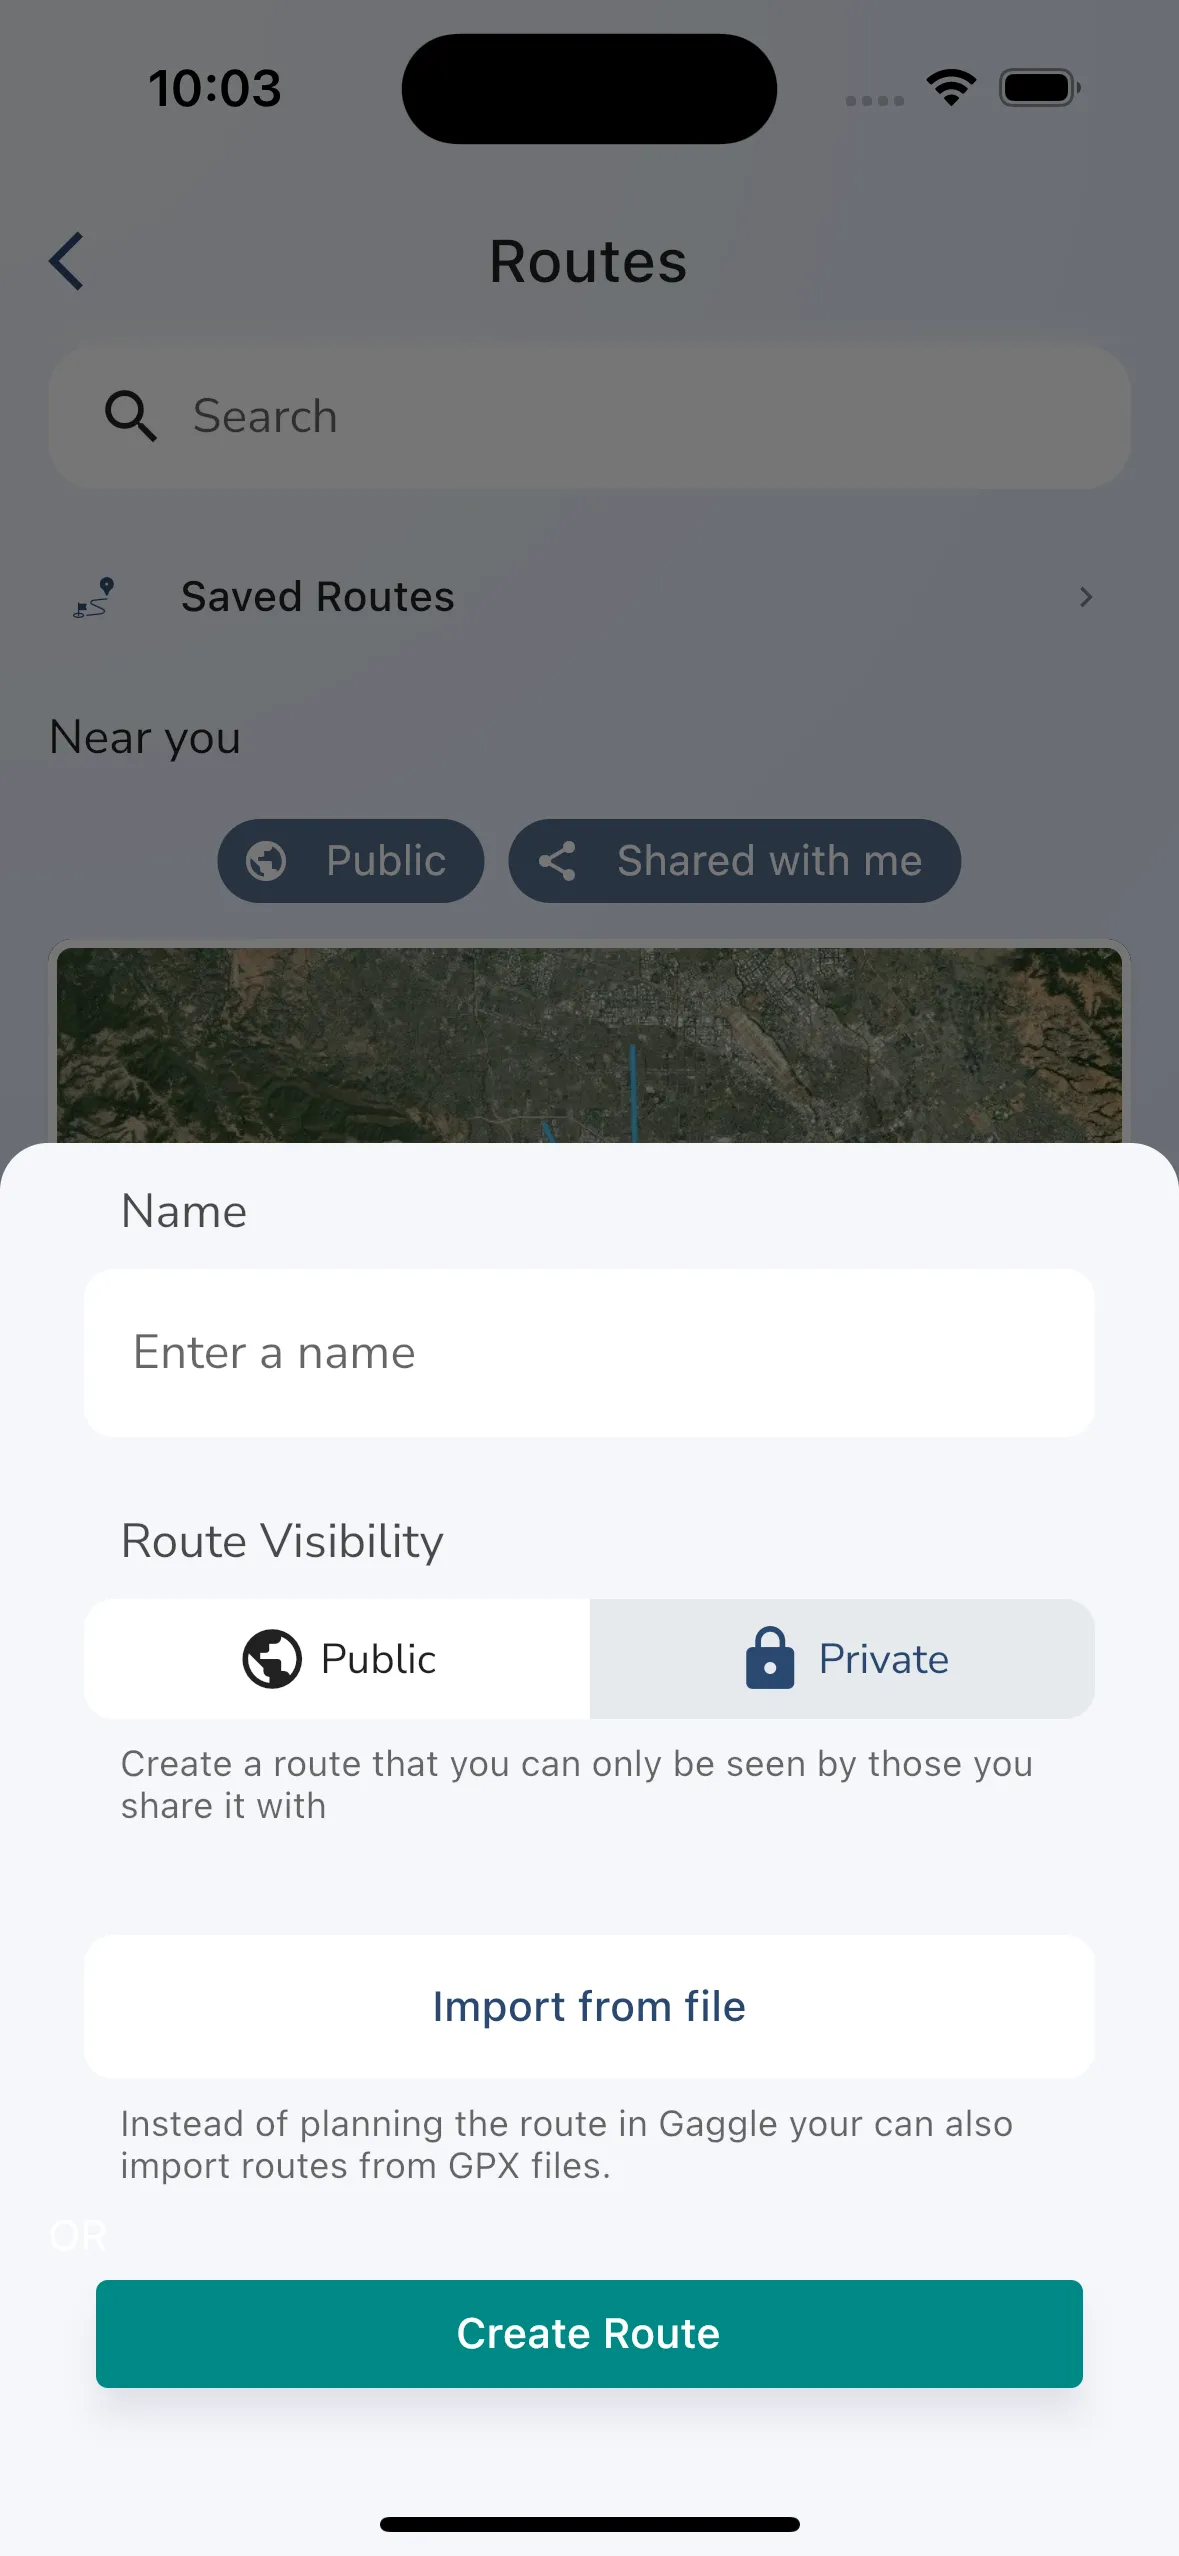
To create a new route you need to provide some basic information:
When you are ready to create the route tap the “Create Route” button.
On the next screen we will show you an empty route without waypoints. Tap on the large block where the route map usually shows to start adding waypoints to the route.
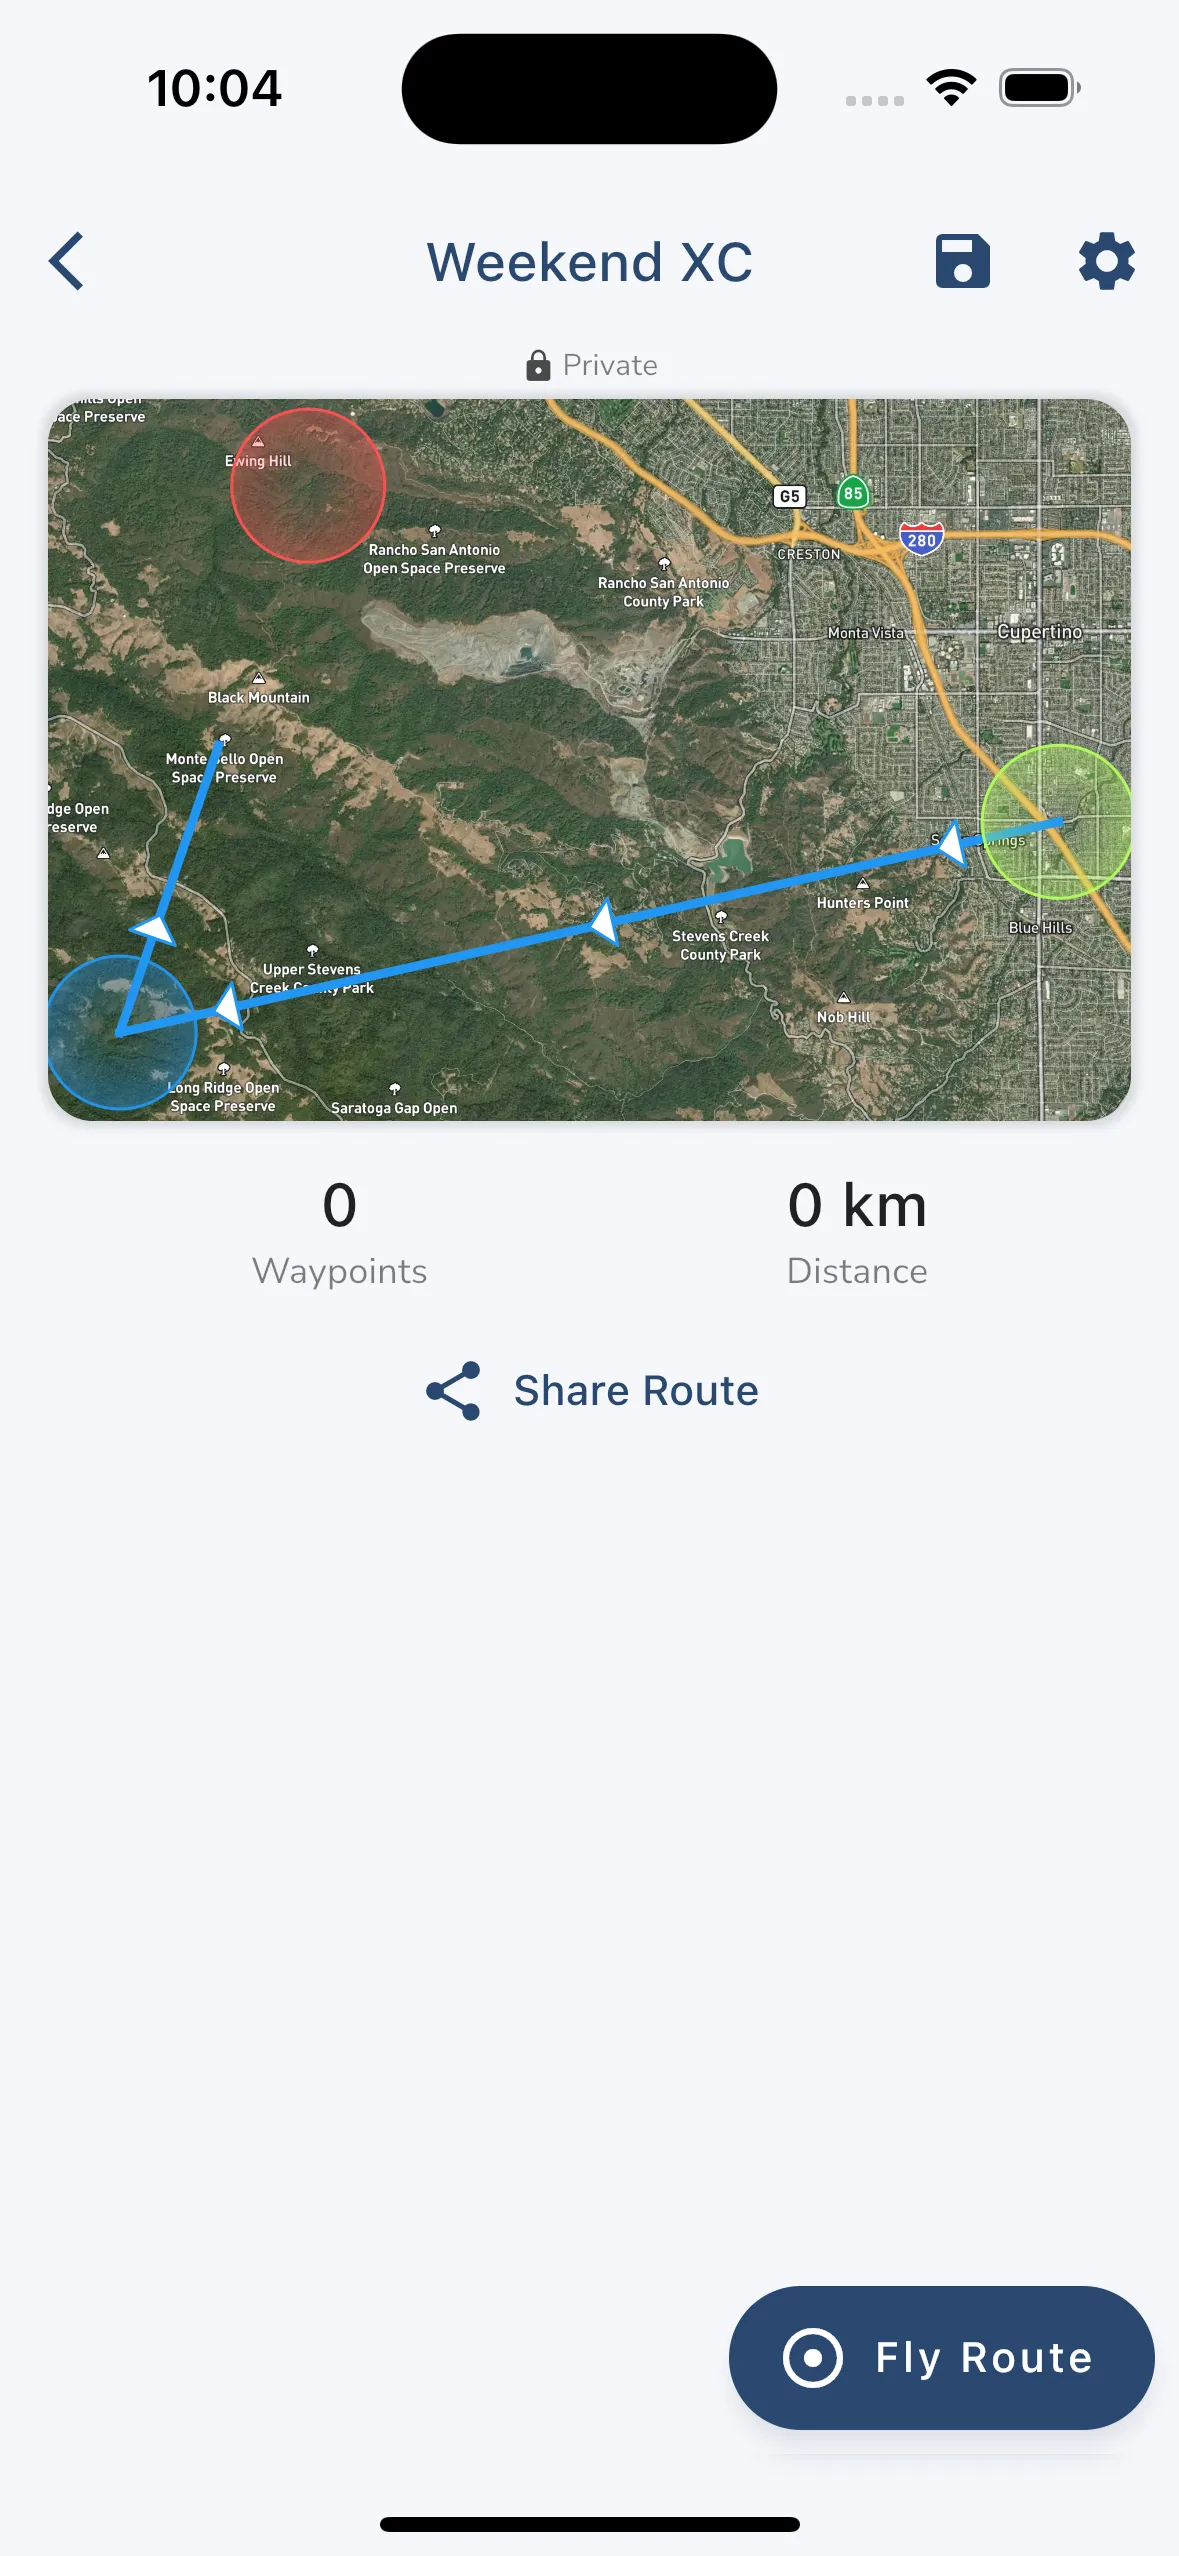
The route overview page shows you a high level view of what the route looks like. You can see the route on the map and some basic stats about the route. You can tap the map to go the waypoint overview screen.
In the top right corner is a button to save the route to one of your folders and also a settings button to manage the route.
You can share the route with others by tapping the “Share Route” button. You can share routes with nearby pilots, groups, friends, or by exporting a GPX file.
You can immediately start a new flight recording with the route by tapping the fly route button. You can also select the route while in flight to start navigating the route.
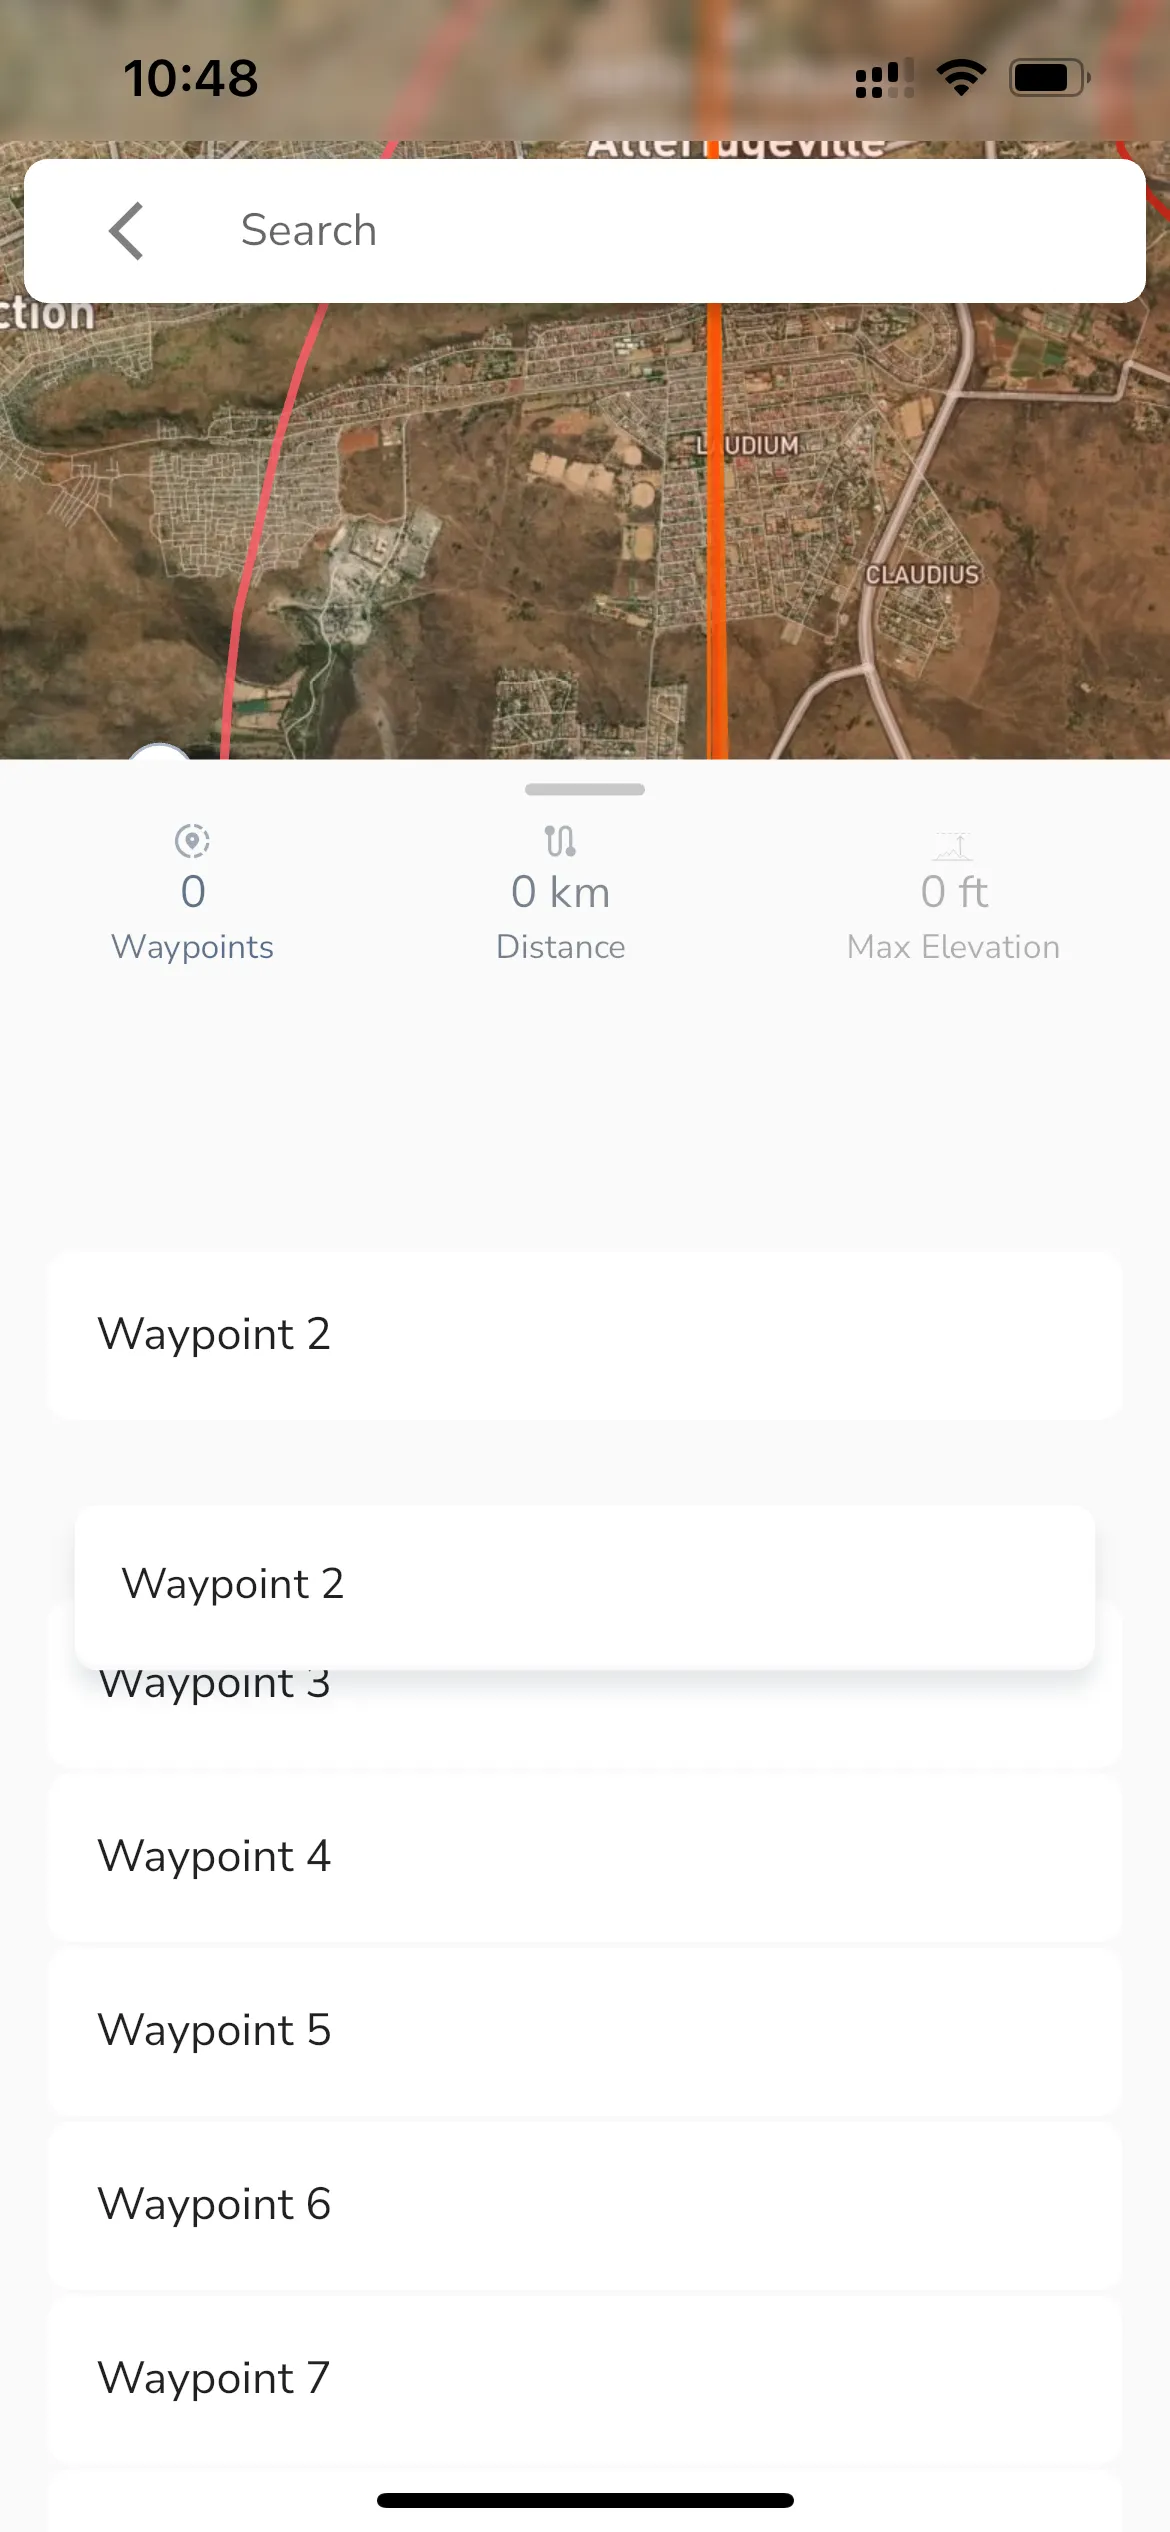
The route waypoint bottom sheet shows you the waypoints for the route along with an elevation profile for the entire route. You can also see some basic details like the total distance for the route and the max elevation along the route. Tapping a waypoint in the list focuses the elevation profile and stats on this waypoint and the previous/next waypoints.
You can drag waypoints around to reorder then or slide right to delete a waypoint. To edit details for a waypoint like changing its name, radius, or to add a custom audio cue that is played when the waypoint is reached swipe left on the waypoint and tap the edit button.
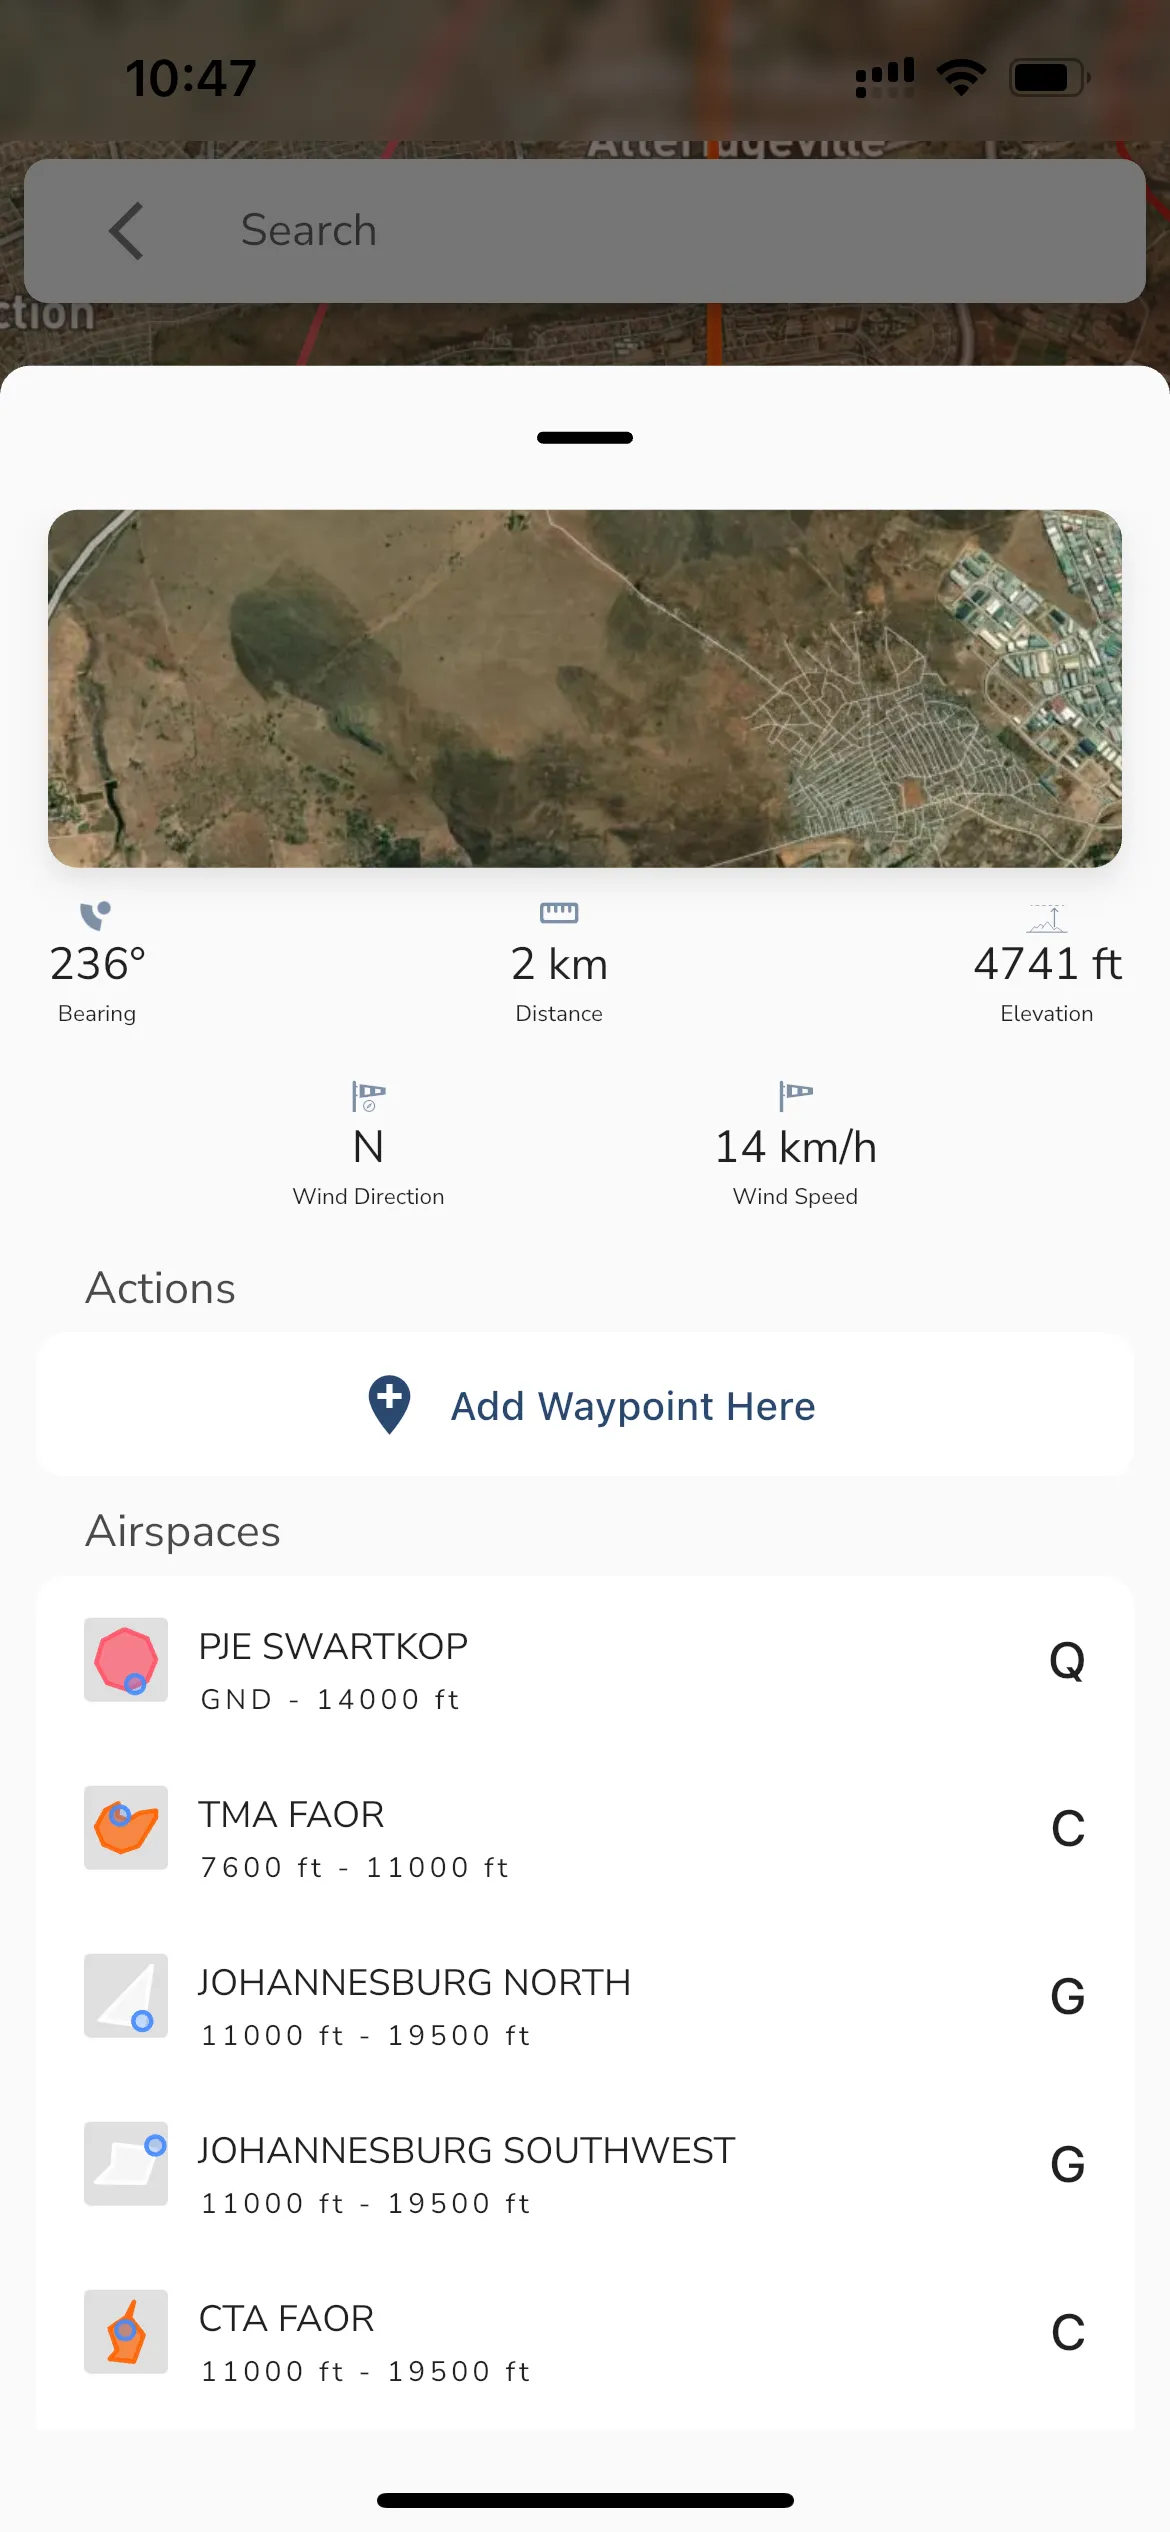
To add a waypoint in the route tap anywhere on the map. This will add a new waypoint at the location you tapped. You can also long press on the map to see a context menu that allows you to add a waypoint at the location you long pressed. The long press menu will also show additional information like:
When you are happy with the location of the waypoint tap the “Add Waypoint Here” button.
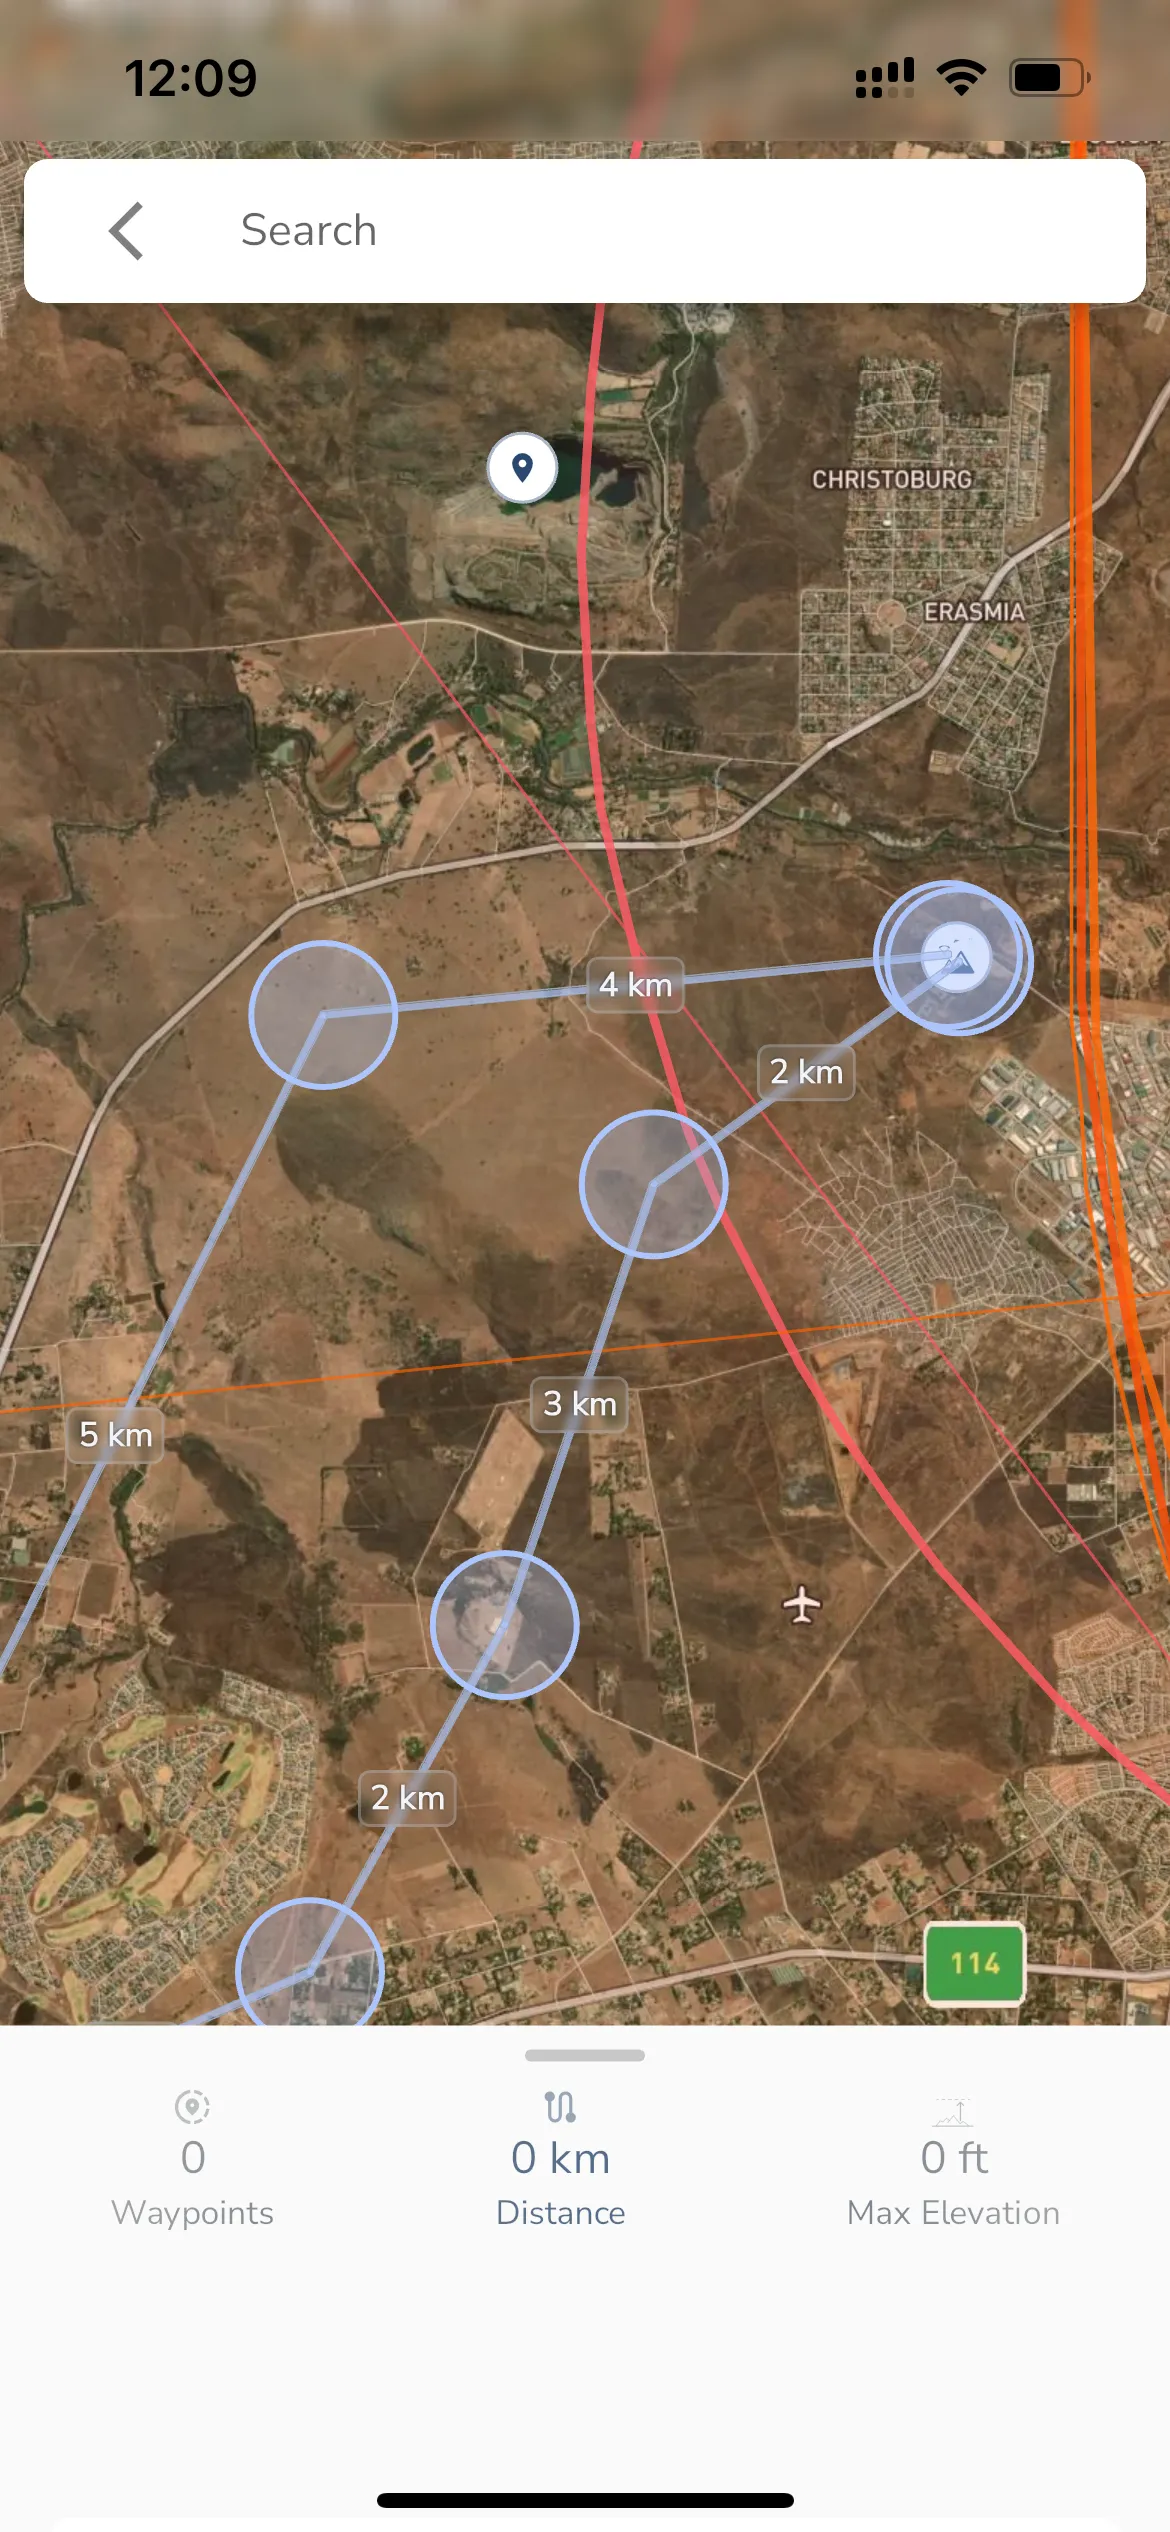
>
Gaggle is fully supported on Apple Watch as a companion app. To get going simply open the app on your watch and start a new recording in the Gaggle app on your phone.
The watch application will show you the following information from the phone app while recording a flight:
Note: To make sure the application stays open you need to change the “Return to Clock” setting for the Gaggle App in your watch settings app on your phone. Once you recorded a flight using Gaggle an email will be sent with the details for how to configure this.
Gaggle is fully supported on Android Wear OS 3 and up as a companion app. To get going simply search for Gaggle on the Play Store on the watch and install it. Once installed open the app on your watch and start a new recording in the Gaggle app on your phone.
The watch application will show you the following information from the phone app while recording a flight:
Garmin supported is in the development pipeline and should be released sometime in 2024/2025.
Domande frequenti
Ecco alcune delle domande più frequenti che ci vengono poste. Se avete altre domande non esitate a contattarci.